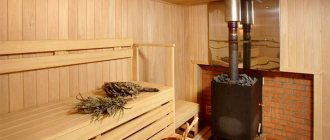
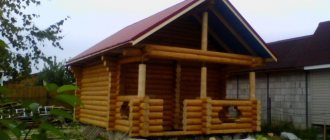
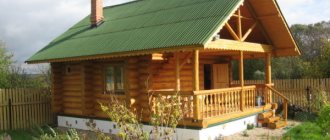
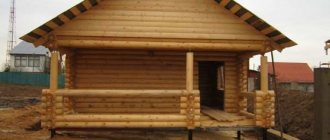
An important stage in the construction of a wooden bathhouse is the construction of a reliable foundation.
The use of expensive monolithic concrete structures designed for much higher loads is not feasible from a financial point of view.
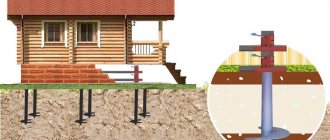
A more affordable option is to install screw piles. Such a foundation will provide the necessary strength and load-bearing capacity and will last at least 50-70 years.
We will tell you in the article how to build a foundation on screw piles for building a bathhouse.
Pros and cons of pile-screw foundations
Foundation structures built on the basis of metal screw piles have many advantages:
Construction work can be carried out in almost any weather.- Iron piles can be leveled by cutting off protruding parts. Before starting construction, there is no need to perform labor-intensive earthworks and level the site.
- Metal supports with good anti-corrosion treatment wear out much more slowly due to atmospheric influences and groundwater than concrete ones.
- Pile-screw foundations are repairable; defective structures can be easily replaced.
At the same time, it is necessary to take into account some disadvantages that may limit the scope of application of screw structures:
- Piles cannot be screwed into soil that contains hard limestone layers. This may damage the tips of the products.
- Structures must be treated with an anti-corrosion coating over the entire surface. The presence of the slightest untreated area will lead to the rapid spread of corrosion.
- Screw supports are not designed for heavy loads. However, when building baths, this drawback becomes insignificant.
How to arrange piles taking into account the impact of different loads on the foundation
Different parts of the structure transfer loads of different magnitudes to the foundation:
- under critical load-bearing units and structures of the structure;
- under load-bearing and self-supporting walls;
- under non-load-bearing partitions, floor joists.
The ability of screw piles to withstand design loads depends on the soil conditions of the construction site, as well as on the number, diameter and configuration of the blades. The wall thickness and barrel diameter, first of all, ensure compliance with the requirements for rigidity, strength, and durability.
For critical load-bearing units and structures of the structure, piles with two or more blades of the maximum diameter for this modification are recommended. The work includes the maximum volume of soil around the pile, which prevents “sinking” under normalized precipitation. At the same time, the distance between the blades, the pitch and the angle of inclination of the blades of such structures must be calculated taking into account the specific soil conditions of the construction site, only then there will not be a “reverse effect” when working with horizontal loads - a decrease in the load-bearing capacity even with respect to disaxial single-blade varieties (more details “Features of calculation of two-bladed piles”).
Varieties with a lower load-bearing capacity (one- or two-bladed with a smaller diameter of the trunk and/or blades) are installed under load-bearing and self-supporting walls; under non-load-bearing partitions, floor joists - with a minimum.
With this arrangement, the safety margin will be evenly distributed throughout the entire foundation, increasing its reliability and service life.
Why choose screw supports for self-assembly?
Constructions of this type are best suited for doing construction work yourself.
Firstly, when using screw piles, the use of expensive special equipment is not required , which for various reasons cannot always be delivered to the site (for example, due to the impossibility of driving to the construction site). Pile supports can be screwed into the ground yourself with the participation of one or two assistants, using lever mechanisms.
Secondly, such designs are initially sold ready-made. Piles can be installed immediately after they are delivered to the site.
For comparison, bored and drilled supports are created on site. This requires additional time for the concrete to harden and gain strength.
Site preparation and procurement of materials
The speed and quality of installation of pile-screw foundations largely depends on the preliminary preparation of the construction site.
Before starting construction, it is necessary to clear the area of weeds , bushes and trees that may interfere with the work.
If the installation of piles is carried out in winter, snow should also be removed from the area where the bathhouse will be built.
It is also necessary to take care of the supply of water and electricity in advance. Water will be needed to prepare the cement-sand mixture, electricity is required for lighting and operation of electrical equipment.
To build the foundation, you will need steel screw piles with a diameter of at least 89 cm . The optimal metal thickness is 3.5-4 mm. Supports with such parameters can withstand operating loads of up to 5 tons.
When filling the internal cavities of pile supports, you will need a sufficient amount of concrete mixture grade M300 or higher. To prepare it, you should purchase sand, cement and crushed stone in advance. If desired, special modifiers can be added to the solution to increase the frost resistance of concrete.
Wood boards, channels or a metal profiled pipe can be used to tie the pile-screw base . If wood is used, when purchasing materials it is also necessary to purchase special means for its antiseptic treatment.
For anti-corrosion protection of channels and profiled pipes, any metal paint that has the appropriate properties can be used.
The last item on the list of required materials is waterproofing. As such, you can use liquid rubber and hydrophobic paints.
Step-by-step instructions for making piles yourself
You can make a screw pile for the foundation with your own hands using available tools and equipment.
Step 1. Preparation of pipes and sheet metal of the required sizes.
Step 2. Making the tip. The cone-shaped tip can be welded or machined from a metal circle; the welded tip is made from triangular metal blanks. The easiest way is to cut triangular spikes on one side of the pipe with a grinder, to get something like a “crown”. You need to form a cone from the spikes: the edges are bent, welded together, and the seams are straightened. The length of the tip is 100-120 mm, the number of spikes can be from 4 to 6.
Step 3. The blank for the blade is made from sheet iron; a circle with a diameter 3-4 times larger than the diameter of the pile pipe is cut out with a gas cutter. A mounting hole is cut inside to the size of the pipe and a continuous side cut is made. The best material for the blade is sheet steel grade “St3” according to GOST 380-71 with a thickness of up to 5 mm.
How to do it yourself?
After drawing up the project, carrying out preparatory work and purchasing building materials, you can proceed directly to installation work.
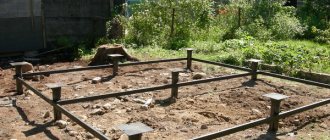
The first stage is creating markings on the site . It is necessary to designate the places where the screw supports will be installed, carefully checking all distances and angles.
At the designated points, shallow excavations of 15-30 cm are made. This will avoid spontaneous displacement of the piles at the very beginning of their screwing into the ground. The distance between the support points should be 2-3 meters, depending on their size, bath area and bearing capacity of the soil.
To screw in piles manually, long metal crowbars are used , which act as levers. This work should be done by two or three people. If it is possible for special equipment to enter the site, installation can be carried out mechanically. This will make it possible to save time and effort.
Screw piles must be immersed in the soil to a depth of at least 1.5 m. The structures are screwed into the ground until their tips reach the dense layers of the earth. At the same time, it becomes much more difficult to rotate the piles manually, which is a sign of the final immersion of the support.
During the screwing process, it is necessary to carefully ensure that the structures are located in a strictly vertical position. Only minor deviations of 1-2 degrees are allowed .
When all the supports are installed and leveled in height, they are concreted from the inside. Concrete mixture is fed into metal pipes, which should preferably be mixed immediately before pouring.
When the cement-sand mixture has finally hardened, caps are installed on the upper parts of the piles. Next, the strapping is installed. For a wooden bathhouse, the best choice would be a timber structure.
Boards of a given thickness are fixed along the entire perimeter of the foundation, which must be firmly connected to each other to prevent spontaneous displacement of the pile supports.
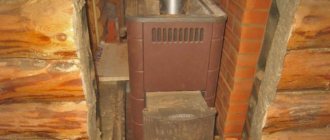
An important point is the arrangement of the foundation for the stove . Brick, cast iron and steel fireboxes place a fairly large load on the surface of the base, so they cannot be built directly on the floor. Additional foundation structures must be located underneath them.
In addition to the main pile-screw foundation, it is necessary to equip a concrete foundation. Its area does not have to be large.
The dimensions and area of the additional foundation are selected taking into account the width and length of the furnace that will be built on it.
To prepare the foundation for a massive furnace, you should prepare a foundation pit in the selected area according to pre-made calculations. Its depth should reach the level of soil freezing.
A sand and gravel cushion is poured onto the compacted bottom. The layer of crushed stone should be at least 15 cm, the layer of sand - from 20 cm. On top of the sand layer, you can fill another layer of crushed stone of the same thickness.
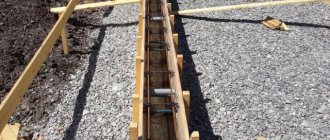
Next, wooden formwork is installed around the perimeter of the furnace foundation, and a reinforcement frame is placed in it.
The next stage is pouring concrete. The upper level of the base should be approximately 5-6 cm below the floor that will be installed in the bathhouse. When the concrete has completely hardened, you need to remove the formwork and treat the walls of the furnace foundation with waterproofing - for example, tar. At the next stage, you can begin installing the log house .
As a rule, when building a wooden bathhouse, it is installed on a metal grillage. This design is created according to a simple scheme: rigid metal channels or I-beams are fixed to the pile heads along the entire perimeter of the foundation, as well as in its central zones. These elements are connected to the heads using electric welding.
The grillage will create a reliable support for the wooden elements of the bathhouse and will perform a load-bearing function, so for its manufacture you need to use metal structures with good anti-corrosion treatment.
Final operations of installing a pile field
The final operations of installing screw piles include:
- Leveling. The marking begins with the corner support and is done using a laser level, the excess parts of the tops are cut off with a grinder, all technical holes for installing the gate must be cut off.
- Concreting. To protect the internal surface from corrosion, the pipes are filled with cement-sand mortar M150.
- Installation of the caps for laying the grillage; a landing cup and cap are placed on the upper edge of the support, horizontalized and welded.
- Cleaning weld seams and applying anti-corrosion coating.
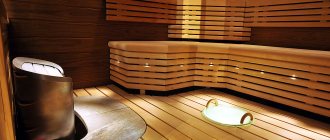
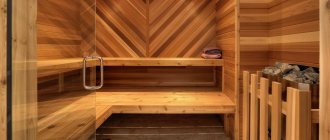
How to arrange the flooring?
In log baths, mostly wooden floors are used, less often - concrete . Wood plank flooring is installed after preliminary insulation. The work is carried out in the following sequence.
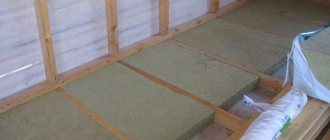
Logs are installed in the lower crowns, under which skull boards are sewn. Plates of heat-insulating material are laid between the supporting elements. A wooden sheathing is created on top of it, on which the subfloor will later be installed.
A layer of waterproofing is laid on the sheathing to prevent moisture from penetrating the underlying wooden structures. Subfloor boards are laid on top of the waterproofing layer, which are nailed or screwed to the sheathing.
Next, a cone-shaped concrete screed is constructed , in the center of which there should be a drain hole to drain moisture.
Side boards are placed around the perimeter of the room; boards cut at a slight angle are installed inside the formwork (see photo below). Next, the concrete mixture is poured.
The finishing wooden floor is subsequently laid on top of the concrete screed. In this case, the boards must be installed with a gap of several millimeters to ensure the unhindered flow of moisture through the pour-type flooring.
Before arranging the floor in the bathhouse on screw piles, it is necessary to install drain pipes in advance , which will be located under the floor covering. If you skip this stage, further arrangement of the drain will be extremely difficult.
The video will show you how to install floors in a bathhouse on screw piles:
Drain arrangement
When building a bathhouse, it is necessary to pay special attention to the arrangement of the drainage system. Ineffective moisture removal can cause premature rotting of the wooden floor, leading to the appearance of mold and unpleasant odors.
The best option is to install a sewer pipeline under the bathhouse, which removes water to a septic tank or cesspool.
Trenches for pipelines must be dug even before the frame is installed on the grillage . They must be brought to the building at those points where the drains in the washing room will be located, as well as sinks and toilets (if a separate bathroom will be installed in the bathhouse).
The trenches should have a slight slope so that the pipes are located at an angle and ensure the removal of moisture by gravity.
The video will show you how to install a drain in a bathhouse on screw piles:
Foundation reliability
Traditionally, two types of foundations have always been built for brick and wooden houses: strip (where increased strength is needed) and columnar (in the form of free-standing concrete pillars - a lightweight version of the design). In the case of log houses, the construction of such structures from concrete is often economically unjustified. Screw piles are capable of supporting the weight of fairly massive buildings. Even two-story ones. Our professionals will be able to design a foundation for a log house on piles with a significant margin of safety.
Construction price: do it yourself and turnkey
In order to save budget, many owners of suburban areas build wooden bathhouses on screw foundations with their own hands.
In this case, the main items of cash expenses will be:
Purchase of pile supports, the cost of which is 1500-3500 rubles, depending on the size.- Purchase of waterproofing materials, insulation materials, raw materials for preparing concrete mixtures (sand, cement, crushed stone).
- Ordering reinforcement for arranging grillages on screw piles, channels and edged boards for tying supports.
- Transportation of the listed materials by our own vehicles or delivery service.
When contacting a specialized construction organization, the costs will be slightly higher. In addition to the listed items, the cost of services for conducting geodetic research on the site and drawing up project documentation is added to the final amount.
The cost of professional builders' services is usually comparable to the total costs of purchasing building materials.
Self-construction of a screw foundation for a small bathhouse measuring 3x3 m costs an average of 20-25 thousand rubles. During turnkey construction, the amount can increase approximately 2 times.
Popular projects on our website
A turnkey log house on screw piles will definitely cost less than the same structure on a reinforced concrete foundation. You can order the production of piles according to an individual project, taking into account the characteristics of the terrain, or you can buy a ready-made, standard set, including connecting elements. In any case, the foundation of a log house based on screw piles is a simple and convenient solution. And given the possibility of self-installation of such a structure, which requires minimal equipment, of which the most technologically advanced would be a welding machine, such work becomes equal to the cost of the products, no more!
Our website presents a number of log house projects, for example: https://www.domastroim.ru/category/proekty-domov/proekty-srubov-domov-ploshhadyu-svyshe-200-kv-m/ Or you can see all prices for log houses . You can calculate the house or bathhouse you need with maximum accuracy using our log house cost calculator. To order and buy a log house, call:
- Vologda
- Moscow,
Reviews and recommendations
The technology of constructing baths on pile-screw foundations is very popular . Reviews from owners of private plots confirm that the construction of such structures takes much less time, effort and money compared to monolithic, strip and other foundations and other foundations.
Experienced users recommend using piles with cast screws and galvanized surfaces - such products are highly reliable and are not subject to premature wear.
A fairly common mistake made by self-taught builders is strengthening pile-screw foundations with additional blocks that are installed under the partitions. This method is ineffective and even dangerous.
With seasonal temperature changes, the soil under the blocks can swell, which is why the floor in the bathhouse begins to “play” and deform. Foundations on screw piles, built in accordance with the technology, do not require strengthening with such dubious methods. This topic is discussed on the forum.
Everything you need to know about the design and construction of a pile foundation can be found here.
Assembling a log house
When the log house was delivered, it was already full winter outside with good frosts. The house turned out to be 55 cubic meters of wood; somehow they managed to store this whole huge pile in a small courtyard (you can’t leave it on the street). The log arrived frost-bitten, smooth, beautiful as if it had been selected.
Rounded log for log house.
After heavy unloading, we rested for a couple of days and assembly began. This process is simple, a little heavy; after all, a 6-meter log weighs about 200 kg, but it is very interesting. You look and are amazed how step by step, crown by crown, a beautiful house turns out from a pile of logs.
Assembly is simple if you follow all the rules and have experience in this matter. All technical documentation is delivered along with the log, where everything is shown clearly, where each log goes, everything is clearly and understandably assembled like a construction set. I laid down the log, secured the inter-crown jute, drilled holes, hammered in the dowels, the next crown, etc. The main thing is to maintain diagonals and vertical level.
The first ten crowns are assembled in one go, but then the higher you get, the process slows down.
Photo of the process of assembling a house from rounded logs.
This is how the house takes on its shape crown by crown. I would like to note that the entire assembly from the first crown to the last was carried out by us manually without the use of a crane!
The advantage of winter assembly is that the frozen logs and resin do not release, nothing gets dirty or sticks, so after final assembly the house turns out clean and elegant. And the frost makes you move. The main disadvantage is the very short daylight hours. In about three weeks we assembled the frame, and it was time to start working on the roof.