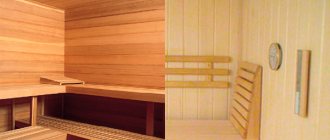
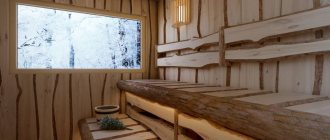
“Wings, legs, most importantly – the tail!” (from the cartoon of almost the same name). Boards, laminate, parquet - this is all good, but the main thing is the fastening! Like skiing. Skis may be made of unique types of wood, made by the “Stradivarius” of skiing, but if the binding is held on by snot, the legs will not run far. Also with the floor. Incorrect fastening of the floor covering will soon turn a smooth and durable floor into a loose and creaky one, like Gogol’s cart.
Perhaps the most ancient method. The trouble is that the nail tends to become loose and fall out under load. To solve this problem, long nails are driven under the joists and bent. But still, this does little to prevent the flooring from creaking and “walking.” Often the nail method is combined with the adhesive method. Many practitioners even advise, especially in the absence of a waterproofing layer. There is another misfortune: no matter how long the board is left to sit, it still will not get rid of 100% of the moisture, so over time, the mounted boards will dry out and the nail heads will stick out like mushrooms after the rain. The next drawback is that ordinary nails do not undergo galvanizing and, accordingly, rust over time. For flooring in wet rooms, such as bathhouses, since ancient times in Rus' they came up with the idea of keeping nails in drying oil, which protected them from corrosion.
Traditionally, there are several methods of fastening:
- Adhesive;
- Gvozdeva;
- Self-tapping.
Methods for attaching the board
Before installation, it is useful to consider a number of factors that may appear later:
- Even special treatment does not exclude the possibility of moisture affecting the floorboard. If the room is constantly damp, the material will become saturated with water. Periodic changes lead to constant fluctuations in the structure of the structure, which causes curvature and warping;
- Shrinkage is a natural process that takes a long period of time. The flooring will show it in any case, so it is useful to keep some of the structural components unfixed. Only the first and last boards, as well as every fourth between them, need to be pulled to the supporting elements;
- The final installation of the floor is carried out no earlier than six months to a year after the completion of the first stage of work. In this case, the screws are unscrewed and the flooring parts are tapped together if there are gaps in the tongue-and-groove area. Warped and severely deformed ones are removed and replaced with new ones;
- Lumber must be treated with fire retardants and antiseptics before installation. When sawing, it is necessary to process the resulting cuts and ends. It is convenient to work with substances that have colors and bright shades. In this case, the uncoated areas are clearly visible.
Fastening with glue
If the base is solid, then the flooring elements can be secured using good glue.
A number of features are taken into account:
- Regular PVA is suitable for the job;
- The ends of the boards on the groove side are coated, and a thin layer (1-2 mm thick) is applied every half meter. This will allow the connecting composition not to be squeezed out onto the surface when docking with the tenon;
- It is necessary to lubricate well for a reliable connection.
A permanent connection is considered inconvenient, since in case of repair it is more difficult to disassemble the flooring. There are two common mistakes: either the adhesive is too weak or the adhesive is too strong. In the first case, the connection can easily break; in the second, it will be impossible to separate the boards and will have to be broken. The best option is to use glue with average characteristics.
Typically, this method is not used as an independent method, but only in addition to other options.
Fastening with a nail
The second permanent fixation method is nails. Despite a history of more than 3 thousand years, this type of fastener continues to develop (up to 5 new types are patented every year).
Features of connecting boards with a nail:
- When raising the floor, you will have to dismantle the entire flooring. For this, a nail puller or similar tool is usually used; when pulled, the board itself is damaged;
- In addition to the floor elements, the nail itself is deformed; it is almost impossible to pull it out intact after nailing it;
- Each fastening pushes the fibers apart, increasing the risk of future cracks;
- The smooth surface of the fastener does not eliminate the risk of turning lumber already in a fixed state. Therefore there must be at least 2 points.
With this method, metal caps will be visible against the background of the array. To disguise them, it is wise to use putty. Hammering it into the groove will help; you need to fix the nail so that it does not interfere with the connection with the adjacent board.
Fastening boards with self-tapping screws
The most popular, convenient and at the same time affordable option. First of all, the method allows you to create a good detachable connection, which can be dismantled using a regular screwdriver. If necessary, you can reuse each hardware, since it is difficult to break the screws when unscrewing them.
Hardware of this type for wood differs from components for metal. The thread pitch is increased to move the fibers apart less and eliminate the risk of cracks. The decorative advantage of the products is important, since the thread does not reach the cap and it itself has the shape of a cone at the bottom, which allows it to be recessed flush with the floor plane.
Aesthetics can be achieved in several ways:
- Use special twisting methods, when the hardware is screwed at an angle into the tenon and remains invisible during assembly;
- Buy special caps that are inserted into the cap after screwing. They can be matched to any type of wood, but form a protrusion;
- Covering with a mixture of glue and wood flour. When sawing a board, small shavings are formed; they can be mixed and covered with screwed fasteners on top. In this case, you will have to deepen them further so that there is room for caulking flush with the floor.
Depending on the thickness of the fastening, you need to select the appropriate screws. Typically used sizes range from 3.5X35 to 3.5X50 mm.
When laying a board, you need to screw at least 2 fasteners into even the smallest components. Otherwise, 1 fixation point will become an axis around which the board will tend to rotate under load. A squeak will quickly appear in this area and the decking component may begin to wobble.
When twisting, you need to install the elements at a distance of 25-30 cm from each other, and you need to retreat 5-10 cm from the edge. This will create a reliable connection, but avoid the appearance of areas of tension along which cracks may develop under load. The only way to completely eliminate the appearance of cracks is by drilling holes for each self-tapping screw; for this you will need a screwdriver and a drill, as thick as the stem of the hardware, but less than the diameter of the thread that should be fixed in the material.
Fastening boards to joists
You can attach it to the joists using any of the described methods, the point is that over a certain space (above the basement, floor) support components are formed in the form of powerful boards, 100X100 or 150X100 are often used. Such a support will be very reliable, suitable, for example, in a garage where a car is supposed to be stored.
For home use, more modest lumber, from 70x40 mm, is sufficient. They are placed at an equal distance, on average 50-100 cm, depending on the thickness of the joists and the flooring itself. This is how supporting elements appear into which nails will be driven or screws will be screwed.
How to choose quality material
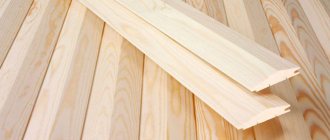
Installing a tongue and groove floor begins with choosing the material. First let's talk about sizes. The width of the floorboard varies from 70 mm to 200 mm. If you choose one that is too narrow, it will take a lot of time to install; if it is too wide, there is a very high probability that when it dries, the edges of the board will rise and the floor will turn out ribbed. The problem can be solved by grinding, but this requires additional time and money. Therefore, most often they take a tongue-and-groove board of medium width - 130-150 cm.
The choice of floorboard thickness depends on the distance between the joists
The thickness of the tongue and groove board is from 18 mm to 45 mm. It is not profitable to lay a thin one - so that it does not sag when laid on the joists, they (the joists) must be installed often. Therefore, lumber with a thickness of 28 mm, 36 mm, 45 mm is often used for flooring.
The tongue and groove board is sold in different lengths. The standard ones are 3 m and 6 m, but they produce 4 m and 5 m. The choice here is simple: the length of the material should be slightly greater than the length of the room in which it will be laid. Splicing in length is not very beautiful, that’s why they do it this way more often.
Choosing a wood type
The floorboard is made from pine and spruce, larch, oak or ash. Pine and spruce are not expensive, but their wood is soft. Traces remain from heels, fallen objects, and are pressed through furniture. In places of active movement, “trails” are formed over time. The situation can be saved by covering with wear-resistant varnish in several layers. If this option suits you, it’s a good choice.
Pine or spruce tongue and groove boards under varnish last a long time
A tongue and groove larch board is a more expensive material, but also more wear-resistant. The wood has a pronounced pattern and a pleasant color. Can be used uncoated or coated with oil-based formulations without creating a hard film on the surface.
Oak and ash are very beautiful hardwoods with dense, wear-resistant wood. But the price for them is completely inhumane. As in the previous version, floors made of these types of wood can be used without coating or with more gentle compositions.
Type of tongue and groove board and its characteristics
All lumber is divided into four grades:
- Class "Extra". Made from top quality material. There should be no brown or black knots, irregularities, cracks or other defects.
- Class A. Single stains are acceptable, otherwise no defects.
The difference between different types of tongue and groove floorboards - Class B (or AB). There may be brown knots, irregularities and spots.
- Class C. Irregularities, stains, black and brown knots, and a certain amount of through stains from knots are acceptable.
Grade C is used when constructing a subfloor. There are too many defects in it for a clean one. The remaining classes are suitable for fine coating, but which grade you choose depends on your financial capabilities - the difference between the classes is significant.
Humidity
For comfortable installation of tongue and groove flooring, choose kiln-dried wood. In this case, after sawing, the raw material is kept in drying chambers, in which it is brought to a humidity of 8-14%. Such material is unlikely to dry out after installation - this is almost impossible, but the cost is approximately 50% higher compared to naturally drying material. This is due to the costs of equipment (drying chambers) and fuel for drying.
Kiln-drying tongue-and-groove board packed in polyethylene
Humidity is measured with a special device, which professionals have, and even then not everyone has. You can also try to determine by appearance. Most often, kiln-dried lumber is packaged in polyethylene so that it does not absorb moisture from the air. Naturally, the packaging must be undamaged and free of moisture (condensation on the inside). If you knock on dry wood, it makes a clear, ringing sound, while wet wood sounds dull.
What happens if you lay a floor made of tongue-and-groove boards with high humidity? The first thing you have to deal with is the formation of cracks as it shrinks. After six months or a year, the floor will have to be re-laid, removing the resulting cracks. Secondly, when drying, cracks often appear and the wood is twisted in different directions. Sometimes these curvatures can be compensated for by pressing the board harder, sometimes not. So you have to keep a couple of boards “in reserve”: to add when reassembling from shrinkage and to replace severely crumpled fragments.
Geometry
When choosing, be sure to pay attention to geometry. In addition to the fact that the thickness and width of the board must match, and there should be no significant curvature, you need to pay attention to the correct formation of the tongue and groove:
- The depth of the groove should be slightly larger than the tongue. In this case, laying a tongue-and-groove floor will be simple and you will not have to manually modify the lumber.
- Keep track of the distance from the top plane to the tongue and groove. It must match, and on all boards of the party. Then, immediately after installation, you will get an even coating that does not require additional sanding.
Two tongue-and-groove boards should fit together without gaps
In normal production, this is all monitored, but in reality there is a very large spread - 5 mm is not the limit. It is clear that such a floor will have to be sanded. But the smaller the discrepancy, the smaller the amount of work will be. Therefore, try to find a manufacturer whose difference will be minimal.
Board installation
Installation of floorboards must be carried out using proven methods. Unreliable fixation will lead to loosening of the flooring and creaks. Gradually, the destruction of hardware begins, the holes for them deteriorate, and the risk of cracking increases.
Another important point is to obtain an aesthetic flooring that will not develop rusty drops or protruding caps over time.
Several methods can achieve this:
- Putty on nail heads. If you drive nails at floor level, rust may appear over time (if the nails are uncoated). Galvanized and galvanized fasteners are not subject to corrosion indoors. To cover the head, the nail, after being completely immersed in the wood, is driven slightly deeper than the level of the board. This creates a small groove in which the putty or mixture with sawdust is fixed;
- If you use clamps, you can get a perfect flooring without visible fasteners. In this case, small metal brackets are used, which are screwed to the joists and hold the boards by the groove;
- Method for ordinary self-tapping screws: if you screw them at an angle of about 45 degrees into the tongue. You will have to screw it in deeply so that the caps do not interfere with the joining of the projections of subsequent lumber;
- Nails with decorative heads. They differ from classic fasteners in a thinner and taller head, which is immersed in the wood at a level with the floor plane. The metal “dot” on the boards will be smaller, almost invisible from the outside.
Fixing floorboards with nails
In this case, the floorboard is fastened to a wooden base, which can be solid or made of joists. Initially, the width of the floorboard is taken into account, which is important.
Next, we will tell you how to lay a floorboard using this fastening method.
The first row of floorboards is secured using nails, which are driven at a 45° angle through the tongue into the base. Then they are driven into place. You should pre-drill holes for fastening elements. This is done so as not to damage the ridges.
When adjusting the next row, the nails must be hidden. All subsequent rows of boards are fixed by driving nails through the surface.
When repairing a plank floor and replacing several floorboards, you need to ensure that all the floorboards end under the center of the crossbar. Otherwise, you may end up with a non-durable coating.
General rules for flooring
There are a number of recommendations for various work options:
- Fastening on a prepared base when using hardware is carried out in increments of 250-300 mm;
- There is no need to adjust each section of the flooring to the width of the room; you need to retreat at least 10 mm from the walls. This gap will act as a compensatory gap, which will allow the boards to take their place during drying without harm. Otherwise, the risk of deformation and warping increases;
- When assembling with self-tapping screws, you can disguise the fasteners even when screwing them vertically. To do this, they need to be recessed by 3-4 mm, and then plug the resulting hole with a plug made of the same wood as the floor. On the market you can find options for all common breeds.
Methods for tightening floorboards
An example of tightening using a clamp and wedges.
Which device is best to use for tightening boards? To prevent gaps from appearing between the floorboards during operation, even at the stage of their installation you need to take care of the high-quality tightening of the boards. Which tool is suitable for these purposes?
What methods are there for joining floor boards together?
- Wooden wedges. A wooden block is placed at a right angle to the board, after which it is tapped to the already fixed floorboards using a hammer;
- Clamps. In this case, the clamp plays the role of a spacer. A block is temporarily attached to the joists, against which the tool “rests,” creating sufficient pressure to press the floorboard against the adjacent plank;
- Jack. This tool, like the previous one, is installed between the bars nailed to the joists, which allows you to create sufficient pressure to tighten the boards on the floor.
Also, for high-quality tightening of planks, the following can be used:
- mount;
- metal staples;
- bowrench.
How to tighten floor boards
The components of the structure must be tightened after drying, which takes up to 6-12 months. If board classes AB and B are used, they may be slightly deformed.
When laying such lumber, the smoothest ones should be fixed first. They are leveled as much as possible and secured. Next, the flooring components are alternated so that the curved and concave sections coincide.
In this case, it is impossible to simultaneously apply force for alignment and screw in the hardware, so several options for tightening tools are used:
- Wedges. You need to take two wedges (triangles made of wood with a long acute angle), secure the support and tamp the flooring with them. In its simplest form, a piece of board is used as a stop, which is screwed to the joists at the required distance for each leveled component;
- Clamps. Quite an expensive pleasure, especially considering the suitable sizes;
- You can assemble your own leveling machine, which is easily screwed to the joists and is equipped with a lever to easily and quickly press even several boards at a time.
Features of screws with a cutter
An example of a wood screw with a drill at the end.
In the process of fixing the floorboards to the base with nails, a hole is first drilled in the wood. This way you can prevent the boards from cracking. The procedure for covering subfloors with wood can be simplified by using special screws with a cutter at the end.
Their advantages include:
- Presence of a protective layer. Fastening elements can be safely used for cladding the car body and open areas. They have a protective layer that prevents the metal from oxidizing even in direct contact with water;
- The presence of a milled tip. The screws are made with a milled edge, which allows them to be easily screwed into wood without first drilling a hole;
- Lack of threads in the area near the “cap”. Self-tapping screws do not have threaded threads near the head, which ensures a more durable tightening of floorboards with joists.
Stages of laying the board
There are general steps required to create a quality floor:
- Analysis and selection of installation method. You need to proceed from the financial capabilities and skills you have;
- In accordance with the selected method, the necessary materials are calculated. These are logs, the flooring boards themselves, hardware and fastenings for fixing, paint and varnish coatings, impregnations. It is worth considering consumables, such as jigsaw files, gloves, protective equipment;
- Preparation of the base;
- Laying boards;
- Final finishing.
Successful work begins with preparing the base, which can be of two types: plywood or in the form of sheathing made of logs. The second method is preferable, but may not be suitable in some cases, for example, with low ceilings, since the installation of load-bearing components will reduce the height. Support beams are also not used if the old floor is preserved.
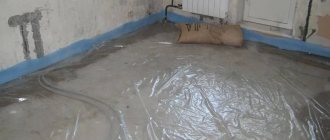
The floor is guaranteed to be damaged if the boards are laid on a screed or surface that retains moisture. To make sure it has dried, you need to put polyethylene on the floor and glue it in the corners; if after a day there are no drops of condensation on the inside, then you can start working.
Features of installation using glue
Glue is the main plus and minus in the method of fixing the flooring itself. It simplifies the work, but does not make it possible to assemble a coating that can be reused after dismantling.
It is important to remember that adhesive for interior living areas will work without water resistance. For the kitchen, it is wiser to take a waterproof one, so that an accidentally spilled drink does not spoil the junction of the components.
On what basis to lay the board
Before you begin assembling the flooring, you need to remember that the surface must be flat. A slope of no more than 0.2% of the length of the room is allowed; you can check it with a level.
For concrete foundations in case of deviations, it is worth using self-leveling compounds.
Next you need to create a waterproofing layer:
- Roofing felt, glassine or polyethylene sheets are purchased;
- The parts of the waterproofing layer are laid with an overlap of up to 20 cm; the overlap on the walls is up to 15 cm. All elements are glued together to create a continuous sheet; tape is suitable for this;
- You can apply a special waterproofing mastic to the concrete base.
Adhesive
When installing on a smooth, solid surface, some simply use PVA glue. This method has two disadvantages. The first is weak gluing; you will have to glue the loose floorboards each time, like a child’s applique. Some would-be craftsmen resort to Moment glue or superglues, which leads to the second drawback. Once you stick it, you can’t tear it off. We will have to cut a hole, like Peter the Great “window to Europe.” In any case, a permanent connection is a priori worse than a detachable one. Experts have long used the adhesive method only in combination with others, otherwise they cannot achieve reliable fastening. But it has been noticed that if you apply a few drops between the parts being connected, the fasteners will be many times stronger than the flooring material.
Installing a board over an existing floor
If the old floor is satisfactory and has a flat surface, then you can install fresh flooring on top. If there are damaged boards, you can replace them with inexpensive pine lumber. Fasteners that are not trustworthy or are loose, rusty, or broken are duplicated.
When laying on an old floor, be sure to lay the new parts perpendicularly to strengthen the structure and avoid squeaking immediately after installation.
It is useful to grind the old surface; this will improve adhesion when using glue and level the surface.
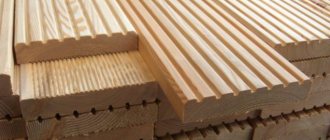
What is a tongue and groove board and why is it better?
A tongue and groove board is a board that has a groove cut along one side and a tenon along the other. When laying, the tenon fits into the groove, creating a more durable connection, eliminating “blow-in”. And this is a plus compared to edged or deck boards.
This is what a tongue and groove floor board looks like
Another advantage is related to the technological process: the tongue-and-groove board is “adjusted” to its geometry by cutting off the sidewalls, grinding the front side, and cutting longitudinal grooves on the back side for better ventilation. Then a tenon and groove are formed on the treated sidewalls using a milling cutter. After this, the tongue and groove board is ready. With such processing, there is certainly a difference (especially in low-grade goods), but not so great and sanding is needed, but not to the same extent as when using edged lumber.
A little about why it is so much more expensive. There is a lot of work, which is why this material is much more expensive, but the floor is stronger and more reliable.
Floor screed tools
For work you need several basic tools:
- Cordless screwdriver (corded drill) and wood drills. Allows you to prepare holes for self-tapping screws to reduce stress in the wood structure. Convenient for tightening self-tapping screws, but you will need a cue ball of the appropriate configuration (usually a “cross”);
- Hammer and nail puller, if nails are supposed to be used;
- A pair of gloves, a protective mask, goggles;
- Jigsaw and file for it. Essential for quickly sawing deck components;
- Glue and brush. The brush is also suitable for applying paintwork, if provided;
- Level, square, tape measure. A level will do;
- Pencil for marking. The most convenient thing is an ordinary pencil, since it can always be erased from the board, removing unwanted marks after marking.
Important Tips
Scheme for fastening floor boards with screws
Whatever types of fasteners are used to fix the floorboards, during the installation process it is simply necessary to take into account the following points:
- The distance between nails (screws) during fastening of boards should be 25 cm;
- The floorboards should be pulled together as much as possible, but a technological gap of 20 mm should be left between the boards and the walls in case the wood expands;
- When using non-galvanized fasteners, it is advisable to “recess” their heads into the wood, and then lubricate them with silicone or sealant.
Where to order floorboards
We suggest starting construction with the purchase of high-quality lumber. Larch has certified products and the ability to deliver throughout Moscow and the region using its own vehicles. We offer significant savings through self-pickup - in this case, we will load your car for free! Also, it is possible to send an order throughout Russia through a transport company.
Finally, watch an interesting and useful video on the topic of laying floorboards:
On what basis is it better to lay tongue and groove?
After purchasing tongue and groove boards, you can proceed to laying them. As a base you can use:
- Wooden logs fixed on top of any covering - screed, plywood, wooden floor. Also, logs can be laid on brick supports.
- Concrete floors with screed.
- Moisture-resistant plywood.
- Old wooden floor.
- Subfloor made of tongue-and-groove boards or low grade lumber.
The gold standard in construction is the laying of tongue and groove boards on pre-fixed joists. They allow you to efficiently tighten the boards during installation and prevent further floor deformations. Therefore, we recommend that you choose this option.
We invite you to familiarize yourself with our range of materials
Floorboard – Prima grade
Wood Larch Width 120 mm Thickness 27 mm Length 3 m Qty.
in pack 4 things. 3200 rub/m2Floorboard - Extra grade
Wood Larch Width 120 mm Thickness 27 mm Length 3 m Qty.
in pack 4 things. 3600 rub/m2
What are they needed for?
Laying wooden beams as lathing under the future floor allows you to strengthen the entire floor structure as a whole. In addition, noise and heat insulation materials are placed in the distance between the joists, which greatly improves the characteristics of the floor.
Properly installed beams and the distance between them ensure sufficient ventilation of the underground space of the house, which means that the wood will not rot over time. Especially if the building is located on an area with high groundwater. How to properly install logs and calculate the optimal distance between the sheathing beams is discussed below.
Features of installing floors with nails
This installation method is widely used in rooms with low ceilings and can only be carried out on a solid and smooth base. The process is very similar to laying parquet, but differs in that the planks are additionally secured with self-tapping screws. To understand how to properly attach a floorboard with glue, you should consider this technology in more detail.
- First of all, the base is covered with waterproofing material, on top of which moisture-resistant plywood with a thickness of at least 18 mm is laid. It is screwed to the subfloor using screws or dowels. Before attaching the floorboards, the prepared surface is thoroughly cleaned of dirt and dust.
- Using a notched trowel, glue is applied to the base, where all the flooring elements are carefully joined.
- Additionally, screws can be screwed into the grooves of the boards to ensure their immobility.
- In some cases, for a stronger connection, the grooves are also coated with glue, after which they are placed on the tongues of the previous row.
Flanking is another method of installing plank flooring. Instead of leveling the floor using various mortars, you can lay a finished surface and secure the plank flooring to it. Of course, it is not as simple as it sounds.
The subfloor must be well prepared by removing dirt and, if possible, removing uneven surfaces. You can use plywood or cork flooring as a false base. Both materials are quite durable and are excellent heat insulators.
The advantage of this type of installation is that there is no need for an additional layer of waterproofing and insulation, as well as the need to create a screed. Most methods involve creating a support separately from the insulators, but the false base acts as a finishing coating, while also serving as a heat insulator. If necessary, you can place a layer of waterproofing under the false base.
In some cases, during the renovation process, it turns out that the old floor covering cannot be completely dismantled, but it is no longer capable of performing its functions. Such problems can only be solved in one way: by attaching floorboards to the old base. In this case, all parts that can be removed from the old floor are replaced. The rough coating is leveled and cleaned of dirt. Old and rotten floor boards are disposed of and replaced with new ones.
The resulting base is sanded and nailed onto it, or the plank flooring is screwed onto it using self-tapping screws for the floorboard, but perpendicularly so that the joints of the floors do not coincide. This option is extremely costly and time-consuming, but in some cases the only one. To speed up the process, it is best to use a special grinding tool.
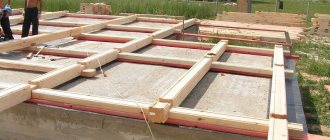
Installation of plank floors using joists
The most common scheme for installing plank floors. Logs (wooden blocks with a rectangular cross-section) can be attached to the rough base using adhesive mastics or self-tapping screws. Lay them perpendicular to the direction of the floorboard.
After installation, the system constructed from timber is leveled by planing the excesses and placing wood chips under the low areas. You can lay joists using an innovative, high-speed method, using timber equipped with height adjustment devices.
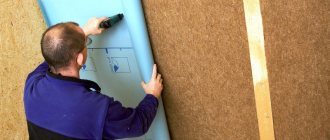
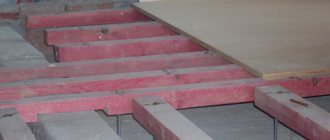
Insulation and waterproofing of the floor
Laying stone wool between joists
For wooden floors, film insulators are used, which effectively protect the covering elements from ground moisture. Waterproofing also provides a comfortable environment for people to avoid developing respiratory diseases due to mold and mildew. The film must be attached in accordance with the technology.
Insulation is done in several stages before attaching the floor board to the joists:
- an insulating membrane from the wind is installed on top of the subfloor, the edges of which are placed on the joists and fastened with a stapler;
- insulation is placed between the beams on top of the film;
- A vapor barrier film is placed over the insulation, and the edges are glued to the mounting tape.
Attention is paid to the membrane joints to obtain a complete coating. For insulation, polystyrene foam and polystyrene foam are used, which have zero saturation with moisture and do not violate the protection. Mineral wool requires a ventilated gap. Expanded clay gravel is placed in niches between joists and beams.
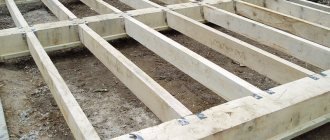
How to install logs?
An example of installing adjustable joists
If you decide to install the sheathing and floor boards yourself, then prepare in advance. Namely, in addition to beams and floor boards, prepare the necessary tools and adjustable support elements. They are the best option because they allow you to install logs on a cement base with perfect evenness.
Moisture-resistant plywood base
Hydrophobic impregnated plywood can be laid on any type of sub-base, including joists, if additional strengthening of the multi-layer floor structure is required. The standard installation of a floorboard on top of plywood precedes the leveling of the rough base.
Sheets of plywood, cut into longitudinal segments, are installed in a diagonal direction relative to the laying of the board. Fastening is done with dowels or screws. Technological seams are left between the plywood sheets and around the perimeter of the room being furnished.
Scheme for installing boards on plywood:
- rough base;
- insulating substrate;
- moisture-resistant plywood;
- floor covering - boards
Note. The plywood can simply be glued to the screed, to a leveled cement or wooden floor prepared for installation. Those who prefer adhesive technology must definitely select an adhesive composition that is compatible with the type of roughing base and insulating materials.
After completing the laying of plywood sheets, its surface is sanded, then the dust and dirt formed during sanding are completely removed. Before installing the boards, primer is applied, after which the floorboard is fastened. Then again sanding, processing with varnish, paint or oil.