Before attaching the logs to the strapping beam, you need to choose a fixation method. The decision depends on the design features of the structure, the availability of fittings and other factors. This stage requires a responsible approach, since the logs are constantly under stress from furniture, equipment and residents.
The choice of method for fixing lags depends on many factors.
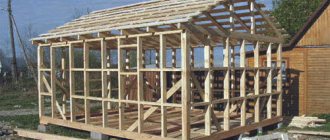
Rules for creating timber strapping
This frame element is made from the following lumber:
- logs;
- timber;
- solid board (double or triple).
The last option is the most durable.
Unlike the other two, it is not susceptible to cracking or warping. The framing of a frame house with a pile or columnar foundation experiences heavy loads, so it is made of high quality wood.
Follow the rules:
- The width of the element corresponds to the thickness of the wall.
- Before installation, the timber is treated with an antiseptic and fire retardant impregnation.
- The foundation is covered with waterproofing.
- The element is positioned strictly horizontally to achieve uniform load distribution.
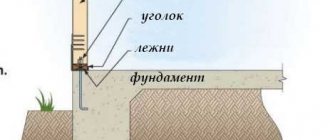
- For fastening to the frame posts, anchors, clamps, U-shaped galvanized profiles and brackets are used.
The frame element is most often made of timber.
Holders and mounting brackets
Holders and mounting brackets and other products can be purchased at Leroy Merlin in Moscow at low prices. Select the product you are interested in on the website and buy it in our online store. The range of products presented in the catalog is extremely wide. Among them there will certainly be a position suitable in all respects.
All products presented in the “Holders and Mounting Brackets” section are produced by well-known companies that have proven themselves to be of high quality for their products.
You can always place an order and pay for it online on the official website of Leroy Merlin in Russia. For residents of the Moscow region, we not only have low prices for products in the “Holders and Mounting Brackets” category, but also fast delivery to cities such as Moscow, Balashikha, Podolsk, Khimki, Korolev, Mytishchi, Lyubertsy, Krasnogorsk, Elektrostal, Kolomna, Odintsovo , Domodedovo, Serpukhov, Shchelkovo, Orekhovo-Zuevo, Ramenskoye, Dolgoprudny, Pushkino, Reutov, Sergiev Posad, Voskresensk, Lobnya, Ivanteevka, Dubna, Yegoryevsk, Chekhov, Dmitrov, Vidnoye, Stupino, Pavlovsky Posad, Naro-Fominsk, Fryazino, Lytkarino , Dzerzhinsky, Solnechnogorsk, Istra and Zhukovsky.
Recommendations for choosing timber for the frame
Lumber with a cross section of 150x150, 150x200 or 200x200 mm is used. If the trim in the house is made from a board, the thickness of the latter is 50 mm.
Coniferous wood is preferred:
- pine trees;
- larches;
- ate;
- fir trees
Rationale:
- low cost;
- prevalence;
- moisture resistance of this wood and antiseptic properties due to the large amount of resin.
Coniferous wood is preferred for the frame.
If a frame house is being built in a lowland area with high humidity, larch is preferable.
Requirements for lumber:
- humidity – 16-18%;
- dimensional and geometry accuracy – high (calibrated timber);
- absence of knots, cracks, rotten or moldy areas.
Logs are made from boards with an aspect ratio of 1:2 or 2:3, for example, 50x100 or 100x150 mm. The choice depends on the pitch between them and the thickness of the insulation.
Assembling a timber frame for a house
The work is carried out in the following sequence:
- Lumber is cut to the required size in accordance with the foundation plan.
- The end of each element is designed according to the configuration of the node.
- The wood is treated with fire and bioprotection.
- Lay 2 layers of waterproofing material on the foundation, for example, roofing felt on bitumen mastic.
- Lay out the beam in the design position and check the lengths of the diagonals of the strapping: their equality indicates the absence of distortion, i.e., in plan, the strapping forms a rectangle.
- Check the level to ensure that it is horizontal and, if necessary, correct the position of the elements using shims or wedges.
- The lumber is connected to each other with nails 150-200 mm long, the corners are reinforced with galvanized corners or bolts.
- Screw the assembled structure to the foundation using anchor bolts or embedded studs.
The timber frame is connected to each other with nails.
In the corners, the timber is connected to each other using the following methods:
- root thorn;
- half a tree;
- end-to-end
The elements are connected lengthwise using the “claw” method.
Cutting is done with a chainsaw or using a hacksaw and a carpenter's axe.
The procedure for constructing a base from a solid board:
- External planks are prepared along the entire perimeter: they are treated with an antiseptic and fire-retardant impregnation, cut to the required size and the ends are designed in accordance with the design of the unit.
- Having laid waterproofing on the foundation, they are laid out in the design position (on edge).
- Measure the lengths of the diagonals, and if they are equal, nail the boards to each other with long nails.
- The inner layers of the strapping are installed in the same order.
- They tighten the boards with pins.
- Screw them to the foundation.
Video description
What it is and how this spring unit works is described in the video:
When building a wooden house, the question always arises of how to connect two beams lengthwise or fasten a corner. Each master has his own preferences in this matter: one adheres to methods that have been proven over centuries, the other trusts more modern methods using special fasteners. And this issue needs to be discussed in advance, after independently studying all the possible options and deciding what is your priority: speed and reasonable cost of installation or quality and reliability.
Types of fastening lags to beams
The logs are the load-bearing base for the floor. They experience heavy loads, so their attachment to the beams must be strong and reliable. Several options are used.
The attachment of the joists to the beams must be strong.
With support on a block
A block that serves as a support for the joist is screwed to the side of the frame from below with self-tapping screws or nailed with long nails. After installation in place, it is additionally fixed with corners to prevent lateral displacement.
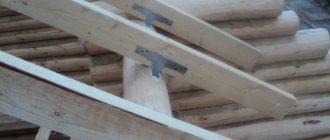
Using metal structures
In this option, there is no support; the joist is held in place only by fasteners.
The most commonly used parts are:
- Perforated brackets. They are straight and L-shaped. They are mounted on self-tapping screws with a diameter of at least 3 mm.
- Corners. They are held in place with self-tapping screws or anchor bolts. This fastener is more susceptible to deformation than others.
- U-shaped holders. Screwed on with screws. The lag is inserted into the holder as if into a groove.
- Plates. This fastener is used if, according to the design, the upper or lower edges of the logs and beams lie in the same plane. The plate is held in place by bolts that penetrate right through the beam.
With harness support
In this option, the logs are simply placed on the timber. To prevent lateral movement, grooves can be cut to a shallow depth. Additionally, the beam is fixed with screws or nails.
The logs are placed on the beam, the beam is fixed with screws.
Horizontal ties are laid on top of the joists so that the racks can be installed.
What should be the distance between the logs for the convenience of further insulation?
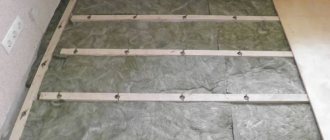
From below, the logs are lined with subfloor boards, on which insulation is placed. To avoid gaps, the material must fit tightly between the beams.
The step of their installation depends on the type of heat insulator:
- Bulk - ecowool, foam chips, expanded clay, sawdust, etc. In this case, the insulation does not affect the distance between the joists in any way.
- Plates made of foam plastic or mineral wool. The distance between the beams should be several millimeters less than the width of the insulation.
The pitch between the lags depends on the permissible load.
It must be remembered that the step primarily depends on the permissible load on the joist, which, in turn, is determined by its cross-section. If, according to calculations, the gap between the beams turns out to be narrow compared to the width of the insulation, and it is not possible to use larger lumber, under no circumstances should you increase the distance. In such a situation, the heat insulator is cut.
If the strength calculation, on the contrary, allows you to install beams with a pitch exceeding the width of the mineral wool slabs, you should not reduce the distance - this will lead to unjustified consumption of lumber. It is better to blow out the gap between the slab and the joist with construction foam or fill it with strips of insulation.
Self-tapping screws for the floor
To facilitate and speed up the work on laying wooden floors, floor screws were created, the design of which includes:
- head with torx slot;
- countersinking ribs on the conical part of the head;
- thread parameters that optimally combine the ability of easy screwing with the strength of floor fasteners;
- a cutter-shaped tip that prevents splitting and splitting of wood;
- external coating with anti-friction properties, facilitating floor installation.
The torx slot is shaped like a six-pointed star and is capable of transmitting maximum torque. The cone of the head of the new self-tapping screw forms an angle of 60°, which was not chosen by chance. This cone shape is optimal for fastening wooden parts. On the one hand, the head easily enters the wood, forming a groove; on the other hand, it firmly holds the parts connected to each other. On the surface of the head cone there are protrusions - countersinking ribs, which cut the wooden surface, making it easier for the cone part to be immersed into it.
Another design feature of floor screws is the presence of a section on the rod without threads. This form of self-tapping screw ensures the tightening of the parts being connected to each other. When using a conventional self-tapping screw with threads along the entire length of the rod, the gap between the floor parts is not selected when tightening it. This is explained by the fact that the rod of such a self-tapping screw is rigidly connected by thread to both parts, excluding their mutual movement at the end of tightening. Floor screws that have a threadless gap work differently. They are screwed into the joist, while ensuring freedom of movement of the tongue and groove floorboard due to the section of the rod without threads. When fully tightened, the floor boards are pressed against the joist with the head of the self-tapping screw and additionally secured with several turns of thread at the conical part.
Instructions for attaching the log to the strapping beam
When installing the floor, the boards and laminate are laid perpendicular to the wall with the window, i.e. parallel to the light flux. With this orientation, the long joints between the lamellas are less visible. Accordingly, the logs are directed along the window.
Before their installation, façade or end boards are installed. They are designed to mark the position of the bars and fix them vertically.
The boards are placed according to the floor plan. They are placed on edge and aligned along the outer edge of the strapping beam. Then they are fixed with corners or nails 100-120 mm long, driven in at an angle.
Installation of logs is carried out in the following sequence:
- Markings are applied to the harness using a cord and a water level.
- Prepare and screw fasteners according to the markings.
- Install the bars, using a lath to ensure that their upper edges lie in the same plane.
- The lintels are secured between the beams with nails.
By marking the lags, fasteners are prepared and screwed.
Transverse elements perform several functions:
- give the flooring rigidity;
- keep the bars in a vertical position;
- transfer part of the point load to adjacent beams, thereby ensuring its more uniform distribution;
- serve as the basis for non-load-bearing partitions.
It is allowed to install jumpers in a checkerboard pattern (except for the last case).
Support on timber
This method of attaching lags involves the following sequence of actions:
- According to the markings, the bars are screwed to the strapping beam with self-tapping screws - 3 fasteners for each.
- Install the bars so that their ends lie on the supports that have just been installed.
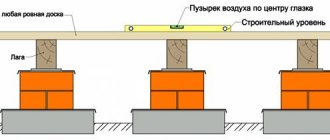
- Make sure, using a strip and a bubble level, that the top edges of the beams lie in the same horizontal plane.
- Take a corner equal to twice the number of joists and drill 2 holes in each shelf.
- Having attached one part to the side surface of the log and the strapping beam, mark the position of the holes on the wood with a pencil.
- Having removed the corner, drill according to the markings.
- Return the part to its place and screw it with self-tapping screws.
- The other corners are installed similarly on both sides of each joist.
The corners are screwed with self-tapping screws on both sides of each joist.
Using self-tapping screws and metal structures
As an example, we consider the method of fastening lags with U-shaped holders:
- In accordance with the markings made on the beam, the outer part is applied to it and leveled in a strictly vertical position.
- Through the holes, clearly visible points are marked on the wood with a pencil.
- Temporarily remove the U-shaped fasteners and drill along the newly applied markings.
- Return the part to its place and screw it with self-tapping screws with a diameter of 3 mm.
- Place the log in the newly fixed U-shaped holder and put the same part on its other end (an assistant will be required).
- Place the beam in the design position, controlling its verticality and horizontality with a level.
- Through the holes in the free holder, clearly visible points are drawn with a pencil on the strapping beam.
- The lag with the metal structure is temporarily set aside and drilled according to the markings just made.
- Screw the holder with self-tapping screws.
- Install the lag in both parts.
Next, in the same order, install the outer beam on the opposite side of the floor. After this, a cord is pulled between the fixed lags and, using it as a guide, intermediate ones are installed.
Support on the harness
To fix the logs in a vertical position, it is recommended to cut grooves on the support beam.
Procedure:
- The contours of future cutting are drawn on the wood according to the size of the logs.
- Make vertical cuts on both sides with a chainsaw.
- Make horizontal cuts.
- Use a chisel, router or carpenter's ax to select the material between the cuts.
- While making a groove on the opposite beam, from time to time install a joist and check its horizontalness.
As in the previous version, it is recommended to first install the outer beams, then install the intermediate beams along the cord stretched between them.
Using Anchors
To obtain reliable and long-term fastening, you can use anchors for floor joists. In addition to holding the beam in one place, they also attract it to the surface, giving the entire system additional rigidity.
In essence, the anchor is a dowel, but much stronger. Its advantage is its high pull-out resistance, so it is used when installing very heavy structures that create a large load on the fasteners. The probability of the floor on the joists completely tearing away from the concrete base is approaching zero, so fastening can also be done with self-tapping screws. However, anchors are quite often used for these purposes.
So, how to secure joists to a concrete floor using anchors? This method is carried out similarly to fastening with self-tapping screws. Identical holes are made in the beams and concrete floor. To prevent the bolt head from sticking out, it must be hidden without damaging the wood; for this, the logs should be countersunk beforehand.
Typically, 3-4 anchors are required to secure one joist within a room. The locking element of the anchor should be inserted into the hole in the floor, then a bolt should be screwed into it through the beam.
Anchor bolts are produced in various lengths: 45-200 mm. When choosing the length, you should take into account the thickness of the log plus 6 cm for penetration into the base. It is recommended to purchase anchors with a diameter of 10 mm.