Many residents of big cities are looking forward to the weekend to escape the hustle and bustle to the countryside. There is nothing more beautiful than a comfortable holiday in nature, especially if one of the components of comfort is a real Russian bathhouse.
Perhaps every summer resident or owner of a private house dreams of having their own bathhouse, even if the home is fully equipped and has a bathroom. Nothing can compare with a hot steam room and fragrant brooms. The bathhouse cleanses not only the body, but also the soul, relieving stress and uplifting your mood. The easiest way would be to order the construction of a bathhouse from builders, but you can do it yourself, arranging it to your taste and significantly saving money. You just need to purchase the material, prepare the tools and get acquainted with tips and tricks on how to make a bathhouse with your own hands.
Before starting construction, you need to choose a suitable project and decide on materials. Many will agree that the ideal bathhouse should be wooden, but in some regions wood is considered a rare and expensive option, preferring to build bathhouses from brick or foam blocks. After this issue has been resolved, preparations for construction can begin.
Brief overview of the article
- Planning a bathhouse
- Selecting a location
- Construction materials for baths
- What material to choose for walls
- Bathhouse made of timber
- Log sauna
- Frame construction
- Block sauna
- Brick bath
- Construction stages
- Preparing the site
- Construction of the foundation
- Construction of walls and installation of roofing
- Interior decoration
- Oven and shelves
- DIY bath photo
Planning a bathhouse
The simplest, but most expensive option is to choose one of the many ready-made projects. You can also order a drawing, but this will also cost money. Therefore, many of the craftsmen who decide to build create drawings of a bathhouse with their own hands, relying on advice, recommendations and certain standards.
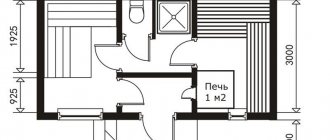
The plan for the future bathhouse should be as accurate as possible. On it you need to draw the locations of windows, doors, stoves and internal wooden structures: benches, shelves, steps. You should also determine the area of the premises and indicate communications.
In summer cottages, simple-type bathhouses are usually installed, containing a relaxation room, a steam room and a washing room. It is advisable to have a dressing room that will not let in the cold from the street and will serve as a storage place for firewood.
The most popular and simplest project is a 3x3 or 3x4 structure. In this case, you get a compact building with a steam room combined with a washing room and a dressing room as a rest room. Two people can steam in such a sauna at the same time. It is not suitable for constant use, but as a summer cottage option it will be very convenient.
Recently, when constructing baths, the steam room is separated from the washing room, choosing a layout of three rooms. In this case, the dimensions of the building should be 4x4 or 6x4.
Modern bathhouses with complex layouts, including up to six interior rooms, a terrace and even an attic floor with a balcony, are often built on sites for private houses and cottages.
But for them it is better to purchase ready-made projects that are designed for building sizes of 8x8 or 10x10. These options are good for frequent use by large companies.
Steam room device
Even when you have just conceived a bathhouse project, the steam room device will immediately begin to determine the position of ventilation, water supply, electrics and much more. This is partly due to the material from which the bathhouse will be built, partly not.
For now, let's look at what is determined by the material .
In a wooden bath
A wooden bathhouse is either a log house or timber. When it comes to installing a steam room in a wooden bathhouse, the main question is to leave it as is, cover it with clapboard without insulation and foil, or with them.
ATTENTION! You must know what kind of wood your log house or timber is made of. If it was used with coniferous species, then the lack of sheathing will lead to a constant release of resin on the walls.
Resin leaks
Therefore, is still coniferous with clapboard. If deciduous logs were used for the bathhouse, then there is no need to sheath it, but care must be taken to ensure that the seal between the logs does not get wet during the procedures. In principle, you can use a sealant if the manufacturer guarantees its safety at high temperatures.
If you decide to sheathe it so as not to get dirty with resin, then you should choose lining made from aspen, linden and other hardwoods . of vapor barrier should be placed between the clapboard and the logs to prevent the logs from getting wet.
Insulation in a wooden bathhouse will not hurt where there is severe frost in winter. Still, fuel is saved and you are more comfortable. But the debate about foil in the steam room never stops. We will not convince or change anyone’s mind , we’ll just say that for insulation you will need a lathing, on it - 10-15 cm of insulation for a sauna, foil, a ventilation gap with the help of a lath, and everything is covered with clapboard. Details here.
In a bath made of aerated concrete
Block baths are all hygroscopic to one degree or another , which means there is a greater or lesser need to protect them from moisture absorption. Installing a steam room in a bathhouse made of aerated concrete will definitely require you, first of all, to waterproof this very aerated concrete so that liquid does not accumulate in it, and it does not lose its thermal insulation properties and does not collapse.
Due to the fact that most block materials are quite fragile, insulation should not be done with support from the walls . The lathing must be attached to the floor and ceiling, and the thermal insulation material must be attached to the lathing itself. Then there will be no load on the walls. You can learn more about the insulation of block baths here.
In a brick bath
The pattern of the pie is always the same , and brick can be classified as a block material. Of course, a steam room in a Russian brick bath necessarily requires insulation and lining with clapboard.
There are several different methods for insulating brick walls, all of which are described in detail in this article.
In frame
Frame buildings are already insulation in almost its pure form. It is inserted into the openings of a wooden frame and covered with wooden panels. Is it necessary to additionally insulate it when installing a steam room in a bathhouse of this type?
You will be surprised, but yes, it is necessary. A sheathing is made on the frame wall, a layer of insulation is inserted into it, everything is covered with a vapor barrier, another lath and clapboard. However, if you are interested, read the article about insulating the walls of a frame bath.
Selecting a location
It is better to choose a flat area for construction so that you do not have to make a solid foundation. The place should not be too damp, otherwise the bottom of the building and the floor will begin to rot.
If there is a body of water nearby, it is better to build a bathhouse closer to it, in this case you can plunge into cool water after the steam room. The entrance to the dressing room is usually made from the south side so that snow does not accumulate in front of the door.
Recommendations for choosing material
Followers of traditions are recommended to build a bathhouse from high-quality coniferous wood. This material is not fragile, and most importantly, it lasts a long time. The needles are also distinguished by their environmental cleanliness and low thermal conductivity, that is, they do not release heat and at the same time interfere with air exchange. A unique property of this tree is its resistance to various climate conditions.
Such a wooden building must stand on a reliable foundation
For construction, you can take one of two types of coniferous wood:
- rounded round logs;
- solid beams.
Experienced builders advise building a bathhouse from beams, since this material is cheaper and it is much easier to build walls from it. In addition, timber construction works well without a bulky foundation.
The timber structure looks simple, but is easy to assemble
If you opt for rounded logs, you may be severely disappointed: a log structure takes a long time to settle, which is why it will not be possible to put it into operation earlier than a year and a half after construction. Unlike a log bathhouse, a timber structure can be safely used six months after the completion of construction work.
When purchasing beams, you should use a tape measure to check the material for compliance with the specified dimensions, and then make sure that the building materials are of good quality. To do this you need to do the following:
- visually examine the material and remove defects from the prepared batch, that is, bars whose color is uneven or unnatural and indicates poor drying of the product;
- see if there are any building materials with large cracks, bluish spots, wormholes or other damage among the beams, and put them aside;
Every beam needs inspection
- pay attention to the edges of the material and make sure that the growth rings on both sides are exactly the same in size.
Construction materials for baths
Before starting construction, you should prepare all the necessary materials. In addition to what you need for the walls, you need to purchase everything you need for the roof, foundation and finishing. You will definitely need:
- batten;
- ceiling boards or lining 20 mm or slightly thicker;
- lining for wall decoration;
- vapor barrier film for roofing;
- waterproofing film;
- mineral wool for ceiling insulation;
- asbestos sheets for insulating walls near the stove and chimney;
- sand-gravel mixture and cement for foundation work;
- roofing material;
- insulation for walls (if the bathhouse is made of timber or logs).
The constructed bathhouse cannot be used immediately, as it must settle. Therefore, it is recommended to begin construction in early spring.
Approval of the project by administrative authorities
This is a key step. Without approval of the project before the start of construction, an already built bathhouse can be demolished due to any complaints from neighbors, and you will lose the labor and money invested. The project should include the following items:
- A plan (floor plan, even if you have only one), created according to all the rules of drawing with specifications, sections and explication.
- Approximate estimate for materials.
- Planned type of foundation with drawing.
- Consent of the closest neighbors for construction.
The bathhouse design must be agreed upon with the necessary authorities
What material to choose for walls
The modern building materials market offers various options suitable for building a bathhouse to suit every taste. The most common: wood, concrete blocks and brick.
Since ancient times, construction has been carried out from wood as the most environmentally friendly material that does not require additional finishing. Wooden walls delight with a pleasant aroma and aesthetic appearance.
How to choose a site for construction
The construction of a bathhouse usually begins with choosing the most suitable location and drawing up a construction plan. When preparing calculations, it is important to comply with the rules and regulations that govern the conditions for locating a steam room in the residential sector. The specific structure must be located at a distance of no closer than 1 meter to the boundary of the neighboring plot. If there are wooden buildings in the neighbors' yard, there should be more than 15 meters from them to the bathhouse.
A separate bathhouse or one built as an extension to a house can only be built taking into account the rules and regulations regarding natural, plant, and protected areas. The permissible distance to a reservoir is 5 meters, an artificial well with drinking water is 12 meters, tall trees are 4 meters, and a forest area is 15 meters.
In the house
You should plan the construction of a steam room in your home at the building design stage. The bathhouse will require special waterproofing, finishing, and processing of materials. More often they make mini-rooms, but they are spacious enough for a comfortable stay. The advantages of planning a residential building with a bathhouse include the following factors:
- Saving space in the garden area;
- Possibility of free movement between rooms, without the need to go outside;
- Simplified firebox. All necessary materials are located in the living area;
- Close location to the bathroom.
The disadvantages of organizing a bathhouse right in the house include a high fire hazard. Even high-quality and systematic treatment of a room with fire retardants does not provide 100% protection against fire and smoke. Additional vapor barrier will also be required. Due to high humidity, complex ventilation will have to be done. Good air exchange can be ensured by installing expensive internal equipment.
Extension to the house
It is possible to attach a bathhouse to a residential building only if the house is made of brick or foam blocks. In other cases, being too close may be unsafe. You can use a ready-made terrace or fill a separate area with the foundation for a sauna. Before laying the floor covering, it is necessary to consider good protection from moisture and a high-quality sewer drain.
You can make a bathhouse extension 2 years after the shrinkage of the main residential building. It is easy to bring communications into the room and make it heated. Disadvantages include a high risk of fire due to open flame. The danger increases if the frame part of the dacha extension is made of budget timber or poorly processed wood materials. Dirt and debris from the firebox easily enter the house, and high humidity destroys the wall covering, leading to inevitable frequent repairs.
Freestanding
The best option for building a bathhouse on the site. The easiest way to make it is from a log house. You will need a lightweight foundation, timber for making a roof truss, and basic material for the walls. Construction will take a minimum of time. You can safely implement your favorite design and furnace equipment with any characteristics.
The disadvantages include the use of an impressive area for construction and a large amount of building materials and improvised means. Due to the distance from a residential building, heating costs will increase, and attempts to save money will lead to a deterioration in technical parameters.
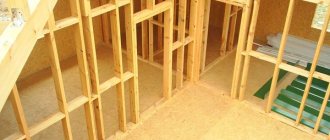
Frame construction
The most inexpensive and simplest option is a self-built frame bathhouse. Even a person with no construction experience can assemble it. This method of construction is the fastest, since in this case there is no need to wait for shrinkage, but to immediately begin interior decoration and installation of windows and doors.
But it should be remembered that the walls of the frame structure require additional insulation.
HOW TO MAKE A FOUNDATION FOR A BATH CORRECTLY
Every building needs a foundation. Its filling depends on the weight of the walls of the structure. The foundation is a construction stage that requires large expenses. Cement, sand, gravels and labor are expensive. It is important to make the foundation for a bathhouse correctly, since it is like the root of a flower or a tree, everything stands on it and holds on. Saving on it can weaken the reliability and strength of the entire bath structure.
Experts recommend pouring a strip foundation designed for clay soil. In the case of hard soil, a base height of 60 cm is sufficient. In this case, the freezing depth should be taken into account. It should not be greater than the height of the base. The tape type allows you to build a cellar, retains heat well, and is durable. For air circulation, it is advisable to raise the foundation approximately 50 cm above ground level.
Foundation pouring progress
- Preparing the construction site - marking is carried out using reinforcement pegs and fishing line.
- Digging a pit - based on the deepest point, the depth of the entire trench is calculated. Its width is 10 cm larger than the proposed walls, and it digs 50 cm deep.
- Laying a sand or gravel cushion is necessary to reduce the load; the top layer is carefully compacted and leveled using a level. It is poured to a height of 15–20 cm. Polyethylene waterproofing is spread over it.
- The construction of wooden formwork is a labor-intensive task that provides the shape of the poured concrete. Usually a smooth, durable, cheap edged board is used. The boards are fixed with nails and screws. Must be tightly connected to each other.
- Preparation of reinforcement - provides high strength to concrete. The reinforcement grid should be 5 cm from the edge of the foundation. It is advisable to use a rod with a cross-section of 12 mm.
- Ventilation arrangement - made from plastic pipes 10 cm wide, placed in the foundation. Before pouring, the holes are sealed to prevent them from being filled with mortar.
- Filling - it is advisable to use an automixer. Preparing a solution with your own hands is a labor-intensive process. Recommended cement grades: M-200, M-300, M-400.
" Important. It is necessary to add crushed stone to concrete
Proportions:
- 3 parts stones;
- 1 part cement;
- 3 parts sand.
Water provides the required consistency, and crushed stone provides sufficient strength for the foundation. Filling occurs gradually, it must be monolithic, without gaps. Tapping the reinforcement while filling allows the concrete mass to be placed more densely. After pouring, you must wait a month before starting the next construction stage. During this time, you can cover the concrete with a film and periodically wet it to increase strength.
In addition to the strip foundation, a columnar foundation is popular, suitable for wet soil and having a lower cost. It consists of brick or concrete supports located 1.5 m from each other, placed at corners and walls.
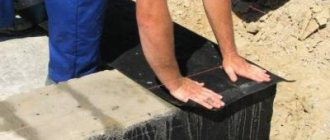
The foundation must be protected from moisture by filling it with hot bitumen and covering it with roofing felt in several layers.
Construction stages
Detailed step-by-step instructions, which consist of several stages, will help you answer the question of how to build a bathhouse yourself:
Russian bath: features of its action
The human body temperature does not exceed 40° because he sweats, due to which he releases excess heat into the surrounding air with the release of excess fluid. This is the basis of the operating principle of any type of bath. The differences are only in the ratio of temperature and humidity.
Hammam decorated with mosaics
In a Turkish bath (hammam), the humidity reaches 100%, and the temperature of the air, stone floor and benches does not exceed 40°. In a sauna (Finnish bath) this ratio is completely opposite. At 120° the humidity is only 40%.
A sauna can also be installed in an apartment
But the optimal combination of temperature and humidity for health (and there will be no negative consequences from such a procedure) can only be maintained in a Russian bathhouse, but only if it is properly designed and built.
A bathhouse cannot be called a cheap pleasure. If you order its construction on a turnkey basis, the amount may turn out to be unaffordable. With average prices for materials and specialist work, you will have to pay from 7 to 22 thousand dollars. You can build the simplest bathhouse yourself, saving significant money.
Construction of a Russian steam bath
Russian baths, as close as possible to traditional ones, are coming back into fashion. They have their own characteristics:
- the foundation is a boulder stone that does not require a plinth;
- the walls are logs, wild, debarked and dried, selectively chopped logs that have not undergone any other processing;
- assembly without metal parts such as nails or corners;
- caulking with natural materials such as tow and moss;
- insulation with natural materials, for example, peat or moss;
- waterproofing - natural resin;
- roof - shingles, turf or shingles;
- the stove must be made of stone;
- font - barrel, pool (you can always run outside and plunge into a river, lake or rub yourself in the snow).
Traditional Russian steam bath built on boulders
All this creates a lot of unnecessary difficulties; the bathhouse itself is generally flammable and short-lived. But there is every opportunity to independently build a bathhouse with the same qualities, but much more practical and modern. It is recommended to make a sauna house not only with a steam room, but also with a washing room, where there is a font, a tub for dousing or a shower, and a dressing room.
A Russian traditional steam bath can consist of several rooms
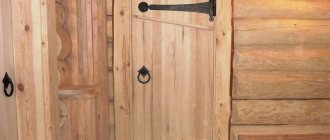
Waiting room
They undress in it, store towels, sheets, brooms and brooms, relax between visits to the steam room, and drink tea. This room serves as a barrier to cold air. There is a window there (for security reasons and for beauty).
A well-equipped dressing room can lift your spirits
Steam room
A heater with a water tank is installed in it, and beds or shelves for lying on are built. The oven provides uniform, strong heating and exposure to superheated steam without convective air mixing. The steam room may have a small window for ventilation, which will help avoid waterlogging (one or two ventilation holes can be made for the same purpose).
A steam room with beds can be equipped with one window
Washing
Heat enters this room from the back wall of the furnace. After visiting the steam room, you need to cool down in the font or shower, which removes waste and toxins from the body. At the same time, sweating does not stop, and due to high humidity it also intensifies. The washing machine's operating principle is similar to that of a hammam.
The washing area with a font and rinsing tubs is heated by the rear wall of the stove
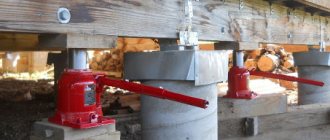
Construction of the foundation
When building a bathhouse from timber, it is recommended to build a simple columnar foundation, which is low cost and suitable for light buildings. Holes are dug in the corners and then after a certain distance of several steps. The depth of the pits ranges from one to one and a half meters.
A small amount of ASG is poured onto the bottom, then an asbestos-cement pipe is installed. The fittings are placed inside and the cavity is filled with mortar. After the mortar has hardened, the spaces between the pillars are filled with bricks.
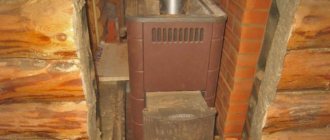
What to consider when choosing a heating device
Each type described above has characteristic advantages and disadvantages. Metal furnaces cool down quickly after stopping operation and require serious protective measures and fencing. Brick ones must be laid on a separate foundation. Electric furnaces are distinguished by the absence of a chimney and easy installation, however, they require a special approach and compliance with all precautions.
Choosing a device depends on individual preferences, the size of the room and the desired result. In any case, you can always consult a professional and ask for help with your choice.
Construction of walls and installation of roofing
The most common material for bathhouse walls is 150x150 timber. The first crown is treated with special antiseptic substances and placed on waterproofing.
More often, the timber is connected “into the paw”. The first crown is checked for the presence of right angles, then the assembly of the walls begins. Each crown is laid with a layer of thermal insulation and connected with iron or wooden pins.
After the walls are erected, the rafters are mounted using metal brackets. The roof of a bathhouse most often has a gable shape. In this case, the rafters rest on the walls and are connected at the top into a ridge. Lathing is installed on the rafters, then steam and waterproofing layers, and insulation. Finally, the roof is installed.
LAYING TILES ON THE FLOOR OF A BATH: CORRECTLY PERFORMING THE COVERING
The quality of the final type of tiled cladding on the floor depends on the technical nuances that should be followed in the process of decorative and finishing work. Compliance with the established technical standards guarantees the quality of the laid tiles even for a novice who does not have the relevant experience as a tiler.
REQUIRED EQUIPMENT
The quality of facing work is a well-chosen arsenal of accompanying tools. Professional finishers have the following technical devices and tools at hand:
- Container (polymer or metal) for mixing tile adhesive. You can use a basin with a volume of 10-15 liters.
- Corded electric drill with the ability to operate at reduced speed. The tool is necessary for high-quality mixing of tile adhesive. An alternative to an electric drill is a screwdriver with a power of at least 14 W.
- Steel whisk. The technical equipment carries out high-quality mixing of glue in a volume of water.
- Putty knife. A technical tool without which it is not possible to evenly apply the tile adhesive mixture. It is advisable to use a device with a width equal to the width of the ceramic tile sheet. A serrated spatula is convenient to prevent excess adhesive mass from being applied to the back surface of the tile.
- Small spatula. Necessary for applying the adhesive mixture over the canvas of the main (notched) spatula. It is enough to have an auxiliary spatula with a width at the base of the steel sheet in the range of 50-70 mm.
- Level with bubble flask. Equipment for monitoring the correct installation of decorative tiles relative to a single horizontal line.
- Jointing spatula. It is required to be used when filling the cracked spaces between the laid tiles with jointing mixture. For good mashing, it is advisable to buy a rubber spatula.
- Tile cutter. Essential equipment for cutting tiles into required pieces.
In addition, plastic crosses are also used. A bag of 50 pieces is usually enough. The elements refer to the type of consumables to ensure equal slot gaps between the tile cladding.
PRELIMINARY WORK
The floor covering is preceded by a number of the following preparatory activities:
- Removing the layer of previous tiles, if any;
- removing residual islands of old glue and areas with cracked screed;
- in the absence of waterproofing, appropriate work is carried out;
- leveling the concrete base by installing a new screed.
The result of the preparatory work is cleaning the room from construction debris and sweeping away dust.
DIRECT WORK
The angle and side in the bathhouse room relative to which the ceramic tiles will be laid is determined. The choice is important because it will determine the presentability of the laid cladding. For professional craftsmen, the area where the facing material begins to be laid is called the “red corner”.
Three tiles without glue are laid out in the selected corner: one directly in the corner, one more on each side of the first tile. This is necessary to determine the state of the corner formed by the adjacent walls. By performing this estimate, you can avoid undercutting other tiles glued along the walls. With an ideal angle of 90 degrees, tiles can be glued close to the walls.
So, after applying the adhesive using a notched trowel, the first tile is laid in the “red” corner. After placing the initial tile, you should press it down a little so that a little of the adhesive mixture comes out on all four sides. The mass of squeezed out adhesive mixture must be collected using a small spatula. Next, a tile is glued on each side of the already laid (previous) one. It turns out that the “red” corner of the floor is tiled. Until the adhesive mixture under the placed tiles has hardened, a level is placed on their decorative surface to adjust all three tiles to the common horizontal line. You can continue tiling the floor along either of the two walls, periodically checking the location of the tiles using a building level.
Don’t forget about the crosses when sticking them between the tiles being laid. The number of crosses is two pieces on each edge of the tile.
The last row of tiles, in most cases, has to be cut using a tile cutter. The cut is made along the glazed side of the tile.
APPLYING THE GRADING MIXTURE
The process is carried out after the tile adhesive has completely set (10-12 hours). The seams are filled with jointing mixture. An alternative option for jointing mixture is tile adhesive. The tile joints are filled completely, without voids inside.
Depending on the color of the glazed surface of the cladding, the appropriate color can be added to the jointing mixture. Work on filling the spaces between tiles is carried out using a rubber spatula. After the jointing has hardened in the seams, a basic wet cleaning of the excess mixture is carried out, and then the coated area is rubbed with a dry rag.
Bathhouses made of wood are considered classics of the genre in Russia - we can say that wood has been the national building material for centuries. Certain architectural and aesthetic traditions have developed that characterize wood as the best raw material for construction.
The bathhouse is rightfully considered an integral part of Slavic culture and an indispensable attribute of its history. Moreover, the concept of “Russian bath” is perceived not so much as a process of ordinary washing, but as a certain custom of bodily and spiritual cleansing. This process of visiting a bathhouse has developed and improved over several centuries.
Interior decoration
First, communications are carried out: electricity, water, sewerage. A drainage well should be dug next to the bathhouse, into which water from the washing room will flow.
When making a floor in a bathhouse with your own hands, you should remember that it must be leaky, that is, have gaps for the passage of water.
Then the walls are insulated and finished with clapboards and electrical appliances are installed.
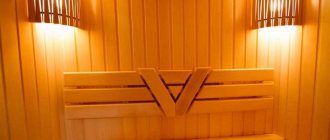
Making shelves right
Previously, we talked about the design of a steam room in a bathhouse, and now we will look at how many levels there should be, their sizes, quantity and on what factors they depend. The best option is 3 shelves located at a distance of 30-40 cm from each other. But it is quite acceptable to limit ourselves to two. If the area of the room is small, to rationally use the space, you can make them retractable and add as needed.
When installing, the professional first determines the shape, and then assembles the frame at an angle or straight. Next, wooden panels are laid on the surface. There must be a gap of 1 cm between the panel boards. For their production, you need to use aspen or linden.
Oven and shelves
The shelf is made of hardwood and mounted on a frame. The stove is installed in compliance with fire safety standards and insulation of the nearest walls and chimney. It is installed on a special monolithic foundation. More often, metal stoves or heaters are installed in bathhouses.
After construction is completed, you can install a table and benches in the dressing room. Place ladles, buckets and basins in the washing room. Prepare brooms.
You can also make many parts for arranging a bathhouse yourself. The best sauna is the one you create with your own hands. It is in it that it will be most pleasant to steam and relax.
How to build a sauna stove
For all sauna stoves there is a single condition, the fulfillment of which is mandatory - lengthening the combustion channel so that the door is located in the dressing room (firewood is placed in it in that room).
The oven door must be in the dressing room
You can install a metal stove by purchasing it ready-made, or build a brick one yourself (it is much better due to its slower heating and long-term heat transfer). The most difficult thing will be to correctly remove the chimney through a wooden roof, insulating it with special metal sheets and vermiculite.
When installing a stove, the most difficult thing is the chimney outlet
Stones must be selected as carefully as possible. They must have the following qualities:
- heat resistance (does not collapse due to temperature changes);
- heat capacity (gives off heat for a long time);
- environmental friendliness (does not emit harmful substances when heated);
- homogeneity and the same coefficient of thermal expansion (foreign inclusions with a different thermal expansion can explode when heated);
- round shape (it improves the circulation of hot air).
The stones should be:
- up to 13 cm for the first layer on the grill;
- up to 9 for the intermediate layer;
- up to 6 for the top layer.
Bath stones should be round in shape
If the heater is made correctly, then unforgettable moments of steam await you.
Russian traditional steam room with heater can be supplemented with dry herbs for aroma
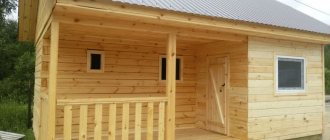
DIY bath photo
Photo gallery of finished frame baths
Here are examples of small frame baths and massive bath complexes, decorated in different styles.
Frame baths are an affordable option for relaxing in dachas. They are distinguished by the low cost of both ready-made buildings and those erected independently. They look beautiful and last for many years.
Recommendations and tips
To facilitate the construction process, it is recommended to follow a few tips, because they can provide important assistance. These include:
- Before you begin attaching a log or beam to the foundation, you need to lay a waterproofing layer.
- It is recommended to fasten the corners in half a tree. This will allow them to be quickly replaced in case of rotting.
- It is necessary to caulk the log house.
- When building a roof, it is recommended to make the “ridge” as high as possible. This will protect the building from the wind.
- When laying the first crown, you need to carefully apply the bitumen mass. It plays an important role, so the layer must be thick.
Cost calculation
How much does it cost to build a bathhouse? Before starting construction, it is necessary to calculate the estimate. This is required to make it easier to calculate upcoming expenses. To do this, you need to make a list of works:
- Creation of a planning bath project. In this matter, you cannot do without the services of an architect. He will independently make and prepare all drawings in accordance with the client’s conditions. A typical bathhouse design 6 m by 6 m will cost 8,000 rubles.
- Foundation. The cost of the necessary materials will depend on the point of purchase.
- Walls and roof. To do this you will need to buy a roofing covering.
- Communications. These include conducting electricity and water. This is one of the most important work during construction.
- Furnace installation.
- Carrying out finishing work.
In addition, funds will be needed to heat the bath and insulate it.
Of course, preparing an estimate and the cost of construction will not show the exact costs, since the prices of the materials used vary.
Undoubtedly, self-construction will cost much less than professional construction (specialized companies require at least $20,000 for the construction of a bathhouse).
Inexpensive mini-baths
Such designs are usually chosen for small areas or with a very limited budget. Mini-baths can be of several types, but they all include a dressing room and a steam room. A washroom or shower room is found only in the largest structures of this type, and in this case it is always combined with a steam room.
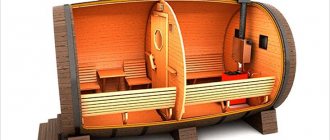
Mini-baths are usually built from boards, logs or timber. They can be built on a wooden frame or mounted on wheels for mobility of the structure. The most popular models of inexpensive mini-baths are barrels. They are convenient, attractive in appearance, and can be installed on a foundation, without it, or on rolling stock.
It is recommended to build mini-baths only in cases of limited space. In terms of cost, due to the peculiarities of size and design, such baths will be equal in cost to frame-tile type structures or those built from cinder blocks.