Various decorative elements can be used to decorate the door opening. Currently, many owners use door frames. Their main purpose is to mask the gap present between the door frame and the opening. Their selection is carried out according to the required texture of the opening. Along with this, its width is taken into account. The color chosen is the same as that of the door structure. A variety of materials are used in their manufacture:
- tree;
- plastic;
- laminated panels made of MDF and veneer.
During door installation, their installation is the final stage of work. They begin only after most of the repair work has been completed, with the exception of the installation of floor skirting boards. Many owners have difficulty installing door frames. How to install them correctly - we will talk about this in this article.
What is a telescopic casing?
In appearance it is similar to a standard door frame. However, there is one feature - a protrusion that is used to connect this element with the extensions and the door frame. The use of telescopic platbands is the best solution in cases where the thickness of the box is several centimeters greater than the wall. The special protrusion that these elements have ensures their tight fastening in the longitudinal grooves of the end of the door frame.
By properly installing these fasteners on the door, you can ensure that they become invisible, and the structure itself acquires a monolithic appearance, durability and strength. But if the calculation of the distance was made incorrectly, then the telescopic trim will not fit tightly into the door frame . As a result, a gap will remain. In this case, the structure will take on an untidy appearance and will look ugly.
What tools are needed for installation?
It is impossible to cope with the installation task with bare hands. Therefore, it is worth stocking up not only with patience, but also with some equipment.
- Roulette. Thanks to it, it is easy to measure the length of the required surface.
- Square. It is a type of ruler that you cannot do without when measuring angles. You will certainly need it when you have to correctly build the letter “G”, and the question arises about 30, 60 or 45 degrees.
- Power saw. If you need to saw off an unnecessary part of a part that will interfere with free access to the opening. But there is no need to rush: this action is irrevocable, and it is better to perform it at the last stage of installation. The saying: “Measure twice, cut once” is more relevant than ever when repairing or installing something.
In addition to these tools, you can’t do without a hand saw (can be replaced with a regular metal saw with teeth), a wooden miter box, a screwdriver, a heat gun and a screwdriver. A well-assembled arsenal is the key to a successfully completed task.
How to make telescopic door frames?
They may vary:
- by size;
- according to its color scheme.
If you want to save on these decorative elements, you can easily make them yourself. In this case, the costs of repair work will be reduced. However, the manufacture of these elements requires the use of special woodworking tools. It will also be useful to have skills in working with such equipment.
Required tools:
- sawmill;
- jointer;
- thicknesser;
- vertical router;
- electric grinder;
- as auxiliary tools: square, ruler, pencil.
Variety of devices
Telescopic products are classified by material and size. Regarding the material of manufacture, the following are distinguished:
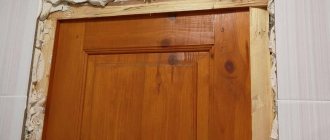
- Decorative planks made of wood. With today's abundance of building materials, wood has not lost its popularity and significance, as it remains an environmentally friendly and versatile material. Wood overlays are suitable for any type of door frame.
Important! The undeniable advantages of wooden components include the possibility of further restoration.
Telescopic element made of wood
- Product made from MDF. These types of parts have a presentable appearance and imitate wood. The coating can be varied, but the most common is laminated paper. However, such a coating is afraid of dampness, so washing it is strictly prohibited;
- Plastic. This type of material has recently begun to be used for the manufacture of decorative overlays. But thanks to its moisture resistance and accessibility, it quickly gained popularity. It is worth noting the extensive color palette of the material;
- Ceramic linings are used only when the interior of the room is finished to resemble natural stone. Such elements are intended for decoration and are in little demand due to limited use.
The size of a telescopic device is determined only approximately, especially if we are talking about the telescopic version of this device. Extensions and trims can always be cut perpendicularly and longitudinally. Telescopic dimensions are characterized by final figures that practically do not differ from the generally accepted ones. The width of the decorative strip is from 60 to 80 mm.
Important! The width of the platband shelf embedded in the groove is constant and equals 40 mm on the outer side.
The set includes trims of standard length. Telescopic extensions have a variety of widths, and the length is identical to conventional trims.
Material selection
For the manufacture of telescopic platbands, only well-dried boards are selected. If you do not comply with this requirement, then the products installed on the doorway during operation will fail. The degree of listening to the material is determined by the sound . To do this, you just need to tap the board with your finger. A dull sound indicates that the board is not dry. If it is sonorous, then such material is optimal for the manufacture of these decorative elements.
When choosing a material for a door trim, you need to pay attention to the color. It should be uniform. If there are blue spots, it means that the technology for drying the boards was broken. This can be hidden only by painting the trim with opaque paint.
Please note that the board intended for making door frames must not have knots. If they exist, this will worsen the aesthetics of the platbands, and in addition, the risk of fracture of the product at the location of the knot will increase.
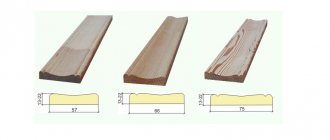
Panel classification
Depending on the properties of the material and design features, there are different options for choosing a platband.
- Decorative model. A plate approximately 6 cm wide will do.
- Semicircular type. Width - 7 cm.
- Curly plank. Dimensions depend on the complexity and geometry of the decor.
This is also worth considering so that it does not rest against a wall or furniture if the opening is located too close to the interior details. When buying a frame, you need to take into account that its size must be greater than the length of the box.
Manufacturing
When the material for the manufacture of door trims has been selected and the necessary tools are at hand, then you can move on to the active phase of work on the manufacture of door trims. First, the workpieces are cut to size , which must be determined in advance. Their dimensions are selected individually for each door product. Note that a high-quality result is possible only if there are cutting knives on the machines used for work.
When the door trim is ready, it is sanded. This work is carried out in two stages:
- the first is performing rough grinding using an electric machine;
- the second is manual processing, during which they resort to the use of fine-grained sandpaper.
It should be noted that at the second stage it is necessary to remove circular scratches that occurred when working with an electric machine. When the platband is ready, it is covered with a layer of protective composition.
DIY installation: step-by-step instructions
It is not difficult to install the platbands yourself. You need to act wisely, taking into account the rules and nuances of installation. The most commonly used are plastic and wooden planks. The order in which they are installed will vary.
Plastic
The installation of plastic strips has its own nuances. Installation is carried out as follows:
- Measurements are taken and markings are applied to the mounting profile.
- The workpieces are cut at an angle of 45 degrees. To do this, use a power saw or grinder.
- Fasten the mounting profile to the wall with self-tapping screws.
- Measure the facial profile. In this case, the thickness of the connecting elements is taken into account.
- Vertical strips are cut at an angle. Fix them on the mounting profile.
- Connecting elements are inserted into the ends of the vertical cut products. A horizontal board is sawed off on one side and inserted into the profile. Mark the place for cutting the second end.
- Cut the front profile at an angle of 45 degrees. They put him in his place.
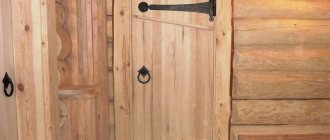
Wooden
Wooden frames are most often used. Their installation is carried out according to the following algorithm:
- Clean the surface of the doorway from the mounting foam with a knife.
- Indicate the places where the planks are attached.
- Vertical strips are applied to the marks and marks are placed on them for cutting. Saw off at the desired angle.
- Vertical trims are attached.
- Apply a horizontal strip, mark the cut points, cut and install.
How to attach platbands to a door?
There are four main methods that can be used to attach door frames:
- using finishing nails;
- using liquid nails;
- fastening with self-tapping screws;
- fixation with fasteners called “beaks”.
Fastening with finishing nails
This method is one of the most popular. Its use has certain advantages: if the need arises, the platbands can be easily dismantled . The process of attaching elements to the door using this method is simple and quite reliable.
To secure the trim to the door, you need to select nails that have a flat head of small width. Calculating the length is not that difficult. They should fit into the door frame to a depth of 1.5-2 cm. The average length of finishing nails should be 4 cm.
Liquid Nails
This type of fastener is a special adhesive composition in tubes. It is easy to fasten elements using it. All that needs to be done is to apply the adhesive composition from the back side to the platbands immediately before fixing it. After this, the element is pressed against the door. You should hold it for a few seconds, after which it lowers. This completes the work.
This method also has its advantages. The main thing is simplicity and speed of work. In addition, when using liquid nails, no traces remain on the front side of the platband. But it also has one drawback. The procedure for dismantling products secured in this way is quite labor-intensive. The fastening reliability is not high enough.
Self-tapping screws
This method of fastening is quite simple and reliable. Every year it is used by more and more owners who have a need to install trim on the door opening. If platbands made of wood are attached, then special wood screws are used. The diameter of the fastener is 6 mm, and its length is up to 2.5 cm.
Before attaching the screws, mark a place for them . Next, small diameter holes are drilled.
High-quality performance of this work is a guarantee of reliable fastening and protection of the wood from splitting when tightening the screws. So that when installing these elements in this way, the head of the screw is less noticeable, it is completely recessed into the wood, before drilling a small recess in it.
Installation algorithm
First of all, the universal slope is assembled. Installation of this part is provided around the entire perimeter of the doorway. For wear-resistant fastening, it is advisable to use a starting molding into which one end of the slope is inserted. The second is attached to the sheathing with mounting screws. Thus, in the corners the slopes meet each other, as a result of which an imaginary letter “L” appears at an angle of 45°.
The next step is to install the telescopic casing directly. Before you begin full installation, you need to cut it down with a hacksaw or electric saw. The cut should be done from the front side. This will help to avoid unevenness and the work will be done accurately. The front part (“nose”) of the extension must be on the same surface as the mounting groove. After cutting, you need to cut off part of the shelf, and be sure to treat the joints with a heat gun. If you can’t use hot glue, you can safely use any other glue. The main thing is that it is colorless. After this, the frame is ready for installation. The spout must be inserted into the mounting groove, and the other end must be secured with screws. The finishing ends with the installation of façade elements, which are attached in the same way to the sheathing or wall if the casing is installed on a window.
Elimination of defects
An unpleasant moment is the visibility of the nail head or screw. They are slightly recessed into the body of the cash, and sealed on top with sealant of the desired color. You can use a wax corrector.
On uneven walls, due to the curvature of wooden planks, joints diverge. During installation, the joining elements are additionally connected with a finishing nail.
Wide strips from 100 to 120 mm help to hide large defects around the door frame.