Often a metal stove is installed to heat steam rooms and other bath rooms. The design is compact, but quickly warms up the rooms. Not every owner can buy a good factory unit, so many owners with minimal skills in working with an angle grinder and a welding machine have learned to assemble such a stove themselves.
A furnace made from a large-diameter pipe is characterized by good reliability and a long service life. We’ll look at how to make it at home in our article.
What is needed to assemble the stove?
The steel from which the pipe is made should not be alloyed or high-carbon. This material has a negative effect on welding seams. After boiling them and subsequent cooling, cracks may appear, which will lead to deformation of the oven. The most suitable steel grades are St10 and St20.
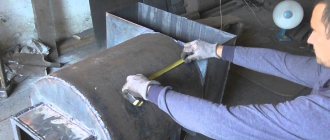
You need to determine the exact dimensions of a vertical pipe bath stove with your own hands, based on the size of the room itself. Ideal pipe dimensions for a bath:
- diameter - 50-55 cm;
- thickness - 0.8-1.2 cm.
Required material:
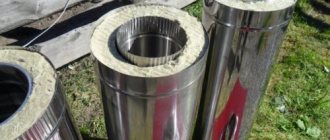
- steel pipe, with a diameter of 50-65 cm, a length of 120-150 cm and a wall thickness of 0.8-1.6 cm, for a water tank and firebox;
- another, 35 cm in diameter with a wall thickness of 0.5-0.8 cm for laying stones;
- another one, with a diameter of 12-15 cm and a wall thickness of 0.2-0.4 cm, for the chimney;
- cut low-carbon steel reinforcement for grates, with a diameter of 1.2-2.0 cm and a length of 50 cm;
- asbestos cord - needed to seal the doors;
- metal sheet for doors, 0.4 cm thick;
- door handles;
Required tools:
- electric welding machine;
- locksmith tools;
- drill and grinder.
Why is it important to make a vertical sauna stove with your own hands from a 530 mm pipe with a wall 0.6 cm thick? A pipe of this diameter has been tested by hydropressure testing. This will help create a stove without holes or burnouts.
Suitable pipe sizes
Steel pipe as the main raw material for the furnace has a number of advantages. Among them:
- resistance to damage;
- good level of heat transfer;
- rapid heating of the room;
- minimal expansion when heated;
- use of any type of fuel;
- minimum number of welds.
The disadvantages of a metal stove are the same rapid cooling of the room as heating, uneven distribution of heat in the room. To eliminate them, the stove is often lined with bricks.
530 mm
For a steam room of standard sizes, a pipe measuring 530 millimeters is good. A stove made from it will be quite powerful; the wood will burn for a long time, providing good performance. Available in horizontal and vertical versions.
640 mm
A good material option for a large steam room in a bath complex. The large firebox allows you to place a lot of firewood at once, increasing the break between loads to 8 hours.
426 mm
This diameter is enough for a small steam room in a seasonal building, where bathing procedures are combined with washing or dousing with cold water in one room.
It is important to note that cast pipes without seams are an excellent option for small furnace parts; their diameter does not exceed 250 mm. To make the main part of the furnace, it is better to take pieces of spiral pipes - they are reliable and will cost the same as scrap metal. If you can’t find these, you should take straight-seam ones.
Assembly instructions
The entire assembly must be carried out in accordance with the drawings to avoid complications and errors. This design may cause slight difficulties during assembly, since there will be a section for laying stone in the firebox compartment.
- The bottom of the pipe is welded with a piece of sheet metal.
- At a distance of 1-2 cm from the bottom, a 24×8 rectangular window is cut out for the blower. This will give oxygen access to the fuel combustion compartment and where the ash is removed.
- At a distance of 15-20 cm from the upper part of the ash pan, another hole is cut for placing fuel. Its size will be 20-24 cm. Special thin disks are used.
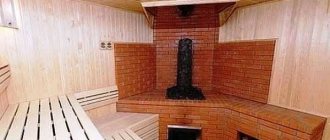
- On top of the firebox there is a chamber into which stones are placed. A round hole is cut at a distance of 12-18 cm from the top of the combustion compartment. Note: the round hole should be 35 cm in diameter, the offset around the circumference of the pipe will be 900.
- The other, with a diameter of 35 cm, is cut to a length that is equal to the outer diameter of the larger pipe. The upper segment is cut by ¾ in the form of a “scapula”, to the border of the anterior edge.
- A blank wall is welded to the rear end, and a plug with a door is welded at the bottom to the front end. Stones will be laid through it and water will be poured in to create steam.
- The cut “blade” is inserted into the hole in the main pipe. Its outer protrusion should be 2-3 cm. There should be a gap inside along the entire perimeter that is completely welded. To enhance the stability of the structure, rods are welded to the body.
- Based on the diameter of the main pipe, a rounded piece is cut out of sheet steel. To fix the grate bars, rectangular holes are cut in a cut out round piece of steel;
- The firebox is welded into the main pipe, parallel to the floor, 2 cm above the upper edge of the vent hole.
- The base of the blower is cut out of metal, based on the outer diameter of the main pipe. Legs are welded under the heater to hold it. Then weld to the bottom.
- The main pipe is the wall for the water heating tank.
- In the cut out bottom of the tank, a compartment is made for the chimney from the edge 3-5 cm.
- A piece of chimney pipe is welded into the hole, protruding at a distance of 10-12 cm.
- The bottom of the tank is installed on the main pipe. Then it is welded 10-12 cm above the stone compartment. The chimney should be located to the side of the “blade”.
- The bottom of the tank is completely scalded. A hole is drilled at the bottom for supplying a water pipe.
- To make a double tank lid, 2 semicircular parts are cut out. One is completely welded, and the other serves to open the tank and is attached to hinges.
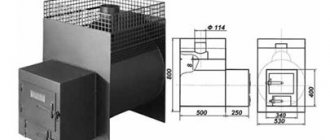
- The result should be a stove like this:
Video description
An example of a vertical stove with a closed, insulated heater is shown in the video:
Above the heater, a water compartment is fenced off with another horizontal spacer and equipped with a tap. Since the water in the “blackie” pipe quickly becomes red from rust, it is often replaced with a stainless steel tank.
Without special electrodes and skills in such work, it is difficult to qualitatively weld ferrous metal with stainless steel. It is better to buy a ready-made tank with a section of the chimney already installed in it and place it on the heater.
Tank for installation on a stove Source prom.st
If space allows, the water tank can be installed separately, connecting it to the firebox with a piece of pipe. One end of it is welded to the wall of the firebox, and the second open end is inserted into the tank, into the lower part of the side wall.
Chimney installation
The chimney is an important component for removing combustion products.
They come in three types:
- Ceramic. A ceramic chimney has the longest shelf life. Maximum resistance to high temperatures.
- Brick. Due to its rough surface, a brick chimney quickly accumulates soot and slows down air draft.
- Steel. A steel chimney is most suitable for a bathhouse due to its affordable price. Also, due to the rapid heating of the metal, a tank is installed and then used for procedures. A stainless steel chimney is the most current. This material is not afraid of water, high temperatures, is not susceptible to corrosion, is lightweight, durable and cheap.
Build process:
- Before installation, you need to mark the location for making the hole.
- A galvanized steel casing is installed on the pipe, after which rings are put on and fixed to the ceiling. The lower pipe is secured with self-tapping screws. The clamps securely fix the chimney.
- The second part is installed on the roof. The holes between the roof and the chimney are filled with expanded clay, clay or asbestos.
conclusions
The level of tilt of the body does not affect the operation of the stove. Therefore, you can install it arbitrarily. It is possible to treat the chimney with a high-temperature compound. This will help eliminate the metallic smell. After several fires, the pipe burns out and turns red. No further oxidation of the metal occurs.
As you can see, you can build a horizontal stove for a bathhouse yourself, if you get acquainted with the main stages of work and the features of preparation. It is important to choose the right materials and find all the necessary tools. If you have basic welding skills, you can make an effective structure that will last for decades.
Recommended Posts
DIY cellar
Wall mounted metal shelves
How to make a birdhouse with your own hands
How to make a swing nest with your own hands
How to make a cellar lid with your own hands
How to make a fountain in your country house
Advantages and disadvantages
A significant advantage of a vertical stove over a horizontal one is its compactness, which allows it to occupy a minimum area in the bathhouse. Suitable for small spaces.
Other benefits include:
- saving money on investments;
- metal, as a reliable material, has excellent mechanical strength and can withstand temperature fluctuations that do not affect this property;
- Sufficiently thick walls of the material provide high heat transfer. After complete combustion of the fuel, heat is retained further;
- the rounded section of the pipe provides powerful heat distribution and the formation of the necessary draft;
- quick heating of the room in less than 1 hour;
- a metal stove will last more than 10 years if its manufacturing is done skillfully;
- The cylindrical shape of the pipe will eliminate unnecessary right angles and long welds. The main reason for the appearance of corrosion and holes through which carbon monoxide leaks is precisely the welds.
The main and common disadvantage of metal construction is that it is more susceptible to corrosion.
What metal is suitable
When selecting and inspecting metal pipes for a future furnace, it is important to pay attention to the following details:
- strength of the metal workpiece;
- pipe thickness;
- no defects or severe metal corrosion.
To eliminate defects, you need to weld patches of a suitable size in problem areas with a small margin.
As for the composition of the metal, it is not recommended to use alloy steel or steel with a high carbon content. The permissible carbon content in steel should not exceed 2%.
You can determine whether a metal is high-carbon or not by the appearance of sparks when grinding with sandpaper or an attachment on a grinder or drill. A high carbon content is indicated by white sparks like stars that pour in different directions. Low carbon content is indicated by yellow sparks that fall in a straight line. Alloy steel produces orange, bright red sparks.
The stove can be made either from a round pipe for a bath or from sheet metal. If in the first case the shape will be close to cylindrical, then in the second the furnace unit will be rectangular.
By choosing a round pipe as a blank, bathhouse owners receive a number of advantages:
- The pipe is easier to work with. Essentially, you have a ready-made firebox at your disposal that does not need to be cut.
- Economical material consumption allows you to reduce money expenses.
- In a round oven, the process of heat and air exchange is many times more efficient.
- The service life of a round stove is longer than a rectangular one made of sheet metal.
In addition to selecting the material, it is important to develop a drawing, a diagram of the future product, indicate the location and method of fastening all structural elements. This will simplify the assembly process of the unit.
Important Tips
- To prevent heat from leaving the stove container, an opening valve is installed on the edge of the chimney.
- A fire can be caused by a huge accumulation of soot. To do this, two holes are drilled in the pipe. Steel tubes are inserted into them and turned towards the pipe. This prevents the appearance of soot. The fuel will burn completely, and soot accumulation will be minimal.
- After completing the construction, it must be checked for holes, gaps and cracks.
- There should be no objects around the stove that are susceptible to fire: synthetics, wood and fabric.
- All cut edges of pipes and metal sheets must be cleaned of sharp edges to avoid cuts. If you do not have experience in correctly installing a chimney, then it is better to contact specialists.
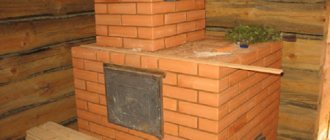
- The installation of this furnace should be done on a finished concrete foundation, its height is 250-300 mm. Brickwork with clay mortar is laid on it in one or two rows. A brick screen will protect the walls from overheating.
Garage
The next most popular class of pipe and stove homemade products is garage stoves using waste motor oil. With the current price situation, it is more profitable to collect waste, store it, and use it for heating in the winter, no matter how much the firefighters snort. A well-known example of such a furnace is shown in Fig. Let's briefly recall how it works; diagram in the inset at the top left.
Garage furnace made from pipes
In the fuel tank (“lower pan” in the figure), the oil burns with an air flow metered through a hole with a damper (air throttle). The heat of the flame is almost entirely used to evaporate the fuel. Air flows freely into the “pipe with holes”, the “burner”. Here, in a gasifier with a combustion chamber, combustion intensifies and pyrolysis of oil vapor occurs, resulting in the formation of a mixture of light combustible gases.
Pipe stove in production for a small garage
The lightest fractions burn out immediately, and the remainder burns out in the “upper pan” - the afterburner. Afterburning generally occurs in 2 stages; so that they do not interfere with each other and do not spoil the efficiency of the furnace, the afterburner is divided by an incomplete partition. What such a furnace looks like in metal is shown at the bottom left in Fig.
A two-chamber furnace made from exhaust pipes develops a power of up to 18-20 kW with rather modest dimensions; it can heat a garage for 2 cars measuring 7x8 m. In a single-box garage for a family/budget car, a single-chamber stove with a power of up to 5-7 kW is more suitable; it requires less work.
Thanks to the reduction in power, it was possible to reduce the entire heat path into one reactor column, for which a 150 mm gas pipe was used, see Fig. on right. The reservoir is made from a 5-liter propane cylinder, but its dimensions are not critical. The reservoir from the stove described above is also quite suitable here.
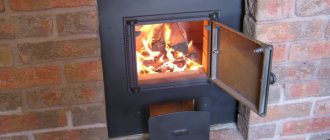
Trial fire
- Before using the stove, you need to conduct a test firebox, which will test the entire structure for the tightness of the welds.
- The damper opens and the air vent opens. Afterwards, a small pile of firewood is made and set on fire. The door is closed and oxygen is supplied to the upper compartment.
- Complete heating is observed, the presence of traction is observed and the seams are checked for tightness.
This is how this sauna stove is made cheaply and practically. Every person can afford such a simple luxury.
What about the kitchen?
Generally speaking, a pipe is not suitable as a workpiece for culinary ovens. It is too heavy for portable summer cookers, and it is definitely not suitable for preparing truly oven-baked delicacies, because... not brick or clay. However, making a stove for a cauldron from a pipe makes complete sense: a heavy base will give the entire structure additional stability.
The vertical design is suitable for a large boiler, and the horizontal design is suitable for several smaller ones at once. The latter is useful in livestock farming. For example, to wash the udders of cows and the paws of poultry, hot water is needed in small quantities, but for quite a long time. 2-3 replaceable pots will ensure its continuous flow, incl. and on summer pasture/grazing: a stove made of a pipe of this size can be carried in the trunk.
Video: example of the simplest outdoor cooking oven made from a pipe
Construction of a potbelly stove
Structurally, a brick potbelly stove is similar to a conventional stove, but is more compact in size. Like a standard stove, a potbelly stove can be used not only for heating a room, but also for cooking.
Materials for creating a furnace
When building a potbelly stove, the following materials are needed:
- ordinary red and fireproof (fireclay) bricks;
- steel or cast iron grate;
- doors for the firebox and ash pan;
- cooking panel;
- chimney pipe;
- waterproofing material (roofing felt);
- asbestos cord;
- steel wire;
- metal plate (thickness 4-5 millimeters) for afterburning;
- heat-resistant mixture for mortar.
Oven base
First of all, you need to prepare a rigid and durable base. If the room has a concrete screed, this is enough. If the floor is wooden, you will need to strengthen the base by creating a foundation. Moreover, the foundation should be at least 10 centimeters wider than the base of the potbelly stove.
Base for a stove in a wooden house
- dismantle the surface area under the foundation;
- We dig a hole 300-400 millimeters deep and fill it with a layer of sand (layer thickness - 60-70 millimeters);
- lay a layer of crushed stone on top of the sand;
- we put a mesh of reinforcement;
- we make wooden formwork (it should be about 100 millimeters above the floor level);
- pour concrete, bayonet it with shovels;
- level the screed and let it dry.
Drying lasts 2-4 weeks. Starting from the second day and during the first 7 days, you need to water the screed with water to prevent it from drying out. After the screed has dried, waterproofing (roofing felt sheet) is placed on its surface.
Even if a foundation is not required, a foundation for the masonry is required. To do this, asbestos material is placed on the boards and a polyethylene film is placed on top of it, which is covered with sand (up to 10 millimeters). You can start laying from the top.
Masonry process
Rules for laying bricks:
- On the first row, we apply mortar only from the end parts of the bricks. There is no need to connect the brick with sand. First we lay the first row dry and level it strictly according to the level. To keep the sand in place, it can be covered with a baseboard.
- On the second row we install the blower door. We place it on a layer of mortar and attach it with wire. An ash chamber is formed behind the door.
Installing the blower door
Installation of grate
Installing a damper on a chimney
After forming the last row, we begin laying the chimney (2-3 rows), to which we attach a steel pipe. The chimney is vented to the street. We insulate the pipe with a 200 mm layer of mineral wool.
Let the oven dry
After condenser fumes stop appearing on the potbelly stove doors, you can carefully begin operating the stove to allow it to dry completely.
Finishing is carried out with a clay solution. Then the potbelly stove can be tiled or whitewashed.
Features of horizontal equipment
Typically, craftsmen make sauna stoves from metal pipes 500 or 530 mm in diameter. We use both used metal and custom-made scraps. The longitudinal option involves only the use of rounded blanks. This is not an axiom, but this geometry provides additional heat transfer.
The mass of the unit depends on the thickness of the metal and most often ranges from 50-200 kg. Even the most massive structure is not too heavy, so a powerful base is not required. This can also be added to the list of advantages. Usually, to install a tubular furnace, a small metal frame mounted on a heat-insulating layer is enough.
Drawings and options for making a stove for a bath from a pipe
Since we decided to devote a separate article to the intricacies of making a sauna stove from a pipe yourself, the main steps will be discussed here in the most general terms. Our task is to clarify what options are available and where they are most effective.
In principle, there are only two ways to use a pipe : either vertical or horizontal. Everything else will be solely a search for the optimal ratio between the volume of the firebox and the heater, variations in the method of heating the stones - flow-through or insulating the stones from fire , etc.
in favor of horizontal placement of the pipe : when wood burns longer, it releases more heat, burns more completely, and all together can be briefly called: higher efficiency . More information about wood stoves here.
However, it is believed that a horizontal stove is not suitable for small steam rooms. Well, that's a moot point. Of course, the quarter of a square meter that a vertical stove will occupy will be smaller than a horizontal stove, but only the owners of very tiny steam rooms have no choice. But here another question arises: won’t the power of a vertical stove for a miniature steam room be too big?
Another advantage of a horizontal stove is the firebox located in the dressing room. There will be more cleanliness, but here everyone decides for himself what is more pleasant for him: running to the dressing room or cleaning up the dirt in the steam room.
The vertical one is suitable for those who would like to combine a stove with a hot water tank - this is easiest to do on the vertical - just separate the tank from the heater with a partition, and not only the heater will heat the water, but also the chimney passing through the tank.
The main advantage of a vertical stove will be a closed heater , because horizontal ones are usually made with an open one, and this is not good for lovers of Russian baths, who should pay attention to a separate article.
Vertical oven
Most often this is a three-part design, divided inside by welded disks. It highlights:
- firebox;
- closed heater;
- container for water.
Furnace structure: ash pan, grate, combustion chamber. Grate bars can be found on sale, or you can weld them yourself by cutting a frame along the diameter of the inner circumference of the pipe, and then welding rods to it. It is better to make the ash pan retractable, in the form of a scoop - by pulling it out during the combustion process, you achieve an increase in draft . Instead, you can make a door on the blower.
The chimney is located vertically, it passes through the tank. This is good, because part of the heat of the gases has time to be transferred to stones and water .
The heater , as already mentioned, can be flow-through ; in this case, between it and the combustion chamber there is only a grate, like a grate at the bottom of the firebox. In this case, the stones will heat up more and deteriorate faster, but the steam will be excellent.
There is an option to weld a piece of pipe of smaller diameter transversely inside the vertical pipe and make a door. This is a closed heater , insulated from the flame. You can feed without waiting for the firewood to completely burn out (in the previous version you will have to wait).
It is worth placing a cut-off device - a rectangle with rounded corners, allowing furnace gases to pass only along the walls. The cut-off valve is located below the heater .
Video on topic
Video demonstrating the manufacture of a simple vertical stove
Horizontal oven
Stove in a bathhouse made from a horizontal pipe
The structure does not change, only the form changes. The frame for the grate is made along the wall, and not across . In the simplest version, a mesh for stones is made on top, which makes such a stove suitable for a sauna, but not for a Russian bath. Because there are two disadvantages to an open heater:
- strong convection, overheating the bath, preventing the creation of a “steam cake”;
- the impossibility of heating stones to temperatures at which finely dispersed “light steam” is formed.
In other words, the pipe body is purely a firebox , on which a mesh for stones and a water tank are hung from the outside. !A separate article is devoted to stoves with a water tank.
BY THE WAY! You should not vent the chimney through the end of the pipe - in this case, the stove gases will escape faster, taking heat with them and reducing the efficiency of the stove.
Video on topic
A video demonstrating the manufacture of a rather complex horizontal stove. You will get an idea of all stages of work:
Types of structures
They differ in structure and operating principles. Let's look at each type in more detail.
Open
The stones are laid on top of the stove structure and are not covered with anything. Due to this, the steam room warms up faster, reaching temperatures of up to 100 degrees. But the humidity in the room is low, so the heat turns out dry.
The product consists of three parts:
- fireboxes;
- compartments for stones;
- containers with water.
There should be few stones, otherwise the top layer will not warm up well and the steam room will not be warm enough.
To increase the level of humidity and the release of water vapor, the hot stones are simply watered. One or two ladles will be enough - this will give up to 15% humidity.
To increase the level of fire safety and reduce the risk of burns, it is recommended to lay fire-resistant bricks around the walls of the furnace or make a partition made of wood.
To heat a sauna, it is important that as much of the stove area as possible is in contact with the air space. This contributes to faster heating of the air in the steam room
Closed (lined with brick or stone)
If wood fuel is chosen for heating, you will have to prepare large reserves in advance. Such a stove takes a long time to reach the desired temperature, but, having reached the desired level, gives good heat transfer and retains heat for a long time.
Closed structures are great for large baths, where there is not only a steam room, a wash room, a dressing room, but also a relaxation room.
One of the advantages is closed stones. Therefore, there is no risk of getting burned.
In factory economical models, the stove has a double casing with a gap for air exchange between the walls.
Combined
For most manufacturers, the design consists of a high box with gratings and double valves (performs the function of a firebox). A chimney pipe emerges from the neck of the box. Stones are placed in the neck here.
There are devices available for sale with combined fuel types:
- gas-wood;
- electric wood-burning.
They do not need to be constantly monitored. Simply adjust to the desired temperature.
By design they are divided into 3 types:
- Monoblock. With heat exchanger, combustion chamber. Gas burner of a fixed type, covered with a steel sheet.
- Paired. They have two separate combustion chambers for wood and gas.
- Reconfigurable. Universal device. Can be modified for each fuel.
The first two types do not need to be reconfigured, since you can switch from one type of fuel to another.
Gas is used as main gas or liquefied in cylinders.
The electric-wood-burning design allows you to successfully heat the bathhouse using electricity or wood (optional). Moreover, firewood is considered the main raw material. When they burn out and the temperature drops, the electric heater automatically starts working. There are two heating elements on the sides of the product. Such stoves operate on a 220 W network, with a three-phase voltage of 380 V.
The owners can choose which fuel to heat the bathhouse with. But such designs are many times more expensive than simple wood-burning stoves.
Varieties
There are several types of chimneys. They are classified depending on their location relative to the furnace itself:
- Mounted pipe. Due to its simplicity of design and ease of installation, it is perhaps the most common. The mounted pipe is mounted directly above the heating structure, being its continuation. Often installed on cast iron or small sauna stoves.
- Root chimney. Such a pipe is mounted next to the furnace on its own foundation, closely adjacent to one of its sides. The basic structure is convenient to use for multi-story buildings, where several heating elements on different floors can be connected to one chimney. For such cases, an accurate calculation of the parameters is required, otherwise the chimney will not provide the necessary draft.
- Wall pipe. Built into the external or internal main wall of the house. The external version should be carefully insulated, since due to the difference in temperatures inside and outside the structure, condensation can accumulate in the chimney, leading to the accumulation of soot and a decrease in draft.
We recommend that you read: How to prevent clogging of storm drains - routine cleaning and prevention
Based on their location to the building, chimneys can be divided into internal and external:
- Internal chimneys provide good draft, but are more difficult to install because they require transitions through the ceilings and roof.
- External chimneys are more convenient in terms of installation (especially in an already built residential building) and maintenance. It is not always possible to give such chimneys an aesthetic shape. In addition, the external surfaces of the structure need to be insulated.