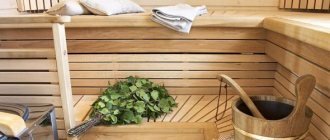
Furniture for a bathhouse differs from any other not only in its purpose, but also
in the materials used. A bathhouse needs a certain set of furniture, which should include a table, shelves, and wooden benches. When choosing pieces of furniture for a bath, its specific features, such as a high degree of humidity, should be taken into account. The heat and moisture inherent in a bathhouse impose special requirements on the choice of material for furniture:
- good humidity tolerance;
- the ability of furniture to withstand high temperatures;
- low heat conductivity;
- the material should not emit toxic compounds hazardous to health.
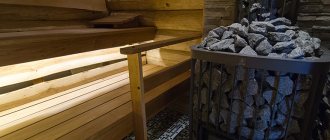
The most suitable materials for bath furniture
Based on the above requirements, the most suitable material for a bathhouse is wood.
- Conifers.
Pine and spruce are not suitable, since their wood is resinous, and the resin softens when the temperature rises and heats up. Hot resin can cause burns and also stain the body. There is an option when resins are removed from pine, but as a result of this process there is a significant increase in the cost of the wooden material. Independent de-resining is a long and rather difficult process, so it would be more correct to choose wooden furniture pieces made from deciduous trees for the bathhouse.
If you really want it and have the means, then the ideal furniture option for a bathhouse is a luxurious cedar interior. Cedar wood is not rich in resin, the texture is most suitable, but the cost is quite high. The advantages of bathhouse furniture made from Canadian cedar include the provision of a significant healing effect on the body through the release of essential oils from the wood as a result of its heating. Such oils perfectly disinfect, deodorize and have a beneficial effect on the skin and respiratory system.
Furniture made from Canadian cedar has a beautiful texture, high strength, a very pleasant aroma and has a beneficial effect on the human body.
- Hardwood.
With all the variety of deciduous species, preference as a material for furniture should be given to aspen and linden. These species have wood of a pleasant light shade, which can withstand changes in temperature and humidity well, without losing its original shape. In addition, linden has a pleasant smell and is easy to process due to its softness. Among the disadvantages of linden, there is susceptibility to infection by fungus and rot, to combat which chemical compounds are used, which are very undesirable in a steam room.
Linden furniture has a pleasant aroma, has a healing effect, is easy to process and does not heat up.
Aspen wood is also light at first, but after some time it begins to darken. Aspen was previously used to make the top of wells, as it is well preserved in high humidity and does not rot. The downside is that wood fibers wear out, leading to dents and abrasions. The cost of aspen lumber is very low.
Aspen furniture is easy to process and is highly moisture resistant
- Exotic breeds.
As an exotic material option, you can use abashi wood, which grows in Africa. Its color shade changes as the temperature around it rises: from milky or light yellow to dark brown. At the hottest temperatures in the steam room, this wood does not heat up above body temperature, so there will be no burn from it. The downside is that this material is not cheap.
Abasha furniture is ideal for a steam room, does not heat up and does not accumulate moisture
If we talk about wood species for other rooms, then for the washing room you need species that respond well to humidity, for the locker room and rest room - any.
Design possibilities
Despite the fact that bath furniture has mainly a utilitarian purpose, there are some possibilities for its design. To ensure that the benches do not stand out from the general style, you can use the following finishing techniques:
- In a traditional Russian bathhouse, massive benches made of logs would be appropriate, and the bench in the dressing room can have a simple shape, and the back of the bench in the rest room can be decorated with carvings. Wooden barrels and tubs will serve as a harmonious addition to the interior.
- A country-style bathhouse will be decorated with a bench, the seat of which is made of boards with uneven edges. Here it is important to ensure that the bend is comfortable (for the back this does not matter). Benches with backs can be complemented with massive armrests.
- Benches intended for saunas have a strict shape, a carefully polished surface, and they try to choose light wood for manufacturing. Such structures are attached along the walls, and the side surface is covered with boards (in the sauna the steam is dry, so ventilation is not so important).
Table and benches in country style Source nikastroy.ru
What items should a bath furniture set consist of?
You need to focus on individual tastes and financial capabilities, but there is a certain standard minimum.
- Shelves must be made in the steam room of the bath. They can have different shapes and sizes: single-stage or have several steps; located along the walls of the bathhouse or be in the shape of “G”, “P”. Wooden headrests and footrests are often placed in the steam room. Due to the fact that the place where they steam is small, it does not need to be cluttered with unnecessary objects, as they will serve as an obstacle to the movement of air. For convenience, you can add a small bench to place basins and ladles and attach hooks.
Shelves are the most important component of a bathhouse interior and making them yourself is absolutely simple and inexpensive.
Types and shapes of shelves for baths - The washing compartment of the bathhouse should be equipped with a shelf, and benches of various configurations and sizes can be made.
Details such as stools for tubs, buckets and other bath utensils would be useful here. Place a hanger away from possible splashes. Scheme and drawing of a bench for a wooden bath
Variety of designs and requirements for them
The word “bench” often serves as a collective name, although in any bathhouse, strictly speaking, there are three types of structures. They have a lot in common, although there are differences:
- Bench . A bench in a bathhouse usually means a portable seat (although there are both portable and stationary options).
- Bench . A seat with or without a backrest, but then adjacent or attached to the wall. A bench, as a rule, is a stationary object.
- Shelf (or sun lounger) . A seat or lounger with strictly defined dimensions is installed exclusively in the steam room. The design of the shelves (emphasis on the last syllable) is extremely varied. There are stationary, removable options, as well as their varieties: tiered, folding, folding.
The terminology is not strict: a bench can be used as a shelf in a steam room. However, no matter what the bathhouse bench is, there is a set of requirements that are the same for all bathhouse furniture. One of the main ones is safety and the associated sustainability.
Bench and benches in the recreation area Source homeli.ru
To prevent a person sitting on the edge of a bench from turning over with it, the structure must have the correct proportions, be low enough, and have a comfortable wide seat to distribute the weight. The weight of the product also plays a big role in stability. In addition to safety, the following qualities are important:
- Two interrelated qualities: functionality and convenience . The size of the furniture plays a big role here.
- When creating bath benches and sun loungers, design is not important : traditional simplicity of forms is welcome.
- Reliability . A lot depends on the design here. For example, a bench in the form of a board with two supports will quickly sway under the weight of those sitting and fall apart. The structure must be strengthened with the help of spacers between the legs, installation of additional (intermediate supports), and braces.
- Durability . You should not use too massive boards to make bath furniture: they absorb more moisture, take longer to dry, and are more difficult to dry properly.
Corner bench in the washing room Source dekoriko.ru
Making bath furniture yourself
Basic drawing of a table for a bathhouse: all dimensions can be changed and adjusted according to individual needs
You can make simple bath furniture with your own hands if you follow the tips. Self-production will allow you to realize all your wildest fantasies and optimally use the space of the bathhouse, maximally designed for comfortable relaxation, following your tastes and preferences.
Bath shelf drawing
First you need to decide on the design and construction. To do this, depending on the size of the bath room, a plan must be drawn up for the location of furniture inside, their sizes and shapes must be determined. It’s good if everything in the bathhouse is done in the same style and selected in accordance with the expected number of people.
Bath flooring installation diagram
When making furniture with your own hands, it is important to process the parts well: round the edges, sand the surfaces until they are absolutely smooth. To avoid burns from the metal heads of the screws, they are recessed 5 mm deep and covered with wood putty on top. No part of the bath furniture should be varnished.
Types and quantities
Furniture for different bath rooms differs in parameters and appearance. Thus, benches for the washing department have the following features:
- The simplest and at the same time stable model, capable of supporting the weight of not only a person, but also a container of water. It shouldn't tip over if you sit on the edge.
- For production, wood species that are resistant to contact with water and high air humidity are selected.
- For safety, the supports are moved to the edges of the structure, the boards chosen are thick enough, from 4 cm.
- The natural location is along the walls, near shelves for bath accessories.
Furniture intended for the rest room is more comfortable:
- Typically, wooden benches have a backrest and can be moved.
Two-tier design for a steam room with an additional shelf Source ytimg.com
- Any wood, even soft wood, is chosen for production, since air humidity is close to normal.
- The surface of the material needs careful processing, and the products themselves can be decorated.
The optimal number of benches for a bathhouse is determined based on the number of visitors to the bathhouse. It is important to arrange them so that they allow free movement around the room. To solve the problem, it is convenient to make a drawing with preserved proportions.
In a small bathhouse in the washing room, as a rule, two benches are placed; they are designed for one and two visitors. In the relaxation room, the furniture is placed around the table and has large dimensions so that you can lie down.
See also: Catalog of companies that specialize in the design and construction of baths of any complexity
Making a wooden bench
Bath bench assembly diagram
This part is necessary for use as a replacement for the lower part of the shelf, footrests, basins and buckets.
To make a bench with your own hands you need:
- cut the block into several 40 cm pieces (future supports);
- transverse posts 60 cm long are cut out from another block;
- nail the supports from below, and attach the base for the seat on top, formed from boards 1 m long;
- cover the base of the bench with wooden boards, leaving 1 cm gaps;
- coat the finished furniture with an antiseptic containing vegetable oils.
Drawing of a simple bathhouse bench to make yourself
How to make a bench
If you don’t have a lot of experience and specialized skills, you should start by making a bath bench. Technologically, this is the simplest design, consisting of two types of parts: supports and seats. A novice carpenter must adhere to the following order:
- Draw a diagram of the structure indicating the dimensions of each element.
- Stock up on material. You will need 2 boards (150x20x5 cm), 2 planks (10x2 cm) and 2 beams (5x5 cm). Self-tapping screws will also be needed. All lumber must be sanded.
Diagram of one of the bench options Source parilochka.com
Blueprints
Below we present several drawings that we found on the vastness of the worldwide computer network. We do not claim authorship and do not know their authors, therefore we cannot provide links to primary sources (see appeal to copyright holders). We have taken the liberty of adding some explanations to these drawings.
Not the easiest bench. Please note that instead of timber for the legs, boards were used, mounted with both glue and self-tapping screws . The connection of the legs with the spacer is done in a quarter. The long side of the bench is sheathed with boards according to exactly the same principle as the short side (see the blue blocks and their fastening - the same is perpendicular). The seat is also attached to the finished frame with self-tapping screws - you can make it simpler, only from bars, without an end strip on both sides (if you make one, then with a tongue-and-groove connection ).
But this drawing is easier to implement. Please note that the legs are attached to the seat using a dovetail joint , which is additionally secured with pairs of plugs. A massive spacer will not allow the structure to wobble. It is noteworthy that the authors did not do without metal fastening - in the middle of the spacer it is supposed to drill a hole for a long self-tapping screw , which will fasten the spacer to the seat.
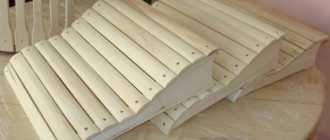
Here is a variation of the first drawing. This is no longer just a bench, but a whole sun lounger. First, a seat is prepared from polished boards 50x100 mm, which are fastened with two transverse bars. The legs are attached to the bars, and instead of the usual spacer or jib, the frame is sheathed on top (immediately under the seat) with a 25x150 mm board around the perimeter.
A small portable “banquette” can also be useful in a bathhouse. It is made extremely simply: the frame on which the seat slats are placed is attached to the U-shaped legs. By the way, the design is quite flimsy ; it would be strengthened from below with a spacer either in the form of a frame “O” (rectangle) or “I” (Latin “I” with transverse dashes). Everything is self-tapping.
Quite a simple model on dowels. The drawing shows that the authors considered a pair of dowels sufficient for attaching each side panel to the seat, and the transverse beam is attached with a tongue-and-groove connection, and the tenon, it seems, is machined from the beam itself. And in the sidewalls a hole of the appropriate diameter is drilled for the tenon. Such connections are mounted on glue.
In this design, it is not entirely clear why make a groove in the sidewall, if anyway the crossbar will then be attached to it using self-tapping screws ? (Which will then have to be masked with putty.) The seat is secured to the frame using dowels.
But the option is generally the simplest and even hacky , which can even be made from moisture-resistant plywood . Of course, you can’t put such a bench in a steam room, but it may well fit somewhere in a waiting room. Since the fastening is not shown in the drawing, we dare to suggest fastening the structure with ordinary corners.
A simple and reliable bench with dowels and screws. All the details can be seen in the figure; in total you will need 8 dowels and 12 screws. Please note that the leg extensions (replacing the jibs) are attached to the legs with self-tapping screws through the grooves on top. And this construct is attached to the seat from the reverse side.
Variation on the crossbeam . Judging by the appearance, everything was done using a board of the same thickness - 38 mm, that is, a sanded “magpie”. The fastening is not shown in the drawing, but it can be assumed that it can be fastened with self-tapping screws.
ATTENTION! Do not forget that it is best to install stainless steel fixtures in the bathhouse.
An interesting option, say, for a relaxation room. X-shaped legs look beautiful, and the way to make them is to make notches half the width of the board on both “legs.” Fasteners - glue and self-tapping screws.
Style
Let's start with style. This time we would like to limit theorizing on this topic as much as possible. Therefore, we will limit ourselves to introducing two poles - simplicity and ornateness, and between them let there be many intermediate options, including various attempts to imitate different eras or countries.
So, the more traditional your bathhouse is, the wider the possibilities - hangers of any degree of ornateness will suit you, and of the simplest ones, only those that combine exaggerated rigor of geometry with metal or glass elements are not suitable.
Original homemade hangers in the bathhouse shown in the previous photo
The more modern your bathhouse is, the better it is to opt for relatively simple interior elements. Of course, we are not talking about high-tech now, but simply about a comfortable bathhouse in which modern materials are used, everything is functional and there are not many references to tradition.
What do we mean by comparative simplicity? The presence of some decorative elements, but subordinate to functionality and not very attractive. Let us explain: the more original your hanger is, the more demanding it will become of its surroundings.
You need to understand the principles of stylistic unity - if you put Khokhloma on the table, then several other interior items should play with similar patterns, and the entire interior as a whole should be designed in the Russian ethno-style. A single out-of-the-ordinary object is more likely to irritate than please the eye
Let us explain: the more original your hanger is, the more demanding it will become of its surroundings. You need to understand the principles of stylistic unity - if you put Khokhloma on the table, then several other interior items should play with similar patterns, and the entire interior as a whole should be designed in the Russian ethno-style. A single out-of-the-ordinary object will irritate rather than please the eye.
Features of care
To keep your racks clean and extend their service life, you must:
- Serious stains and dirt should be removed with a brush.
- For easy regular dust cleaning, use laundry soap.
- The use of any chemical detergents or washing powder is not allowed.
- After each visit to the steam room, thoroughly dry the benches and the entire room, and monitor the proper functioning of the ventilation.
You can make benches in the steam room yourself, following the instructions of the masters
It is important to take a responsible approach to choosing the type of wood, carefully consider the shape, size, location and treatment of the shelves so that being in the steam room is comfortable and safe for health.
shelves
Bath shelf - diagram
Shelves for a small steam room
Before making shelves for a bathhouse, you need to take some measurements. The shelves should not cause inconvenience. Its device can be either single-tiered or three-tiered. It is believed that the heat is higher at the very top. The design resembles the shape of steps.
Once the required dimensions of the boards have been determined, you can begin to work:
- It is necessary to mount a frame of wooden posts. For this, a timber is taken.
- The racks are fastened together. You can even use metal screws here, because the body will not come into contact with this part of the shelf. The distance between the two posts should be about 50 cm.
- The frame must be attached to the walls of the bathhouse.
- Then the boards are attached to the frame. When installing them, you can no longer use metal. The distance between two adjacent boards should be about 1 cm. This is necessary so that the water can drain freely. In addition, this device allows the structure to dry faster.
Important conditions for creating an interior
When decorating the interior of a relaxation room in a bathhouse, several specific conditions and rules are observed. So, to create a beautiful design, they use finishing materials that do not contain metal parts and are moisture resistant.
This room is equipped with a good ventilation system.
Important! The dimensions of the rest room are determined by the dimensions of the bathhouse. The minimum area is considered to be 10 sq.
m.
Also, when creating a beautiful room design, perform the following actions:
- install hooks for drying several bathrobes and towels;
- construct storage areas for a variety of personal items;
- put a mirror.
This place is not cluttered with massive furniture or decor. This way the passage remains clear.
Zoning Features
The rest room usually has 3 zones:
- place for cooking;
- dining area;
- relaxation area.
Bath curtains create a feeling of security. Sometimes zoning of this place is carried out at the stage of construction of the bathhouse. Then they make a special partition wall.
The kitchen is separated from the dining area by a bar counter or a wide countertop. A fireplace is placed in the center of the room, which decorates the interior design.
Color spectrum
The rest room is decorated with light and pastel colors. These tones create a light and cozy atmosphere that relaxes guests.
Orange, light brown or yellow shades bring peace of mind and warmth to this zone. Furniture for such a place is selected according to the color of the cladding.
Variety of materials
When carrying out the interior decoration of this room, only high-quality building materials are used, which are moisture resistant and tolerate temperature changes well. When arranging the design of a relaxation room in a bathhouse, the following materials are used:
- decorative stones - artificial or natural;
- various types of tree species;
- fiberglass or non-woven wallpaper;
- majolica or ceramic granite tiles;
- decorative plaster;
- plastic.
When decorating walls, the following materials are used:
- lining made of oak, aspen, alder, pine or linden;
- various stones - cobblestone, marble, granite or sandstone;
- non-woven wallpaper;
- plasterboard moisture-resistant sheets.
When finishing a room ceiling, wooden panels and linden or cedar lining are used.
When installing floors, the following building materials are used:
- wooden boards 3.5 cm thick, the finished coating is covered with stain or colorless fixing varnish;
- ceramic granite.
After finishing, the recreation area becomes a stylish and comfortable place that gives guests homely warmth and comfort. This area is also a good place for winter holidays or a regular family vacation.
Selection of furniture
When choosing the right furniture for the rest room, perform the following steps:
- buy furniture that suits a certain design and fits well into the room interior;
- the table, chairs and other furniture items are placed as far as possible from the steam room, thus preserving the appearance of the room and increasing the life of the furniture;
- do not clutter up the resting place with various objects - make the space free;
- buy furniture made of durable, moisture-resistant material.
Comment! Wooden furniture is considered the best option when designing a relaxation room. After all, tables and chairs made of wood are covered with antibacterial impregnation.
More often furniture made of beech, oak, alder or larch is placed here.
Lighting in the bathhouse in the relaxation room
In order to create proper and pleasant lighting in the recreation area, perform the following actions:
- Small lamps are placed around the perimeter of the room, from which a lot of diffused light comes;
- install bright but unobtrusive light in the center of the room and dimmer light along the edges of the room; such lighting relaxes the bathhouse guests;
- Several spotlights are placed under the ceiling, which emphasize the youth style, this can be seen from the photo of the interior of the bathhouse and relaxation room.
There are also several narrow windows here, through which direct rays of the sun do not penetrate. This creates natural, pleasant lighting.
Decorating the relaxation room in the bathhouse with decor
Decoration of the rest room is carried out after completion of all other construction work. This completes the design of the room.
Various textiles are hung on the windows and walls, which make the room more comfortable and soft. Window curtains, sofa throws, soft pillows and tea towels create a feeling of home.
The walls are decorated with paintings or individual photographs, and open shelves are installed in the corners. Small souvenirs are placed on them: cups, figurines or vases.
Russian style
A mandatory rule of any harmonious structure is that outside and inside it is necessary to adhere to a single style. Baths in the Russian style are mainly built from wooden logs, and therefore even a modern building looks the same in appearance as our great-grandfathers - a structure made of untreated wood, measuring 4x6 meters, with a height of approximately 3.5 meters .
We maintain a single style
- multi-tiered shelves;
- a large wooden table with benches around;
- working fireplace;
- a huge tub of water, wooden ladles and buckets;
- red brick stove-heater;
- wooden floor boards, brooms from different types of wood, towels and sheets.
Spirit of Russian style
There may be many such small and not so small details, but they have one common feature - all the design elements of a Russian bathhouse are of natural origin, consisting of natural materials.
Exclusively natural materials
It is dangerous to use synthetic or plastic material; when heated, such shelves can release toxic substances, cause burns, and poisoning.
In the shower room and locker room, use materials such as wood, boards, natural textiles, and ceramics. All this will create a cozy atmosphere, and things made by hand will add warmth and soulfulness.
Bench
A bench is needed in the relaxation room and in the steam room. It can be purchased in a store or ordered from a master. Some people prefer to make the bench themselves.
Drawing of a bench without backrest
To make the bench shown in photo 2, you will need three boards (seat) measuring 50x100x1800 mm, two bars for fastening 50x10x170 mm, four spacer bars 35x50x100 mm, four legs 50x10x400 mm, one spacer board 50x100x1400 mm.
To secure all elements of the bench we use special screws or self-tapping screws.
An irreplaceable and necessary piece of furniture in a bathhouse is a table. Making it yourself is not difficult, you just need to follow the recommendations.
Bath table drawing
For production you will need 8 boards measuring 50x10x1200 mm, which will later become the tabletop. Two fastening strips 50x100x700 mm, four legs 50x50x650 mm, two longitudinal bars 25x100x1050 mm and two transverse bars measuring 25x100x750 mm.
Headrest for bath
To make a headrest you will need only two components: a 15x40 mm strip and a dowel with a diameter of 16 mm.
Drawing of a headrest for a bath
After the glue has dried, we check the serviceability of the rotating mechanism and smooth out all the irregularities, rounding off sharp edges and corners.
The height of the headrest is adjustable: the position can be changed three times, the step is 8 degrees (the angle of inclination is 16, 24 and 32 degrees).
Clothes and towel rack
To make a hanger, we take one upper (25x50x708 mm) and one bottom (25x50x567 mm) fastening strip, 7 wooden squares measuring 25x90x90 mm, 4 wooden rectangles 25x100x200 mm, 11 wooden hooks with a diameter of 25 mm and a length of 100 mm.
Stool
To make a stool for a bath, the drawing of which is shown in photo 6, you will need 4 boards for the seat measuring 50x100x430 mm, 2 bars for fastening 50x100x330 mm (grooves 50x50 mm are made at the ends of each), 4 legs 50x50x400 mm and 4 crossbars 25x100x380 mm.
Drawing of a stool for a bath
The sharp corners of the stool elements are rounded and irregularities are removed.
Bath chair
In order to make a chair for a bath yourself, you will need 5 seat boards 50x100x500 mm, 2 bars for fastening 50x100x490 mm, two longitudinal (25x100x475 mm) and transverse (25x100x540 mm) crossbars. Two backrests measuring 50x50x580 mm, 3 backboards 50x100x540 mm, 2 armrests 25x70x467 mm, two rear legs 50x50x610 mm and two front legs 50x50x600 mm.
Bath chair drawing
All elements of the chair are connected using screws, special confirmat screws, wood dowels with glue or self-tapping screws.
So, for today these are all the drawings of bath furniture that we have prepared for you. Good luck with your work and good mood!
Source
Form
By design, all hangers can be divided first into the following categories:
- wall-mounted (have no other support other than walls);
- floor-mounted (may not be attached to walls).
In turn, wall and floor ones can be located along one of the walls, or located in the corner.
Wall mounted
The most minimalistic version of a hanger is a board, on one side of which hooks are attached (these can be wooden sticks, forks of branches, door handles, and knockers, but most likely some kind of purchased type of holders), and on the other side there is a fastening on the wall - ears, hidden loops, other varieties.
A hanger with a shelf is not too different from it in terms of labor intensity. Everything is the same - board, holders, ears, only a shelf is added at an angle of 90 degrees, and a pair of approximately triangular-shaped sidewalls will support it in this position. You can do it without the sidewalls - glue them and place them on the screws.
The structure we conventionally call a “fence” is a little more complicated. These are several boards attached to cross slats with gaps between the boards. The upper edge is usually made smooth (because a shelf is most often attached to it), and the lower edge is either smooth, or a triangle, or rounded, or the author came up with something else.
Floor-standing
Floor designs can also be different.
For example, it could be a classic hanger in the form of a pole with a three- or four-legged support and a crown of hooks for circular placement of clothes.
Idea! A variation of such a pillar can be a felled young tree, the branches of which form “hooks”. However, first it will need to be dried thoroughly (at least a year).
In another version, it can be a frame made of round wooden elements, which rests on two “legs”:
You can turn an old door leaf into a floor hanger by attaching a shelf and hooks to it.
Corner
Corner can be either a wall or floor design. Roughly speaking, its feasibility depends on whether it is imaginable that you mentally cut the design you like so that it folds at an angle. In some cases this will not be difficult.
However, for a steam room there is no need for a floor structure, and a light wall-mounted one consists of two boards at an angle of 90 degrees and a shelf-lid in the form of a triangle or a sector of a circle. It is quite suitable for hats and towels, and if you wish, you can further decorate it.
DIY sofa bed
As a rule, such models are chosen in studio rooms or when it is not possible to fit a double bed in the bedroom. Comfortable, healthy sleep can only be ensured by a product that has orthopedic properties. Therefore, it is better to buy ready-made mattresses for a homemade sofa bed.
The choice of method for transforming a model into a full-fledged sleeping place depends solely on the wishes of its creator. Using the example of making a sofa with the easiest-to-use “Eurobook” mechanism, you can study the main stages of work.
For this you will need the following materials:
- two mattresses;
- beam;
- Chipboard, fibreboard, plywood;
- thin foam rubber, synthetic winterizer;
- legs;
- agrotextiles;
- upholstery fabric;
- glue;
- fasteners, nails, screws;
- folding mechanism (2 pcs.)
- tools.
First you need to assemble a rectangular base box from fiberboard. Attach the legs and timber guides to the inside of the sidewalls, close to each other. Install a fiberboard spacer in the center of the box and cover the bottom with plywood.
Next, the frame of the retractable part is made from timber, the surface of which is covered with a sheet of plywood. Support bars are attached to the structure, and legs are attached to them. At the corners of the inner part of the frame there are small bars up to 10 cm long that prevent it from jumping off the base. A mattress is placed on the frame, its edging is connected to the surface using a furniture stapler. The seat is ready.
Then the upper parts of the folding mechanisms are screwed onto strips of fiberboard measuring approximately 15x30 cm with self-tapping screws. Four through holes are drilled in the corners of the boards.
To attach the resulting parts to the back, you need to “open” the mattress upholstery from the sides, gaining access to its spring blocks. Using a strong wire, the fiberboard is connected to the internal elements of the mattress. Now the lower parts of the mechanisms can be secured to the base.
At the final stage, the wooden parts are covered with foam rubber and synthetic padding. Next comes upholstery with sealing and decorative fabric. A seat is placed on the base. That's it, the sofa bed is ready. For convenience, the model is equipped with large pillows and armrest bolsters.
What is a trestle bed?
Traditionally, a trestle bed is a platform raised on legs that can be used as a lounger, sofa, and even a dining area (if there is a small table-stand). The trestle beds are made from wood.
Initially, this piece of furniture appeared in East Asian countries. This is due to the fact that the floors in eastern houses were either smeared with clay or stone, and therefore cold. A wooden trestle bed allowed, during sleep, rest and meals, not to come into contact with a cold surface, but to sit on a warm mattress among soft pillows. Often the design of the trestle bed was complemented by a wooden canopy or a fabric canopy.
In Rus', the idea of using a trestle bed was adopted from the Mongols, but it was not customary to eat on them - this piece of furniture was used exclusively as a bed. But modern fashion trends have once again revived the popularity of the trestle bed as a place for relaxing, drinking tea and eating food.