What is better to decorate the stove, paint or varnish?
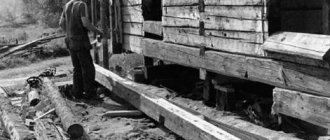
A brick stove is used to heat a cottage, bathhouse or any other room. A beautifully decorated stove is also a decorative element. However, painting such a structure is not an easy task. You need to understand what and how to treat a surface that is under constant heat.
The walls of the stove, as thick as a single solid brick, can heat up to a temperature of 90 degrees. At the same time, constant heating leads to expansion and contraction of the brick. Such operating conditions will not allow the use of any paint. It is worth considering the functional load of the furnace. For example, the paint for a sauna heater must be resistant to high humidity.
Advice from the experts
There are no high temperatures in a brick washing bath, but the materials are affected by moisture. Therefore, the walls can be finished with tiles. The surface is first leveled with plaster. The layer is applied with a thickness of 15 mm. Once the ceramics have been laid, the solution is removed with a rag if it gets on the surface of the cladding.
The foundation, floor, walls, windows - all these are parts of a single whole - the baths. Therefore, for its finishing it is better to use materials that combine with each other. For cladding walls, for example, you can use clinker tiles for interior work, and for arranging the foundation, clinker for difficult operating conditions.
Source
Popular types of modern stove paints
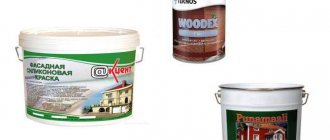
Along with traditional methods of painting red brick stoves, it is worth paying attention to modern materials. The most common are silicate, silicone and acrylic dyes.
It is recommended to apply silicone enamel to a previously primed surface.
If you want to preserve the texture and color of red brick, you should pay attention to varnishes.
The most common compositions are polyphenylsiloxane and organosilicon compositions. Organosilicon varnishes are similar in composition to paints based on this base. There are no tinting pigments in such varnishes or they emphasize the texture of the tone.
Polymer coatings, unlike organosilicon coatings, are not toxic. They can be used for painting bricks and coating joints, which will prevent the mortar from crumbling in the future. Such varnishes dry in half an hour, have high fire-resistant qualities, are durable and water-resistant. The coating on this basis can withstand temperatures up to 300 degrees. Therefore, you can even paint the firebox area.
5. Choice of paint – safety and visual effect
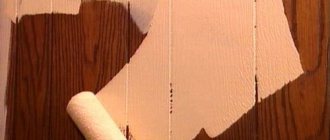
The main thing is not to choose façade paint by mistake. Of course, such materials are better suited for painting porous surfaces, but they contain many volatile substances that are hazardous to health. You will need interior paints - you can choose acrylic or alkyd for a matte or semi-gloss effect. Or use oil paint - it will give the brickwork a soft shine.
It is better to paint a brick wall with a brush - it is easier to feel contact with the surface and apply even strokes. The direction of painting is horizontal, according to the masonry pattern. For acrylic paint, brushes made of polyester fiber are recommended (but high quality!), alkyd and oil paints require brushes made of natural hair.
It is better to use a roller if you want to achieve the effect of a primer layer: brick absorbs a lot of paint at once, so it will take a long time to work with a roller on a smooth coating. But a carelessly rolled layer will turn out quickly and easily!
If you apply paint with a sponge, you will get the effect of old faded masonry. In this way, you can whiten the wall and make the paint layer translucent (as in the case of working with a roller). You can use a sponge to apply bronze or silver highlights, add spots of contrasting color to the wall, or paint over images using stencils.
Another common (but more labor-intensive) painting method is to paint each brick with a paint of the same tone using a brush and use a contrasting color compound for the joints.
Basic rules for painting stoves
The brick surface must be cleaned and degreased. A plastered stove should be sanded and primed. Painting should be done in a well-ventilated area. Any coating, regardless of composition, should be applied in a thin layer. When using polyphenylsiloxane-based varnishes, it is advisable to heat the oven after painting.
Following these rules and following the instructions for use will guarantee a good result.
Source
Design and its features
In order to build a bathhouse that meets all existing norms and rules, special attention should be paid to its initial design. It is in the project that the appearance of the future building (facade), the layout of each floor and the detailed design of the main premises are prescribed. This will allow you to take into account all the design features and include the main elements in the project, including the type of roof being installed. The plan contains drawings of each room, including cross-section. Any project must consist of elements that will help make correct calculations of the stability and strength of the future building.
Such documentation contains both technical and engineering parts, which also describe the sewer system, wiring, heating, ventilation and drainage and water supply. If necessary, basic calculations regarding the gas supply used are prescribed. At the end of this stage, an initial estimate is drawn up, where each type of work is calculated separately, including calculations regarding the materials required for construction and finishing work. When drawing up such projects, you should also take into account some important points:
Briefly about brick
This material is used for the construction of houses, industrial facilities and auxiliary buildings. Information about the first use of brick by man has been lost for centuries. This material gained its popularity due to its excellent characteristics:
Brick can be of several types: silicate, ceramic (traditional red), fireproof, hollow and solid. Since red brick is the most affordable and popular, we will consider a bathhouse made from it for its pros and cons.
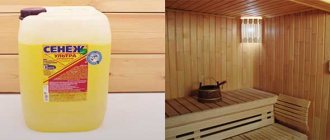
Special paints and varnishes for the oven
These compositions are produced industrially and are available for free sale. But some materials can be made independently; we will also talk about them in our article.
Drying oil
Only natural drying oil is used. Its distinctive quality is that it does not change the color of the brick, but only makes its shade darker. It is used only for painting a red brick stove in a bathhouse; the stove must be lit and run for at least 2 hours, after which it can be painted. We do not recommend using it indoors - here the stove heats up less and the drying oil may not dry out.
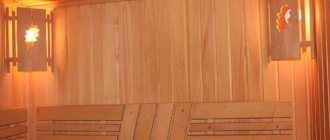
Many owners of private houses ask the question of what varnish to coat a red brick stove with. And this is not surprising, since the transparent glossy coating effectively transforms the appearance of any interior element. To paint stoves, a special varnish of the PF-283 type is used in equal proportions with turpentine, which makes it possible to obtain a decorative layer with increased strength characteristics.
Photo 5. Example of a varnished stove
The main feature of using varnish is the ability to add dry gouache to the composition and give the coating the required shade.
Silicone enamel
Among the shortcomings, only a small selection of colors can be noted.
Heat resistant paint
The main advantages are resistance to high temperatures (up to 600 °C) and a wide range of shades. They are used for painting steam pipes, so if you have not yet decided how to cover a red brick stove, then heat-resistant paint will be the ideal solution.
Frame (beacons)
Proper manufacturing of the frame is the most difficult stage of insulation. A high-quality and durable frame provides a smooth front surface made of lining.
Insulation of a brick bathhouse inside is carried out by filling the cells of a wooden or metal frame.
Other options do not apply.
The wooden frame is assembled from bars, the metal frame is assembled from a specialized galvanized profile.
A wooden frame is simple and cheap, but its strength is less than that of a metal one.
For a heavy block house, a wooden frame made of bars may not be enough. Then the cross-section of the elements must be increased or a structure combined with metal must be used.
A powerful wooden frame is only possible with a large gap for placing insulation. The choice of this gap must correspond to the thickness of the insulating board. Typical options provide a layer of 20 – 90 mm.
The quality of insulation directly depends on the thickness of the slabs. The choice of how to insulate a brick bathhouse from the inside is based on typical data for your climatic region. Recommended projects can be used. Types of connections in a wooden frame:
- Tenon and groove;
- With metal corners;
- Butt joint on nails and dowels.
The most durable and practical connection is on metal corners. Instead of nails, it is convenient to use self-tapping screws, which are purchased with metal corners.
Each T-shaped connection requires two angles and about 10 screws.
Vertical posts (beacons) and horizontal bulkheads are made from bars of the same cross-section.
The most advantageous aspect ratio is 7:5.
Such timber is produced in large quantities and can be purchased at any lumber store.
Weaknesses of brick baths
The construction of a brick bath is advisable in several cases:
When building a bathhouse, you need to get answers to many questions. So, you need to determine which design to choose, how much money will be required to implement your plan. In addition, you should understand what is best to build a bathhouse from, so that it is not only cozy and easy to use, but also durable.
When choosing a material for construction, first of all you need to decide on the balance of desires and capabilities, in particular, the availability of funds. If there are enough of them, you can purchase a ready-made bathhouse or use the services of specialists by ordering an individual project or purchasing a ready-made one. If you don’t have much money and you want to work with your hands, you can build a bathhouse yourself.
Before you start building, you need to draw up a detailed plan showing all the proposed premises (shower, sauna, relaxation room). You can make a simple bathhouse with only a steam room and a washing room. The total size of all rooms constitutes the total area of the building. You need to determine the number of people who will use it at the same time. Using this data, you can calculate how much material is needed to construct a building.
During work, the recommended distances should be taken into account:
After determining the internal layout and construction site, you need to decide what material to build the bathhouse from. Already at the stage of planning work, it is advisable to have an idea of what to build the walls, roof and foundation of the future structure from. Correct calculation will allow you to purchase the material in the right quantity.
We build walls
The most popular option is a wooden frame. However, many people prefer to build a brick bathhouse. It has a number of significant advantages, in particular, reliability due to the large thickness of the walls. It should also be noted that brick has a greater thermal conductivity compared to similar materials, for example, foam concrete.
Advice from the master!
We suggest you read: How to make a steam room in a frame bath
For construction, you can use blocks from various materials. They do not have a very attractive appearance. But this disadvantage is compensated by a low coefficient of thermal conductivity (heat loss) and less time required to construct a building.
If you do not have the skills to work with bricks, experts advise building a bathhouse from wood. In this case, profiled timber is most often used. It is more difficult to build a log house from logs, but it is more resistant to the negative effects of various atmospheric phenomena. Timber can crack in various places, and logs can crack mainly vertically, which reduces thermal conductivity.
The best option is to purchase a log house. Before transportation and disassembly, it is necessary to number the crowns, otherwise difficulties may arise during assembly. It must be taken into account that during the year, shrinkage of wooden buildings occurs.
Construction of wooden walls
It is safer to make a log house from simple timber yourself, as there is a risk of acquiring a low-quality structure. In this case, you need to treat the lower crowns with some kind of antiseptic composition. When purchasing laminated veneer lumber, the construction process is greatly simplified and the quality improves. This material is also necessary for the construction of ceiling beams and floor joists.
When choosing logs or beams, you should find out the date of cutting the tree. It is best to purchase material prepared in winter. After purchasing, you should dry it for a month, for which you need to place the bars under a canopy, protecting them from sunlight and precipitation, and ensuring good ventilation.
Another option for a wooden bathhouse is a frame structure. It is necessary to build a wooden frame and cover it on the inside and outside with clapboard or decorative board that imitates timber, and fill the resulting cavities with a layer of heat-insulating material. It is more difficult to build a frame bathhouse yourself than a log house. However, it is cheaper than other similar products.
This design has a number of advantages:
Increasingly, happy owners of their own plots prefer a brick bathhouse. In this article we will reveal the main secrets and talk in detail about how to build a brick bathhouse with your own hands.
Currently, a brick bathhouse is very popular. Its obvious advantages include, of course, durability, as well as the possibility of using various finishing materials and design solutions. Therefore, it is a worthy competitor to a traditional wooden bathhouse. Below we will talk about how to build a brick bathhouse from the foundation to the roof, as well as important points that should be taken into account during construction.
It is no secret that the quality and durability of a building depends on well-chosen building materials. So, when buying bricks for a bathhouse, you should take into account such a factor as high humidity in the room. Next, it is very important to evaluate the color of the brick itself.
If it is bright scarlet, this may indicate insufficient time in the oven. A purple-brown shade of brick, on the contrary, indicates that the firing time has been exceeded. In any case, specimens with obvious signs of violation of manufacturing technology should be immediately rejected.
In this regard, taking into account the recommendations of specialists, it is important to know that:
When starting construction, you should remember that the final result will depend on both the quality of building materials and the correct sequence of work.
Therefore, before building a brick bathhouse, it is necessary to take into account the following sequence of actions:
Now let's take a closer look at each of the stages of construction. Also, when creating a brick bathhouse with your own hands, the step-by-step instructions given below will be very useful.
You should start working on the foundation after the final choice of the location of the future bathhouse. To do this, it is important to take into account that the recommended distance to residential buildings should be 8–12 m. In this case, it is not advisable to neglect the requirements of the fire services. If you plan to locate a bathhouse near a reservoir, the distance to the shore should be at least 15–20 m. After this, you can proceed to the most important stage.
Depending on the type of soil on the site, the size of the building, the source materials and the chosen technology, the foundation for a bathhouse can be:
So, creating a foundation for a brick bath includes the following procedure:
Installation technology
The walls of a brick bath can be finished by installing lining. It can be installed vertically or horizontally. The first method is most widespread due to its high speed and ease of use. At the first stage, you need to install the sheathing, under which the insulation is laid. Air will circulate between the layers, which will help remove condensation. The sheathing is made of timber, which is coated with a primer. It is recommended to avoid using galvanized profiles.
A 40 cm distance is maintained between the slats. The two outermost elements are nailed at the corners, and a rope is stretched between them. If necessary, shims can be placed under the slats for more precise alignment. Before installing the lining, it is necessary to mark the first row. Fastening is carried out with nails that are nailed to the slats. The last row of trim is cut at an angle. When deviations in height do not exceed 1.5 cm, it is recommended to trim in the bottom row; subsequently, this place is decorated with a plinth.
We insulate the floor
At the first stage of thermal insulation of a brick bathhouse, boards need to be nailed to the wooden beams, the distance between which is one board. Next, the surface of the joists and the floor is covered with windproof film. It is fixed on the protruding elements with a stapler. There is a layer of insulation on top. It is better if it has a foil layer, which will speed up the thermal insulation process. Otherwise, you can use a vapor barrier film, which will protect the layer from moisture and will cope better with the task due to its heat-shielding properties. At the next stage, you need to nail a sheathing consisting of 3 cm bars to the logs. They will also provide ventilation. Now you can begin laying the final coating. They can be wooden boards.
We insulate the walls
When thermally insulating the walls of a brick bathhouse, a frame is formed on the load-bearing surface. Next, the insulation is laid, followed by the waterproofing material. This can be a plastic film or a foil layer. The material is covered with an overlap, and its joints are covered with thin slats. The top needs to be covered with clapboard or boards. An alternative option is PU foam boards.
We insulate the ceiling
The first layer will be a vapor barrier, the main role of which is to prevent the penetration of vapors into the thermal insulation. For these purposes, you can use roofing felt or parchment. Modern geosynthetic coatings, thermofol and membranes also performed well. It’s good if you purchased a foil vapor barrier, then it will also shield the heat, effectively returning it inside.
The next layer will be thermal insulation. It is better to choose the lightest possible material so as not to create unnecessary load on the structure. The layer must be non-flammable and resistant to moisture. An additional selection criterion is ease of installation.
Next, waterproofing is installed. It will be located on the roof side and will act as an additional barrier. It can be a membrane or film. One side must be completely waterproof, and the other must be able to allow steam to pass through. If the bathhouse does not have an attic, thermal insulation is carried out only from the inside.
Useful video
This video shows the process of exterior painting of a bathhouse made of timber, perhaps some of you will find it useful:
*** We again appeal to our readers with an invitation to share their own experience, which will be valuable for other bathhouse owners. Agree that it would be great if useful information was available to everyone.
“Kisa, I have long wanted to ask you as an artist: can you draw?” (quote from the film “12 Chairs”).
Hello, readers of my blog! I never cease to admire our Great Classics... Okay, let's leave them and get down to business.
The topic of how to paint a stove in a bathhouse arose spontaneously. The initial question was how to paint an iron smokehouse, so that it would look nice and it wouldn’t be dangerous to smoke fish and meat. I think many people would like to see an aesthetically painted stove in their steam room. Of course, there is another way - stainless steel screens, brickwork, lattice fences and other “arts” with the goal of covering up rust and “repelling excess heat.”
However, somewhere, a piece of the brown wall of a stove or an old chimney will “come out”. To avoid various experiments ending in cracking and bubbling paint, a chemical smell and a depressing appearance, let’s analyze this topic.
From this article you will learn:
Foundation
Subject to the construction of a brick bathhouse, the distance to the nearest building should be at least twelve meters and one and a half meters from the fences. In this case, the selected area should be well ventilated. If all these requirements have been met, then the bathhouse can be built without the risk of any consequences.
We invite you to familiarize yourself with: Grouting tiles technical specifications
A mound of sand is made at the bottom, after which the surface is sprinkled with crushed stone. Iron reinforcement is being laid. For the formwork you will need wood, which is then poured using a concrete-based solution. At this stage, you should take care of the hole for the drain and a separate formwork for the oven.
Insulation from outside
Before you start insulating a brick bathhouse from the outside, you need to carefully consider the issue of laying bricks:
- The mortar should fill the entire space between the bricks evenly, at the same thickness; The first row of brickwork should be made only from solid elements; The beams rest on the joint row; As for clay bricks, before laying them, it is necessary to thoroughly wet the brick, especially if the bathhouse is arranged in the summer.
In order to insulate a bathhouse from the outside of the building, it is necessary to lay expanded clay 40-50 centimeters thick between the walls. You can also use slag, fluffed lime, sawdust and sand for this.
But it would be more rational to insulate the walls of the bathhouse from the outside with slab insulation. Direct fixation of the insulation layers occurs using a synthetic binder. The plates are placed in spacers at a distance of half a meter from each of the plates. Read the instructions on how to choose a stove for a sauna.
It is worth installing slab insulation so that there are small gaps between the elements. They are necessary for ventilation of the facade, because otherwise the entire surface will be covered with mold during the rainy season.
Basic rules for painting stoves
The brick surface must be cleaned and degreased. A plastered stove should be sanded and primed. Painting should be done in a well-ventilated area. Any coating, regardless of composition, should be applied in a thin layer. When using polyphenylsiloxane-based varnishes, it is advisable to heat the oven after painting.
Following these rules and following the instructions for use will guarantee a good result.
The following video will help you decide on the type of paint or varnish: “Review of varnishes and paints for stoves.”
DIY artistic painting
If desired, the stove can be decorated with a design. Folk motifs will add individuality to your home. Artistic painting is easy to do. Coloring composition:
- Dilute multi-colored gouache with water.
- Add 1-2 raw egg yolks to the mixture.
- Stir well until smooth.
- Use as directed within 12 hours.
The design can be applied with a painting brush or with a sponge. The use of stencils is permitted. Painting depends on personal imagination. For beginners, it is better to use simple patterns.
In addition to the egg coloring mixture, the remaining whitewash is used - gouache is added to the solution. High temperature oil paint can be used.
It is best to carry out all furnace work before the onset of autumn. Cast iron parts (oven, doors) are best treated with fire-retardant or silicon-organic enamels. This will protect them from corrosion.
Source of the article: https://strojdvor.ru/otoplenie/pobelka-pechi-svoimi-rukami-chtoby-ne-treskalas-i-ne-pachkalas/
We build walls and roof
Several methods can be used to lay brick walls. If we are talking about building walls yourself, then you should pay attention to the two simplest methods that will allow you to carry out all the work correctly even for beginners. Single-row masonry refers to one of them. In this case, one element is placed across, after which the second along.
The second includes multi-row masonry. To do this, one element is placed across and five pieces along. This system will save on building materials and on the time allocated for laying and erecting walls. Based on the level of strength, it is significantly inferior to the single-row laying method.
In any case, you should take care of high-quality cement mortar, which will be used in any case. In addition to the main component, it also contains water and lime. It wouldn't hurt to add sand. The solution should be at the same time plastic, but not liquid. It should not spread over the surface of the material. To fix the brick with the highest quality, you should use a layer of mortar of 0.7-1 cm.
Insulation options
Let’s immediately make a reservation that there are a large number of different methods that use different thermal insulation, and not only, materials. Let's look at the main options that you can do yourself.
Option #1
Masters consider this method to be the simplest, so doing it yourself will not be a big problem. It is based on the process of insulating walls with heat-insulating materials, which are laid with or without lathing. Here is the sequence of this process:
- The internal surfaces of the walls need to be waterproofed. To do this, it is necessary to level them with plaster or putty, and after drying, apply coating waterproofing. We recommend using bitumen-based mastics. It is rare that roll material is used for these purposes.
- Next, a sheathing of wooden beams is placed on the walls, which are pre-treated with an antiseptic solution.
- Now insulation is laid between the sheathing elements.
- After this, a vapor barrier membrane is stretched directly over the sheathing. It is attached to wooden elements using metal brackets. Therefore, you will have to purchase a stapler.
- And the lining is installed along the sheathing itself.
Experts often use double wall insulation, installing two battens with insulation 100 mm thick. The process is more complicated, but it won’t be difficult to do it yourself.
If penoplex is used as insulation, then there is no need to install hydro- and vapor barrier layers. But it’s better not to give up the sheathing. This is the base on which the lining will be mounted.
Option No. 2
The second way to insulate a brick bath is to build another wall near the walls, only a wooden one with a heat-insulating layer. To do this, a frame of wooden slats is installed along the brick.
Its elements can be laid horizontally or vertically. Everyone decides for themselves. But remember that the elements of the wall itself will be laid perpendicular to the frame elements:
Now the waterproofing membrane is stretched over the sheathing and attached. Next, a second wall is constructed. It is most often built from wooden beams with a section of 100x100 mm or 150x150 mm
Please note that the elements of the new wall must fit tightly to each other. This thickness of a wooden wall is already an excellent indicator of thermal insulation. But now you need to decide whether to use additional insulation or not
If “yes,” then a sheathing is assembled along the new wall, where the heat insulator is laid. A vapor barrier or foil rolled material is installed on top of the sheathing. If there is no need for insulation, then the sheathing is mounted anyway, only from thin slats. Waterproofing material is stretched over the frame.
And the last stage is finishing the walls with clapboard.
Conclusion
As you can see, you can cover a red brick stove yourself. The process does not require any professional knowledge or much time. All you need is to choose a paint material that is suitable in quality and appearance.
It has an increased strength grade M200 and decent quality. Ideal for a plinth.
One and a half working brick with 3 technical parts. holes of the Kashira ceramic plant with corrugated.
The main advantages of clinker are increased strength, durability and minimal water consumption.
Clinker facade tiles King Klinker (Poland), black color, smooth surface. Format.
You are on a page that is a guide on the topic “painting a bathhouse”. This means that here we briefly consider all the options for painting a bathhouse - inside, outside, in rooms, on surfaces, and you will find more complete and detailed materials on the links that are given right there. If a question has not been addressed in any of our materials, a detailed answer is given.
Metal frames (metal profiles)
The entire metal frame is quickly assembled from ready-made profiles, which are produced by industry specifically for this purpose. In addition to profiles, shaped elements are purchased to make connections.
If in a wooden frame you can make connections with ordinary nails, screws and glue, then in a metal frame you cannot do without specialized fittings. On a metal frame, only the insulation of a brick bathhouse is created from the inside; the scheme is not used for external insulation.
Advantages of a metal frame:
- Quick and easy assembly;
- Fireproof design;
- Suitable for insulation systems with minimal slab thickness.
Information. To insulate the bathhouse, a frame of a standard design is assembled. Without significant changes, frames for plasterboard, suspended slab ceilings and external ventilated facades are made using the same technology.
Advantages of a brick bath
The most important advantage of a brick bathhouse is its strength, high load-bearing capacity and availability of building materials. Since brick is much stronger than wood, it is resistant to impacts. It is from brick that multi-storey bathhouses can be built, while it is not recommended to do this from logs.
Brick can be used to implement almost all design ideas for the construction of a bathhouse, even the most complex architectural projects, and they will also have structural strength and reliability. So a brick bathhouse can be not just an ordinary building, but can ideally match the overall landscape of the site and the style of the cottage.
Brick baths do not need additional finishing, as they already look aesthetically pleasing. If desired, the walls can be additionally insulated with siding and plastered with mortar, thanks to this you can choose new shades each time to decorate the appearance of the building.
A traditional bathhouse is a place where there is a constant high temperature due to the combustion process in the furnace, so there is a need to comply with all fire safety standards, and even the simplest brick can easily do this. All this is due to the fact that brick is a non-combustible material and even if a fire occurs, it will simply collapse from prolonged exposure to the flame, but will not burn. If a fire occurs, they are not uncommon in bathhouses; a brick bathhouse can be restored, unlike a wooden one.
Unlike wood, brick does not need to be treated with special protective solutions (antiseptic, anti-corrosion, anti-flammable), since it does not corrode and, as mentioned above, does not burn. Due to the fact that brick has a longer service life than wood, a brick bathhouse will last longer (up to 150 years) and will not require effort to maintain it during the operational period.
The main advantages include the incredible strength of the building. The load-bearing capacity indicator is also at the proper level, taking into account the availability of all necessary building materials. Brick is classified as a stronger building material compared to logs. In addition, it is more resistant to mechanical damage.
The material will allow you to turn an ordinary bathhouse into a memorable architectural work that will fit perfectly into the existing landscape design. Brick allows you to equip a glass veranda of any shape and size in the bathhouse. On hot days, it will allow you to spend time with company over a cup of tea or cool down after visiting the steam room.
Window and door openings can be made round or any other shape. No additional finishing work will be needed, since the brick will always look more than aesthetically pleasing. If necessary, the walls can be easily insulated using any convenient material used for insulation. It is also possible to use siding and plaster.
Internal floor waterproofing
The waterproofing membrane of the floor must be joined to the wall membrane so that moisture does not get between them. For this reason, it is better to clad the walls after complete completion of waterproofing work.
If the concrete base of the floor is old, you need to check its condition and, if necessary, make repairs by filling the cracks and slightly leveling the surface. To protect the new base from moisture, you need to wait until the concrete has completely hardened, which lasts 4 weeks after pouring. After impregnation of the ceiling with an antifungal composition and primer, the surface is treated with coating waterproofing or covered with rolled material. It is filled with screed, and the finishing coating is laid on top.
You can even make a screed over the joists. Antiseptic-treated plywood, boards or OSB are laid on top of the waterproofing material laid on them. The flooring is covered with sheets of roofing material, waterproofing material, etc. Waterproofing is applied to the walls and joined to the wall membrane, sealing the joints with special tape. The joints on the floor are glued with mastic or sealed by heating with a hairdryer. A reinforcing mesh is placed on the waterproofing sheet and filled with solution. Wood-based floors can now be coated with a topcoat.
Next, you need to fill the lathing over the roofing felt-covered logs, and secure the floorboards to it. Wood must be treated with an antiseptic compound before installation.
Special paints and varnishes for the oven
These compositions are produced industrially and are available for free sale. But some materials can be made independently; we will also talk about them in our article.
Drying oil
Only natural drying oil is used. Its distinctive quality is that it does not change the color of the brick, but only makes its shade darker. It is used only for painting a red brick stove in a bathhouse; the stove must be lit and run for at least 2 hours, after which it can be painted. We do not recommend using it indoors - here the stove heats up less and the drying oil may not dry out.
Many owners of private houses ask the question of what varnish to coat a red brick stove with. And this is not surprising, since the transparent glossy coating effectively transforms the appearance of any interior element. To paint stoves, a special varnish of the PF-283 type is used in equal proportions with turpentine, which makes it possible to obtain a decorative layer with increased strength characteristics.
Photo 5. Example of a varnished stove
The main feature of using varnish is the ability to add dry gouache to the composition and give the coating the required shade.
Silicone enamel
Among the shortcomings, only a small selection of colors can be noted.
Heat resistant paint
The main advantages are resistance to high temperatures (up to 600 °C) and a wide range of shades. They are used for painting steam pipes, so if you have not yet decided how to cover a red brick stove, then heat-resistant paint will be the ideal solution.
Homemade ingredients
- natural varnish;
- products based on lime and chalk.
Chalk and lime based coatings
To prepare, chalk or lime is simply mixed with water in the proportion of 1 kg of bulk material per 1.5 liters of liquid. The only difference between these compositions is that each subsequent layer of chalk mortar must be applied only after the previous one has completely dried; lime mortar can be painted in several layers at once.
Photo 5. An example of covering a stove with lime composition
It is also recommended to add table salt to the solution at the rate of 0.3 kg for every 2 kg of composition. This is necessary to increase strength, since without any additives the coating will soon simply crumble. Some experts use wood glue (0.1 liters per 10 liters of solution) instead of salt. In this case, the coating may acquire a yellowish tint, which can be eliminated and a classic white color obtained by adding regular blue in an amount of 20 ml.
It is possible to use color additives to achieve a specific shade, but choose based on the area of their use, since some materials may change color when exposed to high temperatures.
The use of chalk and lime compositions is the cheapest way to paint a red brick stove.
Making your own natural varnish
A good solution for those who are looking for an answer to the question of how to coat a red brick stove with varnish, but at the same time want to save money, would be to make it themselves. To produce it, you will need chicken egg whites. Don’t be surprised - our ancestors even did stone laying for eggs. But that's not all, there are other components
- squirrels – 8 pcs.;
- milk – 0.25 g;
- brick dust - the quantity is determined independently based on the required color characteristics of the composition.
Brick bath projects
How to build a sauna from timber yourself, many people ask this question. And here the correct selection of materials plays an important role.
Bathhouse made of timber
Choosing material
Building a bathhouse from timber is the best option. The price of such a steam room is much cheaper than construction from any other material. Of course, brick and stone are famous for their durability, but preference should still be given to wood, since it is an environmentally friendly material and creates the right atmosphere during bath procedures.
Please note! The timber must be well dried, since its operation will take place at high temperatures and humidity.
What kind of timber to build a bathhouse from? The wood should be from coniferous species, since the resin it contains has water-repellent properties, which are so necessary for the steam room. In addition, at high temperatures, logs emit a delicate aroma that soothes and relaxes.
Pine is an excellent product for building a bathhouse
So, timber is the most suitable material in terms of quality and price; when building a steam room with your own hands, this is what you should use.
What we will need during construction:
Despite all the love of bathhouse lovers for wood as a traditional material for its construction, this material has a number of disadvantages, the main of which are fire hazard and relatively low durability. From this point of view, brick, being the second most popular structural material, has a number of advantages:
Of course, brick has disadvantages that somewhat reduce its attractiveness and complicate the work of building a bathhouse:
The main disadvantage of a bathhouse made of high-quality brick is its higher cost compared to a wooden one, so we can say that it is usually built by wealthy and demanding people. Moreover, brick is a small-sized piece material, which means that you can build a bathhouse from it according to any, the most unusual projects.
We suggest you read: How to properly lay stones in a sauna stove
Let's look at a few photos of brick bathhouse projects.
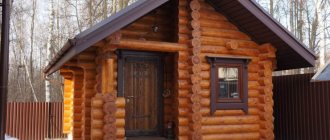
Bathhouse 3 x 3
A small bathhouse with dimensions of 9 sq.m., which makes it ideal for small summer cottages. It is quite possible for any owner to build it independently, without the involvement of specialist masons.
The bathhouse design involves pouring a strip foundation to a depth of 50-60 cm (for non-heaving soils) or to the freezing depth for heaving soils. The wall can be uniform in 1.5 bricks. The roof truss system is simple, gable, the roof covering is slate, bitumen tiles or metal profiles.
Inside there is a relaxation room and a combined washing and steam room of the same size - about 4 sq.m. – area. The dimensions of the steam room mean that 2-3 people can be in it at the same time.
Bathhouse 5 x 4
A more spacious and comfortable one-story brick bathhouse with an area of 20 sq.m. Here we see a separate washing and steam room, the area of which allows 3-4 people to simultaneously take bath procedures. A spacious recreation room allows you to place the necessary amount of furniture for proper rest and recovery.
Each room, including the steam room, has windows, natural light from which will save energy, and relaxation in a room with windows is more complete from a psychological point of view. In addition, windows allow you to properly ventilate all rooms after using the bath to prevent the walls from getting wet.
This brick bathhouse project is quite complex - the owner will need to hire a professional mason, as well as roofing craftsmen, to build the walls. It is almost impossible for a non-specialist to do such a volume of rather complex work on his own.
If you have free space and a great desire, this project can be implemented with a terrace instead of a porch, where in the summer you can spend most of your relaxation, combining bath procedures with cooking, for example, barbecue. Naturally, for this purpose, you can provide a stationary or portable barbecue grill on the terrace.
Bathhouse 10 x 14
This bathhouse project is a real masterpiece of architecture, accessible to very few homeowners. It would be more accurate to call such a building a guest house with a swimming pool and a sauna - there is everything for a full life in the summer; if the owner provides normal heating, you can live all year round.
Through the vestibule on the first floor we find ourselves in a spacious and well-lit rest room of 22 sq.m. From here you can go to the wardrobe and, having undressed, go to the shower (next to which there is a bathroom) and to the steam room. After taking a steam bath, through the relaxation room we find ourselves in a spacious room where the swimming pool is located.
Such a bath complex cannot do without a powerful supply and exhaust ventilation system, which, of course, must be designed by a specialist engineer, taking into account all the features of the location of the rooms and their purpose.
The bathhouse design provides for the presence of an attic, while the entrance to the attic room is located separately from the street. We go up a compact staircase to the second floor, from the landing of which we enter through a door into a large living room with windows. A family of two can perfectly accommodate here, especially since the attic is equipped with a bathroom and a small kitchen.
In this article we will look at how to build a brick bathhouse with our own hands, we will describe all the construction processes from laying the foundation to exterior finishing.
Brick selection
When choosing a material, first of all you need to take into account the high humidity of the building under construction. Experts recommend the following options.
Selecting a location
Convenient location for the bathhouse
The most convenient option for building a bathhouse is near a small body of water, but the minimum distance from the water should be at least 15 meters. Also, according to fire regulations, such buildings cannot be located next to residential buildings, although now many people neglect these requirements.
Site preparation
Before making a brick bathhouse, the construction site is cleared of all debris and the top layer of soil is removed by 200 mm. Then, using pegs and twine, mark the place for the foundation.
After marking, a trench is dug. Before pouring the solution, it is necessary to fill the bottom with sand and gravel (15 cm each) in layers. All layers are spilled with water and compacted. Then, approximately 10 cm of cement mortar should be poured over this layer and left for 5–6 days.
While the solution dries, you need to build the formwork and install it inside the trench. Make it 30–40 cm above the soil level. Then it is necessary to carry out reinforcement, it will give strength to the foundation. To do this, you can use any metal waste: angle, channel or fittings. They are distributed inside the trench and tied with steel wire.
Step-by-step pouring of the base
Before erecting walls, the entire surface of the foundation is laid with roofing felt. To ensure reliable fastening, it is first lubricated with bitumen.
For a brick bathhouse, the foundation is made using several technologies, the choice of which is influenced by the characteristics of the soil at the construction site, the size of the bathhouse and the materials used.
Tags: bathhouse, brick, minus, plus
Conclusion
As you can see, you can cover a red brick stove yourself. The process does not require any professional knowledge or much time. All you need is to choose a paint material that is suitable in quality and appearance.
A Russian stove, laid out in compliance with all the canons of stove masonry, will heat efficiently, look good, and last a long time. But only if suitable and high-quality materials are used - not only masonry elements, but also decorative coatings. Therefore, before moving on to the main question of how to cover a red brick stove, you need to familiarize yourself with its structure and the products used for masonry.
Source