One of the most suitable materials for individual construction is wood. Wood is available, easy to work with, and in terms of cost, lumber has a more justifiable price compared to other building materials. Another advantage of wood is its relative lightness, which reduces the cost of building a strong foundation for a house.
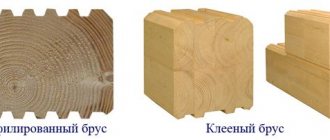
These and other advantages of wood have led to the fact that wooden private construction is relevant and in demand. And if there is demand, supply also appears. Moreover, the natural disadvantages of wood as a building material are offset by complex manufacturing technologies of modern lumber, one of which is profiled timber.
Advantages of a house made of profiled timber
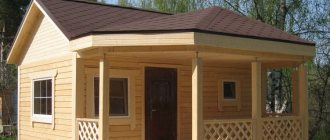
Building a house from profiled timber with your own hands
- can be quickly built. A company (team) of three people, having minimal skills in using carpentry and plumbing tools, is able to assemble a box at home within a season;
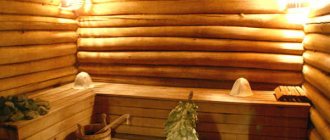
- The log house is environmentally friendly and has a unique microclimate. In addition, good air flow through the wood will ensure a sufficient level of air exchange;
- timber is an excellent heat insulator and allows you to conserve heat and save on heating;
- no need to immediately invest a lot of money in construction and finishing. These processes can be separated in time;
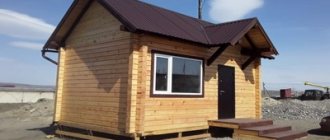
- a house made of timber has natural beauty, presentability and style.
Stages of building a house made of profiled timber
We will briefly list all the stages of construction, and dwell in detail on the key ones that directly relate to working with timber.
Step-by-step instructions for building a house from profiled timber with your own hands:
| Stage number | Name | Content |
| 1. | Design | – standard project of a house made of profiled timber; – individual project (unique). |
| 2. | Foundation | – determination of the type (tape, pile, slab); – calculation of characteristics; - excavation; – formwork installation; – installation of reinforcement frame; - pouring concrete; – strength gain. |
| 3. | Construction of a box house | – waterproofing; - the first crown. |
| 4. | Subfloor | – fits into the period of wall construction. |
| 5. | Box assembly | – subsequent crowns; – interior partitions; – interfloor ceilings. |
| 6. | Installation of the rafter system | – roof truss system; – insulation of the under-roof space; – laying roofing material. |
| 7. | Installation of individual elements | – installation of columns, supports and other vertical elements; – installation of window and door units; – arrangement of stairs to the second floor (attic, attic). |
| 8. | Interior finishing | – connection of communications; – decoration (cladding) of the room. |
| 9. | External wall treatment | – grinding; – treatment with antiseptic, primer, fire retardant, painting. |
Material prepared for the website www.moydomik.net
Foundation preparation
For building a house, the optimal foundation is considered to be a strip foundation. To arrange it, stones and vegetation are removed, mounds and holes are leveled. When the site is leveled, the territory is marked. After this, a trench is dug, the depth of which depends on the height of the future building and the soil, the width is at least 25 cm. The profiled beam is quite light, so for a one-story building you can use a shallow foundation.
For multi-story construction or construction on unstable soil, the foundation must correspond to the freezing level of the soil. On average, this figure reaches 1.2-1.5 m.
The following materials are needed for the foundation:
- concrete, sand, crushed stone;
- formwork;
- reinforcing rods.
Any house begins with preparing the foundation Source penza-press.ru
The trench is filled with sand and crushed stone, and a mesh is laid with rods to reinforce the foundation. It is recommended to use tying wire rather than welding to connect the rods. The formwork is laid out, and then everything is filled with concrete. To make concrete mortar, cement, sand and crushed stone are used - all components are thoroughly mixed. The ratio of materials is 1:3:4, cement grade is at least 400. The foundation stands for about 2 weeks.
Insulation of a house made of profiled timber
Any joint in a timber is a place through which air flows faster than through solid wood. This means it needs insulation. Manufacturers took care to minimize air flow by profiling the timber in different ways. It is the complex profile that allows a house made of profiled timber to achieve heat conservation and minimize the use of thermal insulation material.
The method of insulation depends on the type of beam profile, because some of them do not allow the use of insulation between the beams, and when installing others, the presence of insulation is a prerequisite.
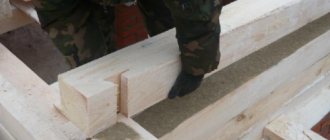
- without interventional insulation . This German profile (“comb”) allows you to make such a tight connection between the beams that insulation is not required. This, however, does not exclude the need to use insulation for caulking the outer part of the wall. In particular, after the final shrinkage of the house;
Assembling a house from timber without inter-crown insulation (comb profile)
- with inter-crown insulation . The Finnish profile provides this opportunity. In this case, the insulation is placed between the ridges of the profiled timber, which provides additional insulation at high installation speed.
Assembling a house from timber with inter-crown insulation (Finnish profile)
For laying between the crowns, predominantly natural materials without synthetic fibers are used, as a rule, jute (jute felt) or flax (eurolinen, jute-flax). These are tape materials that are made from jute and flax in a certain proportion. Strip width 50-259 mm, thickness 5-10 mm.
When choosing a material, you need to make sure that it is not very thick, because... Excess thickness can cause poor adhesion of the beams. The insulation should also not get on the ridge (for the same reason). It is convenient to install jute by rolling it over the surface of the timber. The cost of insulation per roll (20 m.p.) is indicated in the table:
| Density, g/m2 | Thickness, mm. | Width, mm. | Cost, rub/roll. |
| 350 | 5-6 | 100 | 105 |
| 150 | 145 | ||
| 200 | 165 | ||
| 550 | 8-10 | 100 | 145 |
| 150 | 195 | ||
| 200 | 235 |
Linen rope is often used for caulking.
Inter-crown insulation for timber - jute, linen (tape)
Thin jute is convenient for making caulk and insulating openings.
Caulking of timber walls and insulation of openings (windows, doors)
Moss, despite the fact that it is an environmentally friendly raw material for caulking, is not in particular demand in our area.
Less common today is tow. Although this material has currently undergone a number of changes. Tow intended for caulking a wooden house is softened with an emulsion (chemical composition), which makes it softer.
A distinctive feature of natural insulation is its environmental friendliness and the preservation of good ventilation. Among the disadvantages: the complexity of caulking, attractiveness to birds and insects, the integrity of the seam must be constantly checked and corrected, the likelihood of chips appearing on the timber after caulking (marks from a tool). In addition, natural materials are not hygroscopic.
Insulation with synthetic fibers is also available on the market, but their efficiency is lower compared to natural thermal insulation materials.
Another category of insulation is sealants for timber seams. They are used to seal small cracks and between crowns. Joint sealants are not afraid of moisture, are resistant to atmospheric factors, and allow you to obtain an aesthetic thermal insulation joint. They are more expensive than natural materials, but more durable in use.
Sealant for sealing joints in walls made of profiled timber
Good user reviews about such sealants for sealing cracks and seams in timber:
- Perma-Chink . Acrylic sealant with a wide range of colors. Cost 30,500 rub. per bucket 19 liters or 925 rubles. per cartridge 325 ml.
- Remmers Acryl 100 . Acrylic rubber sealant. Price 377 RUR/600 mm. Sold in tubes, compatible with most paint materials.
- Check Mate . Elastic sealant for cracks. Cost 925 rub. per cartridge 325 ml.
- Latex sealant . Excellent adhesion, wide range of colors. Cost 26,000 for 18 liters.
- Accent . Can be applied to a damp surface. Price 3,942 for 15 kg.
- Atacamast . Cost 1,800 for 15 kg. Users note the inconvenient packaging and application of this sealant.
Joining the frame, drilling holes, insulation
Dowels made of wood or metal are used to connect each crown. From the end of the beam they are located at a distance of at least 25 cm, and then every 0.9-1.5 m. For any part, even the smallest one, at least two dowels should be used, the length of which is at least one and a half times longer than the beam. The dowels must be buried several centimeters into the tree.
The holes are slightly smaller in diameter so they fit snugly. The depth of the hole is several centimeters greater than the dowels used. For drilling, use a drill with a limiter so that all dimensions are the same. The seal is carried out with a special insulation tape. The tape is stretched over the entire surface of the beam in several layers and secured with staples. On the outside, if the wall is not sheathed, the gasket is made at a distance of several centimeters so that it does not get wet.
The beams are laid overlapping each other, the edges are secured with dowels Source rwhouse.ru
Construction of a house from profiled timber - video
Cost of building a house from profiled timber
The construction of a house from timber on a turnkey basis or with your own hands consists of such factors as:
- material;
- fare;
- consumables;
- complexity of the project;
- house dimensions;
- project cost;
- payment for the services of a construction team, if they are hired to perform any work or consultations;
- costs of obtaining permits for connecting communications, etc.
Walling
The log house can be tied in several ways:
- in a paw or bowl - for round logs;
- on the main tenon - for a rectangular section, a labor-intensive method, but it ensures a high density of joints.
The dowels used can be made of wood or metal. Standard sizes are 12-15 cm high, 2.5 cm thick, the holes for them should be a few centimeters deeper. The laid row is adjusted in the corners, the insulation is laid and the next crown of logs is placed on top, then the dowels are driven in. The insulation can be tow, felt or jute. The materials are fixed with a stapler. When several rows have been assembled, openings for windows and doors are cut out, and holes are made on the cuts to ensure air exchange. On the last two rows, grooves are made for the ceiling.
At a sufficient level of timber laying, openings for windows and doors are cut Source iskona.org
When assembling walls, one must take into account the fact that virtually all the beams will differ by millimeters from each other, which can negatively affect the result. Therefore, you can make a flat side only from the inside or outside. Sometimes you will come across a bent or twisted beam. It is recommended to cut the former into small pieces, and use the latter for various outbuildings on the site, bathhouses, or use for other purposes. A beam curved in one plane cannot be used for walls, expecting that it will level out under the weight of other materials - this will not happen. Curved timber can be laid into a wall only by leveling it horizontally and sequentially fixing it with dowels.
During operation, the assembly is constantly checked and the following parameters are monitored. If any deviations are detected, further work is stopped until the problems are resolved. Particular attention is paid to the height of the corners and verticality. In case of problems with verticality, the problem is eliminated until the beams are replaced. In this case, the height of the corners can be adjusted by spacers between the rims.
All corners in the house, vertical and horizontal, should be 90° Source cocinandote.com
The assembly of a log house can be carried out in two ways of laying the timber - with or without residue. In the first case, you can get a warmer and more stable house with the simplest possible construction scheme. However, the material will be consumed with more waste, increased installation costs and a smaller building area. In addition, such a house is very difficult to insulate or cover with siding. In the second case, there will be no convex walls, so additional finishing and insulation can be carried out, and the total space inside increases. But it is very important to adhere to all the technology so that the house is not blown out.
Required Tools
Few tools were required to build a log bathhouse:
- chain saw (it would take a very long time to cut with a hacksaw);
- drill with a wood drill with a diameter of 12 mm;
- hammer;
- axe;
- hand plane (the volumes are small, and carrying a wire behind an electric plane would be inconvenient);
- slick;
- stapler and staples for it 12 mm high;
- roulette;
- marking pencil.
Since the weather was not always conducive to the successful progress of the work, we also had to stock up on covering material so that the fresh impregnation would not be washed off from the wood.
Price
The price for constructing a log house will depend on many factors, which include the quantity and quality of the timber, as well as its cross-section and complexity of construction.
Prices are approximate.
| Manufacturer | 150m2 in rub. | 300 m2 in rub |
| Brus House 53 | 1,290,000 | 3,356,000 |
| WILLOW | 1,060,000 | 3,190,000 |
| SVOD_STROY | 1,155,000 | 3,070,000 |
| BUILD kit-C | 1,240,000 | 3,270,000 |
| THREE builders | 970,000 | 2,500,000 |
Beautifully cover the radiators in the room: decoration options
The most interesting way to convert a heat source is in several ways:
- using decoupage technique;
- decorative screens made of various materials;
- special decorative film;
- plasterboard construction.
In turn, each of the methods has many original solutions. Let's consider the most effective and affordable ideas for implementation.
Decorative box with sliding doors
The design with sliding doors is one of the most technically complex options. But this is the most ergonomic way to hide the battery under the windowsill. Making such a model will require skills in using carpentry tools, the tools themselves, the necessary material and a drawing. For the facade, we recommend purchasing ready-made MDF panels with perforations. An experienced sales consultant at any furniture store will help you select accessories, including rails.
Radiator covers
The easiest way is to buy ready-made linings at a plumbing store. The range of such camouflage is not very rich, but it is pleasing with its ease of installation. The overlays are easy to install with your own hands, without the help of a specialist. It is enough to drill a couple of holes in the wall and secure the selected linings with fasteners.
Decoupage heating radiator
Decoupage is not an easy idea to implement. This option will bring a lot of fun to people with creative potential. For those for whom the creative process itself is already a pleasure. The decoupage technique is a topic for a separate article, it is so complex. Quite accurate information can be found on the forums of painting enthusiasts.
Decorative film for radiators
The next offer will be especially interesting for families with small children. The construction market will help you realize your wildest fantasies, which kids will surely love. Particularly impressive in the interior are glass screens that imitate an aquarium.
Another original solution for a nursery is to paint the heating sections in the form of a set of pencils. A drawing from your child’s favorite cartoon looks no less attractive.
Antique-style radiators
With the help of a simple set of painting supplies, a massive cast-iron battery turns into an antique rarity. Moreover, antique styling is a fashion trend in design.
To work you will need:
- putty knife,
- oil-adhesive putty,
- pattern stencil,
- brushes,
- sponge,
- fine-grained skin,
- gold or silver paint for metal.
- Thoroughly sand, rinse and degrease the surface.
- After complete drying, apply the stencil.
- Scoop up the putty with a spatula and apply it to the stencil.
- Once the design is dry, apply a coat of gold paint.
- Shade the edges with color.
Plasterboard structures
We offer another ergonomic way to beautifully close the radiators in the room
If you want to make the most of every centimeter of space, especially in the kitchen, pay attention to drywall. This inexpensive, accessible, versatile material will help you create the most creative designs.
This could be a shelf for a vase, a shelving unit, or even a resting place. By showing your imagination, you will get a functional and original interior element
What is especially important in a small apartment?
Box of lamellas for central heating radiators
Slats are a great way to hide heating appliances. An additional bonus is a visual increase in space. Strips of wood placed horizontally will make the room slightly wider. And vertical slats will help “raise” the ceiling in the room. In addition, such a design solution will promote proper circulation of warm air.
False fireplace instead of a radiator
The classic fireplace has always been, is and will be beyond competition. Interior designers offer a simple and, at the same time, bold solution - a false fireplace as a camouflage of an old radiator.
- Cut a square or rectangular hole in the center of the plywood sheet.
- Etch the shield with stain. Attach it to the wall with self-tapping screws, just like you are securing the shelf.
- Sand the surface with fine-grit sandpaper.
- Paint the batteries with a brick pattern or just white.
- Apply 2-3 layers of acrylic paint to the surface of the portal.
- To simulate fire, attach a lamp to the shelf, which is covered with stones from the garden plot.
Finishing work
The final stage of construction is finishing work, which should preferably begin no less than 12 months after the phase of active shrinkage of the house. Finishing works include:
- A casing block is cut into the door and window openings, a casing is made from a 50x150 mm board around the openings and windows and doors are inserted.
- Next, the floors and ceilings are insulated. After insulation, you can install a heating system at home. Only after this can you begin finishing the floors and ceilings, as well as installing platbands and baseboards.
After all the above work has been completed, you can move into the house.
Tips for the builder
Foundation
Log houses are usually built on one of four types of foundations. The strip base can be prefabricated or monolithic. In the first case, FBS concrete blocks are used for assembly, laid on a gravel-sand backfill and concrete preparation up to 100 mm thick with ligation of vertical seams.
In the second, the tape is poured after laying it in a previously opened trench of the reinforcing frame; Before pouring, the walls of the trench are covered with polyethylene or roofing felt.
A high base requires the installation of additional formwork.
The foundation on bored piles involves drilling wells with a diameter of 300-400 and a depth of 1 - 2 meters. The walls of the wells are waterproofed with roofing felt rolled into a pipe; then a reinforcing frame is lowered into the well, after which it is concreted with mandatory bayonet or vibration compaction.
A screw foundation uses steel pipes with welded or cast tips, reminiscent of a ship's propeller, screwed into the ground with considerable force as supports. This type of foundation can be used on swampy or clayey soils. It transfers the pressure of the building's mass to the denser underlying layers of soil.
Screw foundation with wooden grillage.
Finally, the undoubted leader in cheapness of execution is the columnar foundation.
The instructions for its construction are extremely simple:
- 8-10 cm of low-quality concrete (concrete preparation) is laid out on the sand bedding;
- Brick pillars or pillars assembled from concrete blocks measuring approximately 400x400 - 500x500 mm are erected on it;
- The surface of the pillars is waterproofed, after which a wooden grillage or the first crown of the log house is anchored to them.
Tip: instead of anchor bolts, you can use a piece of reinforcement previously laid in the masonry of the column, protruding above the support by 150 - 250 mm. The beam is placed on the anchor with a pre-drilled hole; thereby preventing its lateral displacement.
Log house
A jute tape is laid between the grillage or strip foundation and the first (tying) crown. It is also used to seal all other inter-crown connections.
The corners of the log house are kept strictly straight, without the slightest gaps or distortions.
The crowns are connected by dowels made of hard wood (usually birch), or steel pins driven into holes drilled in them. One dowel should connect three crowns; the step between them is 1.5 meters.
Square birch dowels are used here.
Do not use dowels of natural humidity with kiln-drying timber. Otherwise, due to the shrinkage of wetter wood, play will quickly appear between the dowels and crowns.
Roof
The main subtlety of creating a rafter system in a house with timber gables is that the attachment of the rafter legs to the ridge girder, intermediate girders and mauerlat must be movable. Otherwise, shrinkage of the gables and walls will cause damage to the fastenings or deformation of the rafters.
The movable fastening of the rafters allows you not to be afraid of shrinkage of the walls and gables.
Window
Before installing windows, the openings are equipped with casing - a movably fixed edging made of bars. The window frame is attached to the casing; the upper part of the opening (5-12% of the height) remains free and is subsequently filled with elastic insulation (tow or polyurethane foam).
The photo clearly shows the gap in the upper part of the opening.
Advantages and features
The advantages of profiled timber include:
- Price. Profiled timber with natural humidity has an acceptable cost. And the need to wait for shrinkage allows you to divide the total costs into parts according to the time they are needed.
- Long service life.
- Durability and reliability.
- The structure of the log with a profile greatly simplifies construction and reduces insulation costs.
- Breathability. Solid wood timber does not lose its characteristics during processing. But when purchasing laminated veneer lumber, you should make sure that the adhesive base is safe.
- Natural, environmentally friendly material. Allows you to create a unique microclimate in the room; tar vapors have a positive effect on residents.
- Aesthetics. Due to the fact that the material has a smooth and even surface, the corner elements harmoniously complement the overall appearance of the log house - the log does not require the use of decorative finishing inside and out.
- Low thermal conductivity, provided the assembly technology is followed and high-quality insulation is used.
- Uniform shrinkage and resistance to deformation.
- A reduced percentage of humidity and making logs from the core part of a tree trunk can reduce the number of cracks during shrinkage.
- Easy to assemble at home. The tongue-and-groove connection simplifies the process and allows you to assemble the house in 1 - 2 months.
- Corner joints made under production conditions reliably secure the crowns.
- Possibility of building structures of various shapes and sizes. Standard bars are made 6 meters long, but can be made to the required length upon request.
- Repeated caulking of the walls is not required, because the ridge lock eliminates the possibility of gaps appearing between the crowns.
- The construction of houses from profiled timber can be done on a columnar or shallow strip foundation.
- The laying of communications (electrical wiring, pipes) can be provided for at the manufacturing stage. For this purpose, technological holes and channels are drilled using special machines.
Disadvantages of profiled timber:
- Long shrinkage period. At the same time, the use of heating and heating devices can lead to uneven shrinkage and an increase in the number of cracks.
- When cutting a log, the structure of the growth rings is disrupted and if they are not treated with antiseptics, the process of rotting may accelerate.
- Formation of cracks during drying. On a square-section log, they appear on all sides, and if the cross-section is rectangular, then mainly on the wide sides located inside the wall.
- Low resistance to insects, fire and weather conditions. The problem is easily solved by using fire-retardant impregnations. After complete drying, they do not emit toxic compounds and pose no danger to humans.
- Material, even with a cross-section of 200 x 200 mm, when used in winter or in northern regions, requires additional insulation from the facade.
- The need to use insulation in inter-crown seams.
A significant disadvantage of a house made of profiled timber is the impossibility of carrying out redevelopment or superstructure work.
When choosing a material you should remember:
- timber structures are more durable than those made from profiled timber;
- the evenness of the sides, to check it is enough to place the beam on a flat base;
- the intervals between annual rings should be equal, this will avoid deformation;
- uniformity and uniformity of surface color. If there are darker areas, this may indicate the presence of internal tension and a possible change in shape in the future.
Analyzing the described pros and cons of profiled timber, we can say that in comparison with similar wood materials, it is very popular due to the optimal combination of quality characteristics and affordable cost.
Let's give the floor to the Scandinavians
There are a lot of insulation materials that are superior to wood in terms of heat conservation. And large-format profiled timber is used for roads due to the abundance of waste that is unsuitable for processing into building materials. Swedish builders decided to reduce the cost of processes by including paired parts with a thickness of 70 mm.
Using smaller section wood reduces costs by up to 40%. Foamed breathable insulation seals joints and allows you to reduce the power of heating devices even in the Arctic zone. Penoizol is ideal in terms of cost and thermophysical properties on the market.
An option was tested with the replacement of wooden beams with a laminated analogue of chipboard made from chips. The 100 mm heat insulator bears the main load for heat conservation. The resulting monolith is not afraid of warping and cracking. Shrinkage has also decreased. It often makes sense to adopt such a new product.
Progress does not stand still
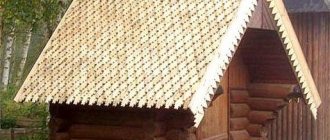
Roof assembly
The beams are laid at a distance of 90-110 cm from each other; if the attic is used as a living space, then 15-20 cm beams are used, non-residential ones - 10-15 cm. Then the support posts and rafters are fastened. For the lathing, boards approximately 15 cm wide and a maximum thickness of 2 cm are used. The distance between the rafters depends entirely on the weight of the ceiling, the standard is 1.2 cm, fastening is carried out with self-tapping screws or nails. Maximum attention is paid to the fasteners of the support posts. Waterproofing is applied to the sheathing, and then the roofing covering.