It is more difficult to build a log house than an aerated concrete or brick one; each crown requires a particularly careful attitude to cutting down the material, especially when laying and connecting the beams in the corners. A good understanding of exactly how the cut should be done is required. Even a seemingly simple procedure for joining timber along its length will require markings accurate to the millimeter, otherwise cold bridges will form in the walls, and, even worse, the material will become saturated with water and deformed.
How to lay timber correctly
Before learning how to connect timber sections into one run or at corners, it would be correct to master the basics of the technique of laying timber into crowns. Moreover, no fewer problems and errors are allowed when installing walls than when connecting beams together along the length. Typically, craftsmen consider splicing to be a last resort and try not to use crowns with a longitudinal connection.
Before you start assembling a log house with your own hands, it is recommended to do a little preparation:
- First of all, the quality of waterproofing of the strip foundation is checked; axial markings of the perimeter are applied at the corners, along which the individual beams will be aligned when connecting to each other and to the wall;
- Cutting fasteners for connecting crowns and joining beams in the corners. Blanks for dowels and dowels must be cut, processed and dried in advance. Steel corners and T-profiles are treated with drying oil;
- Rejection and selection of timber for the first three crowns of the box are performed. These several beams should not have defects, knots, or spliced joints. Geometry is as close to ideal as possible.
It is clear that the construction timber must be treated in advance with an antiseptic and fire retardants, and dried in a pack to a moisture content of 11-14%.
Advice! For a house or a full-fledged residential cottage, the geometry of the material should be of the highest quality. If it suddenly turns out that the purchased timber is misaligned, or the cutting line is not as smooth as desired, in this case the batch is sent for planing and chamfering.
After finishing, they select the timber that will be used for laying the walls.
Cross Lap Knit
Lap knitting is a universal connection of lumber, used when laying walls made of logs and timber. The workpieces are placed at right angles into cut-out grooves; the size of this groove depends on the size of the material used. Such a lock is used in the construction of log houses and ceilings, the construction of bridges, and the construction of canopies. The main methods of cross fastening:
- Half-tree connection;
- Quarter and third wood joint;
- Notch in one row.
The most widespread cross-shaped connection in half a tree is when cutting corners into a bowl; it is used in the construction of utility structures, residential buildings and baths. The structure is reinforced with building brackets, dowels and dowels.
The nuances of selecting and connecting crowns of the first and second rows
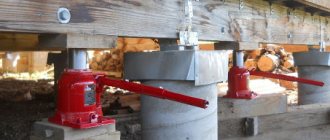
First of all, the selected timber must be absolutely flat. After the material is on the foundation strip, covered with two layers of roofing material, you need to arm yourself with a good building level, preferably with a hydraulic circuit, and check the position of the first crown. You cannot make a connection without making sure that the first crown is perfectly horizontal.
Almost always, masters will be disappointed. The supporting surface of the foundation strip is far from plane and has a slope towards one of the corners. Therefore, if you simply make a connection using anchors embedded in concrete, the first crown will turn out to be crooked.
Even if you try to compensate for the deformation by adjusting the joints in the locks at the corners, this will only worsen the situation; due to shrinkage, huge gaps will appear between the timber crowns. Therefore, before fixing the first crown, the beams are leveled horizontally using wooden pads.
For your information! To ensure the tightness of the connection between the timber and the foundation, the space between them is filled with foam, and after 10-15 minutes the nuts on the anchors can be tightened.
Particular attention should be paid to laying the timber and assembling the corners. The first row must be not only strong, but also flexible, therefore, in the starting crown, an end connection on a key is used in the corners, and metal corners are installed on the inside.
Methods for connecting timber
One of the disadvantages of using lumber material is the strict restrictions on the geometry of the run after the two sections are connected to each other. It is important that all the side edges of both fragments, after connecting the timber to each other, are in pairs in the same plane.
For joining, three types of material splicing are used:
- Longitudinal or linear, two sections of timber are connected to each other to produce one purlin for the entire length of the wall;
- Corner connection, the individual parts of the crown are joined together in a lock in the corner of the box;
- Vertical connection of crowns in the construction of one wall.
It is clear that, regardless of the type of joint and the method of constructing the lock, the spliced surfaces must be sealed with a sealant, preferably jute tow or heat-treated flax fiber. Options with dried moss are best reserved for bathhouses or light cottages where the wall height does not exceed 3 m, which means that the risk of the seal being squeezed out of the joint remains minimal.
Root spines
This technique is based on creating spikes and sockets suitable for them. A tenon is cut out in the center of the end on the edge of one element for connection. Its length is equal to the width of the material. On another block, accordingly, a groove is formed of a size suitable for the tenon. When joining the groove, the tenon is driven into the groove with force. Most often, in order to insulate the corners, flax-jute material is laid before fastening.
The dovetail connection is one of the options for such joining. The manufactured tenon in this case has a trapezoidal shape that expands outward. The groove has a similar shape. This joint is more reliable and dense.
Corner beam connection
Currently, more than a dozen different schemes for constructing locks in corners exist and are actively used. All of them are divided into two large groups:
- Connection with timber residue;
- Docking without leaving a residue or, in other words, leaving the end sections outside the walls.
The simplest connection options can be made with your own hands. At the same time, the strength of the corner connection in all cases is sufficient for the timber box to remain stable. More complex insertion options are used to increase the rigidity of corners or reduce heat loss through cracks.
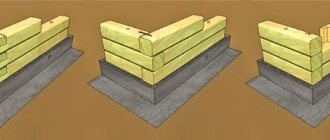
Angle with remainder
In this case, two adjacent beams of one crown are sawed into the lock not at the ends, but at some distance from the edge. The result is a corner with two protruding vertical rows of ends. It is generally accepted that this type of angle ensures minimal heat loss due to the large length of the cut line.
Among the most popular schemes, two variants of the angle can be noted - “half a tree” and its more advanced version - “ohryap”. Other schemes and methods of connecting beams do not have any special advantages, except that the rigidity of the connection increases. They are used for tall buildings made of timber, material thickness less than 100 mm.
If you build a log house from timber with your own hands, then it is best to choose the “half-tree” scheme for the corners. You can make a lock in the following way:
- On the laid beam, an indent equal to the thickness of the material is measured from the end;
- Using the template, a rectangular groove is cut at ½ the height of the beam on the joining parts of the crown;
- Seal the lower element of the lock with a sealant and assemble the connection.
Of course, the quality and speed of manufacturing lock parts depends on the availability of skills and experience. Beginners often have to trim the surfaces of the future joint with a chisel, but high qualifications are not required to assemble the corner.
Joining “in the okhryap” differs only in that two grooves are made with a thickness of 1/3 of the vertical size of the beam; otherwise, this method is not much different from the previous connection.
A castle with a remainder has high rigidity, so it is used to build various types of turrets and superstructures when, according to the designer, it is necessary to emphasize the “wooden” style of the building.
Angle without remainder
If the design of a building made of timber requires that the box look absolutely “clean”, without protruding parts, then in such a situation methods of connecting the crowns along the end surface are used.
The most well-known schemes for making “clean” corners:
- “Half-tree” option without external ending;
- Keyed connection;
- A lock with a molar or tooth.
The first option differs from corners with the remainder in the profile of the connected surfaces. If in the latter case a rectangular cut is made, then in a “clean” angle the joint surfaces have a wedge shape.
The simplest scheme involves joining the end to the side surface of an adjacent beam. To limit the movement of the crown in the horizontal direction, grooves are cut out on the connected sections and embedded key elements are installed. As a result, the joint turns out to be quite simple and, most importantly, movable. Any roll or uneven settlement will not affect the strength of the corner.
The warmest option is a connection with a spike. A tenon or tooth is cut out from the inside of one of the beams, and a tenon is made in the adjacent element. After laying the seal and settling the crown, the corner turns into an almost windproof connection. Locks without residue are most often closed with overlays made of half-inch boards.
Half swallowtail
With this connection, the tenon is sawed down into a cone. The characteristics of the half dovetail connection do not differ from the knot described earlier. But the strength indicator increases. The conical cut securely holds the beams and prevents them from moving apart. This connection is used in the construction of walls with a length greater than the length of the beam.
There is no difference in the complexity of manufacturing when joining a half dovetail and a straight tenon. Both methods are performed with or without a template. For an experienced professional, the difference in the labor intensity of making these joints is almost imperceptible.
The half dovetail tenon should not be more than 5cm at its widest point. Otherwise, a crack will appear in the timber with the groove. This happens due to uneven shrinkage. The picture shows this place.
Connecting timber to each other along the length
Typically, the length of one beam purlin does not exceed 6 m. You can, of course, buy longer material, but the cost of such blanks is several times higher than the price of standard sizes. Sometimes splicing individual sections and connecting timber together into one run is carried out in order to save money and building materials.
In order for the connection to be strong, the lock is formed as a joint of two halves of the parts being connected. Simply put, each piece of timber is sawed down to ½ thickness, folded and tightened, driving nails at an angle of 60-70° to the surface. The length of the groove is taken to be 2-2.5 times the height of the crown.
For timber with a thickness of 150 mm or more, a more complex multi-stage cutting scheme can be used.
Important! In this case, the connecting surface can have 3-4 steps, but the main thing is that the joining planes are wedge-shaped with a slope.
As a result, if the beam shrinks along its length, the joint at the connection does not diverge, it becomes compacted, and the gap between the mating surfaces is reduced to the minimum possible.
Disadvantages of longitudinal connection
The idea of forming full length beams using a scheme of longitudinal splicing of smaller sections looks attractive in theory, but in practice it is not always convenient. A connection of two parts is always a potential additional bridge of cold, even if full-fledged insulation is laid between the halves.
Moreover, the length of the joint is several times longer than the thickness of the timber, so moisture will collect in the cracks, and after a few years the surface around the lock will be an ugly gray-green color. Regular cleaning and bleaching of the walls will be required.
The main disadvantage of such a connection is that as the timber walls dry out and shrink, the width of the slots in the lock increases several times, so the insulation or sealant quickly falls out of the connector. Therefore, sealing and caulking will have to be done every year.
One way to eliminate possible moisture leakage involves using a special acrylic sealant for timber walls. In this case, linen tape of reduced width is used to pack the joints between the crowns. For example, for a beam 100 mm wide, you need to lay a compactor measuring 90 mm. At the end of the shrink installation processes, the joint is cleared of flax residues and covered with a thin layer of acrylic sealing. Of course, this is a temporary measure, and it is impossible to completely protect against condensation in this way.
Advantages of a warm corner
The advantages of connecting profiled timber into a warm corner:
- No cracks or freezing.
- High speed of installation, even a non-professional can handle the job. “Wet” work, including with concrete, is not required.
- Attractiveness from the outside and inside of the house.
- No cladding or insulation is required.
- It will help maintain a comfortable microclimate: the room will be warm in winter, cool in summer.
- Fastening stability.
- No nails or other fasteners are required to connect corner elements.
- Even after shrinkage, the gap between the tenon and groove will not exceed 1-3 mm. In some cases, the gaps are deliberately made large, up to 5 mm - this significantly simplifies the caulking of the log house.
However, connecting a wooden beam into a warm corner has nuances:
- Only masters can accurately adjust the tenon and groove one to the other.
- A warm corner is more expensive than a butt joint, but as a result it helps to save on the use of heating devices and caulking.
How to fasten timber together
In addition to corners and longitudinal joining, the crowns have to be connected to each other in the vertical direction. After laying two rows of timber, additional fastening in the form of dowels or dowels must be installed.
To tie the crowns, it is best to use square wooden rods with an edge size of 18 mm and a length of 250 mm. For installation, pre-drill 25 mm holes. The drilling depth is equal to one and a half heights of the timber. That is, one dowel completely pierces the upper beam and half of the lower one. The dowels are driven in a checkerboard pattern so that the vertical fastening line does not coincide with the connections on the lower rows. Dowels must be attached to corners, window and door openings.
Which dowels to choose
It is best to use wooden fasteners to connect the crowns. Metal dowels are much stronger than wooden dowels, but they are used in especially loaded joints. Usually craftsmen are not particularly fond of metal for two reasons:
- Condensation always forms on a steel surface in winter, the wood swells and rots, and the strength of the connection drops to zero;
- After six months of use, the metal rusts and the connection between the crowns becomes jammed. Instead of normal shrinkage, the rows simply hang on metal rods.
If you choose dowels, then square rods made of dried birch wood are best suited. Thanks to the sharp angles, the fasteners firmly cut into the soft wood of the beam, making the connection strong and reliable.
Round wooden dowels are more difficult to install; if you make a mistake in the diameter of the hole by even half a millimeter, the connection of the two beams will not work, and the fasteners will easily fall out of the corner or wall. If you take the size with a margin, you can easily split the timber before a crack forms.
In addition, adhesive materials, paints and mastics cannot be used to assemble corners or walls made of timber. The only exception is polyurethane foam, which is blown in to seal the supporting surface of the tape. Any rigid connections will not help eliminate cracks and gaps.
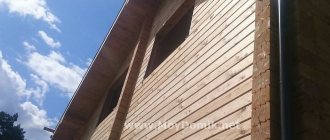
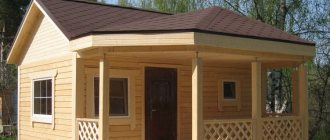
Advantages of a log house
Natural wood is the most environmentally friendly material of all possible basic building materials. It is easy and pleasant to breathe in any log house. A natural microclimate, saturated with oxygen, with specific microelements and resins of a particular type of wood will always contribute to the stable health and well-being of residents. Cedar lumber also has an antiseptic and cleansing effect on humans and the environment as a whole. Read more about the properties of cedar in construction.
Fast construction time.
From the moment the material is delivered to the site until the log house is completely erected, it can take only a few days. The construction process by skilled craftsmen does not take much time. With the exception of the construction of large-area log buildings and complex projects. Another thing is its shrinkage, which we will talk about later in the article.
Low thermal conductivity.
A high-quality log house does not need to be additionally insulated with artificial materials. But the wall thickness should not be thinner than 25 cm.
Good sound insulation.
Wooden walls practically do not allow noise to pass through. At a moderate noise level, residents in adjacent rooms will not hear each other. The exception is extreme noise coming from the street, which can be heard in a house made of any material.
Durability.
With normal care and permanent residence, a high-quality log house will last up to a hundred years. In our time, there are quite a lot of examples of such log houses preserved, the strength of which would be the envy of many modern materials.
- Breathing house. The natural and natural gas exchange of a log house always creates an atmosphere saturated with pure oxygen inside the house. At the same time, the log house does not require the installation of additional ventilation. For such a house, natural air flow through windows and doors is sufficient.
- Quite a light house. Compared to heavy stone and brick houses, a wooden frame does not require such a massive and heavy foundation, since it is much lighter. Thus, some savings are possible when constructing the foundation.
- Beautiful appearance. A log house is a structure on which the gaze of any person involuntarily and for a long time lingers. You want to look at it and want to admire it again and again. The log structure, the unique wood pattern of each log and timber makes each log house beautiful in its own way. It is possible to build an ugly stone house, but it is simply impossible to build a log house. Just looking at your own, chopped-up house brings great pleasure.
- Unique and cozy atmosphere. It is impossible not to highlight this ability of a log house as a separate advantage. This kind of atmosphere is created naturally. In such a house, the tree itself seems to endow the residents with its strength and natural inspiration. The beneficial environment of the log house promotes maximum productivity and the creative spirit of its owners.