0
6119
23.12.2015
Today, paving stones have gained immense popularity, which is an ideal material for creating driveways to houses and garden paths. Gradually it replaced the black and ugly asphalt. With the help of paving stones, a wonderful pedestrian area can be created. To make it unique, you need to use tiles that have different shapes and colors. This will help create exclusive patterns and ornaments. In this article we will talk about how to lay paving stones correctly.
Paving stone area in front of the house
What are paving stones
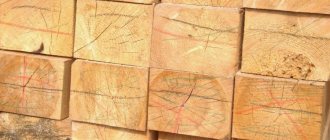
Since ancient times, the raw materials for the production of this building material have been roughly processed natural materials (wild stone, granite, marble, gabbro, diabase, sandstone), hewn to a rectangular shape.
Due to the high cost of the natural product, the modern production of road surfaces began to use concrete or polymer concrete, which are not inferior in their performance characteristics to natural structures. And in some respects (weight, processing, price) it is better.
- By vibration casting or vibrocompression, bricks of any shape are obtained;
- By adding dyes to the mixture, paving stones can be made in a variety of colors;
- Production technology allows us to obtain elements with a smooth and even surface;
- The exact dimensions of the products make it easier to fit them when laying.
Another type of modern path covering is clinker paving stones. It is made from ordinary brick. To increase wear resistance, the bars are pressed, tinted and fired. Therefore, this type is more expensive than products made from cement or concrete mixtures.
What does landscape design consist of?
When landscaping a site, owners of country houses take into account not only their financial capabilities, but also their personal needs and wishes. But at the same time, some nuances must be taken into account so that the result of the work done is truly pleasing to the eye.
Landscape design of a summer cottage
Pay close attention to what types of element groups exist and how they are arranged. In particular, these are:
- buildings (both commercial and residential);
- paths, platforms;
- lawn;
- technical elements (for example, irrigation system, lighting, etc.);
- green spaces;
- decorative elements, small architectural forms;
- artificial reservoirs.
Paving slabs in the landscape
Wooden gazebo with barbecue The main function of garden paths is to provide access to certain objects; They also allow you to walk around the site. If the path is properly arranged, then you can move along it comfortably, without the risk of getting your shoes dirty. As a rule, paving stones and paving slabs are used for the installation.
Types of garden paths
Features of choosing paving stones
Nowadays the construction market offers a wide range of road surfaces. The owner of the site must, first of all, decide which area he is going to pave. The aesthetic and performance characteristics of the bars directly depend on this.
Parameters that determine the purpose of the material:
Thickness
- Bars up to 30 mm thick are suitable exclusively for pedestrian areas.
- Park areas and recreational areas with increased traffic are paved with elements from 50 to 60 mm.
- For the construction of access roads and parking for cars and trucks, stones over 80 mm are used.
Advice from the experts! When purchasing a batch of bars, knock the tiles together. A dull sound indicates that the production technology of the product has been violated (insufficient drying).
Also, the product must be accompanied by a quality certificate, which reflects such characteristics as:
- Frost resistance. The indicator indicates the number of freezing and thawing cycles that the bars can withstand. For example, in the middle zone, temperature changes vary from - 25 ° C to + 25 ° C, with a frequency of 5 to 7 times. This means that the service life of tiles with a frost resistance of 200 and with 5 cycles of temperature changes will be equal to 40 years.
- Strength. Strength indicators are assessed according to three criteria: bending (resistance to oblique loads, value from 60 kg/cm²), compression (impact of vertical loads with a value from 400 kg/cm²), abrasion (for paving stones this indicator should be less than or equal to 0.4 kg/cm2).
- Water absorption. The indicator is measured as a percentage. Moreover, the lower it is, the better. For example, if the value is 1.5%, then in this case the material will absorb water at the rate of 15 g per 1 kg of paving stone weight.
Form
Decorative wave paving stones
The configuration of the elements does not affect the strength of the paving stones. Therefore, the choice of decorative elements depends on the personal preferences of the owner of the site.
Landscape designers recommend selecting several coating options. The original composition will enliven the area.
The construction market offers decorative tiles in the shape of clover, wave, parquet or honeycomb.
You can lay the bars according to your own sketch, or contact the designers.
Filling the forms
First step. Place the forms on a flat horizontal surface.
Second step. Fill the solution to approximately half the volume of the mold.
Third step. We lay out a reinforcing mesh made of wire or scraps of steel rods.
Fourth step. Fill the mold completely.
Fifth step. Carefully compact the fill, level and smooth the surface of the products.
Next, we work depending on what we want our paving stones to look like. If you need paving stones with a pattern, do the following:
- We take a rigid wire and bend a pattern of the desired shape from it;
- press the resulting stamp into the wet fill to the desired depth.
If you need smooth and shiny tiles, we iron them. To do this, pour a little cement evenly onto the surface of the product that has not yet had time to harden and gently rub it in with a trowel. Using the same technology, you can rub various small pebbles into the tiles.
Let the paving stones dry. The drying time depends on the thickness of the products. On average, this takes 2-3 days. If possible, leave the paving stones to dry directly in the molds - this way they will definitely not crack. If it’s hot outside, periodically moisten the surface of the products with water.
What are the advantages and disadvantages of paving stones
Compared to other coatings (asphalt, concrete, gravel), paving stones have a number of advantages.
- Aesthetic appearance due to a variety of shapes and colors;
- Strength, durability, resistance to frost and temperature changes. The service life of stone in the courtyard of a house made in accordance with GOST is from 20 to 40 years;
- Environmental friendliness. The tiles do not emit harmful substances into the atmosphere;
- Repair of individual modules can be carried out without the involvement of specialists. The fragment is simply removed and a new stone is inserted.
In addition to the above, it is possible to lay paving stones with your own hands. Without the involvement of specialists.
The material has inherent disadvantages.
- If there are errors in the layout, a cobblestone road may shrink;
- During precipitation, slipping on a surface that is too smooth is possible;
- Handicraft production of coatings, in violation of technology, even under light loads, can lead to damage to fragments.
Proper selection and placement of stone modules will help you avoid unpleasant consequences.
Result of work
So, it’s a shame, but I still laid 60 square meters of paving stones on my own. Lastly, a photo of the paving stones in the yard.
The result of laying paving stones in the yard
Certain jambs are visible, but for the first time it will do.
I wish everyone good luck in landscaping!
What is the difference between paving stones and paving slabs
Paving slabs and block coverings have many similar characteristics. But the owner of a private home should know their differences from each other.
- Classic paving stones have the shape of a cube, parallelepiped or rectangle. The height of the material (corresponding to the length and width) ensures its greater strength compared to flat tiles;
- The decorative variety of shapes and colors of the bars allows you to implement any design solutions for arranging places with high loads (high traffic, heavy traffic). Areas with light loads are paved with tiles;
- The raw material for the tiles is heavy, fine-grained concrete. The bars are made from natural materials or concrete and polymer concrete, so their cost is higher than the tile coating.
If there are no financial problems, then it is better for the homeowner to give preference to a coating made of bars.
Marking the paving area
First, on the ground, you need to mark the boundaries of landscape objects that will be created using tiles. It should be taken into account that the covering on the side that is not adjacent to any building must be fenced with a curb. When planning, you also need to think about where rainwater will be drained.
First, the site is marked using spray paint or small mounds of lime. Then you need to check whether objects with such outlines will be convenient for use.
Planning before laying paving slabs
For example, if we are talking about paths, you need to walk along them. If necessary, adjustments are made, after which wooden pegs or steel rods are installed at the corner points of the contour and a string is pulled between them at a height of 5–7 cm.
The coating will need to be given a certain slope, so the string should be pulled strictly horizontally - it will serve as a guide. To control horizontality, you need to use a water level.
Paving stone laying technology
Laying paving stones requires careful preparation, following the algorithm. This affects the lifespan of the decking.
Preparatory stage
This item includes several steps that must be performed sequentially.
Drawing up a diagram and marking the path
Laying out the area for paving stones is carried out using strings and pegs.
Before laying the covering, it is necessary to complete the project, drawing on the sketch all the buildings and proposed paths (taking into account bends). If there are large trees on the site, you should maintain a distance between them and the decking of at least 1 - 2 m so that the roots do not undermine the sidewalk bars.
Before marking, it is necessary to clear the areas of vegetation (along with roots).
Note! Before starting installation, it is recommended to first calculate the need for small fragments of the coating, taking into account an error of + - 5% (laying, undercuts). And then summarize the result. When laying a complex pattern configuration, the error will be from 10 to 20%.
The sand layer under the tiles is usually from 3 to 5 centimeters. When using crushed stone, multiply the area of paths and platforms by the thickness of the substrate layer (5–10 cm).
The amount of border framing is calculated based on the length of the perimeter of the site minus the places where the tiles join.
The division of the territory is carried out using pegs and twine (cord). The cord should be flush with the coating (from 5 to 8 cm). The construction level will help maintain the exact dimensions.
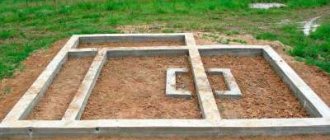
Soil development work
Ready trench for laying paving stones
You need to lay paving stones in a trench formed by excavation of the earth. Its depth depends on the type of cushion (sand, gravel or reinforced concrete). Add 10 cm to the width of the stone sheet on different sides of the trench and remove the soil.
Installation of a drainage support layer
If the soil is swampy or clayey, it is necessary to carry out drainage work (forming a slope and installing drainage pipes for water drainage). On dry soils, it is enough to lay the blocks with a slope of 2 or 3% towards the curb.
Geotextiles are laid out at the bottom of the trench, and the drainage layer is filled with crushed stone and gravel. Then the non-woven material is laid again, and then a pillow is compacted on top - the base.
Creating a Foundation
The laying technology involves arranging a base for the bars. The choice is influenced by the texture of the stone.
Gravel base
Gravel base for paving stones
This type of substrate has high load-bearing characteristics. The granules are evenly distributed over the crushed stone and compacted thoroughly.
Cement-sand base
A base made of a cement-sand mixture for laying paving stones.
A base for a covering made of a mixture of concrete and sand (ratio 1: 3) is used on areas with low loads. To level the area, use a powder of crushed stone. The optimal platform thickness is from 10 to 15 cm.
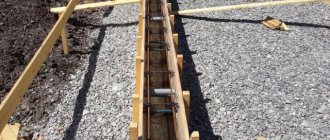
Reinforced concrete base
Reinforced frame for installing a concrete base for paving stones.
To obtain a homogeneous mixture, you will need a concrete mixer. A solution of cement, sand and crushed stone is laid in one layer. This promotes uniform distribution of the mass and eliminates bloating and the formation of other defects.
Concrete is laid on a reinforced mesh.
Foundation for garden and pedestrian paths
Laying paving stones on a sand-crushed stone base.
In a summer cottage or garden plot with little traffic, the base for paving stone paths is an embankment of sand and crushed stone.
Base for moderately loaded paths
Sand concrete for paving stones
Sand concrete (cement 1: sand 3 – 6) is used for parking areas and vehicle parking.
The mixture is laid dry, and then the surface is abundantly moistened with water.
Base for laying paving stones in areas of high loads
Reinforced concrete base for paving stones
High load-bearing capacity is shown by a reinforced concrete base. Its filling is required in areas with heavy loads, on heaving or unstable soils, and in difficult climatic conditions.
Installation of paving stones
Layout of paving stones
Paving stones are laid in several ways:
- Classic scheme. The bars are placed parallel;
- Network. The bars are laid parallel and perpendicular;
- Christmas tree. The elements are positioned at an angle of 90° relative to each other;
- Diagonal scheme. Elements are laid diagonally.
Proper laying of paving stones means the elements are positioned strictly in a horizontal plane. The accuracy is checked with a level.
If the stone is skewed, the stone should be removed and sand should be added, and then the block should be leveled with a rubber hammer.
Laying paving stones will go faster if you pull the string horizontally in each row. And according to this guideline, lay out the next row.
Filling joints between stones
Filling joints between stones
Sealing joints is carried out after laying the covering elements. This is necessary to improve the performance characteristics of the coating. The grout is the mixture on which the bars are laid.
First, the mortar is spread over the surface, and then the excess is removed using a brush with artificial bristles.
The procedure is repeated again after 1.5 - 2 weeks.
Installation of curbs
Installation of borders
The border stone is installed before the main fabric is laid. The elements are fixed with cement mortar. When the mixture begins to dry out, it is necessary to add crushed stone on both sides of the stone.
To maintain aesthetic parameters, the curbs should be located at the same level with each other and their height should preferably be such that after installing the paving stones, they would also be at the same level with it. The height is set by stretching the cord horizontally.
Filling the form
Fill out the form as follows:
- install the product on a vibration table leveled to the building level - factory or homemade;
- use a brush to coat the inside of the mold with lubricant;
- fill the solution halfway and turn on the vibrating table. The total duration of vibration laying is 5-10 minutes:
- after half the vibratory laying cycle has passed, a steel or polymer mesh (reinforcement) is placed on the solution and the solution is added to the top.
After this, the forms are removed from the vibrating table onto the rack.
It is not necessary to paint the entire tile. You can prepare two portions of the solution: tinted and regular gray. First, the mold is filled one third with colored solution, then with regular solution. By pouring two different colored layers, you can imitate marble.
Popular layout methods
Despite the fact that paving stones have a fairly simple geometric shape with a surface in the form of a square or rectangle, a wide range of colors and different ways of laying them allow you to create interesting original patterns. The most popular include:
- classic shape, with parallel arrangement of identical elements;
- “braid”, with parallel and perpendicular arrangement of stones;
- “herringbone”, with tiles laid at an angle of 90 degrees to each other;
- “weaving”, in which alternating longitudinal and transverse strips of material are performed;
- "chaos", or random mixture, using paving stones of various sizes and colors, laid at random;
- radial or circular pattern creating circular compositions;
- a two-color “chess board” laid out like a checkerboard.
When doing work with your own hands, you should not strive to create a particularly complex pattern. As a result, the surface of your path may not look too sophisticated, but the quality of the coating will be ensured.
Installation on cement-sand mixture
How to lay paving slabs correctly if they are expected to be subject to heavy loads? The following recommendations should be followed:
- A sand powder 3-4 cm thick is applied to the prepared base.
- Install reinforcing mesh, which will significantly increase the strength of the coating.
- It is necessary to mix dry fine sand with cement in a ratio of 4:1 (you can buy a special tile composition in the store).
- The finished mixture is leveled on the surface (the maximum preparation thickness is 4 cm).
- To facilitate all operations, guides made from reinforcement bars or pipes are used.
Geotextile layer
Preparation for installation of tiles includes laying a waterproofing layer, which is placed above the drainage as a substrate. This prevents moisture from reaching the top load-bearing layer and improves the quality and integrity of the coating. A layer of geotextile is lined on the bottom and walls of the earthen structure. The artificial material does not rot from prolonged exposure to water, does not decompose even with prolonged use, and provides the road with protection from water.
Making a pillow
The first layer is fine gravel or crushed stone. This is not a monolithic construction made of concrete, so you can even use recycled or limestone crushed stone, but if in the future laying paving stones on a concrete base is planned, then it is better to use gravel or so-called “granite” crushed stone (in fact, it is not always made from granite - the main one indicator is its density).
The greater the load, the greater the thickness of the layer - with large loads (for parking a truck, for example), it can reach 70 cm. The poured crushed stone is leveled with a rake according to the level or beacons and compacted. With a large layer of backfill, the process can be divided into several stages.
Then a bedding layer of sand is laid, which is watered and compacted.
Further options are possible.