Furnace Maintenance
The oven can break down at any time. It is better to prevent bad consequences and inspect the stove for integrity. According to SNiP, dacha heating devices need to be inspected at least twice a year.
If the stove is located inside a year-round residential building, then it is inspected at least once every three months. Unfortunately, the furnace is not inspected at all. It is better to prevent than to suffer the consequences.
The most dangerous thing in a stove is the cracks. These cracks are not visible to the naked eye. Carbon monoxide passes through them, which can harm the owners and the house as a whole.
Reasons for appearance
Before properly and reliably caulking the stove, in order to prevent repeated malfunctions, you need to know what can affect the integrity of the stove coating:
- during a long break in heating the house and sudden temperature changes;
- the furnace was laid using low-quality mortar;
- Perhaps the reason is the settlement of the building or foundation. In this case, it will be necessary to carry out major repairs to the foundation, increasing its size and strength;
- after laying the stove, the process of normal drying of surfaces was disrupted;
- when plastering the stove, a low-quality solution was used or a thick or very thin layer was applied;
- Perhaps the reason is faulty ventilation and condensation deposited on the walls of the furnace.
Clay for stove repair
- A component such as clay is present in all mixtures for sealing stove cracks.
- When heated, it becomes hard as stone.
- Dry clay crumbles when heated.
- When heated, oily clay begins to crack and dry out.
- The proportions of solutions are always different.
- A solution consisting of sand and clay is successful in repairing stoves.
Sand-clay mortar for repairs
- The composition consists of sand, water and clay.
- When preparing the solution, much attention is paid to the quality of the water. It must be free of silt and mineral salts.
- The sand is sifted through a sieve. Through this process, the sand is cleared of various debris and becomes clean.
- Before making a sand-clay solution, you need to let the clay lie in water for half a day.
Solutions to the problem
To prevent the stove from cracking, it is covered with clinker or some other tile.
A solution to the problem is to finish the outer surface with ceramic tiles. The material will last a long time if technological recommendations are followed.
Types of tiles used:
- porcelain stoneware;
- types of tiles;
- clinker material;
- terracotta
You can seal the stove to prevent it from cracking using a clay solution. The mixture adheres well to the surface, and cracks rarely form.
The stove surface is processed using the following tools:
- Putty knife. Several varieties are used for ease of coating.
- Hammer for driving nails under plaster.
- Trowel. Used for mixing the solution and applying the mass to the surface.
- Metal scissors. The tool is needed to cut metal plaster mesh.
- Grater. Used for grouting mortar.
- Ironing iron. Using the device, the plane is leveled to an ideal state.
- Chisel. Used to notch the caulking area for better adhesion.
- Brushes. For wetting the surface.
- Construction level, plumb. The tool is taken to level the plane in a horizontal or vertical position.
Clay coating of a brick stove in a country house or in a house is affordable, the solution is mixed without problems. Cracks need to be repaired using technology, waiting for the previous layers to dry.
Stages of preparing sand-clay mixture
- First, mix the clay solution. It should be free of lumps.
- Add clean sand to the clay. Usually they put four parts clay and two parts sand.
- Lime is added if the stove will not be whitewashed. Stir the solution until smooth. Cover with a plastic bag and let rest for half a day.
- After 12 hours the mixture is stirred. Then they mold it into a ball and squeeze it.
- For reinforcement, straw is added to the mixture.
Afterwards it is better to whiten the stove thoroughly. This will help the stove last a long time without repair work.
Damage diagnostics
Therefore, at the first sign of smoke in the house, you will need to do the following:
- diagnose the furnace surfaces and find the fault;
- after this, immediately prepare a solution or buy ready-made material for filling cracks;
- cover the walls and plaster them again.
But first of all, diagnostics will help determine the size of damaged surfaces and the approximate amount of materials to be repaired. If the mortar has simply cracked due to high temperatures, you simply need to remove the layer of plaster and apply a new layer of high-quality materials.
It’s worse if the cracks are through and continue to expand after the work has been done. In this case, it may be necessary to call specialists to identify the causes and lay a new stove. Stone stoves are a complex structure, so you shouldn’t try to lay it out from a book; it’s better to entrust this work to an experienced stove maker.
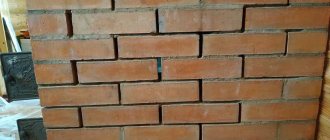
Such cracks can no longer be simply covered up
In this example, you shouldn’t cover it up either. The brick was badly cracked.
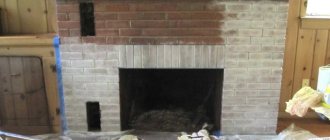
If the cracks are small and their size does not increase, you can begin to troubleshoot the problem yourself. To do this, it is important to prepare a high-quality solution and apply it correctly to the wall. How to cover up cracks in a stove so that it does not crack from the heat - knowledge of the basic materials for making the mortar will help in this matter.
Examples of small cracks:
Example 1
Example 2
Example 3
Repair using fireclay clay
- This clay is also successful in repairing stoves.
- They are resistant to elevated temperatures and vapor-tight.
- Safe for people and animals.
- The downside of this clay is the price.
- Since it almost does not tolerate moisture, sand and cement must also be added to the solution.
- The solution for filling cracks consists of seven parts sand, one part cement and one part clay. Water is added at discretion.
- You can mix the solution with a regular shovel, but the end of the mixing process must be done with your hand.
Advantages and disadvantages
Heat-resistant putty does not emit substances harmful to health when heated.
Heat-resistant putties have advantages over traditional solutions. They are characterized by high strength when exposed to high temperatures due to the presence of binding fibers and the use of refractory materials.
Positive aspects of use:
- The solution consists of safe components; when the surface is heated, harmful air impurities are not released.
- Putty prepared in compliance with the technology and application rules lasts a long time.
- The mixtures adhere well to the surface of the stove made of various materials; there are varieties that are used for finishing metal.
Disadvantages include higher cost than standard ready-mixes. Such compositions are rarely used as a finishing layer - they need to be painted or tiled.
Features of stove repair with heat-resistant glue
- Designed specifically for stove repairs.
- You can even buy it ready-made.
- To prepare a dry glue consistency, you will need water.
- The finished version is suitable for small sizes of smearing. For specific repairs, it is better to buy dry glue.
- The composition of the glue consists of clay, sand, cement and various additives.
- Dries in half an hour.
What tools are needed?
When choosing what to coat the stove with, you need to remember the tools. To repair it yourself you will need:
- angular spatula;
- Master OK;
- chisel;
- sanding paper with grit No. 60 and 100 and a grater for it;
- building level and rule;
- brushes – wide, brushes;
- container where the composition will be mixed.
If clay is added, then you need to prepare a mesh (metal) for wiping it. If you use sand, you will need a mesh to sift it through.
Oven repair using grout
- You can buy and make it yourself.
- When preparing the mixture, the crumbly clay is transferred to a basin. Then fill it with water and leave it alone for ten hours. Sand is added to the mixture. In a ratio of one to four.
Lastly, one kilogram of salt is added and the mixture is mixed thoroughly.
How to eliminate cracks in a metal structure?
The main solution to the problems of cracks in metal stoves is obvious - welding is used. But if this option is not suitable, you can use special fire-resistant putties.
Recipes for preparing mixtures are presented in the tables.
Table 1. Ratio of water-based mixture components
Table 2. Ratio of components of a mixture based on natural drying oil
Secrets of caulking the stove
You can buy a ready-made mixture in the store and prepare it yourself.
- Before caulking the gap, you need to heat the oven a little. Then the cracks are wetted with water.
- Do not heat the stove until all the solution has dried.
- First, all the plaster around the gap is removed.
- The mixture is applied in 2 layers to the stove.
- With a sand-clay mixture, take one part clay and three parts water. You need to determine how much sand to add yourself. To do this, mix the solution with a stick. If clay sticks to the stick while mixing, this means you still need to add sand. The solution is considered ready when almost nothing sticks to the stick.
- Chamotte clay grout is very durable. Before you start preparing the solution, you need to steep this clay in water for two to three days.
- Ready-made glue is suitable for those who do not want to spend a lot of time fiddling around. For small cracks, purchase ready-made viscous glue.
- The quality of ready-made solutions is better than those you prepare yourself.
- Time is saved when using commercial products to seal cracks.
- If the correct proportions are observed when preparing solutions, the stove can last more than ten years.
- The main thing is to inspect the condition of the stove once every few months. Don't forget to do this. After all, this is dangerous to life and health. Everything must be examined carefully. Even a small gap can harm human health. After all, carbon dioxide can escape from there and poison the air.
- Cracks can be due to improper foundation, shrinkage, and so on.
When filling cracks, unusual compounds are also used. For example, a composition that contains sand, clay and horse manure is popular. It is better to knead this solution with your feet.
There should be no lumps. To understand the solution, you need to dip your foot in a bowl of solution. If the water is clear when you pull it out, you're done.
Plastering sequence
Before you start plastering, the old mortar is removed from the stove, and the cracks are made wider.
Before you cover the stove or repair problem stove areas, you need to study the sequence of work. You can plaster it for the first time if the folded hearth has stood for at least six months. Natural shrinkage and shrinkage of materials occurs. Before starting work, the stove warms up so that the masonry expands. Kindling will prevent cracks after plastering when the hearth becomes cold. Plaster is not applied in frosty weather.
Further actions:
- Surface preparation is required before coating a brick stove in the house. The old coating is removed, the cracks widen and become deeper.
- The liquid composition is applied to the leveled surface in a thin layer and left to harden for 1 - 2 days.
- A steel mesh or fabric is fixed to the surface as a frame to strengthen the layer. The mesh and fabric are moistened with a liquid clay solution.
- The clay mixture is applied into separate cracks or spread over the entire surface of the fireplace in two layers. The thickness of one layer is about 4 - 5 mm. Increasing the size leads to instability of the plaster.
- The solution must dry, after which the surface is rubbed with a grater.
- The finished surface is treated with liquid lime or painted with a chalk composition.
If there are ceramic tiles, they are removed from the stove. The elements can be glued again after the plaster layer has completely hardened.