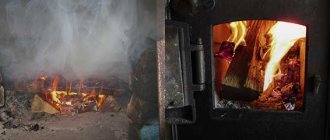
Classic devices for heating any residential building are fuel boilers and stoves operating on solid, liquid or gaseous fuel. Fuel combustion products are removed from the premises through a chimney, which is discharged through the roof. When installing it and removing the pipe above, a leak always occurs, which leads to problems with roofing waterproofing. Therefore, during installation, special care and thoroughness of work is required in order to minimize the violation of tightness and completely seal the resulting cracks. Otherwise the roof will leak.
Exiting the chimney above the roof surface and waterproofing it has its own characteristics for each roof. In this article we will look at how to install and seal its joint with slate.
How to seal the junction of the pipe to the slate roof?
An asbestos cement pipe extends three meters from a hole in the roof slate. Wind, humidity, and vibration cause cracks in the seal around the cement mortar pipe.
Any cement-based products will crack sooner or later. If the pipe does not heat up very much (up to 200-300 C), it is better to use complex grout. First, treat the joint with a special sealant for hot temperatures, and then apply a cement seal. If the pipe gets very hot, you can buy rubberized nozzles. But they have a minus - after a few years in the sun they also begin to crack and leak.
Until recently, I never thought that I would encounter such a problem, until, as people say, “the rooster pecked.” This time we will try to consider simple options, without additional investments. I offer my own version, which I had to do myself.
To do this, it is enough to have at home or buy aluminum foil for baking, such as Sayana.
First, we seal around the pipe with mortar, asbestos or alabaster (gypsum), and it’s okay that it will crack over time. The main thing is to carefully wrap aluminum foil around the pipe and secure it with a simple clamp or wire, then again apply a small layer of solution around it so that the foil does not tear, and then put a decorative flange on the pipe. That's all.
Alternatively, you need to use a round penetration made of silicone or membrane rubber. Actually, these materials, due to their elasticity, can create sufficient waterproofing and can be used on various roofing materials, including slate roofing (note that the diameter of the penetration is taken to be approximately 20 percent smaller than the diameter of the pipe). Of course, in your case there will be some “inconvenience” associated with the presence of high waves in the slate, and if using only the penetration is impossible, then you can use an apron, the main thing here is to adhere to the basic canons of installing pipes on the roof (including “setting up” the apron either under the ridge or under the top sheet of slate). Only then can you use a silicone or rubber penetration. I think that this is the best option, since you are writing about the problem of vibration of a high pipe and its negative impact on the slate itself from this. In the option I propose, this effect is eliminated, since the tightness of the pipe is not achieved by “monolithic” insulation. The pictures actually show the principle of sealing seams:
Preparation of material and tools
To carry out the removal of the pipe and seal its joint, various auxiliary materials will be needed. Conventionally, they are divided into two functional groups:
- Materials intended for sealing cracks formed at the junction of the roof and the chimney pipe. These include various aprons, undercollar penetrations. They can be made of steel with a galvanized surface, silicone or rubber materials. These products provide surface coverage of joint cracks;
- Various sealants designed to protect against moisture inside cracks, mixtures with a cement base, bitumen mastic, as well as modern products for sealing. For example, self-adhesive materials in the form of tape.
For cracks smaller than 5 mm, heat-resistant sealants are mainly used. When the gap size is more than 1 cm, cement-based solutions are used, as well as aprons and seals made from different materials.
To perform the work you will also need the following tools:
- screwdrivers, screwdrivers, self-tapping screws;
- hammer;
- hacksaw or grinder;
- gun for applying sealant.
Where does the roof leak?
Modern roofing has a multi-layer structure: vapor barrier, insulation and waterproofing. This “pie” provides protection for the building from rain, snow and wind, heat retention, and the durability of the roof itself. However, on a roof, even the most reliable one, the joints and connections of the elements will be the weak link. The chimney is one of them.
A waterproofing agent protects the insulation layer from moisture, but only if its layer is continuous. And since most materials of this kind are flammable, it is impossible to lay it at the junction with the chimney. This means that a gap must be left between the pipe and the roof.
The situation is further aggravated by the fact that roofing material, especially sheet material, also cannot be laid close to the pipe. As a result, barely noticeable gaps remain through which moisture will fall into the space under the roof.
The danger is eliminated by any of the sealing methods
Safety and tightness of the connection between the chimney and the roof
The roof of an insulated house has a multi-layer structure, including, in addition to the top roofing covering, a layer of vapor barrier, waterproofing and insulation. This design is called a “roofing pie”. It protects the house from snow, wind and rain, retains heat inside it and ensures long-term operation.
When the chimney is removed, the continuity of the layers of the cake is disrupted. They are made of flammable materials. At the junction, if the insulation is not properly installed, they may be subject to melting or fire. Therefore, they cannot be laid end to end. A safe gap must be left between the chimney pipe and the roof.
Slate sheets cannot be laid close to the pipe. When it is removed through the slate, cracks are formed, which, without sealing, will allow moisture to pass into the internal under-roof space.
The sealing process may vary for different structures. It can be round, rectangular or square. A square or rectangular chimney is usually made of brick, a round one is made of metal or asbestos cement.
Waterproofing methods
The technology for each case is determined by the design of the pipe - square or round, the material of the chimney and the roofing material: for a roof made of slate, corrugated sheets or metal tiles, different methods are offered.
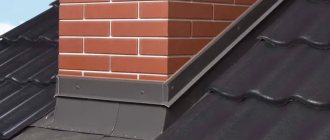
Square chimney on slate roof
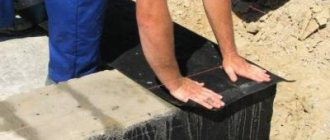
The material is brick. About 50 years ago, a brick chimney was built with a thickening at the roof level, which played the role of sealing. Nowadays this is rarely done. You can correct the situation with your own hands by arranging an “otter” around the chimney - an apron made of cement-sand mortar.
- The gaps between the chimney and the roofing material are covered with collars - strips of galvanized steel, bent so that part of them is adjacent to the brick wall of the pipe, and part of them is adjacent to the roof.
- The steel flashing is poured with a cement-sand mixture so as to rise above the roof level.
- To drain water from the ridge side, build an inclined ledge with your own hands.
The method, while reliable, is not very decorative. Typically, such sealing is used on a slate roof, since this material does not provide any special parts for sealing.
Square smoke exhaust on the roof made of corrugated sheets, ondulin and metal tiles
Manufacturers, in addition to the sheet itself, also produce a variety of roofing elements. To seal the pipe, junction strips are used.
- In the area where the chimney is installed, the waterproofing membrane is cut. Part of it is removed, and the rest is fixed to the walls of the chimney so as to cover them by 5–10 cm. The membrane is glued to the walls with bitumen mastic.
- External and lower junction strips are mounted around the chimney, forming a metal apron. The top bar is filled with sealant.
- The corrugated sheeting is laid on top with your own hands, the joints are treated with a sealing compound.
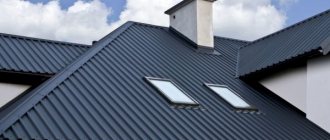
In the same way, a chimney on a metal roof is waterproofed. The material is completed with smooth metal parts of the same color. When laying, the side and bottom elements of the apron are mounted under the roofing material, and the top - under the ridge. To ensure complete tightness, seals and sealant are used.
For an ondulin roof, a combined method is used. A waterproofing film is also glued to the walls of the chimney, then the upper and lower ties from metal corners are mounted. Sheets of ondulin are laid on top of the structure, and then a plastic apron is installed on top. All seams are treated with bitumen mastic. The photo shows a working moment.
Waterproofing of a round chimney
In this case, a sealing device is included with the chimney pipe. These are metal aprons-caps of the appropriate diameter.
- In the area where the chimney is being installed, a hole is made in the waterproofing, and the edges of the material are glued to the chimney with mastic. The pipe is primed before this to increase its adhesive properties.
- The cap is placed on the chimney and attached to the sheathing. At the junction of the cap and the walls, a steel clamp with a heat-resistant gasket is fixed, which covers the gap.
This method is equally suitable for roofs made of metal tiles, corrugated sheets or ondulin. However, it is not suitable for slate roofing.
In this case, they act differently.
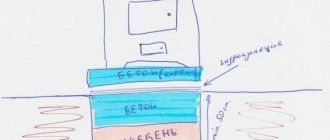
- A cardboard cylinder wrapped in plastic film is installed in the gap between the chimney and the roof.
- A side is molded from plasticine on the sheet at a distance of up to 1 cm from the walls of the chimney.
- The resulting gap is filled with asbestos-cement mortar. After it hardens, the cylinder and side are removed, and the asbestos ring serves as waterproofing.
Any object that is equipped with a chimney must have a good seal to prevent leaks. If you use unsuitable materials or sealing methods, this will cause condensation to form on the pipe walls. In turn, poor waterproofing of the chimney on the roof will lead to an increase in pressure, loss of draft and the occurrence of cracks in the pipe.
Waterproofing the chimney on the roof will eliminate many difficulties during the heating period
Lathing installation and chimney outlet through slate
The roof sheathing is made from 50x50 mm slate timber with a regular profile. If the profile of the sheets is reinforced, then it is recommended to use 75x75 mm timber for the sheathing.
The lathing can be single-layer or two-layer.
When installing a single-layer sheathing, boards or beams are fixed perpendicular to the rafters. The sheathing pitch should be 500 - 550 mm, or 750 - 800 mm.
For a two-layer sheathing structure, first a board is attached to the rafters in a parallel direction to the ridge, and then a beam is attached to it. The overall longitudinal and transverse size of the sheathing must correspond to a multiple of the size of the slate sheets in order to fit a whole number of them. For this purpose, the location of the overhangs is adjusted.
The general rule when laying slate is that each slate sheet must be placed on three beams. One of them should be under the center of the sheet, and the other two should be along the edges.
At the future location of the chimney, embedded elements are mounted to the sheathing. Wooden bars of sheathing and rafters must be located from it at a distance of at least 130 mm.
Where does waterproofing begin?
Heating devices will operate in a safe mode only if the waterproofing is carried out correctly and taking into account all existing rules and recommendations. Waterproofing is carried out taking into account:
A certain distance must be maintained between the rafter system and the roof
, which depends on the materials used. Flammable – 150-300 mm, non-flammable – 100-250 mm.
Sequence of layers
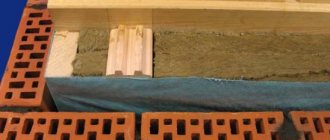
in the roofing pie must not be disturbed. It is necessary to block the possibility of moisture penetrating inside the prepared cake, since any liquid will cause rapid destruction of the layers. The insulation must be separated from the pipe by a gap. Otherwise, there is a risk of fire, since most insulation materials are flammable.
Box
- This is the required device for separating the roof from the pipe. The distance should be approximately 150 mm. Inside, the created box is filled with any heat-insulating material that has non-flammable properties.
Films that perform insulation tasks must be cut “envelope”, and then pulled to the cross beam so that it can be attached with nails. Waterproofing must be fixed with lathing, vapor barrier - with a special frame. All joints of the box and insulation layers must be edged with special tapes.
Sealing a chimney is a complex process and requires certain skills and knowledge
Protecting the roof from heat coming from the pipe
When organizing a pipe passage through the roof, it is important to insulate the roof from it. After all, the pipe gets very hot, which increases the fire hazard. The roof is protected using a separate box, the beams and rafters of which are located taking into account the requirements of SNiP. The minimum distance standard from the chimney to the load-bearing beams and rafters is from 130 to 250 mm. The inside of the box is filled with some material that does not burn. For example, it could be basalt or stone wool.
The chimney must never touch the roofing directly.
Further organization of the pipe outlet depends on what shape it is and what it is made of. The shape of the chimney can be made either as a regular square or round, or in the form of a rectangle or oval. And pipes can be brick, metal, asbestos-cement or ceramic. The material from which the roof is made is also taken into account. This can be slate, metal tiles, corrugated sheets, ondulin, roofing felt or bitumen shingles. Each case has its own characteristics.
How is it carried out?
If the owner of the property notices that a leak appears near the pipe, then in most cases the cause is poor-quality roof sealing. To avoid leaks, specialists install aprons. Installation must be carried out in accordance with the algorithm:
It is necessary to lay a drainage gutter
. It is required to remove moisture from the pipe.
To ensure maximum joint tightness
roof covering and chimney, an internal apron is used for the pipe on the roof.
You need to cut out the waterproofing backing
, which should be placed under the bottom edge of the apron. If the roof is covered with sheet material, then the edge of the substrate must be brought out between the sheets from below. It is imperative to create a side to direct the water along the slope.
Roof covering must be laid around the pipe
.
The external apron is installed using an identical algorithm
. The only difference is in securing the top edge to the chimney.
Insulating apron
can be created manually or a ready-made version can be purchased. The chimney must pass inside the apron.
Attaching the apron to the pipe On our website you can find contacts of construction companies that offer roof repair services. You can communicate directly with representatives by visiting the “Low-Rise Country” exhibition of houses.
What happens if you leave the bayonet unfixed?
There will always be a gap between the chimney and the slate. It cannot be otherwise. Another thing is its size. Gaps can be significant or small. If they are too large, then the residents of such a house may have problems. It is to prevent moisture from penetrating under the roof or into the room that structures such as decorative aprons and collars and other seals are used, which can either be purchased or made at home.
If you do not seal the cracks, the following troubles may occur:
- The roof covering will wear out quickly. This is due to the fact that almost all materials that were used for roof waterproofing are coated with protective compounds on the outside, thereby being negatively affected by excessive humidity from the inside. The ingress of water leads to premature destruction of the material and, as a result, complete covering of the roof.
- Reducing the service life of the rafter frame. The rafters are made of wood. As soon as moisture gets on the tree, the process of rotting and its rapid destruction begins.
- Reduced efficiency of insulation material. Absolutely all materials used for roof insulation are water-resistant. When wet, they lose their basic properties, becoming unsuitable for further use for their intended purpose.
- Increased humidity level in the attic. When water gets inside the attic, it causes the air to become heavy and stale. This negatively affects the interior decoration of the room.
Materials used
The materials used for sealing are divided into three types, each of which has its own advantages and disadvantages.
It is a roll or shortened fibers. Positive qualities of cotton wool
:
adheres tightly to surfaces;
resistance to physical impact (shock, vibration);
resistance to chemical attack;
Cotton wool is the most common material for insulation
Roll filters
They are a mullite-siliceous composition that is included in the fibers of the composition. Positive qualities of roll filters
:
it is permissible to use inorganic glue;
the mechanical fastening can be firmly fixed.
On our website you can find contacts of construction companies that offer country house design services. You can communicate directly with representatives by visiting the “Low-Rise Country” exhibition of houses.
Asbestos and kaolin boards
In production, mullite-siliceous fiber is used. The disadvantage of the plates is their immunity to alkalis and acids at high temperatures. To eliminate the deficiency, additional insulation will need to be installed. Positive qualities of slabs
:
low density, but higher than that of cotton wool;
resistance to physical impacts, such as vibrations;
resistance to steam, water and oils;
resistance to melting non-ferrous metals;
electrical insulating properties will be maintained at temperatures up to 800 degrees Celsius.
Possible ways to eliminate gaps
There are three ways to eliminate gaps between the pipe and the roof:
Special apron
, which performs protective properties. It can be purchased at a specialty store or built.
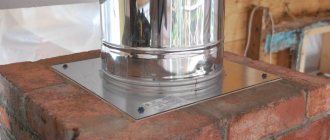
Stainless steel passage
. It is thrown over the pipe itself, after which the joint that appears must be closed with a clamp.
The joint is covered with a rubber clamp
Silicone sealant
. Best suited in cases where the gap is small.
Depending on the materials, sealing methods also change. For example, sealing a pipe on a metal roof is only possible with the installation of an apron. In some cases, depending on the roofing material, individual sealing methods may be used.
This might be interesting!
In the article at the following link, read about waterproofing under metal tiles.
Bitumen roof waterproofing options
In this case, the chimney must be sealed using Wakaflex tape. In this case, the following procedure is observed:
- Creating a cutting from tape.
- The cutting is pressed using the case.
- Any gaps that appear must be sealed using bitumen mastic.
Bitumen mastic best protects against bad weather
Sealing a square pipe on a slate roof
A slate roof adds its own nuances when it comes to creating a sealed pipe. Because of the slate, it is impossible to use any other parts for insulation, so the protection effect was achieved through a cement-sand apron, which was created as follows:
All gaps must be covered with collar guards
made of galvanized steel. This material does not corrode and can last a long time.
Cement-sand mortar is poured
so that it is above the roof level. If a cardboard cylinder was used in the process, then the procedure will be easier and simpler.
Water drainage
should be carried out using an inclined ledge, which must be located on the side of the ridge.
When sealing a chimney, do not forget about water outlets
If, for convenience, when pouring, a cardboard cylinder with plastic film or a plastic side was used, then these parts must be removed after the mass has hardened. Despite its appearance, this method of sealing is in no way inferior to alternative ones, which cannot be used on a slate roof.
Sealing with mortar
To seal the gap between the chimney pipe and the slate or tile roof, use moisture-resistant cement mortar and a decorative collar. This is the most affordable way to insulate the attic and rafters from moisture with your own hands. This requires dry mortar, water, a mixing container, steel corners and a collar. Installation work is carried out in the following order: The gap between the roof and the outer wall of the pipe is lined with stainless steel corners. If the chimney is oval or round in shape, you can use a rubber seal with an adhesive backing. A decorative collar made of galvanized steel is put over the chimney head and secured with self-tapping screws. A pre-mixed viscous solution is poured into the gap between the collar and the pipe and allowed to harden for 1 day. After a day, check the quality of the filling and the degree of hardening of the solution. A surface for liquid drainage is made from a sheet of sheet steel. To do this, a hole is cut out in it, the diameter of which corresponds to the size of the collar, put on the head and fixed with self-tapping screws. Important! To ensure that the structure is reliable and does not collapse during the first serious downpour, high-quality waterproof cement is used. Otherwise, cracks will appear on it, through which water will leak into the rafter frame.
Sealing round multi-layer chimneys
It is much easier to install sealing on modern round chimneys. The simplicity of the process is due to the fact that no additional equipment is required, since the pipe is already equipped with everything necessary. Installation takes place in three stages:
Prime the edge of the pipe
where the waterproofing will be attached.
Make a hole in the waterproofing
, and then glue it to the pipe using mastic.
The sheet must be attached to the sheathing
. The pipe is passed through a cap, between which a clamp with a heat-resistant gasket must be located.
Round metal chimneys
If there are no caps, then flexible elastic seals for pipes are used instead. The sealant can also be used anywhere else where roof insulation needs to be improved.
This might be interesting!
In the article at the following link, read about waterproofing flat roofs.
Getting rid of cracks on a tiled roof
On a tile roof, it is best to seal the cracks with a solution of sand and cement, which will best protect the inside of the building from moisture and precipitation.
To achieve the best moisture insulation, you will need:
- Install a galvanized collar on the roof, thus creating a place for pouring the solution.
- Pour a solution of cement and sand, making sure that it clearly fills the entire space between the roof and the chimney.
- In addition, you will need to make a surface and place it at an angle so that excess liquid flows down it.
Sealing on the roof made of metal tiles and corrugated sheets
Sealing on a roof with such a roof is only possible when using an abutment strip. When sealing a chimney on a corrugated roof, the following procedure
:
Decide
with the installation site of the chimney.
Partially delete
waterproofing membrane in this area.
Create
a metal apron, which must be assembled from the outer and lower abutment plans.
Lay down
roofing material on top.
The resulting joints must be treated with sealant
.
Waterproofing a chimney on a roof covered with metal tiles This might be interesting!
In the article at the following link, read about TechnoNIKOL waterproofing.
Chimney installation
To carry out the output in a place that minimally needs waterproofing, and to eliminate loss of tightness, it is necessary to solve two main problems:
- choose the optimal location for the chimney on the roof surface;
- ensure a safe and tight connection between the roofing layers and the pipe.
Choosing the location of the pipe on the roof surface
The location should be closer to the ridge (in the case of a gable structure). It should rise above the ridge by no less than 0.5 m. The cap should also be 0.5 m above the roof surface level.
The layout of the pipe on a gable roof is clearly shown in the diagram:
This location of the chimney is explained by the minimal accumulation of precipitation in this place. Less snow accumulates here in winter and the likelihood of leakage at the joint will be negligible when it melts.