Errors when installing a roof are unacceptable. This affects the integrity of the structure and its durability. Ondulin has earned trust with its qualities and characteristics. And if you managed to install the roofing material, then another problem arises: how to remove the pipe through the roof from the ondulin. After all, you will have to make a hole in it that needs to be properly sealed.
In fact, the work is not difficult, since the manufacturers themselves provide detailed instructions and videos on how to do the job. With them, the pipe on the roof made of ondulin will not violate the integrity of the roof. We will look at the features of ondulin and the technology itself for removing pipes, ventilation or chimneys.
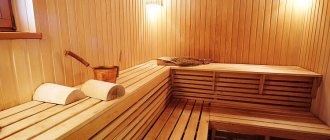
Benefits of ondulin
Roofing made from this material gained popularity for a reason. Ondulin is a type of roofing material, classified as soft, based on bitumen. Externally, its shape resembles slate, however, that’s where all the similarities end. Thanks to its special composition, it has a lot of advantages and is easy to work with. The material is made from cellulose fibers, bitumen compositions, mineral components, dyes and hardening resins.
What does this give? It is easy to cut, it does not crumble or crack like a cipher, so a ventilation or chimney pipe can easily pass through the hole made. Ondulin has the following positive qualities:
- Excellent performance characteristics and high quality due to the composition.
- Manufacturers produce additional elements: ridge, valley, sealing materials and clamps. They make roofing even easier. Therefore, anyone can work with roofing material.
- Ondulin is lightweight and easy to transport.
- A long service life, along with an average cost, raises the position of the product.
- It is safe for humans and environmentally friendly.
- Installation will not be difficult. Fixation is carried out using roofing nails, and the presence of waves makes the process even easier. You can navigate by them.
- Large assortment of products in different colors.
- It suppresses rain noise. If we talk about metal roofing, residents complain about terrible noise when it rains. This is not observed with ondulin.
- The material can be cut using a hacksaw, mounting knife or jigsaw. No high-tech tools are required.
As for the disadvantages, these are average strength, color fading under UV rays and lack of fire protection. Since the material is soft, it is not difficult to pass the pipe through the ondulin. And thanks to additional materials, it is easy to make it airtight.
What determines the method of arranging the pipe passage?
First of all, it depends on the type of pipe and the material of its manufacture. Each of the materials common in construction (brick, concrete, metal, etc.) has its own nuances for installing a passage.
If the stove installed in the house uses wood, coal or peat as fuel, then the chimney is not made of metal, as it will heat up too much. And this can be dangerous.
Depending on what kind of external finishing it is decided to do for the pipe, the choice of sealing the junctions will also be made.
Depending on the size of the pipe, in some cases it is possible to select standard standard elements produced specifically for such purposes, which can be included with the roofing material.
A correctly installed passage for a chimney, taking into account fire safety rules and the operational characteristics of the coating (ondulin), can protect yourself for many years from problems with leaks in this section of the roof, as well as make home heating, regardless of the type of heating, safe and efficient . In addition, according to the recommendations of the roofing material manufacturer, specific building materials that are most suitable for these types of work should be used.
Features of pipe exit through ondulin
There are some rules to follow. They are related to the properties of the material. Professionals know that a residential building requires several pipes to be installed through the roof. This includes a chimney and a ventilation passage through the roof made of ondulin, which have a corresponding weight. When working, the following is taken into account:
- ondulin, unlike slate, is afraid of fire, so it must be protected from elevated temperatures from the chimney pipe and sparks flying from it;
- Since the material has average mechanical strength, it is important to create full supports for the edges. If this is not done, it may become deformed;
- high temperature from the chimney can soften the material, it loses its strength.
You need to know this before you start working. Let's look at two types of work: removing a ventilation pipe through ondulin and removing a chimney.
Answers from experts
The material is resistant to tin
roofing felt
Bitumen-based sealant for such purposes.
fiberglass material and rubberized with special rubber mastic
buy a ready-made metal “apron”, according to the size of the pipe.
Covering apron Ondulin and self-adhesive insulating tapes Onduflesh.
Here is information about Ondulin components. There are also special Onduflesh self-adhesive tapes, which are used for waterproofing the joints of the roof with the chimney, roof window and roof superstructures. Also, ONDUFLESH tapes can improve the waterproofing of eaves and can be used when decorating roof valleys. .unikma/tiles/onduline_teh2.shtml
It is necessary to overlap Ondulin onto the pipe by at least 15 cm, and glue it to bitumen mastic! Or if ondulin is already laid, make a surface layer that extends onto the pipe and the existing ondulin by 10-15 cm, and fasten everything with the same bitumen mastic.
This is a typical unit, look in any roofing system it is there. You need to make a type of metal apron where you need to run it under the andulin or on top, or use the andulin instead of the apron.
Ventilation pipe outlet method
There is a method to make things easier for yourself. For this, not just an ordinary pipe is used, but a special proprietary transition element made of polyvinyl chloride. In construction stores, for example, STD Petrovich, there is an ondulin roof ventilation transition that you can buy. And then the process of removal through the roof can be divided into several stages.
First you need to determine the point from which the pipe will be led through the roof of the ondulin. Most often they are placed in the last row of roofing material. The installation of the passage element in the desired place is carried out so that its lower edge is overlapped and secured to the ondulin sheet of the bottom row. This overlap on the bottom row is 17 cm.
However, there are some nuances. If the work is carried out while laying ondulin, then it is enough not to lay the last row to the end, leaving space for the passage element. If the roof is already finished, then you will have to make a hole of the appropriate diameter and continue the process.
Elements used for terminals and sealing
Most often, chimneys have the shape of a circle; this complicates the making of holes in the roofing material, which can subsequently affect the tightness of the joints of the two systems: the roof and the chimney. In order to improve the quality of penetrations with further fastening to the roof structure and maintaining the required sealing quality, builders use ready-made penetrations, which differ in the form of manufacture and the method of creating elasticity at the joints. For convenience, there are several varieties of this element, which is also used when installing ventilation piping.
Instructions for removing the pipe when laying ondulin
If the removal is carried out at the roof installation stage, then the instructions are as follows:
- The passage element is installed with an overlap of 17 cm, and is nailed to the sheathing at the bottom in each wave, except for the waves for the overlap. Special nails for ondulin are used.
- The next sheet is measured so that the side overlap is equal to 1 wave, and on top, the same 17 cm. The excess is cut off with a jigsaw or saw, if we talk about cutting across, and the work is done along the assembly knife.
- The sheet is placed in place and secured with nails in each wave to the sheathing.
- Ventilation is being assembled. an ondulin pipe passes through the ondulin and is installed in the passage element.
- It remains to lay the last sheet in contact with the passage element, just like the previous one.
Job is done. The ventilation pipe is routed through the surface of the ondulin roof. Detailed video instructions will help you cope with the task:
Nuances of installing ventilation systems
There are two types of ventilation systems: natural and forced. In the first case, no special devices will be installed on the roof surface; everything happens naturally. The air enters along the perimeter of the eaves overhangs, under which the vents are located. They are small gaps and are calculated based on the area of the roof slope; the larger this value, the higher they should be. The air exits through the ridge element or the so-called cold triangle.
If the roofing pie contains heat-insulating boards, then small bars are laid on top of them and covered with waterproofing. They create an air layer inside the slope and the air masses calmly remove condensation from it.
In cases where natural ventilation cannot cope with the processing of supply air and the removal of excess moisture from the attic, special devices are installed that create forced ventilation. These elements can often be purchased along with roofing material. In this way, maximum docking can be achieved.
This ventilation system is extremely easy to install; the main thing is to understand its operating principle. The pipe and ondulin must be combined with each other as much as possible, otherwise small gaps will appear, and through them moisture will enter the roofing pie, gradually destroying the waterproofing.
Pipes for forced ventilation are created with standard dimensions, where the length is 86 centimeters and the height is 47. ABS copolymer is used as the main raw material.
You can install a pipe on an already used ondulin coating using the following technology:
- The covering sheet into which the pipe will be installed is equipped with additional fasteners in order to give it greater stability, and the top sheet is removed.
- A special lining is installed into the cut material, which will serve as a base. We fasten it using suitable hardware; in this case, self-tapping screws with a lining are suitable. Hardware must be included for each wave of ondulin, so relatively many of them will be needed.
- After completing this work, we move on to the removed sheet. It is put back with a slightly larger overlap so that precipitation cannot flow under the base of the pipe.
At the last stages, the pipe is mounted and fixed near the base. It is worth noting that its location must be strictly vertical. Special plastic pins are used as fasteners.
IMPORTANT: You can choose a pipe with a higher quality and carry out the installation work yourself. This way you will get a good device for a small amount
Tags: smoke, ondulin, pipe, through
« Previous entry
Installation on a finished roof
The instructions are:
- A hole is made for the pipe in the selected location.
- Now you can install the pipe through a special apron. The edges of the apron are tucked under the ondulin sheet, and the gaps at the junction points are sealed using Onduflesh tape.
- The apron is nailed to the sheathing slats and reinforced with a flashing from the inside of the roof.
Note! If the apron is universal, then the angle of the roof is unimportant. Sometimes the angles don't match. In this case, the adapter is made by hand from galvanized steel or copper sheet.
We arrange the junction area for the chimney
There are several rules that must be followed when it comes to working with a chimney or stove pipe. These are the rules:
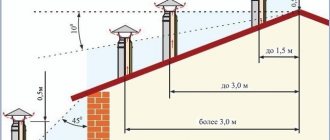
- the chimney is installed closer to the roof ridge;
- The height of the pipe is important. It should rise above the ridge;
- It is prohibited to adjoin the window structure of the attic room to the pipe;
- It is better to make protective screens for pipes on the roof from materials that are not too hard;
- the arrangement of the pipe passage depends on the material used for the chimney.
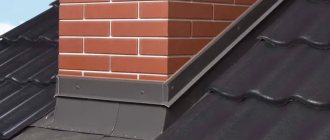
Fire safety when removing the chimney is given special attention. Although the fire source is low in the stove, the combustion products heat the chimney to an impressive temperature. In this case, sandwich pipes through ondulin are used. Their body can be seen in this photo.
It's like a thermos that holds hot liquid on the inside while keeping the outside cold. Thus. the chimney will not harm ondulin. As for chimneys made of brick or other material, they are covered in a protective metal casing with a layer of thermal insulation. Then the outer shell will heat up no more than 30–40 degrees.
Advice! Don't forget about safety rules. The work is carried out on the roof; any wrong movement can lead to harmful consequences.
How is it carried out?
If the owner of the property notices that a leak appears near the pipe, then in most cases the cause is poor-quality roof sealing. To avoid leaks, specialists install aprons. Installation must be carried out in accordance with the algorithm:
- It is necessary to lay a drainage gutter. It is required to remove moisture from the pipe.
- To ensure maximum tightness of the joint between the roofing and the chimney, an internal apron is used for the pipe on the roof.
- It is necessary to cut out the waterproofing backing , which should be placed under the lower edge of the apron. If the roof is covered with sheet material, then the edge of the substrate must be brought out between the sheets from below. It is imperative to create a side to direct the water along the slope.
- The roof covering must be laid around the pipe.
- using an identical algorithm . The only difference is in securing the top edge to the chimney.
- The insulating apron can be created manually or a ready-made version can be purchased. The chimney must pass inside the apron.
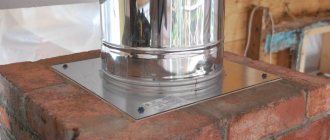
Attaching the apron to the pipe Source banya-ili-sauna.ru
See also: Contacts of construction companies that offer roof repair services.
Let's sum it up
The removal of a ventilation pipe or chimney is an important part of the roofing installation. We looked at several options for how to put everything into practice. The main task is to ensure high-quality waterproofing of ondulin at the junction of the pipe. If this is not done, the area will become a weak point of the entire structure. Moisture will penetrate there, destroying the insulation layer, if any, and the entire structure as a whole. Therefore, following the instructions, it is important to carry out the work correctly so as not to shorten the service life of the roof.
Recommended Posts
Waterproofing roofing felt brand TG 350
How to lay corrugated sheets on the roof
Installing snow guards on a corrugated roof with your own...
Construction of a rafter system for a hipped roof
How to build a hip roof with your own hands
How to get rid of sparrows under the roof of a house
Sealing pipes on a roof made of corrugated sheets and metal tiles
Corrugated sheeting and metal tiles are related materials, so the approach to sealing the joints between the pipe and the roofing is almost the same. There are differences, but they are minor. For example, to design the upper junction of a chimney on a metal tile roof, a transition element that follows the shape of the waves on the sheet can be used. This simplifies installation a little, but due to the high cost of the transition element, a steel sheet painted in the color of the roof is usually installed instead.
As with ondulin, the method of sealing the joint between the roofing material and the chimney depends on the shape of the pipe. If the pipe on the roof of the house is rectangular, then the gap is closed with a set of steel additional elements. If it is round, then a flexible Master Flash adapter is used to seal the pipe.
If the pipe on the roof is brick
Sealing a pipe on a roof made of metal tiles or corrugated sheets is a process that can be roughly divided into two stages:
- Installation of an apron on the roof covering.
- Ensuring a tight fit of the apron to the pipe.
And for each of these stages there are two main solutions. Let's start with installing the apron.
First you need to prepare the roof:
- The waterproofing is applied to the chimney and secured to it. This is important because if there is a gap between the chimney and the waterproofing, condensation that may form on the pipe under the apron will flow directly into the insulation.
- Additional boards for sheathing are placed below and above the pipe. This is necessary so that the apron does not hang in the air. Otherwise, it may be deformed by a snow cap in winter or by an awkward installer who steps on the additional strip, for example, when installing a television antenna on the roof.
- The pipe and coating are cleaned of dirt and degreased.
An apron is installed on the prepared coating either by sealing the joints of additional elements or by folding them.
In the first case, the installation process begins with fitting the lower strip adjacent to the pipe. The corners of the chimney are marked on it, they retreat 2-3 cm from these marks towards the near edge of the plank and cut off part of the upper shoulder of the additional element along this line. An incision is made where the corner is bent and the strip is bent so that it wraps around the pipe.
Then, along the entire length of the plank, double-sided self-adhesive butyl tape is applied to the roof covering, a sealant is attached on top of it so that dust does not get under the apron and animals or insects cannot get in, a layer of sealant is applied on top of the sealant.
The connection strip is installed close to the chimney, covering the joint between the pipe and the roof. At the same time, it is attached to the brickwork with anchors, and to the metal tiles or corrugated sheets - with roofing screws with an EPDM rubber gasket. Self-tapping screws are screwed perpendicular to the sheet into the top of each wave.
The side junction strips are attached in a similar way: they are cut to fit the pipe, bent, but installed only with butyl tape and sealant, without seals. In addition, the sealant is also applied to the lower part of the apron so that it completely covers the line where the planks meet. When attaching the side planks to the roof covering, the distance between the screws should not exceed 15 cm.
The last gap between the pipe and the roof is closed with an abutment strip with a very wide lower shoulder. It is better that it be made of steel with a polymer coating in the color of the roofing material. But stainless steel sheets are also acceptable. It is not advisable to install galvanized steel sheets - the service life of such material when installed on a roof usually does not exceed 15 years, while corrugated sheets or metal tiles last 20-50 years, depending on the type of coating. The galvanized steel sheet behind the pipe, firstly, will need to be replaced much earlier than the need for repair or reconstruction of the roof; secondly, it can become a source of corrosion and lead to premature deterioration of the surrounding roofing material.
The top bar is also cut and bent so that it completely covers the ends of the side parts of the apron. It is then attached to butyl tape laid along the contour of the support sheet.
The width of the lower shoulder of the additional element must be at least 45 cm with a roof slope of at least 15°. On flatter roofs, the upper part of the apron should be even wider, and it is necessary to additionally coat with sealant the entire junction of the plank with the roofing covering below and on the sides.
Where the abutment support sheet will be located under the top sheet of corrugated sheeting or metal tiles, the plank is secured with self-tapping screws with flat heads. This is necessary so that the fasteners do not interfere with the installation of the roofing. In the open part, the plank is secured with ordinary roofing screws.
A sheet of corrugated board or metal tile is laid on top of the upper junction strip and placed under the ridge. Before laying, self-adhesive tape is glued to the flat surface of the lower shoulder, then a sealant is glued to it and a sealant is applied to it. To get the seal exactly into the wave, the top sheet is first tried on and the corrugations are marked. If this is not done, the protrusions of the seal may not coincide with the corrugations of the steel sheet. The roofing material is fastened in the same way as on the rest of the roof.
The butt method of installing an apron is aesthetically pleasing, durable, but very difficult to implement even for professional roofers. It only takes a small mistake for the roof around the pipe to start leaking.
The seam method of installing an apron is more reliable in terms of leaks, since its main idea is to minimize damage to the planks. Compared to the butt method, this method has three features:
- The back strip is attached to the roof with clamps, not screws.
- The side strips on the end side closest to the ridge are not cut off, but are wrapped in an envelope and fastened to the rear junction with a fold.
- The front plank is also fastened to the side ones with a fold.
As a result, the apron turns out to be solid, and is held in place not only by self-tapping screws, but also by the seam connections of the planks to each other. For details on how a chimney on the roof is sealed using this method, see the video:
Although a seam apron does not require the same precision of measurements and cutting as a butt apron, it is much more labor-intensive. In addition, it is impossible to do it without special tools for bending metal, while for installation using the butt method you only need metal scissors, a marker and a tape measure. But for those who decide to seal the joint between the pipe and the roof themselves, the seam installation method is better - yes, it will take more time, but the likelihood of error is much less.
Now about sealing the junction of the apron to the pipe. You can do this in two ways:
- cut a groove in the pipe, insert the apron strips into it and fill it with sealant;
- install a special collar (set of upper junction strips) on the pipe and seal it.
Both methods are effective and reliable, but gating is now rarely used. Firstly, cutting the correct groove is difficult, especially in an old pipe. Secondly, you can accidentally make a cut that is too deep and damage the chimney. Thirdly, there will be a cold bridge on the pipe near the groove, which can lead to an increase in the amount of soot inside the chimney.
Therefore, sealing the roof pipe using a collar is much preferable. To do this, small strips with an extension at the top are placed on the pipe, which press the apron. A thick layer of polyurethane sealant is placed into this extension. It fills all irregularities and hardens, forming a durable, water-impenetrable barrier.
If the roof pipe is round
To seal the gap between a roof made of corrugated sheets or metal tiles and a round pipe, use the already mentioned Master Flash adapter. It is installed in approximately the same way as on an ondulin roof, but there are three features:
- If possible, the adapter should be attached to the corrugated sheet at the bottom and at the top of the wave. Fastenings to the side areas are best avoided if possible.
- Since it is impossible to give the base a shape that will accurately copy the corrugations of a sheet roof, master flush is treated with sealant twice: when gluing, and then again in places near the folds.
- On roofs made of corrugated sheets with a high wave height, the adapter is installed in a diamond shape.
Using an elastic adapter, you can only seal ventilation and insulated chimney pipes. For uninsulated pipes, you need to use steel clamps and sealant, which are used to coat all the junctions of the clamp with the pipe and steel sheets.