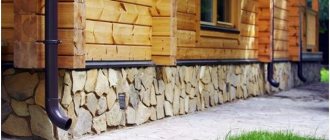
Thermal insulation methods
Technologies for insulating floors in bathhouses:
- Simple flooring option. It consists of compressed soil, a mixture of sand and gravel, a concrete base, vapor barrier, expanded polystyrene, polyethylene film, and a reinforcing frame. To insulate it, you need to prepare the base, level it from bumps and cracks. A screed made of a special insulating mixture is poured over all layers.
- With screed on the ceiling. To insulate the structure, durable foam sheets and pressed mineral wool are suitable. The base is made of a concrete slab, which is fixed to the walls or strip foundation.
- According to the lags. It is better to use polystyrene foam or compressed material wool as insulation.
Styrofoam
Styrofoam balls do not absorb moisture, but be aware that water can accumulate in the spaces between them. In the first winter, the insulation crumbles into individual particles. This is caused by the fact that water freezes inside the foam, expanding in volume (it is the only substance on the planet that expands when cooled).
To prevent problems, insulation of the floor in a bathhouse with foam plastic is carried out using additional materials:
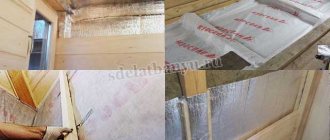
- Vapor barrier. Mounted on the warm air side. Prevents the effect of steam from the bath on the insulation. Available in the form of films or membranes. To more effectively retain heat in the bath, special foil membranes are used. They not only protect the foam from getting wet, but also reflect heat back into the room.
- Waterproofing. Fixed on the cold air side. Prevents atmospheric or ground moisture from entering the insulation. Films and membranes are used as a hydrobarrier. To insulate the floors in a bathhouse on stilts, moisture- and wind-proof membranes are chosen. They prevent drafts.
Innovations in action: do-it-yourself floor insulation in a bathhouse with penoplex
Such a fairly new material as penoplex is used for insulation of baths somewhat less frequently, due to its cost. Its price is higher than expanded clay and polystyrene foam, so consumers who are not yet familiar with its unique properties are afraid to purchase such a product, and completely in vain. Moreover, due to its truly outstanding qualities, as well as environmental friendliness, penoplex is suitable even for insulating floors in a bathhouse with wooden floor structures.
How to insulate the floor in a bathhouse with penoplex: simple tips
In fact, everything here is exactly as simple as in the previous options we presented. However, when working with wooden structures there are some nuances. These points are worth discussing in more detail, so it's worth starting again from the beginning.
- First of all, a rough wooden floor is laid, on top of which logs are installed for finishing with a board.
- Immediately then a layer of standard waterproofing is laid.
- Between the joists you need to lay pre-measured and cut foam boards, tightly fitted, without gaps or cracks.
- If you did not cut the material very precisely, you can simply fill the gaps with the remains that accumulated during cutting or by crumbling ordinary foam.
- On top of the penoplex, you again need to organize high-quality insulation from moisture. In fact, this material is not afraid of it, but water can cause fungus and rotting of the floor, so you should pay enough attention to this.
- It is worth understanding that the finishing coating should never touch the thermal insulation, so you need to take into account that the finishing board should be several centimeters higher.
You need to know that if you were unable to create a gap to ensure ventilation, you need to lay a reinforcing mesh on top, which will “keep” the distance between the board and the insulating material.
Using exactly the same method, you can use a wide variety of insulating materials, and it can be mineral wool on a foil-laminated base, or it can be simple empty glass bottles, for example, beer bottles. Craftsmen have adapted to using them, replacing industrial options; to do this, it is enough to simply place the bottles one next to the other under a layer of finishing fill, and due to the voids inside there will be a kind of air cushion, which will provide the necessary thermal insulation. It works no worse than the newfangled penoplex, which is good news.
Penoplex
The material is a close relative of foam plastic, but without its disadvantages. It costs more, but is distinguished by high strength, quality and resistance to moisture. The thermal insulation properties of these materials are the same.
The choice between them is made depending on the installation method and the expected load. When installing heavy furniture and laying insulation under the screed, extruded polystyrene foam is preferred. It definitely won’t wear out under load (if you choose the right brand for strength).
Insulating the floor in a bathhouse with penoplex allows you to do without vapor barrier and waterproofing. They should be used whenever possible (especially in areas with the highest humidity), but this is not a necessary step.
Other materials for bath insulation
In addition to foam plastic, other materials can be used to insulate a bath. For such work there are several insulation options:
- mineral wool;
- glass wool;
- expanded clay sheets;
- expanded clay concrete slabs.
They should not be seriously considered as an alternative, since each of them is much inferior to polystyrene foam. For example, although mineral wool provides good thermal insulation, it has a significant drawback - it can cause harm to health. This is explained by the presence of phenol-formaldehyde resins in the composition. The disadvantages also include good moisture absorption, as well as strong dusting when working with mineral wool. Due to the latter feature, when laying mineral wool, it is imperative to use personal protective equipment (respirator, goggles and gloves).
Glass wool has similar disadvantages; its only advantage is its affordable price. But even in cost it cannot compete with polystyrene foam, so it is not advisable to use it for insulating a bathhouse.
The use of expanded clay slabs for bath insulation is also associated with certain disadvantages, the main one being difficulty in installation. In particular, when installing them horizontally, it is necessary to use a special substrate. In addition, such material is characterized by high moisture absorption if there is no protective film on its surface. When wet, expanded clay slabs lose their effectiveness as insulation, and due to the long drying process, the material does not quickly restore its original properties.
The disadvantage of expanded clay concrete is that even the lightest varieties of this material have more weight compared to foam plastic. In addition, such sheets or blocks “eat up” space, since for high-quality insulation it is necessary to lay a thicker layer of this material.
What materials to use
Water will become a problem when insulating the floor. Many materials are not designed for installation in conditions of high humidity. This applies to insulation with high absorption capacity.
For example, it is not allowed to use mineral wool to perform the work. This effective insulation is able to absorb water. When wet, cotton wool stops performing its intended tasks, wrinkles, settles and loses its shape.
For wet rooms, it is recommended to choose materials that are resistant to moisture. These include:
- Styrofoam;
- extruded polystyrene foam (or penoplex);
- penoizol, etc.
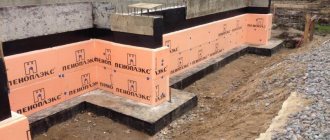
Insulation of a strip foundation for a bathhouse with penoplex
Thermal insulation of the bathhouse foundation with penoplex
It is necessary to start the process after thoroughly waterproofing the base using bitumen mastic. To securely fix the sheets we use acrylic glue.
We carry out the work in the following sequence:
- We apply five to six dots of acrylic glue to the first slab and fix it from the bottom edge.
We secure the remaining elements around the perimeter, connecting them together with a tongue-and-groove system.
We blow out the joints using acrylic glue or polyurethane foam.
Install the second layer with the seams offset. In areas of future backfilling with soil, we use acrylic glue for fastening. It can be attached to the base with dowels 12 cm long and 1 cm in diameter.
We cover the depressions from the fasteners with acrylic glue and wait for complete drying.
We fix the reinforcing fiberglass mesh with an overlap of 10 cm.
We plaster with penoplex to protect against soil action.
Level the surface with cement-sand mortar.
Insulation under the screed
If the bathhouse is built of brick, most likely the ceilings are made of reinforced concrete. Also, sometimes there is a need to make a floor on the ground. In this case, insulation is performed under the screed. When using this technology, the load on the insulation increases, so you should follow the following recommendations:
- choose material grade PSB-S 35 (foam plastic) or EPPS 35 (penoplex);
- the thickness of the screed is prescribed 30-50 mm (when using the “warm floor” system - more);
- when using polystyrene foam, the screed is reinforced with wire mesh with a diameter of 3-4 mm and cells of 50 by 50 mm.
If it is necessary to insulate the floor on the ground, then the base is not only leveled, but also compacted. The floor pie in this case looks like this:
- compacted soil;
- sand-gravel mixture or medium-sized sand (20-30 cm);
- concrete preparation from lean concrete B7.5—B12.5;
- waterproofing;
- insulation;
- vapor barrier;
- screed with reinforcing mesh.
The concrete floor consists of the following layers:
- reinforced concrete slab;
- waterproofing;
- insulation;
- vapor barrier;
- screed (with or without reinforcement).
Insulation of a bathhouse begins with clearing and leveling the base. All cracks in the concrete floor must be covered with cement mortar. After this, special leveling mixtures can be used. A line is drawn on the wall to mark the finished floor. This is required in order to control evenness.
Waterproofing is placed on the prepared base. It is mounted with an overlap of 10 cm (including on walls), gluing the joints with a special film.
Polystyrene foam or polystyrene foam is laid on glue. The solution is applied only along the edges and to several points in the center. When purchasing glue, it is important to check that it does not contain solvents or other substances hazardous to the insulation. The slabs are installed with the seams bandaged (in a staggered manner). A gap of 1-2 cm is provided between the polystyrene and the wall, taking into account the expansion of the material during operation; this space is filled with damper tape. Before pouring the screed, the slabs are secured to the base using disc dowels.
Briefly about the technology
Concrete floors
Let's start with concrete. Regardless of which type of insulation you plan to use, the entire process of insulating the floor will look approximately the same. Therefore, the step-by-step guide in my article will be more schematic than educational. However, to any person who is not so far from construction (and I suspect that there are some among the readers of my blog), everything will be clear without small details (which I can cover separately if questions arise).
So, whether you decide to lay foam plastic under the screed or use, for example, glass wool, the stages of work will not differ significantly. The first step is to prepare the base. The soil is thoroughly compacted, with the preparation of the so-called cushion (naturally, all the necessary details for arranging the drain are also provided). We think through the entire sewerage system in advance.
We fill in a rough screed, designed to ensure leveling of the base and ease of carrying out the next steps. After it hardens, a layer of waterproofing is installed (you can also read about this in more detail in other articles on my website).
Now a layer of thermal insulation is laid, the thickness of which depends on the design of your structure (at a minimum, it cannot be thinner than the standard sizes of the sheets of insulation used).
*Separate recommendations for working with perlite
Perlite and vermiculite
First, avoid drafts while preparing the mixture, otherwise your “sand” (which makes up the base) will scatter so much that you will not be able to collect it. Secondly, to make the mixture it is recommended to use cement of at least grade M 400. Thirdly, follow the recommended proportions, which will speed up the hardening of the layer and ensure its maximum efficiency.
After laying the thermal insulation, the main layer of concrete with its indispensable reinforcement should be poured (I also have many articles about the intricacies of this process).
Well, all that remains is to finish this epic (of course, after the concrete has completely hardened) by laying tiles or mosaics. True, there is one more point. If you are making a bathhouse “for yourself” and are ready to invest a little in it, then before laying the cladding, we can recommend installing an “electric heated floor”.
This is essentially the same as installing heated floors in any living space. Infrared film under the tiles is very easy to install, and turning on its heating depends only on your choice and weather conditions (but in severe frosts you will not regret having it). The relaxation room will delight your feet with great pleasure.
Another option is to make a water heated floor. For those interested, here is a link to the article. By the way, this small bathhouse has been in operation for 4 years, and so far there have been no problems with heating the floor or the entire room...
Wooden floors
Now let's talk about wood floors. In general, the technology for insulating them (meaning non-leaking floors) is similar to working with concrete. But there are also some peculiarities:
- Choice of insulation. The ideal option, in my opinion, would be polystyrene foam, which does not allow moisture to pass through (when using other materials, you will have to think carefully about the correct arrangement of waterproofing).
- Preparing the subfloor. I have also written about this more than once in articles on my website. Here you can use low-grade boards that will be attached to load-bearing beams (joists). At the same time, the essence of arranging such a floor will not differ much with different types of foundation. After all, both the strip foundation and the foundation on screw piles, after installing the support beam, turn into an elementary structure, work with which is carried out according to a single technological process.
- Waterproofing membrane. A thin layer designed to protect beams and subfloors from exposure to steam or leaking water. When laying it, you should thoroughly insulate the joints and provide overlaps on the walls (about 20 cm).
Insulation. In general, the principle of its installation is so simple that I won’t even dwell on this point
The only thing I would like to pay attention to is the choice of insulation. Depending on the material used, you may have to install another layer of waterproofing on top of it. The final
All “unflattering” grooves and joints, as well as the space at the outlet of the sewer pipe and drain, can be blown out with foam. After this, feel free to lay the finished floor, not forgetting about the gaps (about 4 cm) between it and the underlying level, which will significantly improve ventilation and will help the floors dry out as quickly as possible.
Floor insulation with expanded clay
The procedure for filling the thermal insulation layer will vary depending on the design of the floor of the bathhouse being equipped. There are few options:
- the floor is laid over logs installed on compacted soil;
- the flooring is made on top of logs placed on brick supports;
- the structure is represented by a concrete screed or reinforced concrete floor slab.
Choose your option, read the instructions specifically for it and get to work. The information is given in the table.
Table. Floor insulation with expanded clay
| Floor construction type | Insulation procedure |
| Floor on joists on the ground | It is assumed that the joists have already been installed and all that remains is to lay layers of insulation to create the final flooring. If you are insulating an already used wooden floor, you must first remove the flooring (damaged boards are replaced with new ones), replace rotten joists and thoroughly compact the soil. The subsequent steps are similar for both cases: - waterproofing is laid on top of the compacted soil. You can put either plastic film, roofing felt or glassine. Waterproofing is placed both in the space between the joists and on top of them. Lay the sheets with an overlap of 10-15 cm. Tape the joints with construction tape. You can attach the insulation to the joists using a construction stapler with staples or small nails; — a uniform layer of expanded clay is poured over the waterproofing. Further actions depend on whether expanded clay will be used as the only insulation, or whether a second thermal insulation layer, for example, mineral wool, is planned to be laid on top of it. If thermal insulation is performed exclusively with expanded clay, the order is as follows: - the selected vapor barrier material (preferably foil) is laid on top of a leveled layer of expanded clay with a thickness of 30 cm or more. The overlaps and fasteners are the same as when laying the material for waterproofing; — finishing of the floor is carried out at the discretion of the developer. If expanded clay is used together with other insulating material, the procedure is as follows: - a vapor barrier material is placed on top of a layer of expanded clay 10-15 cm thick (the specific value is selected taking into account the planned thickness of the upper thermal insulation layer). The recommendations are similar to the previous case; — expanded polystyrene or mineral wool is laid on the vapor barrier. The functions of the frame for placing the slabs will be performed by the logs - select the width of the thermal insulation elements according to the size of the spaces between the logs (or simply fill the frame with the required parameters from timber). If the height of the logs is not enough, nail a beam on top of them at the height of the top insulation; — the thermal insulation is covered with a layer of hydro-vapor barrier. The further procedure of work remains at the discretion of the owner. So, for example, if a concrete screed is to be poured, a reinforcing mesh is first laid on the insulation. If the floor is wooden, bars are nailed to the joists for laying the boards. |
| Floor on joists on brick supports | In this case, the procedure will differ little from the option discussed above. Minor differences are present only at the initial stages of insulation: - expanded clay is poured to the level of the logs laid on top of the brick supports; - cranial bars are nailed to the joists (the most commonly used option is 4x5 cm in size); - a rough flooring made of boards or wood boards is installed on top of the bars. Further actions are carried out similarly to the previous instructions. |
| Floor on concrete slab | The sequence of activities will differ little from the instructions you have already reviewed: - the base is covered with a water vapor barrier; — expanded clay is poured; — the backfill is covered with another layer of water vapor barrier. The further procedure is determined by the developer and depends on whether a concrete floor will be poured or a wooden structure will be installed. |
The main areas in the bathhouse and the features of using the floors in them
The bathhouse is divided into several thematic areas:
- Steam room.
- Washing room.
- Waiting room.
- Rest room.
There can be even more zones, for example, sometimes a shower and sauna are added. Conversely, some sectors can be combined and reduced to two - an area for direct procedures and a locker room/rest room. Therefore, the whole question of how to cover the floor in a steam room of a bathhouse comes down, first of all, to the degree of exposure to harmful factors in a particular place.
The most extreme conditions for the floor are created in areas of high humidity and temperature, as well as from exposure to detergents. At the same time, in the waiting room these destructive factors are practically excluded. However, the proximity to the bathhouse and the street always carries excess moisture. Therefore, even here it is necessary to use special processing tools.
The main factors of material destruction are:
- Heat.
- High humidity.
- Water.
- Formation of mold and mildew.
- Detergents.
- Temperature changes during the cold season.
Destruction of a wooden floor in a bathhouse by rotSource ytimg.com
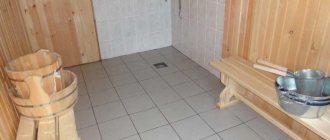
Bathhouse, steam room, washing room
Premises in direct contact with water and heat are exposed to the most destructive factors. Therefore, first of all, you need to know how to cover the floor in the bathhouse and steam room. As a rule, there is a special antiseptic for this. However, the effectiveness of the products used depends not only on the composition, but also on the structure and material of the floor surface.
In the steam room and washing area, the floor is made of wood or concrete. The first option has two varieties:
- Pouring. It is lined with boards located at a short distance from each other. Water naturally drains down into the gaps that form during bathing procedures.
- Solid. It also has a wood base, but unlike the version described above, water does not pass through the surface, but goes into the sewer system through specially equipped drains.
Shower floor in the bathhouseSource ytimg.com
The concrete floor in the bathhouse is continuous and sloped to facilitate water removal. A wooden sheathing is usually placed on top of the screed. A metal flat bowl for catchment can be additionally installed at the bottom of it. In addition, tiles made from natural or artificial materials are often laid at the final stage of finishing.
Dressing room, rest room
The steam room and washing room are only half of the bath, because in many respects the effect of the procedures depends on the correct subsequent rest
Therefore, it is also important to know what the floor in the dressing room should be like - what is best to make it from in order to provide all the necessary conditions for the relaxation room and locker room
Insulation of the floor in the dressing room with expanded claySource banyabest.ru
The floor in the dressing room is made based on how the bathhouse itself is used. If it is fully used all year round, then the floor surface must be insulated. The peculiarities of the operation of this room are that steam, splashes, dampness, and temperature contrast will also be constantly present in it. They are protected by a properly selected coating and a well-assembled structure - double flooring, insulation, hydro- and vapor barrier.
Modern heated floors in the bathhouseSource pikabu.ruInstallation on joists
Insulation of the floor in a bathhouse on screw piles (or for a wooden structure on any foundation) is most often carried out between joists or beams. Unlike the previous method, here you can choose insulation with less strength, since the material does not take the load from furniture and people.
Expanded polystyrene is mounted between wooden floor joists or between floor beams. The floor pie for a wooden bath in this case looks like this:
- subfloor boards (or plywood, DSP, OSB);
- waterproofing;
- insulation between load-bearing wooden beams;
- vapor barrier;
- clean floor.
The insulation is simply laid between the beams. There is no need to use glue or dowels. But it is necessary to fill the gaps between polystyrene and wood with sealant or polyurethane foam.
Proper insulation of the bathhouse will ensure a comfortable microclimate and extend the service life of the building. An increase in construction costs in this case leads to savings in operation.
- Baths
Preparing rooms and surfaces
If for some reason the floor was not insulated during the construction stage, you will have to dismantle the old floor covering
It is recommended to insulate the floor during the construction stage. If for some reason this does not happen, you will have to dismantle the old floor covering.
After dismantling, it is important to check the suitability of the rough beams (they make up the rough floor). Damaged ones must be replaced with new ones.
To avoid rotting, they are treated with an antiseptic.
You cannot coat the material that will be used in the steam room with an antiseptic. When heated in this room, harmful chemical fumes will appear.
Insulation of the floor in different rooms of the bathhouse - steam room, wash room, relaxation room - is done in its own way. This is due to the different temperature conditions and humidity levels that are observed in them.
Preparatory work
Preparatory work includes installation of a waste water drainage system and installation of a subfloor.
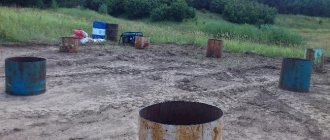
To install a drainage system:
- We excavate the soil to a depth of 40 cm, with wall dimensions of 40x40 cm;
- We concrete the bottom and walls of the tank to a thickness of 5 cm;
- We connect the fan pipe with one end to the reservoir, and the other into a special septic tank;
- Determine the level and location of the drain hole;
- We lay the second pipe from the bathhouse to the tank.
Important! Drainage design and site markings take place before work begins. To prevent unpleasant odors from entering the room, pipes are equipped with automatic valves
Preparing the base of a concrete floor consists of the following operations:
Removing the top layer of soil and filling it with sand;
Installation of a gravel cushion with a thickness of no more than 15 cm. Gravel must be used in a coarse fraction;
Backfilling with crushed stone. The thickness of the crushed stone layer is 10 cm
Important! It is necessary to compact each layer of sand, gravel and crushed stone.
Developments of “zero” markings: From the bottom point of the door frame, set a point upward by 1 meter; From this point along the perimeter, draw lines along the walls. Use a construction or laser level; On each wall from the drawn line, lower the points down vertically exactly 1 meter
Important! The connected points are the finished floor level.
Drive nails into the corners and connect them with a cord;
Divide the room into sections no more than 2 meters wide;
Place “buns” – heaps of concrete mortar – along the boundaries of the plots;
Lubricate the guides with technical oil for subsequent removal of the beacons from the concrete;
Place the guides on concrete “buns”. Profiles, metal pipes or wooden blocks are used as guides. The guides must be aligned in height with the “zero mark”.
Fill the resulting structure with concrete 5 cm thick. To avoid stagnation of water, it is necessary to organize a slope when laying concrete in the direction of the drainage.
Preparatory work for installing a wooden floor consists of the following operations:
- Laying floor joists with a slope;
- Attaching boards to them. It is better to choose solid coniferous trees as a material. The type of wood for the logs and boards must be the same. If the length of the walls of the room is the same, then the lags are laid in any direction, otherwise, the lags must be laid from the wall, which is longer in length and in a transverse direction relative to the water drainage.
- Install support chairs in the center of each joist to prevent them from sagging. The supports can be made of wood, concrete or brick. Brick and wooden supports rest on a concrete platform, at least 20 cm thick, reinforced with reinforced mesh. The projections of the platform beyond the boundaries of the supports are 5 cm on each side.
The concrete platform is a 40 cm depression in the ground, with backfilling and compaction of subsequent layers:
- Sand 10-12 cm thick spilled with water;
- Coarse crushed stone 15-20 cm thick;
To compact the layers, use vibrators or vibrating rammers.
Work on the construction of a concrete platform:
- Install wooden formwork and cover the inside with waterproofing. Use roofing felt as a waterproofing material.
- The first layer of concrete mixture is laid with a thickness of at least 12-14 cm;
- Each layer of concrete must be compacted. Concrete is a mixture of sand, cement, fine crushed stone diluted with water. Mix bulk material in a ratio of 1:3:5. Stir the mixture until a thick consistency is obtained.
- Cover with reinforcing mesh;
- Pour the second layer of concrete and leave until completely dry;
- We coat the concrete preparation with bitumen;
- Glue a layer of rolled waterproofing.
Important! The height of the support chairs should match the height of the places on which the ends of the floor joists will rest. If a strip foundation is designed for the bathhouse, then the levels of the top of the foundation and the support tables must coincide
The lags are laid from the walls towards the water collection tank. It is necessary to make cuts in the joists with a bevel of 2-3 mm, with the exception of the outer joists.
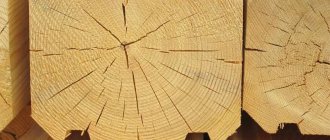
Pros and cons of the material
Polystyrene foam is nothing more than foamed polymers that form gas capsules at high temperatures and retain their shape when cooled.
As a substance formed with the help of gas, polystyrene foam has a number of excellent insulating properties:
- ease;
- moisture resistance;
- durability;
- sound insulation;
- resistance to shrinkage.
In addition, in price lists, foam plastic consistently occupies a position among the cheapest building materials. Just what you need for economical and quick insulation.
However, don’t get too fascinated and think that polystyrene foam is perfect. Of course, it also has disadvantages, but whether or not to pay attention to the disadvantages of this insulation is your choice.
The disadvantages of polystyrene foam are:
- flammability (due to the nature of its formation - using gas);
- not too long service life, which may be further shortened due to violation of installation technology;
- unsuitability for insulation of wooden premises. In practice this is possible, but only if there is high-quality ventilation;
- fragility;
- release of toxic substances during combustion that can cause paralysis of the respiratory tract;
- poor quality of some brands of polystyrene foam produced in artisanal conditions.
Organic raw materials
Insulating the bathhouse with natural materials will provide a high level of vapor barrier.
The following types of raw materials are distinguished:
- flax tow;
- cellulose;
- felt;
- wood sawdust.
When the question arises of what is the best way to insulate the ceiling in a bathhouse from above, it is worth remembering that some samples of animal or plant origin cannot tolerate high temperatures. They can only be used in the waiting room or rest room.
Method of insulating a bathhouse ceiling with sawdust
Among other techniques, the leader is the procedure for improving the roof of a room using compressed wood shavings. It gained such popularity among the people because of its accessibility and ease of installation.
Photo from the website Tomsk.fis.ru
Considering the fact that thermal insulation should not only prevent hot air from passing out, but also promote the accumulation of steam, it is necessary to lay two layers of blocks. To better distribute the wood processing product between the upper beams, a binder is used, so the bathhouse ceiling is insulated with clay with sawdust or with cement.
Why insulate the floor
Thermal insulation layer is necessary to prevent heat loss from the room. The microclimate in the bathhouse is characterized by high humidity and temperature. In the absence of proper insulation, several problems arise in this case:
- The heat quickly escapes. It becomes difficult to light the sauna. At the same time, the consumption of firewood or other fuel increases significantly. Carrying out all the necessary measures during construction will save money.
- The material of supporting structures is exposed to simultaneous moisture from the inside and cold from the outside. This combination has an extremely negative effect on both concrete and wood. In this case, operating costs increase again, but due to repair costs.
- The bathhouse cools down quickly. Drafts may get inside. Cold air causes spoiled rest or illness.
Proper insulation of the floor in a bathhouse with your own hands allows you to prevent problems, ensure an optimal indoor microclimate and not spend money on the services of professionals.
Main features of the material
It is no secret that the thermal insulation qualities of any material with a foam or porous structure can be significantly reduced in the presence of high humidity. This property is not typical for penoplex. The material slightly absorbs moisture during the first 7 or 8 days, while the pores near the surface of the material are filled. Then the moisture absorption process stops. Thus, the thermal insulation qualities of penoplex practically do not change. In addition, the insulation is completely impermeable to water vapor, which is important in a bathhouse.
There are three types of material:
Penoplex insulation, marked 45, has an increased level of mechanical strength and can be used to insulate floors exposed to mechanical loads, as well as various types of vibrations. The dimensions of a standard slab are 60 centimeters wide and vary in thickness from 2 to 15 centimeters. Sales records belong to insulation with a thickness of 10 to 12 centimeters. The length of the slabs can be 120 or 240 centimeters. For large objects, penoplex slabs are produced in 4 and 4.5 meter formats.
Principles of work
After familiarizing yourself with insulation materials, you can begin to insulate yourself. To do this, you need to prepare tools, consumables, draw up a project, and carry out the work.
Materials and tools
Consumables, tools:
sharp knife;
- roofing felt sheets;
- ruler, tape measure, building level;
- sand, cement, water, container for mixing the solution;
- electric drill, whisk attachment;
- insulation;
- waterproofing.
The amount of consumables depends on the area of the room. On the thermal insulation material, the manufacturer writes how many square meters the package is enough for.
Preparation and design
To properly insulate bath rooms, you need to prepare the base. To do this, you need to take into account some nuances:
- Insulation must be carried out at the main stages of building construction. If this has not been done, you will have to dismantle the floor covering and pour a new screed.
- The base must be smooth, without bumps, cracks, or chips. To level it, you need to pour fresh screed along the beacons.
- It is not recommended to cover the materials that will cover the walls and the floor in the steam room with antiseptics. They can release harmful substances when heated strongly.
The insulation process varies depending on the type of room.
Thermal insulation of wooden floors
Execution of work:
- When the concrete base is ready, it is necessary to create a frame to secure the thermal insulation. To do this, a rough base of bars should be filled on top of the lags. Intermediate slats are laid out between the beams.
- The next stage is laying the waterproofing.
- Insulation can be installed on top of the waterproofing material.
- The top of the heat insulator is covered with another layer of waterproofing.
The last stage of construction is laying finishing boards.
Insulation of concrete floors
Execution of work:
- Preparing the base.
- Leveling the concrete slab.
- Laying waterproofing.
- Distribution of slab or bulk insulation.
- Laying reinforcing mesh. It can be knitted from individual metal rods.
Installation of a "warm floor" system
If you only want to step on a heated floor, you can install a special system for forced heating of floor coverings. You need to choose what it will be - electric, water, infrared. Next, you need to purchase consumables and begin construction work. Main stages:
- Prepare the base and level the subfloor.
- Lay a layer of thermal insulation.
- Attach a reinforcing mesh over the heat insulator.
- Attach the system to the mesh.
- Connect the structure to a general electrical network or water supply system. Check functionality.
- Fill the subfloor.
- Wait for the concrete to dry.
All that remains is to do the finishing touches.