It is well known that without a supply of hot water, a steam room in a bathhouse loses its attractiveness. Even the simplest heat exchanger in a sauna stove will provide plenty of boiling water for spraying the heater and washing in the shower. But not everything is so simple, the performance and reliability of heating depends on how well the design of the water heating circuit is chosen, how well the heat exchanger is located in the sauna stove. And also the comfort and mood of bathhouse visitors. Not to mention the need to maintain basic sanitation. Therefore, there is no point in running with buckets to the next room when there is a simpler solution.
The advantage of a sauna stove with a heat exchanger
The most important advantages of furnaces with a heat exchanger are the following parameters:
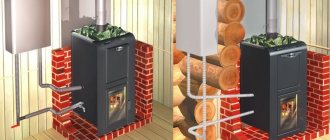
- A sauna system with a heat exchanger performs two functions at once - it heats the water and also heats the steam room and dressing room.
- The tank of such a system can be located in a room adjacent to the steam room.
- Furnaces of this type, the cost of which is not so high, are made from high-quality material with a long service life.
- The firebox of a modern stove is equipped with fireproof glass, thanks to which you can enjoy the burning of fire while controlling the process itself.
- The appearance is quite attractive, and the system itself is easy to maintain.
- I would like to note that stoves of this design are easy to install. which is possible with your own hands.
- The small dimensions of such a sauna stove allow you to save space in the steam room.
- Also, the power of such a system does an excellent job of quickly heating the room reserved for the steam room to the desired temperature.
How to properly install a stove in a bathhouse
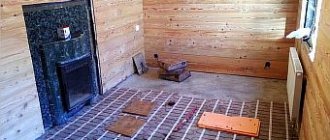
Metal wood-burning stoves do not require such a massive foundation as brick ones, but it is still advisable to make a foundation for them, if possible. A small design of 0.5×1.2 m is sufficient.
For the foundation, make a hole about half a meter deep, compact the bottom and cover it with a layer of crushed stone 30 cm thick. A screed is made on top of the crushed stone cushion. When it dries, a waterproofing material is laid and concrete mortar is poured. After hardening, the foundation is covered with a sheet of metal and the installation of the furnace begins.
Foundation diagram for a sauna stove
When installing a stove, you should remember several important rules:
For the structure, you need to allocate an area measuring 70x70 cm.
The fire door should “look” towards the door. The heater door is on the contrary, in the direction opposite to the door.
Where the chimney goes outside, the brickwork needs to be made 12 cm thicker.
If the bathhouse ceilings are made of wood, they are protected with thermal insulation materials.
The technical documentation for each industrial model specifies the norms and rules that must be followed for safe installation of the structure. Strict adherence to the manufacturer’s recommendations is the key to normal operation of the stove throughout its entire service life.
Do not ignore the instructions and do not use the documentation included with other models.
Layout of the stove in the bathhouse
Video: DIY sauna stove
Wood-burning stoves are considered the most fire-hazardous, but they are the ones that enjoy the greatest respect among bathhouse owners. If you choose this model, take care of the proper level of security. The floor and walls near the stove must be covered with metal sheets or other non-combustible materials. Highly flammable objects should not be placed near the firebox. Follow the safety rules and enjoy your health!
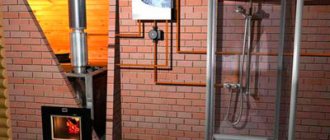
Washing in a bathhouse without hot water is simply unthinkable. Everyone solves the problem of heating it in their own way: some install a vat on the stove, while others prefer to use an electric water heater. However, we should not forget that there are bath stoves that include or are adapted to install special tanks for water, which provide its heating. Moreover, specialists involved in sauna equipment have developed containers that can be used to complement almost any model of existing sauna stoves. That’s why we decided to tell you about what water heating options can make the bathing procedure more enjoyable and convenient.
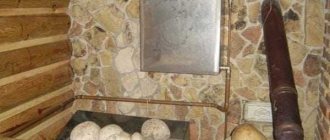
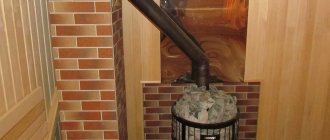
Open siphon type heat exchanger
A very interesting and effective option is to heat water on a stove, but, unfortunately, not very common. An inclined pipe, sealed at the end, is welded into the furnace. Its second end - an open cut - is welded at the bottom of the water tank. When water is poured into the tank, some of it flows into a pipe located in the oven, where it is heated until it boils. The steam released during boiling rises in bubbles. Once in a cold environment, the bubble bursts, transferring a significant part of the heat to the surrounding water. In addition, heat transfer occurs due to the same convection (the movement of hot water up and cold water down).
Siphon heat exchanger. Effective option, but rarely used
One of the practical implementations of such a heat exchanger is shown in the photo. The design has been slightly changed, but the principle remains the same.
DIY heat exchanger for a sauna stove
In this option, the tank is located on a stand in the next room. A hole was made in the wall and in one side of the stove (the stove stands on its side). The length of the pipe is such that it almost reaches the opposite wall of the firebox. The pipe is sealed at the end, the hole in the furnace is slightly larger than the diameter of the pipe, and is not insulated or sealed. The inlet hole is located quite low - firewood is placed directly on this unusual heat exchanger, and then, after burning, coals are heaped onto it if necessary.
How to connect a heat exchanger to a water tank
The owner of such a siphon-type water heat exchanger has been using this unit for more than 6 years. He says that smoke does not enter the room. Sometimes, if you close the door to the steam room too quickly, a small portion of smoke may escape, but this happens very rarely and does not cause any trouble. It is not recommended to make the tank large - it is more convenient to fill the water several times than to wait until a large volume of it heats up. The tank in the photo has a volume of about 50 liters.
Difference by type
The simplest designs of heat exchangers are coils with ends removed from the tank: one takes in liquid at room temperature, the other releases hot liquid.
More complex ones are a system consisting of two metal tanks with anti-corrosion properties - cylindrical and rectangular in shape with connecting pipes.
There are two ways:
- This photo shows an option for installing a heat exchanger in a steam room and a tank in a wash room.
The second option is to install a heat exchanger with a tank inside the steam room.
Advantages of installing a heat exchanger in a steam room
- high water heating speed;
- saving free space in the steam room;
- Wide range of options for installing the tank - in a steam room or in a shower room.
Wall-mounted tanks for sauna stoves
The convenience of stoves designed for the use of hanging tanks is that water heating tanks can be easily installed and also easily removed. As a rule, their suspension is provided using loops and hooks. Like all other water tanks, they are made of stainless steel. They include hatches for filling with water and taps that ensure the use of already heated water.
The Vravra range of stoves includes several products designed for the installation of wall-mounted tanks.
A significant drawback of such designs is that those steaming can get burned on their hot walls, and it is impossible to arrange a shower when using such tanks. In addition, heated water can boil in them, causing abundant formation of steam in the steam room that is not yet fully heated. True, the last problem can be solved in the following two ways:
- hanging the tank a little later;
- Periodically draining the hot water and refilling the tank with cold water.
The convenience of wall-mounted tanks is that they are ideal for retrofitting existing furnaces. They are convenient in small spaces and in combination with small stoves. They, like the mounted tanks, are easy to rinse and clear of accumulated scale.
An excellent system developed by specialists. Their tank can be used both as a mounted or remote one, but subject to the purchase of a water heating register and the installation of a water supply circuit.
Remote large capacity
The water tank for the bathhouse is remote; if a large container is used, it is installed on the floor. For baths with several sinks and showers, a pump must be installed.
It creates the required pressure, which makes it possible to use any modern plumbing fixtures, spray showers, hydromassage cabins and much more.
When installing the pump, care must be taken to ensure that it does not cause excessive noise.
It is reduced by the use of plastic pipeline fittings and the pipes themselves.
Also, the pump installation should be carried out outside the bathhouse.
Nowadays pipes are inexpensive, and you can make an elbow for the pump in any convenient place, for example, in a plumbing hatch, next to the water meter or in the utility room of the bathhouse.
The “water tank with heat exchanger” type arrangement for a bathhouse is suitable for heating the largest volumes of water. The tank capacity can exceed hundreds of liters. In other heating systems, such options are difficult to implement.
Information. All pipes, connecting fittings and pump must be heat-resistant (if plastic is used). For metal, ordinary ½ or ¼ inch steel pipes are optimal.
System Features
When installing a heated water floor in a bathhouse powered by a wood-burning stove, there is no need to install a boiler. However, a heat exchanger needs to be built above the firebox. Any stainless steel tank that is not prone to corrosion is suitable for this. A circuit extends from it into the room where the heated floor will be installed.
To return the waste liquid to the tank, you will need to install a small pump. Without it, the design will only work when the stove is located below the level of the floor covering. The diameter of the pipe with this scheme should be taken equal to 16 mm; the usual 24 mm ones will not work.
The main feature of the stove floor design is the inability to adjust the temperature level. The recommended temperature of heated floors in the bathhouse is 40 degrees, but the heat carrier from the stove will heat up to boiling water.
Video
Therefore, it is necessary to make a mixing block in which hot water will be mixed with already used water, thereby reaching the desired temperature level.
Since it is not possible to install a large container in the furnace, you can place a battery tank near it and stretch steel pipes from it to the heat exchanger.
Electric heater
Special electric heaters for bath needs are traditionally divided into two classes: storage-type boilers and units with flow-through action. When choosing a type suitable for given conditions, it is recommended to proceed from the following considerations.
In areas where there are frequent power outages, a storage tank is more suitable for installation in a bathhouse; in the simplest case, it is a container with a useful volume of 30 to 200 liters. A heating element and a special heat-sensitive sensor are installed in its internal space, which is responsible for maintaining the water temperature at a given level.
Among the advantages of such heaters it should be noted:
- increased level of electrical protection;
- the ability to use heated water for some time even in the absence of electricity;
- availability of several designs (vertical and horizontal);
- efficiency.
For areas with a reliable power supply, less common flow-through heaters that operate on approximately the same principle as a gas water heater may also be suitable.
The disadvantages of units of this type include significant energy consumption and the need for equipment in a bath with powerful electrical wiring. In addition, in order to maintain a fixed level of water heating in this case, it will be necessary to ensure the stability of its supply.
Cast iron, steel or stainless steel?
Quite a lot depends on the material from which the tank is made - both the rate of heating and cooling of water, and the durability of the tank itself.
Cast iron: hot water all day long
For a long time, the tank in the bathhouse was made of heavy cast iron - the water took a long time to heat up, a lot of firewood was consumed, but it was hot until the evening and the whole family could wash all day. In addition, cast iron is not afraid of either corrosion or high temperatures. But its considerable weight is, of course, an obvious drawback.
Stainless steel sauna tanks: lightweight and durable
But today, a stainless steel sauna tank is becoming increasingly popular - there is no need to isolate moisture from it, it has excellent thermal conductivity, and the deformation coefficient due to sudden temperature fluctuations is negligible and cannot be compared with the properties of ferrous metals.
The best brands for such tanks are 8-12X18H10 (304) and 08X17 (430), which are also used for making dishes. They are resistant to even extreme temperatures, hygienic and do not corrode or deform.
Such bath tanks are made from durable and thin stainless steel sheets, into which special ball valves are installed to enter and supply water. Caring for such tanks is extremely simple.
Enameled tanks - good if handled with care
Enameled tanks will also get rid of unpleasant rust. Their only drawback is possible chips, which will lead to corrosion. But they can be treated with special heat-resistant paint - unless the tank itself is inserted into the oven.
Materials
When choosing a tank for a bathhouse or when making it yourself, an unmistakable choice of the material for its manufacture is extremely important. The heating time of the liquid, the period of its cooling and the duration of operation of the device itself will depend on this. Among the most widely used materials, cast iron, stainless steel and enameled steel are widely used.
Previously, only cast iron tanks were used for hot water tanks. Cast iron containers have been tested by time and have a number of positive aspects. In particular, a cast iron tank will keep the water hot for a long time. There is no corrosion on them and the water in this tank will always be clean. This material is very resistant to temperature changes. And finally, the shelf life of a cast iron tank is very long, since this material is not susceptible to corrosion. Currently, not many manufacturers are engaged in the manufacture of cast iron tanks. But it is quite possible to buy a used tank at a lower price. In this case, you will need to process it and give it a pleasant appearance.
One of the disadvantages is the rather long time it takes to heat the water in the tank. Cast iron tanks are heavy and sometimes need to be installed on a special foundation. If the tank is located above the stove, its fastening requires additional reinforcement. Making such a tank yourself will also be a very problematic undertaking.
Stainless steel containers are now used quite often. This material replaced cast iron tanks. The owners of the baths appreciated their high positive qualities. Such tanks do not require additional protection from high humidity. The water in a stainless steel tank heats up in an extremely short period of time. Stainless steel has good resistance to sudden temperature changes and, accordingly, does not rust, as its name already implies. The only downside that can be noted is that the water in it cools down quickly.
Tanks made of enameled steel are also a popular option for this design. A special enamel coating on such tanks reliably protects them from corrosion. The main thing is to prevent damage to the enamel, otherwise the tank may begin to rust. Although damaging the enamel layer is quite problematic, since such a coating is resistant to various types of damage. If necessary, a tank made of this material can be very easily cleaned. Enamel of various colors is available on the market.
For cold water, separate tanks are now rarely used, since it most often enters the room through the water supply. But if there is a need to install a container for cold water, then there is much less hassle with it than with a tank for hot water, since there are no particularly strict requirements for it. You can even use wooden containers, such as an oak barrel. Plastic containers for cold water are also popular. But such containers cannot be placed in a steam room, much less near a stove, because plastic is sensitive to high temperatures and can become deformed when heated. You can also make such a tank yourself.
How to install the stove correctly
A short instruction will help you do this yourself, without involving third parties.
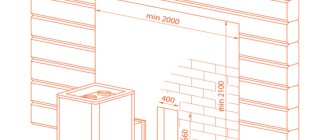
- Prepare a foundation with a depth of 400 mm, the height is adjusted depending on the firebox.
- Enclose the sauna heater with brickwork using clay mortar.
Fencing the heater in the bathhouse
- Install a heat exchanger in the combustion chamber. In this case, the furnace outlet should be led out into a separate room in advance.
- Insulate the pipes coming from the heat exchanger.
- Exit the sauna chimney through a pre-made hole in the roof and protect the wooden elements with metal sheets and asbestos.
- Carefully seal all joints.
Installation and connection of the heat exchanger and tank in the bath
- Find a suitable location to mount the remote tank. If all the structural parts are located in one room, it is most often hung on the wall closest to the heating unit, 200-300 mm above the recuperator.
- Secure the wooden dies with dowels - these are the guides on which you will hang the tank. This is necessary so that the container does not touch the interior elements with its hot surface.
- Strengthen the assembly with brackets for greater reliability.
- Equip the remote tank with 4 pipes, then, using fittings, connect the first two with the corresponding ones at the tank (for direct and reverse water supply), close the third with a valve, and connect the shower (faucet) to the fourth.
- Install (at the lowest point) a valve on the reverse line to drain the water.
- Connect all elements and check the system for leaks.
What you need to know about operation
If you have read the instructions and purchased a heat exchanger for your bath, make sure that the following conditions are met:
Fastening connections must be movable - this will help minimize deformation of the recuperator components under the influence of high temperatures. Seals must be made of heat-resistant materials. The capacity of the remote tank is selected so that it can accommodate the volume of water heated in 2 hours. It is important that full compatibility with the heating unit is maintained. The device should consume no more than 10% of the energy generated by the oven.
Operational safety
To prevent emergency situations, observe the following precautions:
do not attach pipes directly to walls; Make sure that there is always enough water in the tank, otherwise you will quickly encounter a scale problem or even a fire hazard; constantly check the operation of the device and sound the alarm if it suddenly breaks down; Use only heat-resistant gaskets and regularly pay attention to their condition.
Our opinion on water tanks
In our opinion, the most convenient to use is . Once you have spent money on its purchase and gone to the trouble of installing it, you will enjoy the comfort that this type of water heater can provide for a long time.
On the other hand, mounted and mounted tanks are attractive due to their ease of installation. If we talk about tanks on the pipe, then they allow you to save thermal energy by preventing the heat from evaporating along with the escaping smoke.
Thus, all types of tanks have their advantages and disadvantages. Only you should decide which of them is most acceptable, based on the conditions existing in your bathhouse.
Some details of installing a remote tank can be found in the following video:
Flaws
Despite many advantages, the installation of a heating element on a chimney pipe also has disadvantages. One of them, the most important, is a sharp decrease in the smoke temperature at the installation site of the heat exchanger. This can lead to deterioration of traction and the formation of condensation, increased soot deposition inside the pipe.
In addition, when connecting a heating system, for example, a garage, you need to calculate the volume of coolant to avoid boiling water and bursting pipes. Welds must be completely sealed.
Any heat exchanger design significantly increases the efficiency of the furnace. For trouble-free operation of the system, it is necessary to carry out a visual inspection of all its elements at least twice a year, and, if necessary, timely repairs, descaling, replacement of gaskets and other necessary maintenance work. In this case, water heating and heating systems will operate flawlessly for a long time.
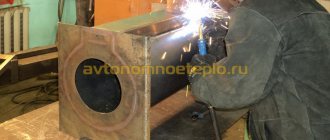
Making a heat exchanger with your own hands
To make a heat exchanger for a sauna stove with your own hands, you need to use sheet metal. the thickness of which is 2.5 mm. The upper container in the form of a cylinder is connected to the lower rectangular container using pipes. In this process, the most important thing is that the seams at the junctions of individual elements have minimal gaps. The immediate dimensions of the furnace, as well as the thickness of the pipes, must be calculated in accordance with the area of the bath.
The prepared metal blanks are attached to each other by welding and only after checking that all the parts are in place is the heat exchanger finally welded. At the end of the welding work, the quality of the seams is checked for this:
- The lower pipe of the heat exchanger is welded.
- water is poured into the system.
- a container is connected to the outlet hole.
- To check, pressurized air is supplied to the system.
- If the welding is done efficiently, there should be no leaks at the seams.
What is important to consider when choosing the right model
There are several factors that determine the intensity of heating of the room and the quality of the steam in the steam room. These are the ones you should focus on when looking for the right stove:
Power. This is the main criterion for choosing any heating device. The power should be sufficient for good heating, but not excessive, so as not to create unnecessary problems. When calculating, they are guided by the volume of the room. For heating 1 cubic meter. 1 kW of power required.
Type of fuel. It is necessary to choose a fuel that is always available in the area where the bathhouse is located. Ideally, it should also be cheap. In gasified areas there is no problem with this, but still many bathhouse owners choose solid fuel models. This is a tribute to tradition. You can buy a design that will be designed for both gas and firewood.
Installation method. The type of lighting depends on the location of the stove - from inside or outside the steam room. A model with a regular combustion channel is suitable if you will be heating from a steam room. If you plan to use kindling from the dressing room or rest room, then it is better to choose a design with an extended combustion channel.
Design. The model should be easy to use and fit into the overall style of the bathhouse design. The appearance of the stove cannot be considered a determining factor in choice, but it is still important, because... Any bathhouse owner wants to equip themselves with a cozy place of rest and relaxation.
Volume and type of water tank. Before purchasing, you should calculate the desired volume of the water tank and its location relative to the stove. For each specific room, you should choose a model based on the layout. In some cases, the best solution would be to purchase a stove with a built-in heat exchanger.
Scheme of the design of a furnace with a built-in tank
What can a water tank look like?
When purchasing a sauna stove with a water tank, pay attention to its location and connection method. There are the following main types of tanks: Mounted
Located on the body of the model, it heats up as the walls of the stove warm up. There is an additional benefit: due to the reservoir, the heated surface area increases. This is the simplest option in terms of installation, however, it will not be possible to organize a shower with such a tank, and the water heats up too quickly
Mounted. Located on the body of the model, it heats up as the walls of the stove warm up. There is an additional benefit: due to the reservoir, the heated surface area increases. This is the simplest option in terms of installation, however, it will not be possible to organize a shower with such a tank, and the water heats up too quickly.
Mentor. The water reservoir can be installed directly on the combustion chamber. This is not always convenient. Water can heat up much earlier than the air in the room. In addition, the material of the tank can quickly burn out and the seams can come apart.
On the chimney pipe. A tank of this type resembles a samovar in appearance, which is why the designs are often called samovar. The tank is mounted on a pipe, and the water in it is heated with the help of hot gases rising upward. This allows for more efficient use of fuel. The shape of the tanks is square or round. Often they are placed so that they serve as a passageway to the roof.
Remote. An ideal option for baths where the stove is located in the steam room, and the tank should be located in the washing room. The water is heated using a built-in heat exchanger. Thanks to the design features of such a tank, a situation where the water is already boiling and the room has not yet warmed up enough is eliminated. The disadvantages include the high cost and complexity of installation compared to other types of tanks.
Model "Varvara" with a mounted tank
How to properly install and connect the tank
Depending on the conditions in the bathhouse, the connection diagrams for the container may be different. For example, if water supply is installed in the washing room, i.e. water will be supplied under constant pressure, then a closed water supply system is needed.
The photo shows an example of installing a tank in a washing room.
In this case, the ideal option is a stove with a coil inside, which is connected to the tank. You can, of course, implement another method - hang the container on the stove itself. For this, the simplest design of a tank of 50-120 liters is suitable, which you can weld yourself, in which case the price of the product will be determined solely by the cost of the material.
If the connection was made correctly, then the water heating circuit looks like this - the water is heated in the register and, according to the law of physics, rises. There it gradually cools down and goes back into the register. Thus, natural circulation is obtained.
Connection instructions are as follows:
- The container is installed in the steam room of the bath under the ceilings and connected to the coil using pipes.
- For normal circulation, the upper outlet of the tank must be connected to the upper outlet of the coil, and the lower outlet must be connected to the outlet from below. Thus, hot water is discharged from above, and cold water will flow from below.
- At the entrance of cold water, check valves and safety valves are installed, the latter is also called a blast valve.
- Then the threshold pressure is set according to the instructions of the storage tank, at which the safety valve is activated.
This system will work as follows:
- A filled tank is heated through a coil and when hot water is drained, it will automatically begin to be filled through the cold inlet.
- If hot water is not used, the pressure in the tank will increase as it heats up. When the critical point is reached, the explosive will go off and release the pressure.
What designs can be used
You can place the tank in the bathhouse in different ways. The main types used are:
Built-in design. In this case, the chimney pipe runs inside the tank. This structure is considered stationary, non-removable and is installed during the manufacture of the chimney. The tank can be made in the form of a pipe (cylindrical version) or have a rectangular cross-section
It is important to securely seal the bottom entrance of the pipe to prevent water from leaking out of the tank. To use water, outlets are made from the tank directly into the shower stall or intermediate tank
Given the elevated location of such a tank, water flows by gravity.
The device of a heater with a tank on the chimney
- Hanging structure. Such a system is removable, i.e. installed on an existing chimney. The tank is placed close to the chimney pipe and securely attached to the column. Such containers can be purchased or made by yourself. This design is typical when a gutter is formed on the back wall, repeating the shape and diameter of the chimney, which makes it possible to bring the surfaces as close as possible and ensure high-quality heating.
Design of a hanging tank for a bath
- Remote design. In principle, the water container itself can be placed in any convenient place (for example, in a shower). In this case, the energy of the chimney heats the coolant, which is sent to heat the water container. When such a heat exchanger is mounted on a bath pipe, the installation height of the tank must be selected so as to ensure gravity flow of the coolant according to the laws of physics, i.e. the warm flow rushes upward, and the cooled flow – downward. This design provides for the presence of additional elements in the form of a heat exchanger, but it also allows you to place the tank itself in the right place.
Water circulation diagram with a remote design of the tank and stove in the bathhouse
Depending on the design, the tank can be placed at different height levels. 3 options can be implemented:
- At the stove level: the base of the tank is placed on the top of the stove, which means no additional brackets are required. The main disadvantage is that the height does not allow gravity flow of water for showering. In this case, it is scooped by hand.
Tanks at furnace level
- On the chimney column. This design is located at a certain height, which eliminates the previous drawback. Mounting the tank requires special brackets, and the weight of the structure is limited.
- Attic level. Here there is a reliable support for the tank in the form of a ceiling. The problem arises in a cold attic, where you will have to think about external thermal insulation.
Diagram of installing a water tank on a chimney at the attic level
When calculating the parameter, they usually proceed from the following requirement: 10 liters per person for a bath procedure and 5 liters per person when taking a shower. In addition, a reserve should be created for unforeseen circumstances.
There are various forms of water tanks for a bath on a chimney
The dimensions of the container also depend on the design and dimensions of the chimney. The most common type is a sauna tank with a 115 mm pipe. Naturally, a bath tank for a 150 mm pipe is made of a larger diameter, regardless of the need.
The choice of volume of a metal water tank depends on the number of family members. Formula for determining the volume of a cylindrical tank
What are bath water tanks made of?
First, let's talk about what the tank can be made of.
In addition, stainless steel containers are quite heat-resistant and durable and are not negatively affected by sudden temperature changes. However, there is one drawback: the prices for stainless steel bath tanks exceed the cost of their steel “brothers” made of enameled steel. To be fair, we note that this can be neglected: a stainless steel container will last longer than its steel counterparts.
In modern production conditions, enameled steel tanks also have a long service life. Parameters such as resistance to corrosion and high temperatures indicate a fairly high quality of products: the tanks in the bathhouse do not rust.
But still, enameled steel cannot be compared with stainless steel (although it is successfully used in the production of tanks). The only thing in which steel containers are superior to their stainless counterparts is price: the cost of enameled products is approximately 1.5-2 times lower.
Stainless steel and steel sauna tanks are by far the most popular, although there are other options (for example, cast iron sauna tanks).
Selecting the boiler power
It is important to take care of the installation of an RCD (residual current device). This will prevent accidental electric shock to bathhouse visitors.
This will prevent accidental electric shock to bathhouse visitors.
Based on the design features and range of water heaters, we can state the following:
- If you don’t have gas, then the heaters and boilers using this fuel will “pass” by your bathhouse. If you are the happy owner of a gas bath, then you can no longer consider other options.
- Electric water heaters are expensive, but there are no problems with installing the device. It is cut into the water supply and plugged into an outlet. And that’s it – you can use it. Moreover, an electric boiler is a “one-time” device - this device will prepare the next portion of hot water after 3-4 hours. In addition, instantaneous and electric storage water heaters are afraid of excessive humidity in the bathhouse “atmosphere”.
- If you are a supporter of budget solutions and want to have a supply of hot water until the heater goes out, then you will undoubtedly like wood-burning water heaters. In this case, the water in the tank is heated by the stove itself, which imposes some restrictions on the process of installing such water heaters. They are installed during the construction of the heater. But if you haven’t missed the moment, then you won’t find anything better.
Well, now let's talk about volume:
- Large companies need an appropriate amount of water. Therefore, for a company of 4-5 people, you need either an instantaneous water heater or a boiler with a capacity of 100-150 liters.
- One or two people or a company of three people will get by with a 50-80 liter boiler.
- The bathhouse for one “user” is equipped with a 30-liter boiler.
water heaters “Success”,
which are tanks with a capacity of 40 to 250 liters, heated by heating elements at 1.5-2 kW.
Water heater “Success” 125 l
The tank is made of sheet steel, at least a millimeter thick, and the heating element is equipped not only with a thermostat, but also with a mechanical temperature regulator.
Less sociable bathhouse owners will be interested in
model GARANTERM ER 150 V
Water heater GARANTERM ER 150 V
electric boiler for 150 liters, boiling water heating element for 1.5 kW. This dressing can serve a company of 3-4 people, who can not only rinse off in front of the steam room, but also take a full-fledged hot shower. Moreover, the heater body, as well as the outlet fittings, are made of stainless steel, and moisture-resistant polyurethane foam is used as a heat insulator.
The cost of the heater is 10-11 thousand rubles.
model Ermak KVS-10-2-90
Water heater model Ermak KVS-10-2-90
wood-burning storage water heater made of stainless steel with a capacity of 90 liters. This boiler boils water using both wood and heating elements with a power of up to 2.5 kW. Moreover, this boiler has relatively modest dimensions - the wood-burning firebox is built directly into the storage tank of the heater.
The cost of a stainless steel model is 15,000 rubles.
Why do you need a tank on a pipe?
Strong hot steam, invigorating tart aroma of wood, birch and juniper brooms, the special spirit of a Russian bath... Not a single sauna with scalding air can replace real light steam! Even in our time, a bathhouse is a favorite place to relax for a person tired of the everyday hustle and bustle. And no entertainment and shopping centers will replace it.
And now I’ll add a little horror to the beautiful picture.
Imagine - you have decided to build or renovate a bathhouse. And so, the walls are covered with new lining, fresh brooms are waiting for hot steam, and the simplest thing remains - to buy a tank for the sauna stove. It would seem, what could be simpler?
Modern stores are overflowing with bath accessories and there are a great variety of containers for heating water. Most are tanks for sauna stoves of various shapes, shiny, smooth to the touch, with high-quality and beautiful welds. It would seem, what else is needed?
Now let's take a closer look at the material of manufacture.
In 80% of cases it is stainless steel with the incomprehensible name AISI430. And few people know that the stainless steel in this AISI is only a shiny surface and a little chrome. And a sheet of such material burns out under the influence of direct fire in 3-4 months. It’s no wonder that the manufacturer’s warranty for such tanks is no more than 3 months. Moreover, the sheet thickness is rarely more than one and a half millimeters.
And this is where the fun begins. Imagine, you bought a tank for 10, 15, or even 30 thousand rubles and happily installed it on the stove in the bathhouse. And six months later a hole burned in the bottom. Scary?
So I'm scared.
But there is a great way to avoid all such troubles, even using products made from Chinese stainless steel. And one of them is installing a water tank directly on the sauna pipe.
Heat exchanger on pipe
Heat exchanger for pipe
The temperature of the gas leaving the sauna stove is quite high, so it is advisable to use it. Accordingly, the heat exchangers, which will be discussed further, are attached only to the single-wall metal pipe of the furnace.
Heat exchangers for chimneys are also called samovar. The water in them heats up evenly and quickly enough, circulation occurs very quickly, and fuel savings are achieved. Additionally, such heat exchangers are a kind of fuses that prevent any leakage of smoke from the chimney into the room.
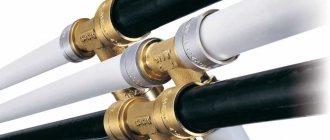
The heat exchanger and pipe are joined using heat-resistant sealant (up to 1000 degrees) and clamps. The pipes are connected using the technology discussed above.
Connecting the heat exchanger on the pipe
It is not necessary to make such a heat exchanger yourself; the cost of factory-made products is presented in table form.
Technical characteristics and prices of heat exchangers
| Chimney diameter 105 mm | Chimney diameter 115 mm | Chimney diameter 130 mm | |
| price, rub. | 2790 | 2890 | 5290 |
| Volume, l | 8 | 8 | 20 |
| Steel | Stainless steel – 0.5 mm on the sides and 0.8 mm on the bottom/top | Stainless steel 0.5 and 0.8 mm | Stainless steel 0.5 and 0.8 mm |
| Weight, kg | 2,5 | 2,5 | 4,5 |
| Height, mm | 500 | 600 | 665 |
| Fittings | 3/4″ x 2 | 3/4″ x 2 | 3/4″ x 2 |
Bath stove with heat exchanger: operating principle and installation
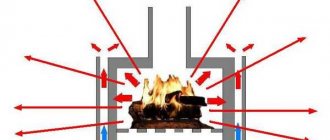
Principle of operation
Let’s make a reservation right away: any calculations of the required dimensions of a heat exchanger for a sauna stove will always be approximate. For example, heating a standard sauna room will require approximately 5 kW of electricity. This means that this is exactly the amount of energy we should get from a furnace with a heat exchanger.
On the question of the shape of the heat exchanger for a sauna stove - it all depends on your imagination. The simplest, cheapest and therefore most common option is a stainless steel pipe system. An equivalent replacement can be considered units welded from several channels.
We will take sheet metal as a basis, the thickness of which is at least 2 mm. From it you will need to build a cylindrical (later upper) and rectangular (lower) tank, and connect them with pipes. The size (or rather the area) should be calculated in accordance with the dimensions of the intended room.
Before final installation, it would be a good idea to evaluate the accuracy of the calculations made. To do this, the cut parts are secured by welding. After checking, you can begin assembly. Next is the strength assessment: we weld the lower pipe, and fill the heat exchanger itself with water, while connecting the outlet hole to the main tank.
If a pump is not provided in the system, then the following device and relative arrangement of pipes is recommended: cold water from the tank flows by gravity through the pipe to the stove, and hot water returns to the tank. The main condition: the pipes must be installed at an angle of 2-5 degrees.
The need for thermal insulation of the tank is determined by the possibility of its multi-purpose use, including for heating adjacent rooms.
Regardless of the form and method of self-production, the weak point of any heat exchanger is metal corrosion. Metal surfaces, by definition, have low resistance to aggressive environments, including water. This is why there is a need for internal surface protection.
Experts in this field recommend taking a responsible approach to choosing a heat exchanger for a bath and not skimping on materials and proper installation. Proper operation is also important. Here are the basic rules you should know:
- The main property of pipes when heating a heat exchanger is expansion. As a result, there is a possibility of their length increasing. Therefore, it is prohibited to use fixed connections when attaching pipes to walls.
- Choose the heat exchanger wisely in terms of power (size). This should not negatively affect the performance of the oven. Ten percent heat extraction is the limit. And if the already designed sauna stove is not powerful enough, opt for a more modest heat exchanger.
- The external water tank should be selected based on the following condition: the water in the system should heat up only two hours after the start of the fire. Not before! Otherwise, boiling water will quickly fill the steam room with wet steam. I don't think this is of any use to you.
- It is better to fill the tank with water in advance. It is not recommended to do this when the sauna stove is already at a high temperature.
- It is recommended to use a material that can withstand high temperatures as a sealant for threaded connections. It seems to be an obvious fact, but it is often forgotten.
Nowadays, the construction market is flooded with offers of all kinds of bathhouse units. Starting from a massive cast iron stove, and ending with simple and cheap options for wood stoves with a heat exchanger, where the price of the latter has little effect on the overall cost of the system. The choice is yours! Let us just give you a little advice: the heat exchanger must be made of high-quality steel with a good level of heat resistance and heat resistance.
Recommendations from experienced professionals
When installing a heat exchanger for hot water in a bathhouse, you need to remember that:
- A remote water tank should be selected in accordance with the power of the sauna stove - a container that is too large will take a long time to heat up. In a small tank, the water will boil early and fill the washer with unnecessary steam.
- The heat exchanger must also match the furnace - too large a design will reduce the efficiency of the furnace. The optimal option is when the system takes 10 percent. on the power of the stove.
- The system pipes should not be fixed rigidly to the walls - their linear dimensions change when heated.
- For threaded connections of the system, only a sealant that can withstand high temperatures is used.
- In a system with natural heat exchange (without using a pump), it is necessary to maintain a slope of 2 - 5 degrees for the upper and lower contours of the pipes.
- The sauna tank with a heat exchanger should not be empty when the stove is fired.
After heating the system to high temperatures, it is undesirable to add cold water - a sharp drop will negatively affect the service life
A sauna stove with a heat exchanger will allow you to get maximum comfort and, at the same time, preserve the charm of this favorite traditional procedure.
Let's talk about the rules of installation and operation
System calculation
If you decide to install the system yourself, you will have to make certain calculations. It will be difficult to absolutely accurately calculate the dimensions and volume of the system, and there is no urgent need for this.
For example, 5 kW is enough to heat a medium-sized room. This power can be provided by a heat exchanger with an area of 1 m². But the temperature in the furnace constantly fluctuates; when fully heated, 1 m² provides up to 9 kW, and when the furnace goes out, the power begins to drop rapidly and can drop by 5 to 10 times. Therefore, the area of the unit is taken with a significant margin, which makes it possible to equalize the heating of the liquid.
The configuration of the heat exchanger itself can be different; there is no consensus among experts. Some argue that stainless steel pipes are the best option, others prefer plates or manifolds consisting of 2 mating channels.
Connecting the system to the shower stall.
Tips for installation
If you decide to assemble the system yourself, then you should take into account several mandatory requirements.
- Tanks should be welded from metal with a thickness of at least 2.5 mm. The requirements for the upper, large tank are minimal; the main thing is that it does not rust or leak.
- The requirements for piping and the heat exchanger itself are somewhat higher; in the past, the most popular material for a heat exchanger was cast iron. Indeed, the material is very durable, does not corrode and holds the temperature for a long time. But cast iron also has serious disadvantages; it is heavy, which requires serious fastenings. And cast iron takes a long time to heat up.
- At this time, most experts prefer to assemble a system from stainless steel; its price is of course higher than that of cast iron or conventional steel grades that are susceptible to corrosion, but the savings here will cost more in the future. For the heat exchanger, stainless steel grades 08X17 (430) will be the most optimal; or 8-12Х18Н10 (304) they have optimal heat transfer parameters and meet all hygienic standards.
- As for the connecting pipes, naturally they should also be made of stainless steel. The drive pipe with cold water must initially, when leaving the large tank, fall slightly below the level of the heat exchanger; a drain valve is mounted at the lowest point and then rises at an angle of 2˚ to 5˚ to the entrance to the heat exchanger.
- The outlet pipe, through which hot water will flow into a large tank for a heated bath, must exit the heat exchanger, pass through the wall at an angle of at least 30˚ and connect to the tank.
The simplest samovar-type heat exchanger.
Important: pay attention to the cross-section of the pipes in the system must be at least 1 inch, otherwise the system will not operate stably, may overheat and require forced circulation of liquid. The optimal length of the entire pipework should not exceed 3 m
The system is designed exclusively for heating the room.
Do not forget that both the piping of the bath and the heat exchanger itself at all interface points must be equipped with special heat-resistant gaskets that provide sufficient damping clearance during thermal expansion of the metal.
Recommendations for safe operation of the system
- The pipework must absolutely not be rigidly fastened; all fastenings must be of the floating type, otherwise it will be deformed or fall off the fastenings.
- You should not get carried away with overly powerful heat exchangers; this system should take no more than 10% of the furnace power, because the main goal is to steam, and not to heat the water.
- The main tank for heating water in the bathhouse should be selected carefully; the best option is when the water in it becomes hot 2 hours after igniting the stove. If less, the water will boil and you will get excess steam. If it is more, you will waste a lot of fuel and the stove will take a long time to heat up.
- Wherever there is a threaded connection, the seals must be extremely heat-resistant, as a rule, it is an asbestos cord.
Of course, it’s up to you to decide whether to purchase a ready-made stove or assemble it yourself. But absolutely all experts agree that if you do not have sufficient skills in construction and plumbing, even the best instructions will not help you, and in this case it would be wiser to buy a ready-made, factory-made system and, if desired, assemble it using the included instructions.
The video in this article shows some of the subtleties of selecting a system.
Water jacket
Another heat exchanger is simply implemented - a water jacket (water circuit) on the pipe. A larger diameter pipe with two pipes for water supply/discharge is welded onto the chimney section. The principle of operation is still the same: hot water rises up, colder water flows down from the remote tank.
This method is more attractive for several reasons:
- heating occurs due to heat that previously simply flew away;
- making such a heat exchanger with your own hands is not difficult, although there are factory-made options;
- can be installed on any metal chimney and for this you do not need to disassemble the stove and make holes in it;
- a heat exchanger on the pipe prevents the penetration of gases from the chimney into the room.
All these advantages make such a device quite attractive. But this solution also has disadvantages:
- complete sealing of seams is required;
- when adding cold water, condensation may form;
- You cannot pour water into a heated system - it may tear the walls of the chimney due to the temperature difference.
The water circuit for the stove is made in a similar way, but in this case, a container with water is built around the body. Almost always, such a heat exchanger is made for round stoves. Firstly, you can select a larger pipe and weld the bottom and top, which is unlikely to be possible with rectangular stoves, and secondly, water moves in a circle easily and the system is efficient, which is difficult to achieve with a square casing.
When installing a heat exchanger in a stove, you need to understand that it is primarily intended for heating a steam room, and heating water is a secondary function. It is impossible to control two processes at the same time; the steam room is a priority, so it costs nothing to boil the water in the tank or coil. This means that it is necessary to ensure good heat extraction or sufficient storage capacity. For the same reason, it is not recommended to use circulation pumps in such systems; the flow of the hot medium must be natural.
For installation of the system, you can use both metal and polymer pipes, excluding polyethylene. The diameters of pipelines for gravity networks should be taken at least as large as the dimensions of the heater nozzles, or better yet, one size larger. In this case, the distance from the tank to the furnace should not exceed 3 m.
The heat exchanger in the form of a tank located around the chimney is made of stainless steel or galvanized sheet. In this case, the design of the furnace should be taken into account. If it has a combustion mode for flue gases, and the smoke temperature at the furnace outlet does not exceed 200 degrees, you can use any material to make the heat exchanger.
In simple stoves without smoke circulation, the smoke temperature at the outlet can reach 500 degrees Celsius. In this case, it is necessary to use stainless steel, since the zinc coating releases harmful substances when heated strongly.
Most often, heat exchangers of this type are installed on a sauna stove and used as a water heater for domestic hot water. The tank is equipped with fittings in its upper and lower parts, and pipes leading into the system are connected to them. The hot water tank is installed in the shower or steam room. It is possible to use such a system for heating a utility room or garage.
Heat exchangers for industrial furnaces are sold complete with some modifications; when installing a new furnace, you can choose a suitable model with a ready-made water circuit. You can also make a heat exchanger for the chimney with your own hands. To make it you need the following materials:
- pieces of stainless steel pipe of different diameters with a wall thickness of 1.5-2 mm, sheet steel;
- 2 1-inch or ¾-inch fittings for connecting to the system;
- storage tank made of stainless steel or galvanized steel with a volume of 50 to 100 liters;
- copper or steel pipes or flexible connections for hot water supply;
- ball valve for draining coolant.
Manufacturing sequence for a sauna stove or potbelly stove:
- Work begins with preparing a drawing. The dimensions of the tank installed on the chimney depend on the diameter of the pipe and the type of stove. Furnaces of a simple design with a direct chimney are characterized by a high temperature of the flue gases at the outlet, so the dimensions of the heat exchanger can be quite large: up to 0.5 m in height.
- The diameter of the inner walls of the tank must ensure a tight fit of the heat exchanger on the smoke pipe. The diameter of the external walls of the tank can exceed the diameter of the internal ones by 1.5-2.5 times. These sizes will ensure quick heating and good coolant circulation. It is better to equip furnaces with low flue gas temperatures with a small tank to speed up its heating and avoid the formation of condensation and deterioration of draft.
- Using a welding inverter, the parts of the workpiece are connected, ensuring the tightness of the seams. Fittings for supplying and withdrawing water are welded into the lower and upper parts of the tank.
- The tank is installed tightly onto the smoke fitting of the furnace, coating the connecting seam with heat-resistant silicate sealant. An adapter from a non-insulated pipe to an insulated one is placed on top of the heat exchanger tank in the same way and the chimney is removed from the room through the ceiling or wall.
- Connect the heat exchanger to the system and storage tank. At the same time, the required degree of inclination is maintained: the cold water supply pipe connected to the lower fitting must have an angle of at least 1-2 degrees relative to the horizontal plane, the heated water supply pipe is connected to the upper fitting and, with a slope of at least 30 degrees, is led to the storage tank. The storage tank must be located above the heat exchanger level.
- A drain valve is installed at the lowest point of the system. In the bathhouse it can be combined with a tap for drawing warm water for the steam room.
- Before starting operation, the system must be filled with water, otherwise the metal will overheat and leak, which can lead to poor sealing of welds and leaks.
- The water supply to the storage tank can be done either manually or automatically using a float valve. When filling manually, it is recommended to place a transparent tube on its outer wall to monitor the water level in the tank, so as not to run the system dry.
A do-it-yourself water heater exchanger is shown in the video.