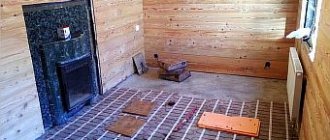
Each bathhouse has a stove to heat the room. For finishing and isolation, a portal for a sauna stove is used. This structure favorably emphasizes the beauty of the firebox, covers poorly located structural elements, gives seriousness to the entire structure, and protects nearby wooden elements from fire. Each person who thinks about arranging a bathhouse personally decides how to approach the arrangement of the frame. It is made from simple or designer materials and can withstand hours of heat from a hot oven.
Description of the sauna stove design
The portal is the facade of the stove, so they pay attention to the decorative elements.
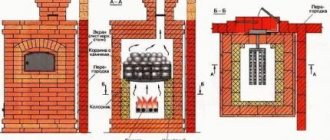
The sauna stove is made of different materials - brick, alloy heat-resistant steel, cast iron elements. However, the designs are similar. A standard oven includes the following elements:
- Firebox. This is the place where wood or other coolant is burned. In brick structures, this place is made of fire-resistant material. In steel - from heat-resistant alloy steel.
- Ash pit. Being placed under the firebox, it is designed to remove spilled ash and ash. The degree of openness of the ash pan regulates the rate of air supply and the rate of fuel combustion.
- The firebox arch is made in the form of a grate for open passage of the flame, or closed in metal models.
- Kamenka. Filled with stones, this element of the furnace is the main heat accumulator due to the passage of flame through it or intense heating from the furnace roof. The heater produces steam in the bathhouse when watered. The higher the temperature of the stones, the lighter the steam.
- Boiler or other container for hot water. It is located directly above the firebox, heater, heated by a pipe passing inside with flame and smoke. Sometimes the boilers are taken outside the furnace, connected by pipes to a special heat exchanger.
- Chimney. This is a natural way to remove combustion products outside. It is a pipe, sometimes equipped with a draft regulator - a rotary gate valve that prevents heat from escaping after heating. Even when the damper is completely closed, a gap remains, amounting to 15% of the pipe area, in order to avoid poisoning from combustion products leaking through the gaps.
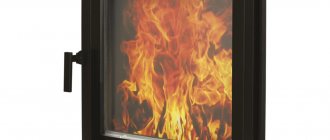
- Doors. This heat-resistant element is necessary for loading fuel. It experiences high-temperature loads, so it is made of heat-resistant alloy steel, cast iron or heat-resistant glass.
The stove and portal weigh a lot, so a solid foundation is laid under the base. On heaving soils, it should not be connected to the foundation of the house.
Furnaces are either horizontal or vertical in design. Shape: barrel-shaped, cylindrical, square.
Strengthening the base and performing masonry
The stove is a fairly heavy structure, weighing about 100 kilograms. If it is placed on the floor of the bathhouse (sometimes it is even placed on the ground - for this, a hole is made in the floor and a foundation is poured for the stove), then the floorboards require strengthening. For this purpose, metal concrete slabs or at least sheets of iron are used.
Structurally it consists of the following elements:
- chamber for firebox and ash;
- heater (place where stones lie);
- iron water tank;
- chimney base.
The laying is carried out as follows:
- lay the first row of bricks along the perimeter of the future structure;
- in the second row there is room for a door;
- at this stage, install the frame for the door and secure it with wire;
- the third row is erected under a place for the door;
- in the fourth row they place a grate - this is a grate through which air will penetrate;
- in the fifth - they make a chamber for the firebox;
- in the sixth, the door for the combustion chamber is strengthened;
- the seventh and eighth rows are placed taking into account the door;
- ninth - closes the doorway;
- in the tenth they provide space for water tanks;
- the eleventh–nineteenth rows increase the height of the stove;
- From rows 20 to 25 we lay bricks to form a smoke path and block the stove.
Types by manufacturing method
The most common method of laying brick and metal.
The portal for the stove in the bathhouse is made depending on several parameters:
- room design;
- skills in working with material;
- owner preferences and cost.
Mostly brick or metal is used. They are easily accessible.
When used, there is no need to install massive heat-reflecting screens. These materials look beautiful and can be processed at home.
Made of metal
Metal products are used independently and to create a structure when fastening lightweight materials - wood, drywall and the like. A number of advantages of decorative metal finishing:
- withstands high temperatures;
- fire resistance;
- easy to clean with detergents;
- forged inserts go well with brick and stone.
The stainless steel elements of the gate look interesting. It is recommended to decorate metal elements with any non-heat-intensive material.
Made of brick
Portal made of red brick with heat-resistant glass in the door.
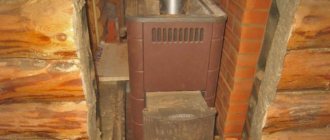
Portal made of brick for a sauna stove will easily fit into the interior of a sauna room. For lovers of the classic style, the red brick option will suit you. It is heat resistant and tolerates high humidity. In some cases, the use of clinker material is recommended.
The main thing is that the structure of the material matches the interior. Finishing bricks with a smooth surface are often used. The U-shaped finish lasts for decades inside the bathhouse, in the relaxation room, and outdoors.
If the construction of the portal is combined with the installation of a brick screen, the bath unit immediately falls into place. Brick is a universal material for installation.
Preparation of the solution
Before finishing the stove in the steam room of the bath, it is necessary to prepare a masonry mortar.
To do this, you need to choose the optimal ratio between clay and sand. This can be done by mixing a small portion and rolling it out into a thin cylinder. Then they fold it into a ring and look at the walls. If no cracks have formed, then the solution is of the highest quality. Modern craftsmen use a different composition to finish a sauna stove. It includes Portland cement, sand and tile adhesive. All ingredients are mixed and work begins. With this composition, the brick holds quite tightly, which guarantees the durability of the masonry. But cement in the solution can have a negative effect when heated. So the choice will remain with the owner of the bathhouse.
Tags: bathhouse, framing, oven
« Previous entry
Materials for portal design
Marble is not afraid of sudden temperature changes, so it lasts longer.
Materials adjacent to the stove must be non-flammable. For the stove portal in the bathhouse, non-combustible materials are selected, or flammable materials are separated by heat-reflecting screens. The following apply:
- brick;
- metal;
- stone;
- glass;
- tile;
- tree;
- drywall.
In addition to brick and metal, gates using natural or artificial stone masonry are popular. Decorative stone makes a simple stove look like an elegant fireplace. Several types of hard rock are used:
- elements away from the door can be laid out from sedimentary materials - slate, marble, shell rock or foam blocks;
- cladding options with river pebbles, embedded in the solution, look great.
Stone products are heavy and increase the load on walls and supports, so the foundation must be massive.
When finishing wooden baths, wooden portals are used, made of moisture-resistant plywood, parquet boards, and chipboards. The tree is decorated with carvings and ornaments. Wooden materials are attached to a metal base, which provides additional rigidity to the structure. Over time, the wood darkens and warps. To avoid this, material made from dense rocks or well-dried raw materials is used. Sometimes inserts made of brick, stone, concrete are installed, and heat-reflecting screens are used.
The use of laminated wood will reduce deformation. Darkening of the material is prevented by varnish coating in 2-3 layers.
Wooden boards, plywood and drywall are attached to the frame with self-tapping screws. The frame is made of metal or slats. Self-tapping screws are disguised. It is easy to assemble a figured portal from these materials.
The use of ceramic tiles depends on the vision and taste of the owner. The main advantage is easy surface cleaning and resistance to soot contamination.
How to improve the efficiency of an iron stove
Effective methods include:
- Furnace lining. The point is to line the inside of the firebox with fireclay bricks. It is enough to place it on the edge, then the lining will be up to 6 cm thick, when using narrow fireclay for masonry - 3 cm. It will be the heater that warms up, not the steel walls of the stove. It is recommended to plan the lining at the drawing development stage in order to increase the size of the firebox for lining in advance. The disadvantage of this method is the production of hot smoke. The solution is to install the heater on the pipe.
- Creating a brick screen around the stove. Material – ceramic brick. An opening is left in the brickwork for the doors so that the air heating can be regulated. The downside is overheating of the rear wall. The solution is to use thickened heat-resistant steel for the firebox.
Bathroom wall decoration for safety
The firebox is fenced with natural stone from wooden products.
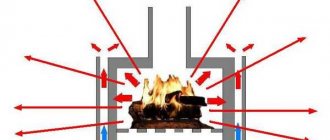
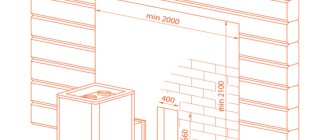
During combustion, the temperature of the stove surface reaches 400 degrees or more. For safe operation, all flammable elements are kept away. 20-25 cm is not enough. Wooden surfaces will catch fire when exposed to infrared radiation from a heated oven. This is relevant in a steam room, where temperatures above 100 degrees constantly dry out the wood.
The heat-insulating screen is made of brick or basalt cardboard coated with galvanization. In some cases, soap chloride becomes the insulating material. It conducts heat well, so the base for it is made of non-combustible materials.
We make a long-burning stove with our own hands
The first step is to decide what the stove body will be made of. It is advisable to choose thick metal so that it does not burn out longer. Most often, such a potbelly stove is made from a gas cylinder with a volume of 50 liters. You can use a large-diameter thick-walled pipe or a 200-liter steel barrel, but its walls are thinner.
You will also need
:
- steel pipes;
- metal profile;
- tool for cutting metal (grinder, gas cutter, etc.);
- welding machine with electrodes;
- Sheet steel.
Let's take a closer look at how to make a potbelly stove with your own hands. It is first recommended to sketch out a design diagram and determine the dimensions of the elements.
Frame
. When making a body from a gas cylinder, it is necessary to carefully cut off the upper part (cut line 1 cm below the weld). If desired, the body can be extended by welding the cut-off part of another cylinder. The top part with the lid is also cut off from the barrel. And if a pipe is chosen for the body, a round or square bottom made of thick sheet metal should be welded to it.
Housing options
Lid. In the cut off top of the gas cylinder or in the lid of the barrel, a hole should be cut in the center, corresponding in size to the pipe from which the piston will be made
The lid is scalded with a steel strip - it is important that it fits tightly onto the body. For a pipe body, the lid will have to be specially made from sheet metal. Chimney pipe
On the side of the stove, a couple of centimeters below the lid, a hole is cut and the chimney pipe is welded
Chimney pipe. On the side of the stove, a couple of centimeters below the lid, a hole is cut and the chimney pipe is welded
It is important that the removable chimney elbow fits tightly, without gap
Chimney. The lower, horizontal section of the chimney should be longer than the diameter of the stove. The chimney pipe can be made broken to increase the surface area that transfers heat to the room
It is important that there are no angles less than 45°. A pipe with a diameter of 10-15 cm is suitable for installing a chimney.
Piston
. The length of the air duct must exceed the height of the housing by 100-150 mm. It is necessary to weld a steel circle with a hole in the center to its lower part and equip it with five to six blades on the lower side (arranged in a circle, with rays from the center).
The blades can be
:
- pieces of steel angle;
- U-shaped sections;
- wave-curved strips of metal (welded edgewise).
In the middle, a small steel circle with a hole in the center is welded onto the blade. If the platform with the blades is made of steel less than 6 mm thick, it will deform over time due to overheating. To prevent this from happening, stiffening ribs are welded on top - a triangle made up of angle segments. Attach a steel plate to the upper section of the pipe with a bolt to adjust the combustion intensity.
Assembly
. Install a top-burning stove, check the tightness of the chimney connection. Insert the piston into the stove, put on and close the lid. Make sure that the cap fits tightly and that the gap between the piston and the hole in the cap is minimal.
Commissioning
. Homemade long-burning potbelly stoves can be placed on an earthen or concrete floor. If the floor in the room is wooden, lay out a brick platform using stove mortar and cover it with a steel sheet. Instead of brick, you can lay a sheet of refractory material and also cover it with sheet metal. It is advisable to line the walls next to a self-made stove with bricks, which will accumulate heat and transfer it to the room.
Firewood is placed into the installed stove, filling the firebox approximately 2/3 or a little more. Place paper on top and set it on fire. After making sure that the firewood is occupied, you can install the piston and put on the lid. The next addition of firewood is possible only after all the fuel has burned out and the stove has cooled down.
Conclusion
“Bubafonya” is not the most effective long-lasting homemade stove. Craftsmen are developing various versions of a wood-burning “rocket” stove, but its manufacture requires precise calculations, hand-made drawings and good skills in working with various tools.
“Bubafonya” can also be modernized, for example, by installing a device that simplifies the unloading of ash.
Video on the topic
:
Rules for heating a bath
The bathhouse is ready when the water immediately evaporates when it hits the heater.
The tactics for heating a bathhouse are constantly being improved, taking into account the experience of generations. Rules for preparing and heating the room:
- the room is put in order, the floors are washed, the leaves left over from the brooms are swept away;
- garbage is carefully swept away in the immediate vicinity of the stove;
- before heating the stove, the room is ventilated for about 30 minutes;
- using a scoop, the ash chamber and grate are cleared;
- the stove is inspected for damage;
- the open heater is rinsed;
- tanks are filled with water;
- traction is checked;
- using kindling from natural materials, the stove is lit;
- Firewood is added as it burns.
A heated heater is characterized by instant evaporation of splashed water. When you first apply water, a layer of ash flies off, so it’s better to turn away. Having finished heating the bathhouse, close the windows and ventilation, pour a ladle of warm water onto the heater and prepare for the bathing procedures.
Advantages of mineralite
- Having made the insulation with mineralite, you will forget about replacing them for a long time. They serve well and properly.
- The panels do not burn or ignite. This fiber cement board meets the most stringent fire safety requirements.
- Minerite is considered a universal material. It can be used not only for insulation, but also for decorative finishing.
- Installation of the plates is extremely simple.
- You can do everything yourself without resorting to outside help.
A mineralite slab for a bath, like any other material, in addition to its undeniable advantages, also has disadvantages. And most buyers note only one thing - the unpresentable appearance of some types of such panels. If you choose more decorative specimens, they will cost a little more.
Preparing construction tools
To build a brick sauna stove with your own hands, it is recommended to prepare working tools:
- grinder with a circle;
- electric drill with a special attachment;
- wide plastic container for solution;
- Master OK;
- level;
- tape measure and pencil;
- metal strips.
This is a basic list of tools, but if desired, it can be expanded with additional equipment.
At the stage of choosing a place where a small brick oven will be located, as well as preparing a construction project, it is important to take into account the basic requirements for the future design:
- Firebox safety doors should face the door.
- The base for the stove device must be at least 75 × 75 cm in size and up to 22 cm in height.
- The shelves should be located along the wall near which the stove is installed.
- Heating stoves made of bricks are built in compliance with the technological gaps between the walls of the structures and the walls of the steam room.
Step-by-step instruction
Forming the base
In order for a brick-lined sauna stove to be strong and reliable, it is important to lay the foundation correctly. The strip foundation is considered the easiest to assemble and install. To equip it, the wooden floor elements in the house are first dismantled, after which a trench is dug, the bottom of which is covered with a sand-crushed stone mixture
Everything is compacted well and watered. The next stage is concreting the foundation. For the strength and reliability of the structure, it is recommended to additionally lay a reinforcing mesh into the foundation before pouring it. The solution is then left to dry. Until the base is completely dry, further work is not recommended.
To equip it, the wooden floor elements in the house are first dismantled, after which a trench is dug, the bottom of which is covered with a sand-crushed stone mixture. Everything is compacted well and watered. The next stage is concreting the foundation. For the strength and reliability of the structure, it is recommended to additionally lay a reinforcing mesh into the foundation before pouring it. The solution is then left to dry. Until the base is completely dry, further work is not recommended.
Preparation
Before constructing the protective apron, it is recommended to soak the lining brick for 12 hours. To do this, the required amount of material is separated, cleaned if necessary and placed in cold water. This event is necessary to ensure that the blocks do not absorb moisture from the solution during the formation of the order.
How to prepare brick mortar?
The installation of a metal furnace will be reliable if a cement-clay mixture is used as a masonry mortar. Both components are taken in equal proportions and diluted with water to obtain a creamy consistency. To mix the solution well and obtain a homogeneous mass, it is recommended to use a construction mixer. After mixing, you need to let the masonry mixture thicken, and then proceed directly to the masonry.
Bricklaying
In order for the apron to be reliable, it is important to correctly calculate the permissible distance between the brick wall and the iron body, because if the gap is small, the masonry will quickly crack and you will have to redo everything all over again. On average, it will take up to 15 orders to form a screen. It is recommended to divide the work into 2 stages: on the first day, form half of the rows, then leave the structure to dry until the morning
Then the rest of the masonry is done, the optimal row thickness is half a brick. The ordering scheme is presented in the table:
It is recommended to divide the work into 2 stages: on the first day, form half of the rows, then leave the structure to dry until the morning. Then the rest of the masonry is done, the optimal row thickness is half a brick. The ordering scheme is presented in the table:
| Row | Description of work |
| 1 | The perimeter is completely laid with bricks, the row is started from the corner, with strict observance of evenness of laying |
| 2 | The wall is built up, reinforcement is carried out, air gaps are formed |
| 3 | Posted as 1st |
| 4—5 | A portal is formed for the firebox door and ash pan, |
| 6—8 | A metal corner is placed above the base of the portal |
| 9 | Can be stacked randomly |
Depending on personal preferences, you can arrange the arrangement with an arch at the level of the stove where the coals are located. This way the smoldering embers will be visible and you can admire them for a long time. You can also complete the arrangement by installing a round pipe in the bathhouse through which the smoke will come out. In none of the selected options, the step-by-step instructions for forming the order do not change.
11e848e1d3edc9508581e7ba9670a865.jpe
b93bf8b1cfe8d748c9f00f0289d65ea6.jpe ca0a0831eef5a22c9c2b40b8d044df0d.jpe 4ee5b7901e5b4f12fd8d62f5442bdc66.jpe
First heating
When the brick finish dries, and this lasts on average up to 2 weeks, it is important to put the device into operation correctly. To do this, 2-3 test fires are performed, during which a minimum of firewood is used. This will prevent excessive heating and cracking of the structure.
In this way it will be possible to safely dry wet areas, thanks to which the stove will serve reliably and for a long time.
This will prevent excessive heating and cracking of the structure. In this way, it will be possible to safely dry wet areas, thanks to which the stove will serve reliably and for a long time.
