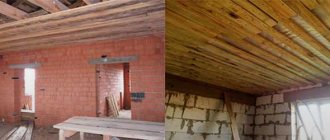
The concept of a rough ceiling refers to a structural element, usually an interfloor ceiling, laid by builders during the construction of a building.
Of course, the version of such a ceiling differs depending on the type of building. In particular, in brick houses this function is performed by concrete slabs, which during finishing only require the application of a decorative layer.
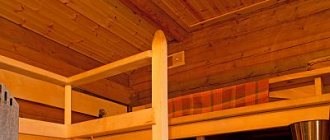
The design of wooden houses looks somewhat more complicated. Here the rough ceiling is laid on wooden beams, often using boards. The work is simple and completely doable on your own.
Installation of an attic floor with a false ceiling
When constructing roofs from trusses, skull blocks are nailed to the lower chords of the truss, and floor panels are placed on them or false ceilings are made.
After installing attic floors, the ceilings of houses are lined with solid fiberboards or plasterboard sheets.
When installing an attic floor from panels, they are laid on the top frame of the walls and secured to each other and to the frame with nails.
The joints between the panels are carefully insulated and covered with strips. The panels are moved into the design position by a crane, and it is necessary to strictly ensure that the ends of the panels rest on the frame equally on both sides of the walls. On the ceiling side, there should be no ledges larger than 1 mm between adjacent panels.
Specifics of assembling hydro-, heat- and vapor barriers
In the construction of a draft ceiling, materials are used that have the following characteristics:
- low thermal conductivity,
- low dead weight,
- fire safety,
- high levels of noise insulation.
Insulation materials can be polymer, organic, combined, or inorganic. The former are attractive due to their high strength and relative lightness; they are sold in the budget price segment.
Polymer substances - polyurethane foam, polystyrene foam, expanded polystyrene - cannot withstand temperature fluctuations, they are a fire hazard.
Organic insulation materials, such as straw and sawdust, peat, are affordable and environmentally friendly. But there are also disadvantages - rapid ignition, gradual decrease in thermal insulation performance.
Inorganic variations can only be used in floors with reinforced wooden beams and continuous lining. This category includes perlite, mineral wool, expanded clay, and vermiculite. Mineral wool is most convenient to use - it is not as heavy as other representatives of the segment and exhibits optimal consumer properties.
Insulation is carried out from above or below, depending on whether the upper level is supplemented with flooring.
Hydro-vapor barrier of the ceiling
Installation sequence if flooring is not provided:
- Laying vapor barrier in the form of a special membrane film. The material is spread on the ceiling, tightly fixed with a construction stapler. The membrane should ideally follow the contours of the beams and rough filing.
- The insulation is laid out so that the final surface is level with the level of the beams.
- A waterproofing film is spread on top.
If there is flooring, insulating the ceiling from above becomes impossible; in such conditions, work is carried out directly in the living room:
- Beams and flooring are covered with waterproofing.
- Nails are driven into the beams to stretch the twine in a zigzag pattern - this is the basis for layers of insulation, placed so that the rope holds them.
- Next, the vapor barrier is fixed.
After completing the formation of the rough ceiling, finishing begins. Materials are selected in accordance with the priority style of residential premises, usually plasterboard, plastic panels, lining or slatted structures, tension fabrics. A separate niche is occupied by interiors in which the beams remain open; in this case, the wood is carefully impregnated with protective compounds that need regular updating.
Features of work when creating different designs of wooden ceilings
If you want to create a ceiling from boards, you should choose one of the existing options for its construction. The first involves the creation of false ceilings. This technology is the most reliable, but is expensive. To lay finishing materials, floor beams with thick bars or hewn logs should be installed. These items are expensive. They are installed on the crown, and depending on the type of roof, they can be attached to the walls. Boards are nailed to the beams. This design looks quite massive and durable.
You can stuff lumber from above, as a result of which movement along the roof or ceiling area will be safe. When filing the ceiling, steam, heat and waterproofing should be installed.
The ceiling made of boards can be arranged according to the principle of laying a panel system. This technology involves the assembly of shields from two bars, which are installed in parallel. The boards must be packed transversely. The shields should be raised to the ceiling and reinforced. Outside, if desired, you can lay heat and waterproofing. If beams are used to create the base, this option will be the most preferable, because it has the required strength.
Panel ceilings, however, have a disadvantage. It lies in the fact that the structure will have significant weight. In order to raise the shield, you should enlist the help of several people. The structure will need to be held for some time until it is strengthened. The ceiling made of boards can be arranged according to the principle of a flooring system. This method is the simplest when using a board. The technology is relevant if the span length is no more than 2.5 m. In this case, lumber is fastened simultaneously at both ends. It will be impossible to move on such flooring.
According to experts, when performing ceiling repairs, it is better to prefer the third option, since it is less labor-intensive and does not require significant financial costs. If a house is being built, saving is not recommended. In this case, it is better to stick to the first method. The floor beams will also serve as the base of the roof.
Is it necessary to treat the rough ceiling?
Having figured out how to line the ceiling in a wooden house, do not forget that the structure requires additional protection, especially if there are changes in humidity levels in the room. Processing includes the following stages: sanding for smoothness, puttying the seams between the sheets and fastening points. As soon as the putty mixture has dried, sand the surface again and treat it with impregnation with an antiseptic and antiprene.
If the ceiling will be covered with gypsum board, metal profiles are mounted on the rough ceiling, onto which sheet material is then sewn. Or you can leave the plywood covering without decoration, impregnating it with tinting impregnation, matte or glossy varnish, or paints.
Plywood
When choosing a finishing material for a ceiling, plywood is usually not paid attention to.
However, with the help of plywood you can create an original interior design and decorate your home without extra costs. In the photo, no one will understand that the ceiling is lined with plywood sheets. Plywood varies in the number of layers glued together, as well as in such parameters as:
- moisture resistance: this characteristic is especially important if the house is not heated. If the top layer of plywood is covered with laminate, this figure is even higher;
- grade: construction plywood of one of five grades is used for cladding;
- the type of wood used in production. The most popular top layers of plywood are alder, birch and maple, while the middle layers of plywood are usually made from softwood;
- processing method: for a country house you can use untreated plywood; for a cottage, preference should be given to plywood sanded on at least one side. There is no need for double-sided sanding;
- appearance of the cladding: the decorative layer of plywood can be made of plastic, asbestos paper, decorated with a pattern or a natural “wood” look.
To finish the ceiling using plywood, it is necessary to construct a sheathing, which can be made of aluminum profiles or wooden beams.
Fastening plywood to beams is done using nails or self-tapping screws. The joints are sealed in two ways: with putty or a decorative strip. The corresponding photos, which show walls and ceilings lined with plywood, will help you create a unique design for an attic or any other room.
Plywood is an inexpensive and practical material that is advisable to use for ceiling cladding.
The principle of operation of an injection engine
What is an injection engine? This is a type of engine with a fuel injection system. This type of engine provides economical fuel consumption and reduced emissions of combustion products into the air.
Its main difference from other types is the operating features of the fuel supply system. Namely, fuel injection is carried out forcibly using a special element for dosing it (nozzle) into the cylinder or a system of pipes and valves (intake manifold).
Injection engines began to be installed in the 1930s, but they were able to gain popularity only in the late 90s.
Rough ceiling finish
There are many durable materials for lining a rough ceiling, embodying the intended interior, a special design of the room, even without cladding, in an antique style. Depending on the purpose of the interior of the room, finishing and decor are selected.
Filing the rough ceiling
For example, for rough renovations, interior design, when planning a design or decor in a bathhouse, you cannot use the following elements:
Various wooden ceiling panels: chipboard, fiberboard, plywood, because with high humidity they will deform. Plastic, it can be used to decorate a rough base, a ceiling with a wood and antique look, to emphasize the design even without facing cladding, but it has poor thermal insulation properties, condensation will form, and then mold on the finish. Timber containing resins that will drip when heated
This can be lath or MDF, it is important to check before purchasing.
Preliminary preparation
It is necessary to calculate all the expenses necessary to build a rough foundation.
We will need:
- Ladder;
- Construction trestle;
- Self-tapping screws, screwdriver;
- Sheathing material, heat and vapor barrier;
- Construction level, stationery knife;
- Antiseptic, construction adhesive, fire-fighting compound.
Antiseptic
First, I inspect the beams for defects: cracks, chips, curvature, mold, cover the cracks with putty, clean suspicious areas, treat them with an antiseptic, primer, after which they can be painted, if necessary, to do it once and for centuries.
The rough base together with the beams can be treated with an antiseptic with the addition of a teaspoon of universal construction glue so that the mixture does not drip and creates a more durable film.
Choosing a place for linden
Linden is a shade-tolerant tree, but if you plant it in an open sunny place, it will thank you: it will delight you with its rapid growth and lush crown. Undemanding to soil, but prefers
, well flavored
. Can't stand it
, lying close to the surface. Mature trees can easily tolerate drought, but seedlings need regular watering.
The linden tree confidently “stands on its feet”: its powerful root system, with a taproot penetrating deeply into the soil, allows the tree not to be afraid of even strong winds. The crown is quite dense and if you plant linden trees in a row along the windward side, then in a few years not a single breeze will come to your site) But keep in mind that the linden tree reaches full development only by 20-40 years (depending on the species).
Well, shall we plant a “freedom tree” on a country plot?
Houses with wooden floors
The rough ceiling varies depending on the structure of the building. A rough ceiling is a ceiling erected during the construction of a house.
In a wooden private house, the rough floor has the following parameters:
- the basis of the floor is wooden beams;
- the component of the ceiling surface is the construction of the rough ceiling;
- Using the rough ceiling, the ceiling surface is constructed, then finishing work is carried out on top.
Interior finishing work usually begins with the arrangement of the ceiling
Therefore, an important task is the question of how to hem the rough ceiling in a private house. You can sheathe the ceiling surface with plasterboard, or install a tension structure
Another option for ceiling cladding is OSB boards.
Design features of floors
The main feature of such ceilings is that they consist of several layers.
- Support beams. They form the base, are placed on the surface of the ceiling at a certain distance and are attached to each other using timber.
- Attic floor. It is a flooring made of wooden planks that separates the roof from the floors.
- Insulation. Polyurethane foam, mineral wool and polystyrene are most often used as thermal insulation. This layer of construction protects the room from cold air currents that can penetrate through the roof or interfloor ceilings.
- Vapor barrier. It is laid in order to prevent the accumulation of condensation and create an optimal microclimate in the room.
- Rough ceiling. It is a coating that is attached to the sheathing; OSB boards, boards or plywood sheets are used as the finishing material for cladding. The sheathing is usually made from slats. After installing the rough ceiling, decorative cladding is performed, with the help of which the covering is either completely sewn up, or the beams are simply hidden.
Before making a black ceiling, in order to obtain a high-quality result, you should understand what constitutes an interfloor ceiling in a wooden building. It consists of several layers and each performs a specific function. Provided that all elements are assembled correctly, the ceiling will be reliable and will last for a long period.
The interfloor ceiling in the basic version has 5 layers:
- Plank floor. If there is another floor on top, you also need to lay a floor for it. The plank layer can be rough, for finishing, it can be used as a finishing option.
- Vapor barrier. Despite the fact that some owners do not make this layer, to obtain a high-quality result it is advisable to lay a vapor barrier material.
- Insulation. Creating thermal insulation is necessary to keep the house warm. This is especially important when there is an unheated attic or roof above the ceiling.
- Waterproofing. This layer is needed to protect the wood from destruction due to moisture.
- Rough ceiling in a wooden house. It is used to attach finishing trim. It is also a support for waterproofing, insulation and vapor barrier.
There are different options for completing the final finishing of the ceiling. The most popular is the use of plasterboard boards. To secure them, a metal frame is assembled. This finishing method is practical, easy to implement and inexpensive. The result is excellent if everything is done correctly.
To install a rough ceiling on wooden beams, first boards are attached to them, then insulation and waterproofing are laid, and then all that remains is to finish the ceiling surface with plasterboard or other material.
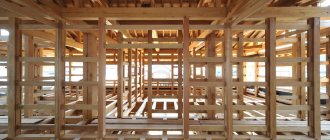
Any wooden ceilings are laid on the frame and frame-panel structure of the house, since its walls are not designed for heavy loads.
Here the ceiling is a horizontal fence, a kind of wall, but the installation of this ceiling differs from the construction of walls.
Sections of ceiling beams
- The load-bearing base of the ceiling is made of wood - beams, the size of which is calculated in the diagram of the power frame of the house.
- The beams are made from round timber, processed into beams, edging or boards with a thickness of at least 60 mm, which are installed on the edge. You can use 50mm thick boards paired with nails or staples. But it’s better to construct a box from boards.
On large spans, the beam is also supported on internal walls, or even on intermediate pillars
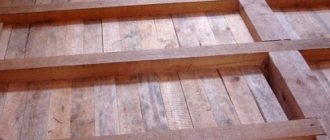
- Sheet flooring is made in non-residential premises due to its low noise-absorbing and heat-insulating qualities. The essence of the ceiling: plank flooring is placed on the load-bearing beams - the floor of the attic.
- A hemmed ceiling is made in a country house or attic house, since the thermal insulation properties of such a ceiling are sufficient only for seasonal use of the room. To do this, we fill tongue-and-groove boards on both sides of the beams.
- We lay sound-absorbing material on the bottom lining. The insulation backfill on the boards of the lower floor should be light so as not to tear the boards away from the beam. Sawdust or husk will do. This is the ceiling of the lower floor.
- The top flooring is the attic floor.
1 – sheets of drywall; 2 - tongue and groove boards - floor panel; 3 - waterproofing; 4 - sound insulation; 5 – floor beam; 6 - lag; 7 - floor boards; 8 - cranial beam bars
Preparatory stage
In most cases, beams are the basis for interfloor ceilings in wooden houses. They are installed with their ends on the load-bearing elements of the structure and are easily subject to additional processing. In addition, such a base can perform not only a supporting, but also a decorative function. In particular, if the ceiling is hemmed along wooden beams from above, the beam becomes part of the interior decor of the premises.
If we talk about the tools that may be required when performing work, they are prepared according to the list:
- jigsaw;
- screwdriver;
- drill with a set of wood drills;
- hammer;
- fastening elements (corners, screws, nails);
- stapler;
- pencil;
- tape measure and building level.
In addition, gloves and safety glasses will be required. If mineral wool is supposed to be used as insulation, it makes sense to take care of a respirator.
Basic properties of wood
When choosing an option for installing a ceiling, you should take into account the basic properties of wood. First of all, you need to understand that wood is a natural material with many microscopic pores. Quite often you can hear that a tree is breathing. This means that wood is able to absorb moisture from the environment during periods of high humidity and release it into the space when a dry microclimate is established in the room. In this case, the wood itself swells slightly and then shrinks again. From this we can conclude that maximum strong fastening of materials to a wooden surface is not allowed, otherwise deformation and warping cannot be avoided. In addition, in order to ensure a normal air exchange process, you should not choose materials that do not allow moisture and water pores to pass through.
In conclusion, it can be noted that installing a ceiling in a wooden house can be done with your own hands.
It is only important to know the features of the materials used, as well as adhere to the technologies developed by professional builders. If self-confidence is not enough, then you can always hire qualified craftsmen who will help create exactly the kind of ceiling that the owners have dreamed of all their lives.
After all, only a competently and correctly finished ceiling surface can positively influence the atmosphere and create truly homely coziness and comfort.
Things to consider
When choosing a specific design option, it is worth remembering the many nuances that may arise during subsequent finishing. For example, if you plan to decorate the ceiling with plasterboard, then attaching the sheathing directly to the joists or rough plane can only be done with hangers, since these parts may have unevenness and the structure itself may be deformed under the influence of different temperatures and humidity.
This will significantly reduce the height of the room and in this case, it would be a good option to place gypsum plasterboard parts between the ceiling beams. Therefore, in such a situation it is better to use the method with cranial bars. If you plan to hem the surface with clapboard, then the sheathing can be attached as you wish - wood coverings are not so sensitive to deformation.
If the ceiling does not require serious insulation, as is the case with interfloor spans, then the design with cranial bars will allow you to raise the plane as high as possible and at the same time leave visible beams, which can become a beautiful decorative element of the interior.
Materials for filing the ceiling
After properly installing the floors, you can line the ceiling with almost any materials.
The most popular of them:
- board or lining;
- plastic panels;
- MDF panels;
- drywall;
- suspended ceilings made of fabric or PVC film;
- ceiling tiles.
An interesting effect is also achieved by combining different materials, for example, plasterboard with lining or with suspended ceilings. By combining different textures, you can achieve not only an interesting design, but also make the ceiling more practical, hide defects in the beams and highlight the advantages of the room.
The original option is a plasterboard ceiling with protruding beams
Natural wood
For ceiling cladding, graded coniferous or hardwood wood is used: lining, block house, imitation timber or regular edged board. This finish will fit well into the interior if the walls are fully or partially covered with natural wood.
Prices for lining
lining
Ceiling with natural wood
Sheathing a ceiling with boards is quite simple. Since wooden floors and sheathing have the same coefficient of thermal expansion, the boards can be attached directly to the beams using screws or nails.
Advantages of the material:
- low price;
- goes well with other finishing materials;
- installation is easy to do with your own hands;
- environmentally friendly material;
- can be painted in any shade.
Minuses:
- Requires regular treatment or painting to protect against aging;
- fire hazard.
Plastic panels
This finish is well suited for rooms where high humidity is possible: bathroom, kitchen, loggia or balcony. Plastic is not afraid of condensation and splashes of water.
Finishing the ceiling with plastic panels is quite simple. The panels are attached to special guides or with self-tapping screws directly to the beams only if they are well aligned and in the same plane. If it is necessary to level the height, slats are attached to the beams below, and panels are attached to them.
Ceiling finishing with plastic panels
The individual strips are connected using a tongue-and-groove lock, thereby creating a smooth surface without cracks or gaps. If you seal the connections with silicone sealant, you can create a vapor-tight seal.
Advantages of the material:
- low price and large assortment of shades;
- light weight, no load on the floors;
- does not require painting or processing;
- the panels are not afraid of moisture, do not rot, and can be easily washed with warm water.
Minuses:
- plastic is a fire hazard; it is undesirable to use it in rooms with stove heating;
- The material is fragile, chips and damage are possible.
MDF panels
The difference between MDF panels and plastic ones is that they do not tolerate moisture and become deformed when wet. Therefore, they cannot be used in the bathroom and on the balcony. MDF panels often imitate the texture of wood, so they can be used instead of lining or boards, since their processing and fitting are much simpler and their weight is less. They are attached in the same way as plastic ones directly to beams or slats.
Ceiling cladding with MDF panels
Advantages of the material:
- inexpensive and easy to process;
- good thermal insulation properties;
- light weight.
Minuses:
- fade when exposed to direct sunlight;
- due to their small thickness they are prone to sagging, they need to be fastened in increments of no more than 60 cm, and the construction of an additional frame may be required.
Drywall
This material is very popular not only for conventional ceiling finishing, but also for creating multi-level structures with built-in lamps. With its help, you can sew up niches between beams or completely hide them and create a completely even coating.
Plasterboard ceilings are puttied and painted with water-based interior paints in any desired shade. A ceiling finished with gypsum plasterboard sheets fits well into various interiors, which is why it is so popular. Plasterboard finishing can be combined with wood or suspended ceilings.
Ceiling plasterboard
Installing drywall on a ceiling is more difficult than wood or panels. Due to the different coefficient of thermal expansion and the large size of the sheets, they cannot be attached directly to the beams. Drywall is mounted on special hangers and guides that have a flexible connection with the ceiling beams.
Drywall prices
drywall
Advantages of the material:
- it is inexpensive;
- easy to process and allows you to create any designs, including curved ones;
- easily painted in any shade;
- the material breathes and does not contribute to the formation of condensation;
- goes well with any decoration.
Minuses
- the rather heavy structure creates a load on the floors;
- afraid of water leaks, deformed and wet;
- fragile material, may break if impacted.
Application of floor board
If you want to finish the ceiling with boards, you can use flooring material. This option is an original solution and involves the use of tongue and groove boards. This technology has a great advantage, because the floor boards have mounting grooves. Thanks to this, during changes in humidity and temperature, cracks and cracks will not appear at the joints. When using a tongue and groove board, you will get a smooth surface. If differences are present, they will be completely unnoticeable.
If you want to cover the ceiling with floorboards, then you should take into account some nuances. For example, you should not purchase too thick lumber for the ceiling. A thickness of 20 mm is sufficient; in some cases, the board should have smaller dimensions. As an alternative solution, you can use durable parquet boards, because such material will give the room a special atmosphere.
You can also choose parquet, this allows you to achieve original solutions
When purchasing a board, you should pay attention to the quality of processing of the building material. Wood must be protected from mold and parasites. When processing has not been carried out at the production stage, you must take care of it yourself
When processing has not been carried out at the production stage, you must take care of it yourself.
Sequence of installation on beams
To understand how to make a ceiling in a private home, consider the installation sequence described below. If you follow the instructions exactly, even a beginner can handle the job.
Materials and tools
Before making a ceiling in a wooden house, you need to prepare everything you need for work:
- stepladder;
- jigsaw or hand saw;
- screwdriver;
- hammer;
- construction level;
- stapler;
- nails;
- cranial bars measuring 50x50 mm will be needed if the filing will be located above the level of the beams, that is, you will get a structure with a visible beam system;
- slats for making lathing for wood sheet materials;
- wood screws 45-55 mm long;
- suitable material for rough filing (plywood, OSB, fiberboard, etc.);
- insulation (for example, mineral wool);
- vapor barrier membrane;
- waterproofing.
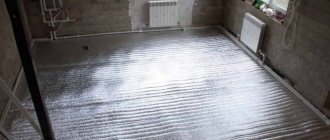
Laying waterproofing
If you are making a ceiling in a wooden house with your own hands, then before laying the thermal insulation material you need to lay a layer of waterproofing. As a rule, it is aimed with a stapler to the bottom surface of the beams.
Since after laying the insulation the film may not support its weight and tear, before this a supporting frame made of wooden slats is attached to the beams from below. It will simultaneously serve as a base for the rough ceiling, support the insulation and create the necessary ventilation gap between the water barrier and the rough finish. This gap is needed to ventilate the material and protect it from condensing moisture.
For the manufacture of waterproofing use:
- polypropylene films;
- foil insulation;
- reinforced polyethylene films;
- multilayer membrane materials.
The waterproofing is laid with the strips overlapping by 15 cm. All joints are additionally taped. To prevent the film from being damaged during the process of fixing with a stapler, the staples are driven through layers of thick cardboard. The waterproofing film must be placed on the walls of the room to a height of 200-300 mm. These areas are also well sealed.
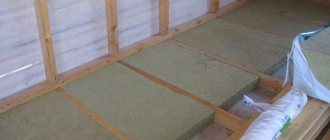
Laying insulation
After the film is securely fixed underneath with a wooden sheathing, you can begin laying the insulation. The heat insulator is placed between the beams on the upper floor side.
The following materials are suitable for these purposes:
- expanded polystyrene;
- mineral wool;
- sawdust;
- basalt wool;
- expanded clay;
- Styrofoam.
All of the materials listed above, except expanded clay, are quite light, so they can be laid immediately after installing the waterproofing and sheathing. Expanded clay is poured after installing the rough ceiling, having previously covered all the beams with a layer of plastic film.
Draft ceiling installation
The production of the rough ceiling begins after installing the load-bearing sheathing. It should be done before laying the insulation. To make the sheathing we use wooden slats with a cross-section of at least 40x20 mm. The installation step of the slats is assumed to be at least 50 cm. The exact step depends on the dimensions of the lining material. Each wood board must be mounted on three slats. To attach the slats to the beams, we use nails or self-tapping screws.
After assembling the frame, we proceed to installing the sheathing. For ease of installation, plywood or fiberboard can be cut into squares measuring 1x1 m. We fasten the boards so that the joint of adjacent sheets falls exactly in the middle of the batten. We install fasteners around the perimeter of the slab in increments of 150 mm. It is recommended to additionally fix the sheet in the central part. Here the screws are screwed in in increments of 25 cm.
Strengthening methods
Using steel plates you can strengthen beams
Steel auxiliary materials
Steel plates fixed on different sides of the beam will help strengthen wooden beams. Steel tools must be treated with a solution that prevents corrosion, otherwise they will not last long.
Carbon fiber
The material, also called carbon fiber, is a modern technology in the construction world and is actively used during beam ceiling reconstructions. It comes in the form of plates, ribbons or threads.
This plastic material is applied in several layers to a wood surface, ensuring ease of work and reliable quality, which makes it quite popular.
Prostheses made of wood or metal in the end areas
Due to variable temperatures, beams in the area of the load-bearing wall are significantly weakened. It is necessary to make the main timber beam stronger to prevent negative consequences in the future, as well as to avoid repeated reconstruction in the near future.
To do this, additional prostheses made of metal or wood are attached to the edges of the wooden base, which are placed in the brick recess of the wall, thereby providing reliable protection for the central beam.
Installation of prostheses for a rotten floor beam
Supports for load-bearing beams
This method involves placing additional support structures under the load-bearing ceiling beams to distribute the load evenly.
Additional beams
If the work is completed, but the weight is distributed incorrectly, then the finished structure must be covered with additional beams that will take on the excess weight.
It is quite possible to bring ceilings to life with your own hands, but to do this you need to familiarize yourself with the necessary information in order to minimize unpleasant moments during work, as well as build a high-quality model that will last for many years.
A few words about insulation
After filing the rough ceiling, a waterproofing film is laid. After this, the insulation is installed. This function can be performed by ordinary sawdust or expanded clay, which fills the free space between the beams. Foam plastic is considered a good option for insulation, which not only provides reliable thermal insulation, but also does not attract harmful insects.
A subfloor is laid on top of the insulation. At the final stage, finishing is performed. If the interfloor pie is made correctly, any materials can be used for finishing, the risk of damage and deformation is minimal.
If you work alone
It’s hard to find a good helper, so sometimes a builder has a question about how to line a ceiling with boards alone. In general, the principle of filing a rough ceiling remains unchanged, but here you will have to choose building materials more meticulously. In particular, when working alone, it is better to give preference to lightweight materials that you can easily hold yourself, such as PVC panels or MDF. If it is intended to be hemmed with boards, then it is better to lay the lumber on top of the interfloor floor beams.
It is noteworthy that you can also attach the boards to the bottom, but here you will have to use homemade spacers that will support one end of the board, replacing the missing assistant. You can also use various hooks on which one end of the board is hung until secured.
Rules for installing a suspended ceiling
- Unlike concrete ceilings in a city apartment, wooden ceilings in a country house or dacha can be hemmed with almost any material, and beams can be beautifully incorporated into the interior.
- Before starting work, the rough structure needs to be insulated and its air conditioning must be considered.
- The ideal material for the bathroom is plastic, because it does not mold or rot at all.
- Balconies are most often covered with plastic, metal slats or clapboard, because these materials are resistant to temperature changes.
- Open verandas, gazebos, and terraces are sheathed with plastic or siding; slatted and cassette structures are suitable. Due to low moisture resistance, drywall is not suitable.
- The bathhouse requires a moisture-resistant and heat-resistant finish. You cannot use resinous wood, plywood, chipboard, or plastic in the bathhouse. The best choice would be linden or aspen lining.
Rough ceiling before finishing stage
Wood massif
The most prestigious type of finishing using wood is natural wood, which is produced in the form of convenient, practical panels. Main characteristics of the material:
- high quality, which directly depends on the type of wood from which the panels are made;
- strength and durability: the panels will serve you for decades;
- aesthetics - natural solid wood looks prestigious and expensive not only in the photo, but also in person;
- Quick and easy installation can be done with your own hands thanks to the built-in locks. In fact, you just need to veneer the rough ceiling between, or over the entire area.
Panels are made from solid hardwood trees that meet the characteristics necessary for construction. We also note that in addition to wood, there are other types of materials that can be used to finish the ceiling in a wooden house. For example, in a country cottage, for this purpose you can use any option used in city apartments.
Plastic panels
The most practical and inexpensive materials for ceiling cladding, in almost any room, are panels made of plastic material. The use of such a coating became possible thanks to the development of modern production of artificial materials.
Plastic panels are lightweight, which is very important for ceiling structures, are easy to install even with a stapler, and are also easy to clean from dirt.
The main disadvantage of artificial material is its inability to allow air flow to pass through, which sometimes leads to the formation of fungus or mold.
If the ceiling has a flat surface, plastic panels can be attached directly to it. If it is necessary to correct the curvature of the base, you will have to install a sheathing made of wooden slats or an aluminum profile.
It is very convenient to use plastic panels for finishing bathrooms. But they are not suitable for covering the ceiling of a bathhouse.
Useful tips
Regardless of which finishing option is chosen, load-bearing wooden beams must be treated with antiseptics and fire retardants. The solutions are applied one on top of the other, first antiseptic. Each layer must dry thoroughly.
The natural beauty of wood is always a priority, so it is not recommended to paint beams. It is better to cover it with clear varnish.
If beams have become a decorative element, then you need to take care of their geometric evenness. The best option is to carry out some minor work before installation. If they are installed, you should try to level the ends and the bottom plane with an electric planer. This is not as simple as it might seem at first glance.
If they are hemmed with a finished ceiling (plasterboard, plywood and other materials), the lower surface can be leveled with slats or metal profiles. Or, as was described with plastic panels, using direct hangers. The latter are more often used if the difference in the plane of the beams is significant. For small differences, wooden slats are also suitable.
Video:
Sheathing with plasterboard
This type of finishing differs from board design in that it is necessary to use a galvanized profile for gypsum boards to prevent deformation of the ceiling surface.
The work is carried out in stages:
- The profile is mounted along the beams using hangers or U-shaped brackets. The transverse profiles are installed so that a sheathing is formed, having dimensions that allow the gypsum boards to be joined.
- Drywall is cut with a sharp knife, hacksaw or jigsaw. Fix the sheets to the sheathing with self-tapping screws, trying to immerse them in the material to a depth of 1 millimeter.
- The joints between them are puttied using sickle tape, sanded and again covered with finishing putty. You also need to rub out the fixation points for screws and other irregularities.
- The ceiling is coated with water-based or acrylic-based interior paint using a roller. To create a more even tone, apply a second layer.
If the ceiling lining in a wooden house in the kitchen is made of plasterboard and painted with water-based paint, it will look good if the fillets are selected well.
Stretch ceiling structures
If you hem the ceiling with tension fabric, you will be able to completely cover the beams and niches between them. The structure is fastened to the walls. It can be combined with other types of finishes.
Stretch ceilings are installed by professionals who will help you choose the material for their manufacture, design, and also arrange lighting. To avoid condensation, ventilation of the ceiling space should be ensured.
Pros:
- large selection of textures, shapes and colors;
- strength and, as a result, durability;
- The material is not dangerous from moisture and leaks.
Minuses:
- high price of material;
- installation cannot be done independently.