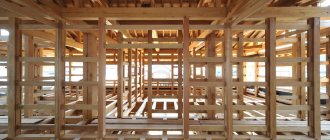
Floor installation is one of the most important tasks that future owners face when building a house. The floor design may vary. 2 possible options:
- floor on wooden beams; floor on joists.
Scheme of a wooden floor by joists
Most often, preference is given to flooring with joists, as it is easier to lay. However, constructing a floor using wooden beams has a number of advantages over constructing a floor using joists. Beams are an important functional element of the structure of a wooden house.
If the floor spreads along them, then the house acquires additional stability, since the beams are built into the load-bearing walls. However, this is the only drawback of such a floor arrangement. By means of beams built into the frame, any mechanical impact on the floor is reflected on the load-bearing walls.
In addition, the advantages of installing a floor on beams include low material costs, since there is no need to make a lower floor under the floor, as well as the low weight of the material used. Moreover, if you build a frame for the floor that does not have points of contact with the walls of the house, then the only drawback of this design will be eliminated.
How to install a beam into a brick wall?
First of all, it is necessary to determine the required number and cross-sectional size of beams. As a rule, beams with a cross-section of 15x15 cm or 20x20 cm are used. The distance between them should be no more than 60 cm. Such a structure will have the necessary strength and stability.
Scheme for installing a beam in a brick wall.
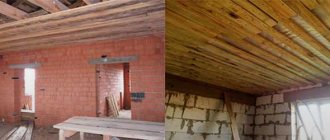
In a brick house, in which the upper part of the foundation is covered with bricks, the beams must be sealed tightly into the walls. This must be provided for at the stage of laying brick walls.
Sockets are left in the required places for installing beams. To ensure that the edges of the beams that will be located in the nests do not rot, it is necessary to line the openings under them with roofing felt in 2 layers, and the ends of the beams must be treated with a fire-retardant compound. It is recommended to apply similar compounds to all wooden elements of the structure.
The ends should not be coated with a compound that would prevent the wood from breathing. If this is not provided for, then condensation will accumulate on the wooden elements. Resin should not be applied to the ends.
If the openings in the wall are larger than the cross-section of the wooden elements, then the space remaining free must be filled with insulation (for example, foam plastic or mineral wool) or cement mortar. It is necessary to take into account that there should be an air gap of 3-5 cm between the timber and the walls of the nests in the brick wall.
The beam is not attached to the brick. The minimum permissible distance between the load-bearing wall and the first beam is 5 cm. Their supporting part must be at least 15 cm, and the depth of the opening in the wall must be 18 cm.
It is necessary to provide for cutting the end of the beam at the desired angle.
This angle is 60°. In addition, the end is laid so that the cut in the upper part is at a greater distance from the wall of the opening than in the lower part. That is, the lower edge of the beam should be as close as possible to the brickwork.
Types of floors
First of all, it doesn’t hurt to figure out what type of ceiling covering is – both by type and purpose.
So, according to the design solution, the load-bearing part of the ceiling partitions is:
- beamless, consisting of a homogeneous material (panels or slabs as flooring);
- beam, which involves the use of beams in the form of a load-bearing surface, as well as filling of a certain type (depending on the circumstances).
According to their purpose, floors are divided into the following groups:
- attic rooms separating the living space and the unheated upper part of the house (attic);
- basement, as opposed to attic, separating the heated space from the cold underground;
- basements separating the house and the cellar;
- interfloor - a buffer between residential floors, including the attic.
Reliable roofing is a guarantee of your comfortable stay in your new home
Installation of beams in a wooden or frame house
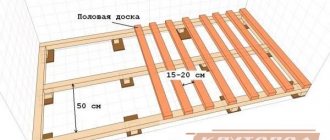
Layout of the floor along the joists in a frame house.
When building a frame or wooden house, the lower floor beams are laid in a different way than in brickwork. If we are talking about a frame structure, then the lower floor beams are mounted on the lower frame of the house. The beams are attached to the bottom frame with nails.
Building a house from logs or timber involves cutting openings in the wall for floor beams. These openings must be treated with an antiseptic composition. In this case, the beams that make up the lower ceiling must be located at a distance of at least 40 cm from the base of the stove and chimney.
Base structure
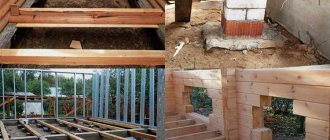
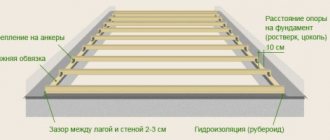
Diagram for installing a wooden floor on a columnar foundation
What is the diagram for installing a rough foundation on beams? The floor base is a cake, which consists of the following layers:
- Beams and/or joists. Installation of wooden elements is carried out on the base of the foundation or support pillars when arranging the floor on the ground;
- Skull bars. They are fixed to the bottom of the beams and serve as support for rough boards;
- Draft boards. Sheets of plywood, OSB, chipboard and other wood-based materials are often used as cladding for a wooden frame;
- Waterproofer. Coatings with water-repellent properties are laid on the layered cake to protect the base from moisture;
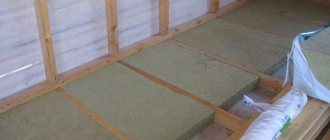
- Thermal insulator. Installation of insulation involves laying material between beams and sheets of plywood;
- Vapor barrier. Membrane coatings prevent the accumulation of condensation under the floor, which prevents the development of fungus;
- Counterrail. Installation of the counter batten ensures the presence of a technological gap under the coating necessary for floor ventilation;
- Soundproofer. Sound-absorbing materials are often installed in multi-story buildings;
- Finish coating. At the final stage of repair, the layered cake is covered with finishing material - solid boards, decorative plywood, parquet, etc.
It is worth noting that the base pie may consist of fewer layers. The diagram discussed above gives an idea of the possibility of laying certain materials in the process of arranging the rough foundation. The “correct” layered cake scheme is presented in the video.
Laying the floor on the ceiling
For beam floors, there are certain rules for laying flooring.
It is recommended to adhere to the following tips:
You need to attach bars to each floor beam on both sides. They will serve to fit the flooring tightly. You can use gypsum boards, boards, etc. as flooring.
The flooring needs to be built at the level of the lower plane of the floor beams. Waterproofing work needs to be done on top of the flooring. To do this, you can use a solution of sand and clay, which will be spread on the flooring, or roofing felt. Waterproofing is intended to protect the insulation. Tile materials, slag or sawdust can be used to insulate the floor. After completing all the above work, you can begin to lay the covering.
The floor is most often made of planed boards. Their thickness should be at least 3.5 cm. If you first lay logs on the beams, an additional air gap will be created that will provide ventilation.
Thus, building a floor using wooden beams is quite simple. But at the same time, it is necessary to take into account some nuances that will ensure the durability and reliability of not only the floor, but also the entire structure. This is very important, since an incorrectly made floor can cause instability of the entire building.
In a wooden house, there is a different system for laying floors, especially when insulating them. It is important that in the end the circuit remains operational and functions correctly, heating the building. Warm floors in a wooden house are equipped according to different systems, which are:
1. Electrical installation is not so acceptable, because it can cause fires and short circuits, and for wood this is a fire hazard. One of the advantages is the small dimensions of the circuits, and there is also no need to use heavy screeds and the formation of multi-layer flooring devices.
2. Water heated floors in a wooden house are completely safe during installation and operation. However, the likelihood of the floor heating up is reduced since the boards do not have a high level of thermal conductivity.
Options for designing a heated floor are equally used in practice. The main thing is to carefully follow all safety measures during the installation process and comply with the requirements and recommendations of specialists.
The methods of folding the floor in the house differ in different parameters and installation principles. Before analyzing the installation features, we recommend studying the variations in the installation of heated floors in a wooden house. According to their design, they can be divided into two groups: floors made of boards and concrete.
Construction material
Before you begin installing the floor on the second floor using wooden beams, you should make a list of all the necessary materials. This will allow you to avoid unexpected downtime and delays during work caused by the need to purchase additional building materials.
Beams
A beam section of 15 x 15 will be sufficient.
The basis of the entire structure of interfloor wooden floors is beams. They act as load-bearing elements, and the strength of the structure depends on them. For them, a beam or carriage with a section of 15 x 15 cm or 18 x 18 cm is usually taken.
This cross-section is usually enough to provide sufficient rigidity for a specific load of 400 kg per sq.m. In this case, it is necessary to comply with the parameters recommended by construction standards: the span length is 4 m, and the step between the beams is 60 cm. Based on these parameters, you can also calculate the required amount of timber.
The table shows the recommended cross-sectional dimensions of the load-bearing beam for a certain span length.
| № | Span length (mm) | Beam cross section (mm) |
| 1 | 2000 | 75×150 |
| 2 | 2500 | 100×150 |
| 3 | 3000 | 100×175 |
| 4 | 3500 | 125×175 |
| 5 | 4000 | 125×200 |
| 6 | 4500 | 150×200 |
| 7 | 5000 | 150×225 |
However, in the absence of timber and small values of the expected loads on the floor, it is quite possible to use boards 50 or 40 mm thick, knocked together in pairs and placed on edge. This option is suitable for installing floors in an attic or in a small country house.
For the first floor of a residential building, this option is not suitable due to the low load-bearing capacity of the boards: to ensure the necessary rigidity, the pitch between the board beams will have to be significantly reduced, which will lead to an unjustified waste of material.
Pine is most often used as a material for beams.
This is the best option in terms of price-quality: its wood is quite affordable and at the same time has good technical characteristics. Beams made from wood of stronger species (larch, oak) can rarely be found on the open market, and their price is incomparably higher, and pine wood, after appropriate treatment with antiseptics, will be little inferior in durability to the same larch.
When purchasing timber, you should choose a material with dry wood. Otherwise, after installation of the beams, they may become deformed during the drying process - bending and twisting.
Flooring
Wooden flooring laid on the beams will be a rough base for the floor covering.
Typically, the flooring of interfloor floors is made in two tiers: below are rough floors on which insulation is laid, and on top is a pre-finish flooring mounted on top of the load-bearing beams. Decorative flooring is laid directly on it.
To determine the nature and amount of material for the flooring, you should clearly think through the design of the floors.
When constructing a subfloor, either 5 x 6 cm bars, packed onto load-bearing beams, or grooves made in the beams can be used as support for the flooring boards. The latter option is quite labor-intensive, so most often 5 x 6 cm bars are used to create support.
To calculate the required number of bars, it is enough to count the number of beams and multiply them by the length of each of them. We multiply the resulting footage (the total length of all beams) by two more (since the bars will be packed on both sides of each beam).
A wide range of materials can be used for finishing flooring. This can be plank flooring, plywood, chipboard panels, MDF, OSB, etc. Each of these materials has its own advantages and disadvantages, after reading which you can choose one of them. To calculate the required amount of material, simply calculate the area of the room.
When purchasing building material, you should always purchase it with a reserve of 10–15%, since during construction unforeseen material overruns are inevitable.
This will save you from having to interrupt your work and buy the missing part.
Impregnations
An antiseptic will extend the service life of wood.
To maximize the service life of wooden structures, they must be treated with antiseptic materials.
It would also be useful to treat the wood with fire retardants, which increase its fire safety.
To calculate the required amount of impregnation, you should read the instructions for its use - the approximate consumption of the mixture per sq.m. is always indicated there.
Waterproofing
Since wood is afraid of moisture, waterproofing materials are always used during construction.
This can be a roll waterproofing used to create a water-repellent layer between wooden floor structures and the finishing coating, or between wood and brick (stone, cinder block, etc.).
To protect wood from dampness, you can also use coating waterproofing based on polymers or liquid bitumen.
Heat and sound insulation
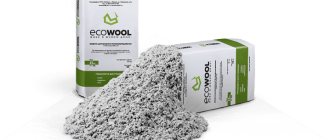
If it is necessary to create a barrier to noise or cold, insulating materials are used in the construction of floors. Most often, mini-slabs or polystyrene foam are used for these purposes. Their total number in area should be approximately equal to the area of the room. For more information about floor insulation, watch this video:
Expanded clay or ordinary slag mixed with sawdust can also be used as an insulating material.
Fastening materials
To fasten wooden floor elements, you should purchase screws, nails, steel angles, anchor bolts and other consumables. When purchasing screws and nails, you should pay attention to their length.
According to the standards, for a strong connection, the nail must be 2/3 longer than the thickness of the element being attached (board, block). For self-tapping screws and self-tapping screws, this figure can be reduced to 50%.
Those. To securely attach a magpie board to a beam, you will need 120 mm nails or 80 mm long self-tapping screws.
Features of installing a wooden floor
The wooden floor forms a base in several layers, which creates the rough part of the installation, insulating layers, after which comes the final coating and finishing of the surface. In the overall design, heating systems such as pipes or special cables are placed between the layers to complete the heating system in the house.
A wooden heated floor in a private house differs in its construction scheme, which involves installation on poles with a concrete foundation or on joists. With a monolithic fill, it is much easier to arrange the floor; in its absence, the entire structure is erected using beams. They have a span of 4 meters in width and are inserted into the walls of the house on support pillars.
In essence, this is a columnar foundation for a building in which the beams are not fastened. The distance between the pillars is from 0.7 to 1 meter, and the top covering is made of roofing material in 3 rows. The cross beams must rest entirely on the supporting elements, and for better fixation, wedges or seals are used, which secure the parts with nails.
Warm floors in a wooden house without screed are divided into two types:
1.
Single-layer structures that are installed both on logs and on another base. The choice of priority depends on the gap between the beams and the thickness of the boards. When constructing a floor on joists, the boards are laid directly on the beams, but it is important that the distance between them is no more than 0.5 meters.
2. The two-layer design involves installing a subfloor with boards attached to both sides of the beams.
A layer of insulation is laid on top of them, for example, sheet material or expanded clay, and its height should be about 80 millimeters. As additional insulation, a layer is placed between the rough and finished floors. In this case, we leave a gap of 4 mm on average, which will allow air circulation between the boards and prevent their destruction.
The main advantages and disadvantages of wooden floors
There is a stereotype in the minds of citizens that precast concrete panels are the only possible solution for any building. It is not difficult to overcome it.
It is enough to list the advantages of wooden beam floors:
- Minimum cost (1 m3 of timber is several times cheaper than 1 m3 of hollow-core panels);
- The load on the walls is 2-3 times less than from the panels. This allows you to significantly reduce the consumption of reinforcement and concrete when constructing the foundation;
- On short spans (up to 4 meters), wooden beams can be laid manually using simple devices (a winch or a lifting block). Installing heavy slabs without a powerful crane is an unrealistic task;
- Low labor intensity and high speed of work (compared to pouring a monolithic reinforced concrete floor);
- Environmental friendliness (concrete uses granite gravel, the background radiation of which can significantly exceed the norm).
As you know, there are no advantages without disadvantages. Wood floors have few of them:
- Increased deformability. It manifests itself in the effect of vibration when walking and the formation of cracks at the junction of plasterboard partitions;
- Low fire resistance (without special impregnation);
- Relatively short length (does not exceed 6 meters). For reinforced concrete panels it reaches 7.2 meters.
Among the disadvantages of these structures, some authors of feature articles include the formation of cracks in the ceiling plaster and poor insulation of impact noise. However, with a competent approach to installation, these two problems can be solved simply and reliably. To do this, a series of less thick beams are laid below the load-bearing beams, specially designed for lining the ceiling (plasterboard, OSB, lining, board).
Floor insulation
Wooden and concrete floors always need to be insulated using different materials and heating methods. For greater effect, many builders try to apply additional layers of thermal insulation, which will fill the space between the rows of subfloor and finished floor.
Among the current materials used are polyurethane, mineral wool, and among natural methods you can find sawdust and shavings, dry leaves, and so on. When using any floor insulating material, it is recommended to leave a gap of approximately 15 or 20mm for air exchange.
Basic rules for installing joists
When installing logs yourself, you should strictly follow the following rules:
- Before installing the log, the surface must be cleaned and primed;
- all wooden elements of the pie structure are thoroughly dried and treated with antiseptic antifungal drugs;
- sand or fiberboard can be used as a soundproofing material;
- adjustable floors with your own hands must be fixed well, and then use a long construction level to make sure that the logs are installed straight horizontally;
To control the horizontality of the structure, you must use a level
- Under no circumstances should you begin installing the floor without checking the horizontalness and evenness of the joists;
- floor boards are attached to each and every joist;
- In order not to spoil the board, the slots for fastenings must be made in advance; when using self-tapping screws, the holes are made with a thin drill.
Subfloor: installation
An electric heated floor in a wooden house or an infrared one must be equally ventilated and be strong at the base. In order for the insulation scheme to be of high quality and functional, a floor is installed that must meet the following requirements:
- they must be rigid in their structure, which distributes further load; their intended purpose is to serve as the basis for insulation or fillers and create an intermediate waterproofing layer; the air space between the rough and finishing layers provides an air exchange system, which does not allow the wooden boards to rot and deteriorate.
All parameters indicate that in order to build a durable and warm floor, lay a rough layer, which allows you to preserve the top layer of finishing. For them, boards with a width of 16 to 45 cm are used, which can be finished with antiseptic agents.
When furnishing a home on their own, builders assume that the rough construction is the reason for the flooring, but this is not the case.
The essence is that the substrate is the laying of plywood or chipboard or the boards themselves on the joists. They are used for the subsequent laying of materials and for their level position, as well as the measured division of the weight of the entire floor onto the floor. Such substrates are used in buildings made of wood and monolith.
The subfloor is also the lowest layer among the base boards as a cover for joists or beams, depending on the structure of the building.
As a rule, the layers of the floor are boards, which are located in a diagonal position relative to the finishing masonry. In this case, the strength of the floor is created, formed by the options for laying the boards. The floor creates a double insulating structure, which allows you to retain heat, as well as fix the insulating layers and regulate the heat supply in the house.
The installation procedure for heated floors consists of the following steps:
1. Creating a ventilation shaft allows for air exchange between the crossbars of the boards so that they do not succumb to rot. The installation process is carried out by drilling several holes in the corners of the house with approximately a diameter of 50 to 60 mm.
They should be rounded, which are then covered with special grilles as a decorative material. Above the subfloor, they should be located at a height of 5 or 6 cm to prevent water from getting inside. In some cases, rough ventilation is installed in the baseboard.
2. Waterproofing the foundation is an important part of installing a heated floor in a wooden house with your own hands. As a building material, roofing felt or other insulating objects are used, which are laid relative to the first step of insulating the building.
3. Joists, crowns and all boards must be thoroughly treated with antiseptic agents, which will remove and protect the wood from the appearance of fungus or mold, as well as insects. Some builders use regular machine oil or other protective items.
4. Laying the subfloor is carried out in three options:
- the arrangement of the boards is installed on the beam shoulders, which resemble the letter “T” in an inverted form; laying on the cranial beams, which act as the same shoulders, but attached to the edges of the beams; installation of the boards in special grooves, which are prepared at the initial stages of construction.
5. After choosing the installation method, you should give preference to the position of the boards on the skull beams; it is necessary to lay a layer of waterproofing. The best option may be mineral wool as insulation, and the last thing to lay out is a vapor barrier.
6.
After laying it, a finishing floor is placed. For this purpose, tongue and groove boards or chipboards are used. Laminate or linoleum is laid on top of them.
It should be noted that the temperature should not differ from the temperature of the room and floor by more than two degrees, so it is necessary to approach floor insulation carefully.
Experts recommend carefully selecting all thermal insulation materials that will retain heat in the room. Important properties include a high degree of energy conductivity, the absence of non-flammable components and allergic substances. Also, the insulation material must be durable and strong in structure and be easy to use in construction work.
The most suitable option is mineral wool, which is hygroscopic and perfectly absorbs moisture, preventing it from seeping through the boards. Other thermal insulation materials are combustible, although they are light in weight; examples include polystyrene foam and expanded polystyrene.
Roofing felt, plastic film, and so on would be excellent waterproofing items. To the question: how to make a warm floor in a wooden house? The procedure for laying all layers is carried out from the installation of the first row of flooring, and then the laying of all waterproofing materials, after thermal insulation materials, and the last row will be the vapor barrier.
Construction requirements for wooden floors
In order to install a durable and safe wooden floor between the 1st and 2nd floors with your own hands, you must strictly comply with the technical requirements for them.
Thermal insulation layer
Thermal insulation of the floor will improve the temperature in the room on the second floor
If a wooden floor separates the upper and lower rooms with a temperature difference between them of more than 10°C, it will be necessary to construct a thermal insulation layer.
This is necessary, for example, when arranging floors between the first floor and the subfloor, basement, or between the first/second floor and an uninsulated attic.
Beam strength
Beams and floors must withstand up to 180 kg/sq.m load
When constructing the floor of the second floor on wooden beams, special attention should be paid to the strength of the supporting structures. The safety of the building depends on how strong the wooden floor beams are.
According to building standards for wooden low-rise buildings, the maximum load on the first floor floors should not exceed 210 kg per sq.m. pressure on the wooden floor of the second floor is no more than 180 kg/sq.m. and for attics and attics this figure should be less than 105 kg/sq.m.
Maximum deflection
In addition, building regulations also impose requirements on the deflection values of wooden floor beams. According to SNiP, this coefficient should not exceed 1 to 250. That is, the maximum deflection of wooden load-bearing structures during operation should be less than 4 mm per meter of beam length.
According to this standard, the deflection of a beam structure 4 m long in the center should not be more than 1.6 cm (4 m. 250 = 0.016 m). If it is planned to place massive furniture and household appliances in the room, tile flooring, etc. then the requirements for structural rigidity increase to 1 in 400.
That is, the deflection should not exceed 2.5 mm per meter. For non-residential attics and attics, a higher deflection coefficient is allowed - 1 to 200 (5 mm per 1 meter).
Soundproofing
Fifty-millimeter mineral wool will not only insulate the floor, but will also become a good sound insulator
According to building regulations, the sound insulation threshold for interfloor ceilings of residential buildings should be 50 dB.
To meet this requirement, it will be sufficient to cover the floor of the second floor under the finishing coating with mineral wool 50 mm thick.
Length of supporting beams
The length of the beam should be no more than 5 m
The maximum permissible free sag length of wooden beams should not exceed 5 m for interfloor and 6 m for attic floors. If the design length of the room is more than 5 m, it will be necessary to install additional support under the load-bearing beam. The fact is that the optimal length of a load-bearing wooden structure is 4 m.
With a further increase in its length, the rigidity and strength of the supporting structure sharply decreases and the requirements for the thickness of the beam section increase disproportionately. So, in order for the deflection indicators for an 8 m beam to “fit” into SNiP standards, its thickness should be about 40 cm. For example: the same deflection indicator is shown by a 4 m beam with a cross section of only 15 x 15 cm.
Wood is a material quite vulnerable to external influences, primarily dampness and fire, therefore, before proceeding with the construction of load-bearing structures, all wooden elements must be treated with antiseptic materials and fire retardants.
Finish floor: installation
The last step is the folding of the finished floor, which consists of subsequent actions. We choose milled boards that are fastened together using tongues and grooves. Their dimensions should be 28-44x98-145 mm, which have special vents on the back edge of 2 cm, which are determined for constant air exchange.
In the absence of these boards, other variations can be used, such as boards with straight or trapezoidal tenons, as well as with tongue-and-groove slats and the like. The only drawback of these boards is the lack of air vents. It is important to remember that when laying boards, they should be directed in different directions, and determined by the rings on the tree.
Best answers
NV-StroyTerminal:
Pirilax-Lux For external and internal work, risk areas. For harsh conditions (swampy areas, southern subtropical regions, Far North). Has two-level antiseptic protection. Destroys mold and wood-staining fungi, algae and prevents their reappearance. Protects against wood-boring beetles and termites.
Anna Grushevskaya:
for prophylaxis, antiseptics, but already damaged areas should be replaced, the grinder cannot be removed
3:
lime
Dimon Rumyantsev:
Senezh antiseptic
Alexander Senin:
how scary it is... but since it’s antiseptics. There are a lot of them right now. from everything. And if you want it to last forever. then treat it with bitumen. will last forever. I saw a house 160 years old. the logs were like new. The sleepers are also being processed. They lie on the street for just as long.
Alex:
superarch /materialy/lnyanoe-maslo-dlya-drevesinyi
Installation of concrete floors in a wooden house
When installing a concrete floor, you will not need to lay many layers of boards and insulation material. To do this, you only need to make a screed, but it is important to remember some factors and aspects. Concrete floor has its advantages, which are:
- the durability of the material, its reliability and strength; modern construction methods will create a perfectly level base without flaws. You can put linoleum or laminate on it without any problems.
However, you should remember some nuances and rules for pouring a concrete floor and calculate the need to create it. There are two variations of installation: the main one - on the ground, the other - along the logs. In the main version, all work is carried out quickly and simply, but otherwise, you will need to work with new and undamaged lags.
Design Features
At the base of the floor on wooden logs are beams (joists). These are beams made of wood or polymer materials, laid parallel to each other, which serve as support for the sheet material. This is one of the most common options for creating a subfloor.
It is distinguished by:
- sufficient ease of installation;
- low cost of material;
- significant increase in floor strength;
- uniform load distribution;
- ease of installation of thermal insulation and noise protection.
It is impossible not to note the versatility of this type of subfloor. Logs can be laid on the ground, wooden or concrete surfaces; of course, in all cases it is important to ensure maximum protection of the wood from moisture. The result of work done correctly will be a dry, ventilated subfloor, which will have a positive effect on the characteristics of the floor and the structure as a whole.
Laying concrete on the ground: installation work
Infrared heated floors in a wooden house or water ones are installed after the process of pouring the concrete base. The sequence of work is carried out in the following way:
1. Determine the pouring level for the concrete floor. Marks are made using a cord and the equal perimeter of the base is measured to be approximately 10 cm.
2. Pour a layer of gravel onto the ground so that the existing pegs should be compared with the level. After this, the tags are extracted.
3. Sand is poured onto the gravel, which compacts the previous layers.
4. A layer of waterproofing is laid using polyethylene film. It spreads on the sand, but the edges should be higher than the floor.
5. After this, concrete is poured onto the waterproofing material, which is evenly leveled.
6. The solution is covered with film, but the base must be constantly moistened with water.
The concrete floor is left for 3-4 weeks for the mortar to set and become durable.
After two months you can start making a cement screed. At the beginning of the work, you should decide on the type of heated floor: electric or water. In this episode, the thickness of all layers should not exceed 25 mm, which is suitable for laying tiles, linoleum or laminate.
Plate
If a wooden house stands on a slab (foundation or ceiling on a brick plinth), then the floor of the first floor is equipped with a screed. In this case, the same technologies are used as in stone houses.
On a solid base, logs can even be installed on point adjustable supports Source pinterest.it
Even for installing a wooden subfloor, there is a choice among a wider list of methods:
- installing joists on supports on a concrete base without fixing them to the base and load-bearing walls (floating floor);
- installation of logs on adjustable supports;
- installation of adjustable plywood.
Strengthening methods
Using steel plates you can strengthen beams
Steel auxiliary materials
Steel plates fixed on different sides of the beam will help strengthen wooden beams. Steel tools must be treated with a solution that prevents corrosion, otherwise they will not last long.
Carbon fiber
The material, also called carbon fiber, is a modern technology in the construction world and is actively used during beam ceiling reconstructions. It comes in the form of plates, ribbons or threads.
This plastic material is applied in several layers to a wood surface, ensuring ease of work and reliable quality, which makes it quite popular.
Prostheses made of wood or metal in the end areas
Due to variable temperatures, beams in the area of the load-bearing wall are significantly weakened. It is necessary to make the main timber beam stronger to prevent negative consequences in the future, as well as to avoid repeated reconstruction in the near future.
To do this, additional prostheses made of metal or wood are attached to the edges of the wooden base, which are placed in the brick recess of the wall, thereby providing reliable protection for the central beam.
Installation of prostheses for a rotten floor beam
Supports for load-bearing beams
This method involves placing additional support structures under the load-bearing ceiling beams to distribute the load evenly.