Cement screed is an opportunity to make the floor flat and smooth, strong and durable, ready for finishing using even the most demanding materials (tiles, laminate, parquet, etc.). Pouring a cement-sand screed can be done independently - implementing all stages of the work with your own hands is quite possible, without loss of quality and aesthetics.
Cement-sand screed guarantees an almost ideal base; most often this option is chosen for leveling the subfloor (concrete floors in multi-storey and private houses, brick floors or soil). As a rule, the thickness of the filling layer is 3-8 centimeters, calculated in accordance with the requirements and strength of the floors, estimates and other parameters.
The application of a cement-sand screed is designed to level the surface, strengthen it, redistribute loads, create hydro/heat/sound insulation layers, lay communications inside, equip a “warm floor” system if desired, and solve many other problems. There are special types of cement-polymer screed, thanks to which you can create a beautiful and original decorative floor.
Features and Benefits
The weight of one square meter of cement screed 1 centimeter thick averages from 16 to 20 kilograms. Screeds using expanded clay or polystyrene weigh a maximum of 18 kilograms, self-leveling mixtures show a figure of 16 kilograms.
In cases where differences in the subfloor reach 3 centimeters or more, a cement-sand floor screed is the best option. The screed can be tied and firmly adhered to the base, or unbound (floating), when the layer is placed on an additional layer (usually a mixture of sand and expanded clay), which acts as thermal insulation and protects against moisture.
The thickness of the cement-sand screed can be different. On average, the area can support a weight of up to 300 kilograms. If you need to increase the strength and ability to withstand different loads, the screed is reinforced with steel rods or mesh. The frame is placed on top of the expanded clay layer or attached to special fasteners or sheets of plasterboard.
Sand-cement screed has a porous structure, due to which it can absorb moisture. Therefore, the layer inside the building must be insulated with a special membrane, or waterproofed with bitumen mastic.
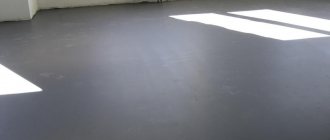
It is quite possible to carry out all the work on arranging a floor screed with your own hands. The main thing is to do everything according to the rules and preliminary calculations. When the screed has hardened and gained full strength, it acquires a rich gray tint.
The layer should be even and dense. If cracks or chips appear on the surface, it means that the proportion of the components was violated or the pouring technology was not followed, or the rules for drying the screed were ignored.
The main advantages of cement-sand screed:
- High-quality leveling - for any type of decorative coating.
- Durability – the service life of a concrete floor is on average 50 years.
- The ability to disguise communications inside the screed - sewer, water pipes, wires, underfloor heating systems, etc.
- Strength - the screed can withstand any load from furniture, equipment, etc.
- Good sound insulation - the screed almost does not conduct sound, and if it is also accompanied by a layer of sound insulation, the effect is magnificent.
- Thermal insulation - the minimum thickness of the screed and itself retains heat well, but if necessary, you can lay a layer of thermal insulation, ensuring the best characteristics.
- Minimal shrinkage - provided that the cement for the screed has been chosen of high quality, and the mixing is done correctly with the correct proportions.
- Quite a low price when compared with alternative methods of flooring.
Among the disadvantages that sand-cement screed may have are the following: large weight (depending on the thickness of the layer) and considerable pressure on the floor, long drying time (during which no further work can be performed - and this is about a month), the difficulty of creating a perfectly flat surface with your own by hand (but you can pour a self-leveling mixture on top), a long and labor-intensive pouring process.
Carrying out preliminary calculations and a properly executed screed allows you to eliminate most of the shortcomings and achieve an excellent result in the form of a strong, durable, even floor that is ready for further finishing.
Preparation
All work on installing floors in an apartment must begin with preparatory activities. After a thorough inspection, all points must be completed on the surface so that you can begin installing the floor screed.
First of all, it concerns the removal of excess debris and dust. This is carried out in parallel with the removal of irregularities and protruding elements that may interfere with the pouring of the solution.
If there are cracks, potholes, holes, they all must be sealed with a specially prepared mixture. Large defects in the base are filled with a solution of sand and cement, which are prepared in strict proportions of the components.
Preparatory activities
The initial measures include setting the “zero” level and all other points relative to the horizontal line. The quality of this work will affect the evenness of the future concrete floor. At the same time, the technology for installing floors in the apartment must be fully observed. Any deviations will have a negative impact on the outcome. The installation of a concrete floor in an apartment requires sequential work.
A certain set of tools and materials will be useful in the work. Everything will depend on the specific situation of installing the concrete floor, as well as on the desired quality and strength of the solution. Each of the items can be purchased without any problems at a hardware store. If desired, you can use the services of special construction equipment, which is rented for a certain period together with the contractor.
Types of cement screeds
There are many options for making floors made of cement-sand mortar. The proportions of the components can be different, you can add various additives and plasticizers, choose a polymer-cement screed and make floors with a 3D effect, etc. But there are two main types of screed arrangement: tied and untied screeds, as well as floating.
A bonded type cement screed is installed when pouring a layer of up to 4 centimeters. In this case, the base becomes a single monolith with walls and floor. The rough foundation needs to be prepared - cracks must be sealed, large holes, bumps and pits must be eliminated. Small defects with a difference of up to 3 centimeters can be left.
Before making a cement-bonded floor screed, it is advisable to go over the base with a wire brush to improve adhesion. The filling composition should resemble sour cream in consistency and hardens within 20 minutes after installation. Large premises are filled in stages. The screed takes up to 40 days to dry, maintaining the temperature and humidity conditions under the film.
An untied screed must be mounted on an already ideal surface. The base should not absorb moisture. The layer when installing this type of screed can be 5 centimeters or more. Before pouring, no primer is used, nor are methods for increasing adhesion.
A floating screed is installed when you need to make a layer of 5-8 centimeters. Cementing does not involve contact of the screed with the subfloor, since heat/waterproofing and different materials are installed between the layers. Typically, reinforcing mesh is used; fiber fiber is added to the solution, which increases the strength of the layer and eliminates the risk of crack propagation.
A floating (including reinforced) screed does not involve too much weight, since, despite its considerable thickness, it is poured using a semi-dry technology: the solution is mixed with a reduced volume of water, so it resembles wet sand in structure more than a liquid mixture.
Waterproofing
Before you prepare the solution for pouring the floor, you must complete the main step - installing a waterproofing layer. This is especially true for premises in private households, when flowing groundwater is very close. Waterproofing will prevent water from getting from the soil into the poured solution, which can cause oversaturation with moisture and uneven drying. The same applies to the rapid release of water from the fill into the lower floors and rooms. If this layer is not completed before the concrete floor is installed, this will negatively affect the drying process of the solution, the final quality and reliability of the surface of the future floor.
The technology of floor screeding in an apartment involves the use of a certain set of materials for the waterproofing layer. These include:
- Roll waterproofing. The most common of them is roofing felt. But it has a vulnerable area, which is the joint of the sheets. This means that they should not be joined, but should have an overlap of at least 15 cm. Some commercially available rolls have a special fastening element along the edge that allows individual sections to be fully and reliably connected to each other.
- Liquid waterproofing. Bitumen mastic is one of the most expensive. But in the end, they provide an excellent result that almost nothing can compare with. Ideal for rooms with high humidity, such as bathrooms.
- Film for waterproofing. It is not uncommon to use conventional polymer film. It only needs to have a certain thickness in order to meet all the qualities of the layer being arranged.
The choice of a specific option will depend on the size of the wallet, the desired items, as well as the specific case and condition of the room as a whole.
Thickness and calculation of floor screed
The composition of the cement-sand mortar is simple and unchanged: cement, sand, water. Approximate calculations are given below (they may vary depending on the required floor characteristics and the brand of cement used).
The weight of a cubic meter of solution reaches 2000 kilograms. On average, a cubic meter of mixture contains 450 kilograms of cement and 1,300 kilograms of sand. A screed 1 centimeter thick requires 20 kilograms of solution - which means the consumption of components is 4.5 and 13 kilograms, respectively.
If you don’t want to prepare concrete with your own hands and think about what kind of cement is needed, what ratios of materials, etc., you can purchase a ready-made dry mixture. Its cost will be higher than a solution prepared independently, but the result will be of high quality, with the properties and parameters of the finished coating established by the standards.
In addition to cement, it is important to choose the right sand - without impurities (clay, silt, dust) that reduce the strength characteristics of the future screed layer. Usually they take washed river sand, or, in extreme cases, quarry sand.
To fill a standard screed, you will need to purchase a primer - its consumption is about 350 milliliters per square meter of surface. Thanks to the primer, it will be possible to ensure high-quality adhesion of the base and mortar, guaranteeing the strength and reliability of the screed.
Dry mixes
Do-it-yourself cement floor screed can be done using ready-made dry mixtures. Their main advantage is the absence of the need to calculate the proportions of the components included in the composition and, as a result, stability of characteristics and excellent results. The manufacturer prepares the mixture, the foreman’s task is to calculate the required volume of the mixture to complete the work and mix the solution on site, adding water.
Dry building mixtures are also distinguished by their ease of preparation, density, plasticity - they are comfortable to work with, they often demonstrate improved characteristics due to the introduction of various additives, plasticizers, etc. into the composition. All you need is to look at the mixture consumption in the instructions, purchase the required number of bags (25-50 kilograms each), add water according to the instructions and work.
Mixtures for screeding using dry and semi-dry technology are available on the market. Thus, the polycement mixture is more convenient to work with due to its elasticity; it is often used in industrial and civil construction to create new structures and restore existing ones.
Self-leveling mixtures for floor screed are very popular - you just need to pour this solution onto the surface, it will distribute itself evenly and perfectly evenly. True, it does not guarantee high strength and is inferior to dry mixtures reinforced with metal fiber fiber. The self-leveling mixture option is ideal for residential premises where the load on the floor is light. Lightweight concrete mixtures are also used here.
The modern market offers a large selection of dry mixtures of domestic and foreign production. The range is very wide and choosing an option even for fairly specific requirements is not difficult. While cement for floor screed one way or another assumes certain properties and parameters, ready-made mixtures can give very different effects due to the introduction of various components into their composition.
An example of such a product would be the Knauf Ubo mixture from one of the best manufacturers in the segment (German company Knauf). This is an ideal option for preparing CSP, which has a density that is 4-5 times greater than that of classic concrete. The screed is resistant to any temperature changes and is perfect for installing underfloor heating systems. Provides good sound insulation due to the introduction of polyethylene modifiers into the composition.
To fill one square meter you need about 5 kilograms of the mixture. And this choice is justified for pouring in a residential area due to the ease and simplicity of installation and the excellent performance characteristics of the floor.
Types of expansion joints
During the operation of buildings, it shrinks due to temperature fluctuations, different thicknesses of the concrete floor and other operational errors. The same applies to a poured concrete floor, which may also begin to crack during the drying process. To avoid all this on a concrete floor, expansion joints must be present. Although this is not provided for or stated in the building codes and regulations.
The following types of expansion joints in concrete floors are distinguished:
- Insulating. They are performed along walls, possible decorative elements in the room (columns), around foundation protrusions for equipment. These seams are designed to prevent the transfer of deformations to the screed from the structure itself.
- Structural. They are issued in those places where the day's work of pouring the solution has been completed.
- Installation of shrinkage joints for concrete floors. Allows you to avoid the appearance of chaotic cracks on the screed during the drying process. If cracks appear, they appear only in a given direction. This is achieved by creating straight planes of slack.
Construction of deformation layers
DIY cement screed
Before cementing the floor, it is necessary to carefully study all stages of the work. First of all, the base needs to be prepared for pouring, and then just lay the screed. All stages are important, so each one needs to be given enough attention.
Preparatory work
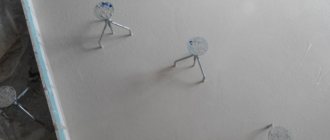
First you need to mark the future screed, determining the layer height and evenness. To do this, it is best to use a laser or ordinary construction level. Laser helps to correctly install beacons, which will ensure faster leveling of the mixture and a high-quality result.
The laser level is placed on the base, the beam is projected, and the horizon line is determined. Then, 30 centimeters from the wall and with the same step, a parallel line is further marked, portions of the solution are laid out along it, with a profile on top. You can use special beacons on the clamps. The poured mixture is then equalized using the beacons or profile. But before that, a number of important works need to be completed.
Stages of foundation preparation:
- Removing the old screed.
- Cleaning the surface from dirt, debris, dust.
- Apply an adhesion primer using a roller/brush.
- Filling with a layer of expanded clay and sand (if necessary, thermal insulation is laid), the thickness of which is up to 10 centimeters. Compaction of the layer with moisture.
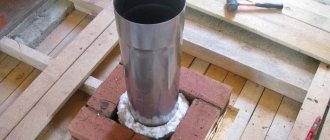
- Design, installation of pipes, wires and other communications that are planned to be laid in the screed.
If there are too serious irregularities (which exceed the planned thickness of the screed), it is necessary to eliminate them: fill cracks, fill potholes, cut off bumps, etc.
Preparing the mixture
Before concreting the floor, prepare the solution needed for the screed. There are several ways to obtain a cement-sand mixture: purchasing ready-made dry mixture and mixing it on site, ordering the required volume of liquid mortar from the factory (this service is available both in Moscow and in the regions), independently determining the proportions of the components and preparing concrete.
If you choose the option of preparing the mixture yourself, then take cement and sand in a ratio of 1:3, fill it with water until the desired consistency is obtained. Next, the solution is poured onto the floor, leveled along the beacons, and allowed to harden.
The process of preparing semi-dry screed:
- Lay polyethylene film on the ground, pour cement and sand on top of it, mix with a shovel in the direction from bottom to top, trying not to disturb the shape of the cone.
- Make a hole in the center of the cone, pour water into it and mix everything.
- Without stopping mixing the components, pour the dry mixture around the edges, trying not to break the integrity.
- When the mass becomes thick, it is ready for installation; it must be used within 20 minutes.
- Leveling the screed within 1.5 hours.
To create a wet cement-sand mixture, high grade cement is used. Take a third of a bag of cement onto a bag of sand and fill it with water (about the same amount as the binder taken). The easiest way to do the mixing is in a container with a volume of 25-30 liters.
During the preparation of the mixture, you need to control the color of the solution - it should be gray: too dark indicates an excess of cement, red indicates too much sand.
Fill
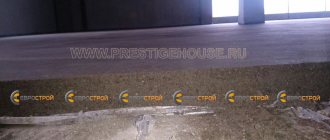
Before pouring begins, the room must be covered around the perimeter with damper tape, which will protect the screed from moisture, temperature changes, and pressure. Laying the mixture begins from the corner farthest to the door, one person pours and smoothes the solution, the second at this time prepares the next portion. It is best to fill the base with an area of 30-50 centimeters at a time (this is the step at which beacons are laid).
Adjacent zones of two pours are mixed to a depth of 10 centimeters. The strip at the doorway is done last. The screed hardens within 2-3 hours, acquiring 50% strength after 2-4 days. Full ripening depends on the thickness of the screed and the volume of water in the mixture. On average, in ordinary residential premises the screed hardens by 1 centimeter per week.
Every day the screed is sprayed with water to prevent the top layer from quickly hardening while the bottom layer is still soft. 1.5 hours after pouring, the surface can be leveled by sliding on wedges; the bumps that appear later are knocked down manually.
Rub the solution with a mixture of cement and sand in equal proportions with the addition of water. During grouting, the surface should be sprayed generously with water.
Pouring concrete
To fill, you will need a rule and a trowel. It is advisable that the concrete mixer be located in the same room where the work is being done. It is on wheels and can be moved to free space as needed.
Preparation of mortar for screed
Step 1. Unload the concrete onto the floor and spread it with a shovel between the two beacons. Start from the wall, don’t rush, add a layer of approximately the same thickness.
Step 2. Make a rough edit with a trowel. Level out the recesses and throw away excess mass on the back side of the lighthouse. Do not throw the mixture too widely, do not forget that the reinforcing mesh must be constantly raised; it may fall during work.
Adding mortar with a trowel
Step 3. Level the poured concrete properly. The rule needs to be pulled towards you and simultaneously moved left/right.
Alignment
Practical advice! If it is difficult for you to work in a bent position, then work on your knees. To avoid injury, place a flat board under your knees. As the space between the beacons fills, move the board.
There should be a strict rule for leveling concrete. The mass is heavy, you usually need to pull with great effort. If the strength of the device is insufficient, then it will bend in the middle. As a result, a gutter forms between the beacons, and this is a very unpleasant marriage. Constantly clear the beacons of stones; the width of the poured concrete should be such that it can be leveled with outstretched arms.
Another photo of the process
Step 4. Using the same principle, screed the entire room. Do not forget to manually throw and level various small niches and places where walls meet the floor.
After the floor has completely dried, we can begin further refining the floor surface.
Work should always start from the farthest wall and move towards the exit of the room. Pull the concrete mixer behind you as needed. Constantly pay attention to the position of the reinforcing mesh. There are times when all the special measures to raise it do not give the desired effect. If so, after leveling each small section of concrete, lift the mesh again. Remember that it should never lie on the base.
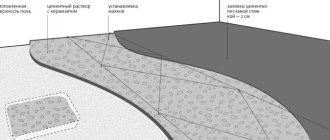
How to make a concrete screed with a slope - the beginning
How to make a concrete screed with a slope - continued
How to make an insulated concrete screed
Mechanized floor pouring