Concrete screed is used as a rough base for various finishing floor coverings and can be used as the main floor in technical production rooms, garages, warehouses and other premises. To increase strength, it is reinforced with metal mesh or construction reinforcement of a periodic profile. In some cases, water protection is used. The specific features of the concrete screed depend on the operating conditions and purpose of the structure. Regardless of the specifics of the technology for pouring surfaces with concrete, all work consists of several stages.
Concrete screed
Installation of concrete floor screed
Types of concrete screeds
Depending on the functional characteristics of the room and the design of the base, different types of concrete floors are used. According to their intended purpose, screeds can be used for:
- leveling differences in foundation heights;
- hiding communications ("warm floor" systems);
- creating a certain slope in the room.
Based on their design features, a distinction is made between single-layer and multi-layer concrete screeds. The former are poured to the full height in one go, while the latter are laid in several stages and may include, in addition to several layers of concrete, layers of heat and sound insulation.
Concrete floor screed can have varying degrees of adhesion to the base. There are three main types:
- bound screed - the concrete mixture is laid directly on the interfloor floor. This design has high strength, but can only be used on dry substrates;
- screed on the separating layer - there is a layer of insulation between the base and the monolithic slab. This type of floor screed is used both on wet bases (on the ground) and in combination with thermal insulation;
- “floating” screed - the concrete floor is completely separated from the supporting structures (base and walls) using damper pads and insulating layers. Such a concrete screed is used on a wooden floor or when installing internal heating systems, as well as using layers of heat and sound insulation.
The composition of the mixtures can be either homogeneous or include various fillers that give the floors certain properties.
The inclusion of polystyrene foam chips in the cement-sand screed increases the heat and sound insulation characteristics of the floor. Using expanded clay as a filler when pouring a floor screed, you can lighten the weight of a monolithic slab. This is true for large thicknesses of the concrete mixture layer. But to obtain a flat surface for laying sports flooring, a finishing leveling screed is required.
In cases where it is impossible to use metal reinforcement (lightening weight, electrical heating, etc.), reinforcement for such a floor can be done by adding fiber fiber to the concrete mixture.
A perfectly flat floor - why is it needed?
Even in a new building, there are differences in the floors. They can reach 10 cm. Today, panel slabs are laid so that the ceiling between floors with its smooth surface is directed towards the ceiling, and its lumpy surface towards the floor. And on this side, without screeds, you can only lay linoleum. The parquet will be constantly deformed.
Thus, we fill the floor according to two main reasons:
- Laying flooring.
- Construction of a floor with water or electric heating.
- Other floor insulation.
For your information
To get a perfectly even coating, we use cement filling. This operation is also called screeding. It is necessary before laying the topcoat. In this regard, many owners have a question about how to properly fill the floors in the apartment. This technology is not anything overly complicated. The main thing is to perform all operations correctly and step by step.
Preparing the surface for laying screed
Before making a concrete floor screed, it is necessary to properly prepare the base for laying the mixture. If there is already any floor covering or screed on it, then it is necessary to determine the degree of its suitability.
If there is a durable concrete covering, and if the level of the old foundation allows, then installing a cement floor screed on the existing surface is allowed, but it is necessary to calculate the load-bearing capacity of the floor slabs for additional load.
Damage and cracks in the old screed must be repaired with repair compounds. In some cases, it is permitted to lay concrete mixture over existing ceramic tiles or marble slabs (provided they are firmly supported by the substrate). Laying concrete floors over soft floor coverings (linoleum, etc.) is not allowed; they must be completely removed from the base. If there is a loose and weak old screed, as well as if there is not enough height to lay a new one on top of it, it is completely removed from the base using a hammer drill.
The surface of the base should be free of grease and oil stains, construction debris and dust. To ensure good adhesion, treatment with special primers is required. With their help, in addition to increasing the adhesion of the concrete mixture to the base, dust removal and strengthening of the top layer are achieved.
Padding
The surface is coated with deep penetration primers. This will improve adhesion, additionally remove dust, and bind the surface. The base will stop absorbing the moisture contained in the solution, which is important. If moisture escapes from the concrete mixture into the slab, this will cause incomplete maturation of the cement stone. The finished screed will begin to collapse and peel off even under the slightest load.
The selected primer composition is distributed over the slab in strips and spread evenly with short-haired rollers . If there are hard-to-reach areas, go over them with a brush. The primer is applied in 2-3 working approaches, observing the norms of layer-by-layer drying.
Waterproofing and insulation
In the case of waterproofing on the surface of the base, you can use both rolled materials and bitumen-based mastics. An inexpensive and reliable option would be polyethylene film with a thickness of 200 microns. It is laid on the prepared surface with an overlap of 10-15 cm, the seams should be secured together with tape.
The film should extend onto the walls above the top mark of the concrete screed. Particular attention is paid to the corners of the room. The film cannot be cut, but must be spread over the surface of the walls, secured with adhesive tape.
Natural and polymer insulation can be used as sound and heat insulating materials. These can be slabs of extruded, foamed polystyrene foam or high-density basalt stone wool. For their installation (depending on the material), various types of adhesives or polyurethane foam are used. The sheets are arranged staggered, without direct intersection of the longitudinal seams. The joints must be sealed with a sealing compound.
A layer of vapor barrier made of membrane or polyethylene film must be laid on top of the insulation. Its flooring is also overlapped with joints sealed and placed on the walls.
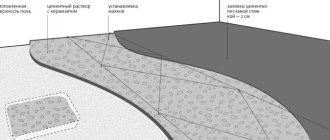
If you need to significantly raise the floor level in a room and at the same time perform heat or sound insulation work, there is no need to install a screed to the entire required height. You can fill the surface of the base with blast furnace slag or expanded clay to a certain height, and install a cement floor screed on top.
This will not only reduce the load on the floor slab, but also save on concrete consumption, since its cost is much higher than that of bulk materials.
Reinforcement of concrete screed and installation of beacons
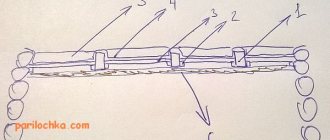
To increase the strength of the screed, a metal reinforcing mesh with a mesh of 10-15 cm and a rod diameter of 8-16 mm is used. It is laid on special beacon-clamps in such a way that there is a gap between the reinforcement and the base of at least 10-15 mm.
To reinforce thin screeds, a mesh made of fiberglass can be used. Installation of guides is carried out using a level or level. The starting point (zero) will be the threshold of the front door. A basic horizontal line is marked on the wall along the entire perimeter at an arbitrary height (1.2-1.5 m).
The distance from it to the zero mark is measured, and the thickness of the floor covering is added. This value is deposited along the entire perimeter from the base line, and it will be the top of the screed.
At a distance of 15-20 cm from the wall, a number of beacons are installed at a given mark. By stretching the threads between them along and across the room, you can transfer the height of the screed to the entire area and install beacons.
The guides for pouring the mixture are installed in such a way that concreting is carried out from the far wall to the front door. They are fixed using a rigid solution. As guides, you can use various types of profiles, including plaster, as well as pipes with a diameter of 30-50 mm or wooden beams, which must subsequently be removed and the grooves filled with concrete mixture.
Each guide is leveled according to the mark, both independently and in combination with others. The pitch of the guides should be 30-40 cm narrower than the rule that will be used to level the mixture.
Creation of formwork. Working with Guides
We lay the concrete floor in parts - cards. These are rectangular areas. Their parameters are determined by two factors:
- Total surface area.
- Possibility of filling the composition in one working cycle.
We place formwork along the perimeter of these areas to mark the finished floor. It is created from a 5 x 10 cm board. We pre-drill holes in the boards for reinforcing pins with a distance of 50 cm. We apply the formwork lines to the seam pattern.
We fill the floor in a new house along the guides. We can use them as:
- metal profiles,
- steel corners 5 x 5 x 0.3 cm,
- profile pipe 4 x 2 x 0.2 cm.
We mount the guides by welding to reinforcement posts with a diameter of 1.2 cm. To control the evenness, we use an optical level.
All areas where the surface is adjacent to the load-bearing components are covered with Izolon with a density of 4 mm. This is a damper tape based on polyethylene foam.
So we fill the floor in parts. Just before filling, we treat all profiles with engine oil. And we moisten the rough base with water.
Have questions ? Call!
Preparation of concrete mixture
To construct floors for laying sports surfaces, concrete of a class of at least B15 is required. For a significant amount of work, it is more advisable to use a factory-prepared mixture, but for a small room you can prepare the required volume yourself in a concrete mixer.
Having calculated the required amount of concrete mixture based on the area of the room and the average thickness, you need to stock up on cement, sand and crushed stone.
To prepare 1 m3 of concrete class B15 with mobility P3 it is necessary:
- cement M400 – 265 kg;
- crushed stone fraction 5-20 mm – 1170 kg;
- sand – 825 kg;
- water – 140 l.
After pre-mixing the dry components in a concrete mixer, add water to the mixture. Changing the water-cement ratio upward can lead to a loss of the design strength of concrete. In case of insufficient mobility of the mixture, it is necessary to use special plasticizer additives.
Creation of the working staff
This composition is not difficult to create. We dilute it in water strictly according to the instructions. Mix using a drill with a special attachment. This way we get a homogeneous composition.
A simple recipe for preparing a sand-cement mixture is as follows:
- 4 shares of perlite are used. Pour 2 parts of water on them.
- Add water and cement one part at a time to the solution. Mix.
- Add two parts of sand and 10 parts of water.
- Mix the mixture until it reaches a plastic consistency.
This option is good for use in a new private home. It is also often used on the lower floors of buildings with many floors. In an apartment it is also justified if a small layer of fill is created.
Pouring screed and caring for it
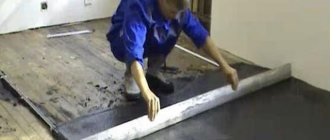
Laying the concrete screed begins from the far corner of the room. Having filled the gap between the guides with the mixture, it is leveled using the rule. To better fill all voids, it is necessary to initially lay the mixture slightly above the level of the guides (2-3 cm).
One of the main conditions in concrete floor screed technology is the removal of excess air from the laid mixture. To do this, “bayonet” or vibrate it before leveling.
To ensure the integrity of the base, it is necessary to fill the entire floor surface in one go. The presence of joints can reduce strength, which will affect further operation.
After pouring the screed, it is left to harden. After a day, you need to cover the surface with plastic film to prevent moisture evaporation. Over the next 3-4 days, it is necessary to additionally shed it with water. 100% strength gains occur after 4 weeks and if the screed has the required humidity, then laying sports linoleum is allowed.
Installation of concrete screed on wooden floors
It is not recommended to lay concrete screed on wooden floors, since the significant mass of the monolithic slab creates large loads on the base. At the same time, the moisture present in the mixture at the time of hardening can have a negative effect on the wood.
But there are cases when there is no alternative to this option, and a concrete screed on a wooden floor, boards, plywood or OSB is the only way out.
Floor screeding is prohibited on new wooden structures, as there is a high probability of large shrinkage deformations. This is especially true for floors made of joists and floorboards; at least 3-4 years of operation must pass for complete shrinkage of the wood. For plywood and OSB boards, this factor is not critical, since the material that has undergone special processing does not shrink.
Before laying the concrete mixture on a wooden base, all structures must be treated with antiseptic compounds. The decking must be removed and joists in need of repair replaced. If the structure is insufficiently reliable, it must be strengthened by installing additional beams.
The lag pitch should be 30-40 cm, this will ensure sufficient load-bearing capacity of the wooden base. After the decking is reinstalled, it is coated with a hydrophobic compound, and the gaps between the boards or plywood are sealed with a waterproof sealant.
Wood is capable of changing its geometric dimensions during operation when the humidity regime changes, and the concrete screed is practically stable. Therefore, the technology of pouring concrete on a wooden base is to create a dividing boundary between the layers - creating a “floating” floor. Otherwise, the mobility of the wooden flooring may lead to the destruction of the concrete screed.
To do this, the monolithic slab is cut off from the walls along the perimeter with a damper tape, and concrete and wood are separated with roofing felt, parchment or bitumen mastic, but it is better to make a layer of polyethylene film, since it has zero adhesion to concrete and the slab will “slide” freely over it.
The damper tape made of expanded polystyrene foam should be attached 2-3 cm above the level of the future screed; the excess is then removed by trimming and covered with a plinth. Polyethylene is laid with an overlap of 10-15 cm and extending onto the walls to the height of the damper tape. Thus, a waterproof “trough” is created on the surface of the wooden floor, into which the concrete mixture will be laid.
Accidental punctures of the waterproofing film should be avoided. If they form, they must be sealed with tape. Therefore, self-tapping structures cannot be used to install beacons.
To reduce the weight of a monolithic slab, it is recommended to use lightweight types of concrete with a specific gravity of 800-1200 kg/m3. With a screed thickness of 5 cm, the load per 1 m2 will be 40-60 kg.
These types include:
- slag concrete;
- pumice concrete;
- expanded clay concrete.
In addition, such compositions have significantly higher heat and sound insulation characteristics.
In the future, the technology for installing a concrete floor screed on a wooden base is similar to laying the mixture on floor slabs, with the exception of its reinforcement. To reduce the load on the wooden base, it is recommended to use polypropylene fiber or plastic mesh instead of reinforcement.
A floor screed reinforced in this way has less weight, but is not inferior in strength to bases with metal mesh. Additional layers of sound and heat insulation can be laid on wooden flooring. It is allowed to install a “warm floor” system.
When using the electric heating method, the wooden base must be treated with fire retardants. Caring for the concrete base during the hardening process also does not differ from the standard one.
Methods for checking screed before laying flooring
Since the main requirement for the base when laying sports flooring is its evenness, before starting work on linoleum flooring, all flaws on the surface of the screed are identified. Height differences of no more than 2 mm are allowed.
Control is carried out using a two-meter strip applied to the surface of the screed. The measurement is carried out in places of the largest gap between the support points of the rack using a graduated wedge.
If there are bulges and depressions on the surface of the screed that exceed the tolerance, they must be removed by grinding or sealing with repair compounds. Cracks wider than 0.4 mm must be expanded and sealed with epoxy resins.
Laying linoleum is allowed only after the screed has dried to 75% humidity. To measure it, carbide hygrometers, electronic moisture meters or laboratory analysis using a drying cabinet are used. But there is also a simple method without the use of special equipment.
It is enough to cover an area of about 1 m2 of screed with polyethylene, gluing the sheet along the edges. If after 24 hours no condensation has formed under the film or the screed has not changed its color, further work on laying linoleum is allowed.