In order for a bathhouse built on site to be warm, it is important to know how to make a floor screed correctly.
Concrete floor screed diagram.
In essence, a floor screed is a surface element of the base of a concrete floor on which the floor covering will subsequently be laid. The main purpose of the screed is to level the floor surface, give it strength and hardness, and also, if necessary, create floor slopes on the floors.
Depending on the type of floor covering, the screed can be one of the following types:
- screed on a wooden floor;
- screed with installation of a heating system;
- semi-dry screed;
- dry screed;
- concrete screed.
By the way, a concrete screed on a wooden floor is made according to the same principle as on a regular one . The only thing is that concrete mortar cannot be poured onto the wooden floor beams themselves, and therefore, before starting work, all wooden beams must be replaced with metal ones, and the base must be reinforced. In this article we will look at the two most common, in our opinion, types of bath screeds - concrete and dry. If decorating a bathhouse with your own hands is your option, then this article is just for you!
More about waterproofing
The service life of a bathhouse, the safety and comfort of staying in it largely depends on high-quality waterproofing.
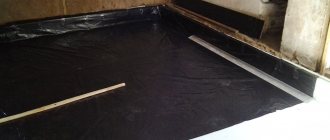
Traditional methods of floor waterproofing include coating and laying. We are talking about bitumen mastic, which is applied in several layers to the cleaned floor. A waterproofing coating and finishing are laid on top. This simple method provides excellent protection from moisture, but has its drawbacks. The height of the room decreases, as the floor level rises by an average of 5 cm. It is likely that the wooden cladding of the ceiling and floor will become saturated with a specific pungent bitumen odor.
Another traditional method of waterproofing is the use of glass roofing material, various polymer films, hydroglass insulation and other materials that are not afraid of moisture.
Waterproofing with polyethylene film
Often in baths they use penetrating waterproofing, which does not have the disadvantages of the above methods. We are talking about special waterproofing compounds that are applied over a cleaned and primed floor. As a result, a layer is formed that, after drying, reliably protects the surface from moisture.
Penetrating waterproofing is:
- concreting;
- polymer cement;
- cement inorganic;
- seamless.
Of all the varieties, the polymer-cement composition is suitable for use in a bath - environmentally friendly, durable, with excellent adhesion and seamless coating.
In a bathhouse with a wooden floor, the work of waterproofing the floor is firmly connected with the process of its thermal insulation. A floor without insulation will freeze, become covered with ice and release heat from the room. Therefore, heat-insulating material with fire-fighting properties is laid on the waterproofing layer (2-3 layers of roofing felt, for example or polyethylene film). Mineral wool is excellent for these purposes. A waterproofing layer is placed on top of the thermal insulation.
How to choose good mineral wool?
Why concrete floor?
The only drawback of a concrete floor on the ground is that it is very cold and requires insulation. In principle, two types of floors are used for a bath structure: wooden and concrete.
However, concrete floors are more suitable for installation on the ground. Judge for yourself, any wooden structure, even one made of moisture-resistant larch wood, will in any case be subject to constant exposure to moisture. Even if a special antiseptic impregnation protects the material from rot and decomposition, the wood will still absorb moisture, which will lead to a persistent and unpleasant odor in the room. In addition, it is better to lay the logs not on the ground, but attach them at a short distance from it to the base frame. Concrete flooring is the best option, since such structures have many advantages:
How to insulate the floor in a frame bath?
- strength and reliability;
- if the floor was poured according to all the rules, the structure will last a very long time;
- a heating system can be installed in the concrete floor layer;
- the design has good moisture resistance;
- The versatility of the concrete base allows you to lay any flooring in the bathhouse that is suitable for the operating conditions, for example, porcelain stoneware or tiles, wooden flooring made of moisture-resistant larch or oak.
The only downside to concrete flooring is that it is very cold, but this can be easily dealt with. It is enough to make high-quality floor insulation. There are many different options and materials for this. For example, insulation can be done with polystyrene foam. In addition, a heated floor system will perfectly cope with the problem of cold surfaces.
Bathhouse projects
Number of projects 681
- 2 rooms
- 1 bathroom
Project AS-2000-9
To favorites
65.7² Total area
from 886,950 rub. Construction time individually
- 2 rooms
- 2 bathrooms
Luxor Bath Project
To favorites
- 77.7² Total area
- 11 x 10m Construction area
from 1,233,000 rub. Construction time individually
Bathhouse project “Slavyanka”
To favorites
- 15² Total area
- 3 x 5m Building area
from RUR 292,294 Construction time individually
- 1 room
- 2 bathrooms
Bathhouse project No. 15067
To favorites
- 140² Total area
- 14 x 14m Construction area
from RUR 4,615,596 Construction time individually
- 1 room
- 2 bathrooms
Bani Toliman project
To favorites
- 40.5² Total area
- 8 x 7m Construction area
from 546,750 rub. Construction time individually
- 1 room
- 2 bathrooms
Bani Country Project
To favorites
- 50.5² Total area
- 12 x 7m Construction area
from 681,750 rub. Construction time individually
1 room
Project Baths Actaeon 8*11.2
To favorites
- 75² Total area
- 11 x 8m Construction area
from 952,450 rub. Construction time individually
Bathhouse project 5x4m with veranda
To favorites
5 x 4m Building area
from 290,000 rub. Construction time individually
- 2 rooms
- 4 bathrooms
Corner Baths Project
To favorites
- 226² Total area
- 20 x 17m Construction area
from 4,062,600 rub. Construction time individually
- 2 rooms
- 1 bathroom
Log bathhouse project BO-043
To favorites
- 76² Total area
- 7 x 8m Construction area
from 1,026,000 rub. Construction time individually
- 1 room
- 1 bathroom
Bathhouse project Chistye Prudy
To favorites
- 82² Total area
- 20 x 9m Construction area
from 1,069,620 rub. Construction time individually
- 1 room
- 1 bathroom
Project Baths on the Pebbles
To favorites
- 31.6² Total area
- 6 x 6m Construction area
from 426,600 rub. Construction time individually
- 1 room
- 1 bathroom
Project AS-2002-14
To favorites
76² Total area
from 1,026,000 rub. Construction time individually
Log bathhouse project BO-007
To favorites
- 21² Total area
- 4 x 6m Building area
from 283,500 rub. Construction time individually
- 1 room
- 1 bathroom
Bani B-13 project
To favorites
5 x 6m Construction area
from 452,000 rub. Construction time individually
- 1 room
- 1 bathroom
Bath Parnushka project
To favorites
- 23² Total area
- 5 x 6m Construction area
from 310,500 rub. Construction time individually
- 2 rooms
- 1 bathroom
Bathhouse project No. 25-4
To favorites
- 26.5² Total area
- 6 x 6m Construction area
from RUB 357,750 Construction time individually
Barrel sauna project “Standard”
To favorites
2 x 4m Building area
from 149,900 rub. Construction time individually
- 1 room
- 1 bathroom
Project of log bathhouse 6x4 m
To favorites
- 36² Total area
- 6 x 4m Construction area
from 199,000 rub. Construction time individually
- 1 room
- 1 bathroom
Project AS-2000-6
To favorites
48.4² Total area
from 653,400 rub. Construction time individually
View all projects
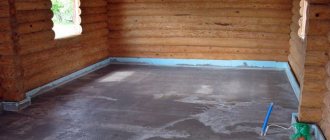
Many owners of country houses are thinking about building a bathhouse on their site. If you are one of those, find out in advance how to fill the floor in the bathhouse so that it can withstand harsh operating conditions
Attention should be paid not only to the order of work, but also to the requirements for the materials used. This will allow you to avoid typical mistakes and achieve high performance characteristics of the formed base.
The floor of the bathhouse must be filled in compliance with technological requirements Source twimg.com
Self-filling - simple rules
Having weighed all the pros and cons, have you come to the conclusion that you can arrange the floors in the bathhouse yourself? Absolutely right! The technology for pouring a floor is not complicated; any technically competent person can master it. Follow the recipe, the sequence of preparing solutions and carrying out construction activities. We have no doubt - you will succeed! We offer the following sequence of work to ensure that the final filling of the floor in the bathhouse is completed quickly and efficiently:
- First, carefully calculate the required amount of cement and sand for the screed. Construction reference books will help you with this. Purchase materials, prepare tools.
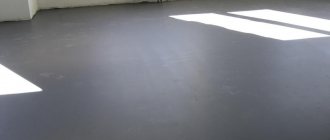
- Decide on the decorative coating of the base. When using tiles, use a self-leveling solution. It quickly acquires operational strength and has a smoother surface compared to concrete screed.
The technology for pouring floor screed in a bathhouse, in general, is no different; it is quite simple and accessible
These are simple recommendations for filling the floor in a bathhouse.
Installation of a water floor heating system
If we are talking about how to make a warm water floor in a bathhouse, then the fundamental criteria for the installation method are the technical characteristics of the base on which the installation is carried out, as well as the wishes of the owner.
There are two main installation methods:
- concrete type, which involves pouring a screed over the laid heating circuit. In fact, the installation technology is similar to that used when installing an electric heating system. The difference lies in the greater thickness of the screed due to the significant diameter of the pipes used;
- the floor type involves laying the heating circuit on top of polystyrene foam boards or wooden flooring. It is used in cases where the foundation or wooden base does not have sufficient strength to withstand a massive cement-sand screed.
The most common option is to pour the screed, but it has one significant drawback, which is that the solution takes an excessively long time to harden. As for water heating, its distinctive feature is its absolute resistance to overheating.
This allows the heating circuit lines to be laid with almost any interval between the lines. However, it is worth understanding that if the gaps between the lines are too small, the total length of the circuit will increase, which will lead to a decrease in its efficiency. The optimal value is considered to be a step of 40 centimeters.
As in the case of an energy cable, sharp bends and creases in the circuit should not be allowed. The contour is secured with clamps and dowels. You can also use reinforced mesh, to which the pipes are easily wound with wire. A more massive reinforced mesh must be laid under the heating circuit than in the case of an energy cable.
On the modern construction market you can find polystyrene foam boards with already prepared clamps, along which all that remains is to lay the elements of the heating system. In this case, the fastening method is simultaneously combined with thermal insulation of the floors.
conclusions
From all of the above, a number of conclusions can be drawn. It is worth noting the fact that there are no special rules regarding the use of a particular heating system in a bathhouse.
Emphasis can be placed on a number of features of the process of arranging underfloor heating:
- Infrared film systems with the simplest installation and operation scheme are leaders in this issue;
- An electric floor differs from an infrared floor in the complexity of installation and increased power, which is counterbalanced by the high cost of consumed electrical energy;
- water floors are intended for the most economical owners, but they must understand in advance that during installation the height of the room will be significantly reduced, and they will also have to solve the problem of connecting the system to an autonomous heating installation or a centralized system. Aesthetically, this system is also the most ugliest, since the photo and visual inspection show the intricacies of pipelines and other elements necessary for the functioning of water floor heating.
Of course, it is possible to combine different types of underfloor heating, which will create a single heating system. The installation method and scheme is the personal choice of the owner, which he can make based on the information presented in the article, or by contacting specialists. The latter can help with installation, taking responsibility for all stages - from purchasing the necessary materials to putting the system into operation.
Useful advice from experts
To increase the strength of a concrete floor, you can pour an additional layer of cement-sand screed on top of it. This will level the surface of the base, best preparing it for laying the finishing coating.
You can begin finishing work only after the concrete has sufficiently dried. In the case of laying ceramic tiles, this period is 4-7 days.
If the final finishing of the concrete floor in the bathhouse will be done with ceramic tiles, be sure to first make a screed to level the base. It is most convenient to use ready-made solutions. It is important that the screed is as strong and uniform as possible. The presence of chips and cracks is unacceptable.
Pouring concrete is a relatively inexpensive and quick method of arranging a high-quality floor. Follow the instructions and everything will definitely work out. Good luck!
Features of a wooden floor
Despite certain difficulties, ceramic tiles can be laid on a wooden floor in a bathhouse.
Taking this into account, when deciding how to make a tiled floor in a bathhouse when it is made of wood, it is necessary to ensure the following conditions: eliminating mobility, i.e. strengthening the subfloor and leveling the surface.
The most common method of laying tiles is considered to be “dry”
When preparing a wooden base for laying tile coverings, the following basic technologies are used:
1. “Dry” method. It is considered the most common and is based on installing sheet material on top of a wooden floor. It can be used as waterproof plywood, OSB, gypsum board. It is not recommended to use chipboard in a steam room, because its impregnating composition contains harmful substances that are released when heated. Before laying the sheets, it is necessary to strengthen the base as much as possible, i.e. if necessary, replace the logs and install additional support posts. Reliable waterproofing must be provided on top of the rough structure. The most common way to make it is to apply a layer of bitumen and lay down roofing felt. The seams between the sheets of coating are sealed with sealant and then carefully sanded. They are fastened to the base using self-tapping screws, and their caps must be recessed. The surface of the sheet covering is coated with a primer that will ensure reliable adhesion to the adhesive and tiles. When installing the floor, you should not forget about the thermal insulation that is placed between the joists. It is made of expanded clay, mineral wool or other heat-insulating modern materials.
When installing the floor, do not forget about thermal insulation
2. “Wet” method. In this case, a concrete floor screed is carried out in the bathhouse under the tiles on top of a wooden base. It is carried out with a special solution, and the thickness of the poured layer is 3-5 cm. The wooden base may not withstand a thicker layer. A damper gap of 1-2 cm wide must be left along the perimeter of the floor along the walls. The floor is made in this order. Waterproofing is laid on a rough wooden base in the form of a layer of bitumen, roofing felt, paraffin paper or thickened polyethylene film. The edges of the insulation are placed on the walls to a height of 10-12 cm and secured using a furniture stapler. A damper tape about 10 cm wide is fixed along the walls. A reinforcing metal mesh is laid on top. Filling is best done with a ready-made leveling mixture, but you can prepare a leveling solution yourself. To do this, mix liquid glass and sand with water in a ratio of 2:2:1.
3. Express technology. Sometimes a simpler technique is used, which consists of gluing sheets of plasterboard with increased water resistance to the surface of a wooden plank floor. As a rule, polyurethane glue is used, and the sheets are applied in 2 layers.
Before constructing a concrete floor, the drainage system must be carefully thought out
Screed care
After the screed is poured, make sure it dries. It is necessary to catch the moment of initial solidification, when the beacons can already be pulled out. Hardening time will depend on temperature. When you can stand on the screed, you should fill in the strips in which the beacons were located. Full load on the screed is allowed no earlier than after a week, or better, if you have time, after three. During the drying period, it is necessary to moisten the screed regularly (at least 2 times a day) to avoid cracking.
Wetting the floor screed during the drying period
The floor is ready, what's next?
After the floor has been prepared, you need to take care of its beauty and convenience. We are talking about direct coating of the concrete screed.
Most often, ceramic tiles are used in sinks and showers.
Video:
Metlakhskaya is well suited for a bath due to its performance qualities. How is it laid?
Dry cement is applied to our still concrete floor, half a kilogram per square meter, and the tiles are applied directly to it by pressing.
It is better to seal the seams between the tiles after two days.
If you still choose this option, then you can put wooden canopies or polymer mats on the floor.
The latter will need to be dried after each use to avoid the spread of bacteria.
Synthetic materials: linoleum, laminate - it is also better not to use.
Video:
Why? Because at high temperatures they can begin to release toxic substances, as well as swell and become very hot.
The bathhouse is designed to improve health, and not contribute to its deterioration, so you should not do this.
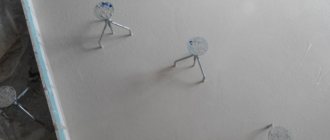
Installation of beacons or guides
In order to make the floor as level as possible, guide rails are used, or, as they are also called, beacons. These are wooden or metal strips that are installed on the base so that their upper part coincides with the found zero mark.
Special beacons can be bought in construction stores
What are lighthouses made of?
As guides, you can use straight pipes or special flat metal with perforated edges. They are sold in specialized stores and are called “beacons”.
It is not recommended to use wooden slats: they absorb moisture from the solution, which negatively affects the strength of concrete. In addition, wood can become deformed from moisture, which can cause height differences when leveling the screed.
How and on what to lay
The guides are laid along the walls perpendicular to the one in which the door is located. The distance between them should not exceed the size of the rule used: it slides along the guides, leveling the laid out solution. When leveling the solution, it will need to be moved from side to side, so leave another 10-20 cm in reserve (with a rule length of 150 cm, place the guides every 110-120 cm).
Place the beacons on the floor at the required distance, prepare materials that will serve to level them. The selected slats must be installed at the same level so that their top coincides with the found zero level. To do this, some materials are placed under the slats.
Some people use broken bricks, others use plastic or metal plates. It is not recommended to use cardboard, plywood, or pieces of wood due to the moisture content in the solution, which leads to deformation of these materials. Once saturated with moisture, they can change thickness, which will cause distortion. The distance between the fasteners should be such that the beacons or guides do not “walk” or sag.
Guides/beacons are laid out along the walls
When using special beacons for screeds, they can be leveled using dowels. They fit perfectly into the existing ledge. In the necessary places, drill holes in the base and insert self-tapping screws. Rotate them to set the required height.
You can use the “old-fashioned” method. “Spots” of solution (thick) are placed at some distance. By pressing or installing additional plates, align the planks to the zero mark (using a building level) and give time for the solution to “set.”
To level the beacons, you can use spots of thick mortar
The floor in the steam room and washing room should have a slope that will direct water to the drain - take this into account when installing beacons. Can be oriented along the top of the water seal.
Making a rough foundation with your own hands
Scheme of an insulated concrete screed on the ground for a bathhouse
In both options for the finishing floor covering (whether wood or tile), the first step is to create a rough screed that would become a reliable, durable basis for the structural elements of the floor that will be located above. Therefore, the step-by-step instructions below apply in both cases. To carry out the work you will need the following tools:
- concrete mixer or container for manual mixing of concrete;
- manual or mechanical tamping;
- water (laser level);
- rule;
- trowel or trowel;
- tools for excavation work.
The following materials should be prepared:
- large crushed stone (gravel);
- fine crushed stone (fraction 1-1.5 cm);
- river (washed) sand;
- cement grade 400;
- dense polyethylene film.
Now about the sequence of installing a rough subfloor on the ground.
- The surface soil layers are carefully compacted and leveled.
- Adding is done. First a layer of gravel, then half crushed stone with sand. With a proposed insulation thickness of 50 mm, the top layer of fine bedding should be 15-17 cm below the desired level of the finishing screed.
- The fine bedding is leveled, a polyethylene film is laid on top with an overlap on the walls to the level of the upper edge of the finished base. If the film is not continuous, adjacent areas overlap by about 15 cm. The film will serve as a water barrier in the path of ground moisture, and will also prevent moisture from leaving the concrete.
- Concrete is being prepared. For rough screed, you can use a solution with a reduced content of the binder component. Therefore, a proportion of 4:4:1, where, respectively, fine crushed stone, sand and Portland cement M-400, will be quite acceptable for these purposes.
- The rough screed does not imply perfect leveling of the surface, so it is not necessary to install beacons here. But it is advisable to draw a horizontal line along the perimeter of the walls using a water or laser level and some kind of marker. The smoother the surface, the easier it will be to lay insulation or install joists under wooden flooring. The prepared concrete is poured starting from the wall farthest from the entrance to the room and leveled first with a trowel and then with a rule.
Tools and materials for work:
- Rule and trowel;
- Beacons for forming a slope and thread;
- Tape measure, ruler and level for measurements;
- Buckets with strong handles (which you don’t mind), a shovel;
- Tool for compacting the “pillow” (vibrating plate, etc.);
- A hammer drill with a special attachment or a construction mixer;
- Concrete mixer (and if it is not there, then a container in which the solution will be mixed). Or, as an option, purchase ready-made mortar from a concrete unit.
As for materials, taking into account the specifics of each individual bathhouse, their selection and proportions will depend on the current conditions and construction requirements. The installation of bath floors is usually done on the ground or logs. In addition, the installation of thermal insulation must be provided.
Required materials for an insulated concrete floor with a drain:
- To prepare a concrete solution you will need: cement, sand and clean water. As an option - ready-made mixtures or imported solution;
- Crushed stone or gravel (not small) to prepare the base cushion;
- Additives and plasticizers for concrete. They are necessary to increase strength and resistance to moisture;
- Ruberoid or waterproofing film (thickness more than 200 microns) and bitumen mastic;
- Insulation material*.
*In terms of performance properties, the optimal choice would be penoplex (technoplex), with a thickness of 30 to 50 mm and a density of at least 35 kg/cm². You can make insulation with polystyrene foam (however, here you already need a thickness of 50-100 mm), or expanded clay with a thickness of 150 mm. But mineral wool is an impractical material
for bath concrete floor;
- Reinforcing mesh with cell size from 50×50 to 80×80. A section of 3-4 mm is sufficient. It can be metal or polymer. And to it, knitting wire or clamps;
- Suitable drainage elements (drain, pipe, valves, etc.)
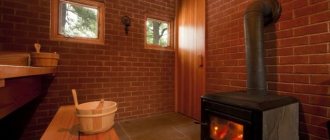
Features of the floor in the bath
In the bathhouse, special operating conditions are created for finishing materials, more extreme than in a regular bathroom. This is especially true for the steam room, where the floor and wall coverings are exposed to the following aggressive influences:
- pouring water;
- superheated steam condensate;
- high temperature (up to 70 degrees) and its changes;
- mechanical influences.
Indoors, washing tiles are appropriate not only on the floor, but also on the walls
Floor coverings for use in such conditions must meet increased requirements regarding resistance to water, steam, high temperatures, wear and possible mechanical stress. Therefore, ceramic floor tiles will be an excellent choice, as they can withstand this type of impact for a long time.
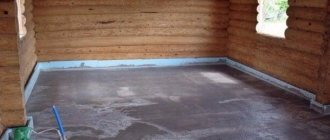
A traditional bathhouse is built from a log house, so the subfloor is wooden, but with proper preparation, it will become a reliable base for tiles. Concrete screed is best suited for tiles, as it allows you to create a perfectly level base. How to correctly lay tiles on a wooden floor, read here.
The shower room in the bathhouse can be completely decorated with tiles, choosing a pattern that imitates natural stone
Preparation of the solution
To make a screed, you can use a mixture of cement and sand you prepare yourself, or buy one of the ready-made compounds. When using ready-made mixtures, dilute it in strict accordance with the instructions. This will guarantee its high reliability.
Ready-made dry mixture for floor screed “Diola D-342”
Materials for screed
The proportions of sand and cement depend on the brand of cement and the required characteristics of the concrete. Below is a table that lists them.
| Cement brand | Proportion | Brand of solution |
| 600 | 1:3 | M300 |
| 600 | 1:4 | M200 |
| 500 | 1:2 | M300 |
| 500 | 1:3 | M200 |
| 400 | 1:1 | M300 |
| 400 | 1:3 | M150 |
| 300 | 1:1 | M200 |
| 300 | 1:3 | M100 |
Now about the purpose of the grades of solution and their scope of application:
- M100 is used to create rough screeds, as well as for cushioning under blocks;
- M150 - for the production of concrete foundation blocks of the FBS type;
- M200 - most often used in private housing construction, used for pouring foundations, screeds in heated rooms, etc.
- M250 - for severe operating conditions - for fences, paths, etc.;
- M300 - has water-repellent and frost-resistant properties, therefore it is most widely used: from pouring foundations to installing repair support systems (when repairing foundations);
- M350 - for creating beams and load-bearing walls in multi-story construction;
- M400 and higher are used to create heavy-duty structures.
Below is a table showing the proportions of concrete using two aggregates: sand and crushed stone. Perhaps someone will want to use such concrete.
Table of aggregate amounts for different grades of concrete
A typical mistake in concrete work is exceeding the recommended proportion of cement. Its quantity is increased in the hope that the concrete will become stronger. The result is the opposite: it cracks, crumbles and quickly collapses. This happens due to the fact that it did not have enough aggregate and/or water to gain normal strength. Therefore, the recommended standards should not be changed.
How to mix
If you want to use a regular mixture of cement and sand, then to screed the floor, take 1 part of cement (400 grade) and 3 parts of construction sand. First, dry sand and cement are mixed until a uniform color is obtained. Then pour water into the container (0.5 part water per 1 part cement or 1 liter per 5 kg of mixture), add the mixture, stirring thoroughly (with a trowel or shovel - depending on the volume).
For small volumes, to obtain a homogeneous composition, you can use a construction mixer or drill with an appropriate attachment; for large volumes, you will need a concrete mixer. Mechanized mixing is necessary according to technology: this is the only way to achieve uniform distribution of all components.
The strength of concrete made using a concrete mixer or mixer is 50% higher than concrete for which the rasters were mixed using a shovel.
As a result, the solution should have a uniform structure and the same color. After finishing mixing, you need to let the composition stand for a while, then knead it again with a mixer.
To obtain a homogeneous solution, use a construction mixer or drill with an appropriate attachment
You can check the thickness by taking a little solution in your hand and clenching your fist. After the hand is unclenched, the solution remains in the lump - it does not flow or crumble. If you pour the solution onto the floor, it should spread, but not run. This consistency is ideal.
Exposing the prepared solution to air for a long time is undesirable. Ideally, as soon as one part has been used, the next one should be ready. This is achievable with the help of an assistant. While one is leveling one portion according to the beacons, the second is preparing a new one. This way the screed will be strong and uniform.
Installation methods
Pouring the concrete base in a bathhouse is done in different ways. The choice of method depends on the characteristics of the soil on the site, the qualifications, experience and knowledge of the master, and the financial capabilities of the owner. Experts know how to fill the floor in a bathhouse with a slope, under the drain, so that there are no difficulties during operation. They will ensure the formation of a surface with the correct geometry, ensuring timely removal of moisture under the influence of gravity. The amount of slope is regulated by regulatory requirements.
Installation directly on the ground
Installation work begins with the excavation of a certain volume of soil. To do this, a layer is removed from the area where the base is to be formed, the average thickness of which is 40 - 50 cm. After this, a sand and gravel cushion is arranged, the thickness of which can reach 60 cm. The filled layer of sand and gravel is carefully compacted to ensure sufficient density and foundation strength. Pouring the solution begins after complete and thorough preparation of the base, ensuring its compliance with regulatory requirements.
The screed is poured in 1 - 2 layers depending on the desired thickness. Work is being carried out on waterproofing and insulating the concrete base due to its high thermal conductivity.
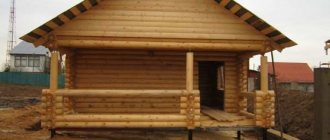
One of the options for installing a bath floorSource logvinov.net
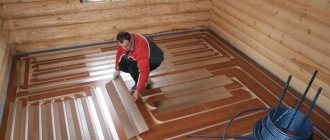
Filling along logs
This method of installing a concrete screed is suitable for those who plan to use the bathhouse all year round or the site is located in a region with a fairly harsh climate. The technology for performing the work is somewhat different. It is possible to create a ventilated underground without installing an additional ventilation system in the screed itself. To carry out installation work, additional financial influence will be required. The finished coating will be quite durable and reliable.
To make logs, a beam with a side of 10–20 cm is used. It is placed on the base, forming a kind of wooden mesh, the cell size of which is selected individually. Subfloor boards are laid on top. After installing thermal and waterproofing, the concrete mixture is poured. A metal mesh is used to reinforce the concrete base.
The finished structure will not have a drainage hole. The outflow of water will be carried out into a special pit designed to collect it, and a drain, which will allow moisture to be removed outside the building. Thanks to the ventilated basement space, you can eliminate the need for a pillow.
Logs create a ventilated facadeSource vanna-prosto.ru
A water drainage system is a must!
There is always water in the bathhouse, and in large quantities. Therefore, you need to think over a system that will effectively remove it. Water removal is carried out by arranging drainage and ensuring a certain slope of the floor base.
If the soil in the area where the bathhouse is being built is clayey, you need to dig a small ditch under the foundation of the building, lay pipes in it and drain the latter into the gutter. It is advisable to line the walls of the ditch with tiles or concrete, and cover the ditch on top with a metal grating. Be sure to install a special valve at the end of the last pipe designed to drain water. Then there will be no unpleasant odors in your bathhouse.
Exiting the bathhouse pipe into the gutter
When the soil under the building absorbs water well (for example, sandy soil), it is necessary to dig a special drainage hole under the bathhouse. Its dimensions are 0.5x0.5–1x1 m, and its depth is 0.7–1 m. The pit must be filled with construction sand, broken stone or brick, and large crushed stone. In this case, the backfill is done so that it does not interfere with the water flowing calmly into the drainage structure.
In the base of the pit, make several vents (they are called vents), which will ensure the through passage of air masses. Essentially, you will make a simple ventilation system with your own hands. Believe me, she will cope well with the task assigned to ventilation. But it is better to dig a drainage hole away from the bathhouse. Then you need to run a pipeline to it according to the diagram described above.
Note. The discussed options for arranging a pit for drainage and water collection are used in situations where the concrete floor base is raised above the soil. If you plan to pour the floor directly onto the ground, you should immediately embed the sewer pipes into the concrete screed.
Arrangement of the pillow
Diagram of the installation of an insulated concrete screed with reinforcement on the ground In order for the concrete base to retain heat better, when backfilling the mineral cushion in the ground, a depression of 0.5 m is made, of which 0.3 m will be used for backfilling coarse-grained materials:
- broken brick;
- granular gravel;
- large crushed stone.
After this, the filled materials are thoroughly compacted, and the entire perimeter of the future bathhouse is coated with a clay composition. Then you need to lay a small layer of shock absorber. For these purposes, sand with fine gravel or crushed stone is used. The height of the shock-absorbing layer should be no higher than 15-17 cm. Why is it even needed?
Primer
After the beacons are fixed, the solution on the stains has hardened a little, the base can be primed. This will improve the adhesion of concrete to the base.
The primer is poured onto the base, then spread over the surface with a roller or wide brush.
If the solution will be laid on a waterproofing film, before installing the beacons, carefully seal all joints and check the entire surface for holes and openings. In this case, the use of dowels is impossible - the tightness is broken, and all work on installing beacons and laying the solution will need to be carried out carefully, without damaging the integrity of the film.
Insulation materials
In general, the floor in a bathhouse can be insulated with any insulation material. There are rooms with different operating modes and the floor structure may be different. Let's look at the most common materials that can be used to insulate a bath.
- Foam glass (foam glass). Not to say that it is widespread, but it is an ideal option in all respects for any room. Foam glass does not get wet, is not afraid of moisture, frost, can withstand temperatures up to 100°C without problems, does not emit anything, does not burn, does not support combustion. It, like ordinary glass, melts at a very high temperature and does not emit anything. It has very good thermal insulation characteristics; a small layer is needed to achieve the required degree of protection. The material has low vapor permeability and this must be kept in mind when choosing a floor design. There is only one drawback - the price. Foam glass comes in the form of blocks, granules, and you can also find scraps. The most expensive blocks are (about $350 per cube), the cheapest are scraps (about $40 per cube). Blocks can be placed between the logs, granules and trimmings can be used as backfill. This is a much more effective (but also more expensive) replacement for expanded clay.
New technologies bring new materials. For example, foam glass is almost ideal as insulation - Expanded polystyrene (not foam). The best option is extruded polystyrene foam. It can be placed in the screed or between the joists. It has excellent thermal insulation properties and does not absorb water (or rather, it does, but in a very small amount). Up to a temperature of 95°C it is environmentally safe, but above that it begins to release not the most beneficial substances. In relation to floor insulation in a bathhouse, it can be installed in any room. The floor is not walls and it simply has no chance of heating above 40°C. But polystyrene foam is flammable and vapor-proof. That is, good ventilation is needed.
How to insulate floors in a bathhouse and with what depends on how you are going to make them - Mineral wool.
- Stone wool can only be used in dry rooms. She will work great here. It is better to insulate the floor in a bathhouse using a different material. If you want mineral wool, look at glass wool. The humidity in the bathhouse is still high. If wet stone wool freezes, it does not restore its properties after freezing, but immediately loses them by 40%. So after two frosts there will be nothing left. Just rubbish that doesn't affect anything at all.
Glass wool is very itchy, but is not afraid of moisture, which is very important in a bathhouse
Working with glass wool is difficult and difficult. It pricks even through overalls. But she is not afraid of getting wet. It also slightly reduces its properties when wet, but after drying the characteristics remain almost unchanged.
From old memory, many still remember such insulation as expanded clay. Until there was an alternative, it could still be considered insulation. Now, to replace a layer of mineral wool with a thickness of, for example, 8 cm, you need to pour 40 cm of expanded clay. Yes, it is cheap, but it is afraid of water, which makes it completely unattractive.