If you have a private house, then sooner or later the desire to build a bathhouse matures.
To carry out its construction, you must have certain knowledge and skills. Particular attention should be paid to creating a ceiling that should not get wet from abundant hot steam and retain heat well. To make a ceiling in a bathhouse, you need to choose the right materials and perform all the work efficiently.
How to do
The above does not exhaust the issues related to waterproofing. But a complete coverage of the topic is hardly possible. Let's look at a couple more questions that are often asked.
How to make a frame bath
If you are making a frame bathhouse with mineral wool insulation, then there is a high probability that you will use the same mineral wool to insulate the floor. And mineral wool differs from extruded polystyrene foam, which was mentioned above, in that it requires protection from moisture. Those, in fact, don’t like it.
In general, polystyrene foam should not be used in a bathhouse, but if it is in the floor and under a concrete screed, it is completely fireproof. But in a frame bathhouse, the floors are often made on joists and stilts.
The video below shows an option on how to cover a floor with slate sheets. But it's your choice. We are talking about waterproofing the floor in a frame bath.
So, it’s correct to make the layer at the very bottom from a one-sided waterproofing membrane, which releases water vapor from the insulation to the outside, but not to the inside. And on top the insulation is covered with a vapor barrier, which does not allow anything to pass through at all - neither steam nor water. These are two layers of waterproofing designed solely to preserve the mineral wool.
Then you can do it as in the video - before laying the tiles, cover the subfloor (in essence, slate simply replaced the concrete screed) with mastic waterproofing for bathrooms, and then lay the tiles on the mastic. Why do we consider the use of mastic justified here? Because below is mineral wool.
How to make a sauna on stilts
The technology for creating a subfloor in a bathhouse on stilts does not differ from that described above, but you can vary the materials used. In particular, watch the video in which instead of slate and instead of concrete screed, OSB sheets were used, on top of which heated bitumen mastic was used as glue, and sheets of galvanized iron were glued onto it.
The floor above this iron is torrential. Mastic was used not only as waterproofing, but also as a material that prevents metal sheets from rattling when water pours on them. If there are no voids on the reverse side of the iron, it behaves quietly.
Here is an option for how to waterproof the floor in a bathhouse on stilts.
It is clear that the option is not the only one, that everyone chooses according to their tastes and finances. The floor can be poured or not poured, with tiles or without tiles.
In principle, the blue waterproofing from the previous video is enough to make concrete or slate waterproof so much that you don’t have to lay tiles on top, but make a pourable floor on top (so as not to wash off the mastic with your feet).
***
Ceiling construction technology
The construction of different types of ceilings differs significantly in installation technology. But some points are mandatory in any case.
- Before you start installing the ceiling in a Russian bathhouse, you should thoroughly treat the floor beams with special protective compounds.
- Next, you need to take the dimensions of the entire room. This will make it possible to calculate all the required materials. It is better to buy them with a reserve, as there will always be waste.
- At this stage you can also check how perpendicular the walls are to each other. 90° is ideal, but this is not always the case. If the deviations are small, they can be corrected by shifting the materials during cladding.
- Next, you need to check the position of the wooden floor beams. When the rope is pulled between the extreme elements, all differences in the height of the lower planes will be clearly visible. Deviations of 0.5 cm between adjacent parts definitely need to be equalized. You can fill the slats, or adjust everything with a plane. If the problem is not corrected in time, it will become even worse when finishing the ceiling surface.
- It is necessary to measure the distance from the edge of the chimney to the floor beams. It must be at least 20 cm. If the distance is less than required and it is not possible to remake the chimney, then careful impregnation of the wooden beam elements with special fire-retardant compounds is required.
Ways to protect wood from fire
Advice: do not skimp on the quality of protective materials. Saunas burn very often and this happens very quickly. Take care of safety in advance.
- It is necessary to make a frame of wooden blocks around the chimney structure. They are fixed with nails or self-tapping screws. A layer of mineral wool must be laid between the surface of the exhaust system and the bars. It will protect the tree from open fire.
Further actions depend on the type of ceiling structure being installed.
Installation of suspended wooden ceilings
How to make a suspended ceiling in a bathhouse?
After the preparatory work described above, you can proceed to the actual installation of the structure:
- At the initial stage, it is necessary to install a vapor barrier layer. The ceiling vapor barrier must be laid with an overlap on the material. It is 10-20 cm and is performed without breaks. The sheets are also stacked overlapping each other. Aluminum foil is placed shiny side down. The vapor barrier is attached to the beams using a stapler.
- The two layers are fixed together with special adhesive tape. If polyethylene film is used, it must not be brought into contact with the chimney structure. In this place it is recommended to lay foil materials.
Important! A vapor barrier must be installed underneath the floor beams to protect them from moisture.
Improper installation of vapor barrier
- If the dimensions of the walls do not require adjustment, then all the cladding material can be immediately cut into pieces of the required length. Otherwise, you should cut off each element only after installing the previous one. It is recommended to make the length of the boards 1-2 cm less than the size between the walls. The gaps will subsequently be covered with skirting boards.
- Small deviations in the dimensions of the walls can be corrected by shifting the board elements relative to each other. If the walls are significantly non-perpendicular, the last board will have to be sawn off at an angle. It is better to place it in the least visible place, for example, behind the chimney.
Tip: when gradually moving the lining, constantly check the position of the entire structure so as not to overdo it with alignment. A shift in the connection of the boards by 1 mm through ten elements will give a shift of the entire structure by 1 cm.
To align the non-parallelism of the walls, the parts are shifted relative to each other
Covering the ceiling surface with clapboard is carried out in several ways:
- The elements are fixed to the beams with nails no more than 2 cm long in a secret way through the surface of the groove.
- In the second case, galvanized or decorative nails are driven directly into the surface of the board. To do this, they must be 4-5 cm long.
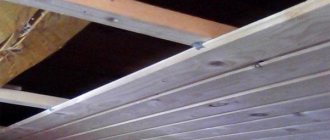
- You can also fix parts using self-tapping screws. The sheathing must be fixed close to the vapor barrier layer, without gaps.
- But it is best to use galvanized steel clamps.
Secret fastening of the lining
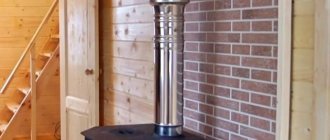
- After lining the lower surface of the ceiling system, it is necessary to decorate the space around the chimney, if any. A metal structure for a pipe is inserted into the prepared box, which is attached to the ceiling. It is made of ordinary steel, galvanized or stainless steel.
Metal chimney lining
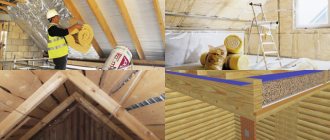
- Now you can insulate the entire ceiling structure. Roll insulation is laid using strips of mineral wool. Its width is taken 2 cm greater than the distance between the beams. The materials are placed very tightly between the beam parts. There should be no gaps. In the case of using bulk insulation, preliminary formwork is required.
Laying insulation between beams
- The top of the insulation must be covered with waterproofing to prevent water from entering in the event of a roof leak. The best solution would be to use membrane materials. The waterproofing layer is fixed to the floor beams using a stapler with staples.
- Next, you can lay the floor of the attic. It is made from unedged boards or various waste plywood, fiberboard, chipboard. If you plan to create a full-fledged room under the roof, then laying a finished floor is required. The second option when constructing sheathed structures is used much more often.
An interesting option for a hemming system with built-in lamps in the dressing room
A slightly different procedure for installing flat ceilings.
Installation of flat ceiling structures
This method has been used in bathhouses since ancient times. Previously, quite often the installation of a ceiling in a bathhouse was carried out using ordinary hewn logs. The powerful structure did not require additional insulation.
Currently, this is a very expensive pleasure. Therefore, simpler methods of installing floor ceiling systems are used.
They perform in two versions:
- In the first case, the support of thick, about 5 cm, ceiling boards is carried out directly on the walls of the log house, in which special grooves are cut out. When using a tongue and groove board, its thickness can be at least 2.5 cm.
- The depth of support of the boards must be at least 5 cm. They are fixed to the beams with nails or self-tapping screws. This method is only suitable for small rooms. The length of the boards should not be more than 2.5 meters. It is best to use well-planed wooden elements. Such materials are easier to lay without gaps.
- But this method has many disadvantages. The space above the ceiling cannot be used, since the boards will not withstand such a load. In addition, it is not suitable if there is a chimney inside the room. In this case, the vapor barrier is laid directly on the boards. Since the room is small, there is no need for thermal insulation. An interesting solution is to construct a ceiling structure made of two layers of sanded, unedged boards perpendicular to each other.
- In the second case, the ceiling boards are fixed on top of the floor beams. There are no longer restrictions on the size of the room. You can use not only thick boards, but also ordinary lining. The technology for further work on the installation of the ceiling is practically no different from the installation of sheathed structures. Since the parts of the floor beams will be open, it is necessary to give them an aesthetic appearance. You can simply sand the wood, or coat it with drying oil or oil. Another option is to soak the beams with beeswax. The aromatic effect will be amazing.
You can also use a combination of two types of ceiling structures.
Insulation of bath walls from the inside
The direction of thermal insulation of walls depends on what function the room performs.
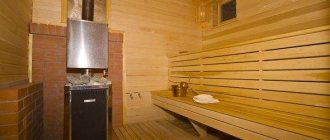
The steam room is the most important part of the sauna. The temperature in the steam room can reach 90 °C (Russian bath) and 130 °C (sauna). Maintaining such a temperature is difficult and costly if you do not properly insulate the steam room in the bathhouse. Only natural materials can be used in the steam room. Basalt wool, laid in a frame or natural insulation, has proven itself to be excellent for those who are not ready to sacrifice the natural beauty of wood.
Insulation of walls in a foam concrete bathhouse with cotton wool
Insulation technology:
frame device. Guides made of timber or metal profiles are mounted on the wall. Since the bathhouse is a low building, it is often enough to make only vertical guides and choose cotton wool with a density of more than 65 kr./m3. The distance between the frame slats (step) is 15-20 less than the width of the wool and is 580-590 mm
Important! The specificity of laying wool in a steam room is that you cannot use metal guides, but only wood; in addition, you have to take into account temperature fluctuations and the ability of wood to expand/contract under their influence. To level out temperature fluctuations, when constructing a frame, vertical cuts are made in the timber, through which the timber is attached to the wall with hardware. The presence of grooves allows the guide to move along the wall; they also compensate for possible shrinkage of the walls if the bathhouse is built from timber.
A membrane or waterproofing film is placed inside the frame. As a waterproofing material in the steam room, it is recommended to use penoizol, laid with a reflective layer inside the room. The junction of the penoizol strips is glued with foil tape;
- cotton wool is placed on the reflective layer or membrane;
- the cotton wool is covered with a membrane or vapor barrier film;
- a lathing is installed (a 25-30 mm thick lath is stuffed), allowing air to pass between the film and the finishing material;
- the insulation is covered with wooden paneling.
How to insulate walls in a bathhouse with basalt wool and foam insulation
Insulation of bathhouse walls with sawdust (heat-insulating mixture)
Insulation technology:
a wooden frame is being installed. If the lining is planned to be mounted vertically, then the frame guides should be positioned horizontally;
A mixture is being prepared for wall insulation: – sawdust – 10 parts; – cement – 0.5 parts; – water – 2 parts; – lime – 1 part (used as an antiseptic);
- the prepared mixture is placed in the cells of the frame and leveled;
- finishing work is being carried out.
Insulation of a bathhouse made of timber/logs with jute
Jute – jute rope, tape, felt, inter-crown insulation (organic material)
Thermal insulation is carried out using a special tool - a wooden hammer, a mallet (weight 300-400 g), chisels and a caulking shovel.
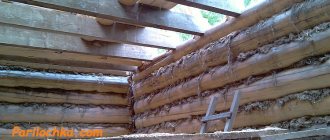
Sealing cracks between logs and beams: jute is placed (hammered) into the inter-crown cracks, while trying to lay the material as tightly as possible.
How to seal cracks in a wooden bathhouse with jute
Insulation of a washing room in a bathhouse
The washing compartment, dressing room or rest room have a lower temperature, so foam plastic can be used to insulate the walls in these rooms.
Operating procedure:
the frame is made. Some craftsmen recommend laying foam sheets with glue. But this method is only suitable for brick or foam concrete baths, but not for wooden ones;
foam is placed between the cells of the frame. There is no need to protect the foam from moisture, so films are not used;
finishing is being carried out.
Recommendation. Insulation of the wall near the firebox is carried out only with basalt wool with the installation of metal trim (protective screen) around the stove. This is due to the fact that cotton wool has a high melting point and does not support combustion.
Features of finishing material for washing
The washing room in a wooden bath is practically not subject to heating, but is in contact with water, which eliminates the possibility of using wood for interior decoration. To maintain the overall design of the premises in a bathhouse made of timber, you can use its high-quality imitation.
When choosing materials for the interior decoration of the washing compartment, the following parameters are taken into account:
- resistance to high humidity;
- environmental safety;
- practicality and durability;
- convenient and affordable installation;
- ease of maintenance;
- price.
The most popular finishing materials include wood, tiles, stone, paint, and plastic.
According to their purpose, they are divided into types: for finishing floor, wall and ceiling surfaces. Each of the available options has its own advantages and disadvantages.
How to insulate the ceiling in a bathhouse
The following materials are suitable for insulating the ceiling in a bathhouse:
- Mineral wool is a good heat insulator, but after getting wet, its characteristics deteriorate, so it is imperative to do good steam and waterproofing.
- Foamed polypropylene with foil not only retains heat well, but also reflects it back into the room, this allows you to speed up the process of warming up the bath several times.
- Expanded clay is used in large rooms with a thick ceiling, since to ensure good thermal insulation, its layer must be at least 30 cm;
- You can use peat, clay with sawdust, on top they are covered with sawdust and a layer of dry earth.
- Growing aerated concrete, formwork is made to fill it.
The thickness of the insulation layer will depend on its type, technical characteristics of the room and is determined individually in each case.
Protective compounds for processing
If it is possible to change the internal lining of the steam room, then treatment with additional compounds is not required. This can often be quite costly and time-consuming, so it is recommended to treat not only the ceiling in a Russian steam bath, but also in other rooms, as well as walls and other elements.
When actively using the steam room, there will inevitably be stains on the ceiling from splashing water with aromatic oils and drops of sweat. To avoid this, it is recommended to treat the ceiling in a sauna or bathhouse with a special water-soluble antiseptic, which forms a protective, breathable film on the surface.
In addition, it has dirt- and water-repellent properties. The composition has antimicrobial properties and prevents the formation of mold and the proliferation of microbes. If you don’t know how to paint the ceiling in a bathhouse, you can simply add a colored tint to the protective composition. This will not only preserve the wood for a long time, but also give it the desired shade.
Information. For the ceiling, you should choose special mixtures that are intended specifically for it. Compositions for treating walls are not suitable.
Advantages of wooden floors
When trying to make a warm floor in a wooden washing bath with your own hands, you need to take into account all the pros and cons of the chosen floor covering. After all, floors perform several functions at once: they are safe movement and a component of the entire water drainage system in the bathhouse. Therefore, before choosing one or another flooring option, you should carefully consider the organization of a particular building.
Two types of technologies can be used for installation: leaking and non-leaking floors made of wooden planks. The main advantages of leaky flooring are ease of installation and low cost of materials, which saves not only time, but also money. But the main disadvantage of such a floor is the loss of heat in the room. Leaking floor coverings have good ventilation properties and therefore do not retain heat well in the room.
Main types of ceiling
In modern baths, it is customary to use three main types of ceilings: hemmed, floor, panel, which differ from each other in the method of arrangement and design.
Hemmed construction
It consists of wooden beams, to which boards are nailed from below, and a vapor barrier, a layer of thermal insulation and waterproofing are mounted on top of them, after which everything is again covered with boards.
Among the disadvantages of this design, it should be noted the need to use powerful beams , the cost of which will be high. This type of ceiling is suitable for a log bathhouse with an attic; the thermal insulation is reliably protected on both sides, but keep in mind that the cost of such a design will be high.
Floor type
In this case, the design is simpler, since such a ceiling only includes plank flooring, a vapor barrier layer and a layer of insulation. The only advantage of a flat ceiling is its ease of creation and low cost.
Such a structure can be made over a span not exceeding 2.5 meters, because in this case beams are not used. Since the insulation is not protected on top, it can get wet, which causes its characteristics to deteriorate over time.
Such an attic space cannot be used, and if the roof needs to be repaired, problems will arise, since it is impossible to walk on the insulation and the boards may not support the weight of a person.
Panel device
This type of ceiling is assembled from separate panels, they are made in the form of wooden troughs, into which a layer of vapor barrier is laid, then insulation, waterproofing, and everything is covered with boards on top.
Insulation is placed between the individual panels, which is not afraid of high humidity. In this case, you can use scraps of boards from which panels are created. But keep in mind that such panels are heavy , so you won’t be able to install this structure yourself.
Protecting the floor from moisture, mold and rot
When using a bathhouse, there is a high probability of mold fungi appearing on the floor and walls. Therefore, to prevent such processes, it is advisable to treat the floor covering before painting. The means used for this are different, because the material from which the floor in the washing compartment is made remains important. Protecting wood from the harmful effects of water and the further occurrence of microorganisms in it should significantly extend the service life of a wooden floor, improving and maintaining its performance properties.
The protective layer should be applied to the floor covering in the correct order. At the first stage, specialists clean the wood using a grinding machine. Then carefully remove all debris after sanding using a vacuum cleaner, broom and damp cloth. And at the final stage it is necessary to impregnate the wood using special means.
Depending on the basic properties, impregnations can be divided into several types:
- antibacterial;
- water-repellent;
- fireproof;
- darkening or bleaching agents.
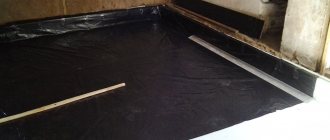
Floor waterproofing scheme
To apply impregnation in the washing area, use brushes (for hard-to-reach places) and rollers (for the main area). To enhance the effect, experts recommend applying several layers of impregnation of different types. But in this case, it will be necessary to maintain a certain time interval between treatments, which is indicated in the manufacturer’s instructions. And only after the boards have completely dried can you proceed to painting. Popular and effective means of treating wooden floors are such as Neomid 2000, Ecosept 200 and Senezh Sauna.
Protecting the floor from mold and mildew using traditional methods is considered effective. To do this, during processing, agents such as vinegar, ammonia, hydrogen peroxide and boric acid are used. After completing the surface treatment of the floor covering, you should ventilate the room well, completely getting rid of the specific odor.
You can also use store-bought products to treat surfaces in the sink. These include powders, sprays or ready-made solutions and mixtures. But you should be careful when processing. It is best to use gloves during the procedure to keep the skin of your hands intact, and a respirator to protect the respiratory organs. Effective means are bleach, antiseptics “Antifungal”, “Izotsid”, “Mil Kill”, Dali, as well as copper sulfate.
Providing the wash room with water
Traditionally, when deciding how to decorate a bathhouse sink, they prefer to choose wood, since it meets all the requirements for this room. However, not every type of tree is suitable for these purposes.
It is best to finish the shower in a wooden bath from the following types of wood:
- Abashi is an African type of wood that has a beautiful appearance and texture, practically does not heat up and is very durable.
- Cedar is suitable for lining walls and ceilings in the washing room of a bathhouse, since it does not heat up very much, and it will not release resin, because it is not as hot here as in a steam room. However, such lining is very expensive.
- Larch is a moisture-resistant and durable material. Although it is quite difficult to process, it is very attractive in appearance and smells pleasant.
- Linden - this type of wood is the best among the options for sheathing a bathhouse sink. When exposed to water, the wood does not darken, and also has a subtle aroma that has a positive effect on the body.
Regardless of what you decide to cover the bathhouse sink with, the lining can be positioned in several directions to create a decorative effect (read: “How to cover the inside of a bathhouse - how to choose the material”).
There can be several options for fastening the lining:
- horizontally;
- vertically;
- diagonally;
- in mixed media.
Fastening the lining can be done using the following methods:
- using clamps;
- using nails, driving them into the groove at an acute angle, which can be a difficult process for a beginner;
- using self-tapping screws, screwing them all the way through.
A properly equipped floor will help create an attractive interior for a bathhouse washroom. It must meet a number of requirements - at a minimum, it should not slip, and its maintenance should not be difficult.
Most professionals believe that a tiled sink in a bathhouse will look best. In addition, such material is relatively inexpensive.
Calculation of the capacity of the water supply pipes must be made based on the expected number of people and the area of the future bathhouse, since a sufficient water supply is an important condition for the functioning of the bathhouse.
To provide washing hot water in sufficient quantity, you can choose one of the following methods:
- heating water with a gas heater, if it is possible to supply gas to the bathhouse;
- using an electric boiler.
Thus, if it is possible to connect to the central water supply, then solving the issue of providing water is not difficult.
Therefore, the calculation of the approximate volume of water must be made in advance. Considering that on average one person needs about 7-10 liters of hot water at 80-90 ºС and 3-4 times more cold water, it turns out that each steamer will need about 45 liters of water.
Warm floors in the bathhouse in the washing room
There are several ways to heat the floor covering in the wash compartment. Most often, water or electric heated floors are used. The water heating pipes of the bathhouse are laid directly into the concrete screed and into the walls of the washing room. This floor perfectly warms up the washing room, but requires special care and drainage of the coolant when preserving the bathhouse for the winter.
Water-based heated floors provide excellent heating, but are used only in rooms attached to the house
A simpler electrical version exists in two versions - cable or film. Wired flooring is available in cable form or in the form of mesh rolls with already built-in thermal wire. The heating element is laid on wooden logs or on a concrete subfloor and covered with a floor covering. As in the case of water heating, the cable version eats up 100-120 mm of space in the washroom. Therefore, when planning to make a warm floor in a washing bath with your own hands, you will need to decide in advance on the type of heating system.
Rolled cable floors can be laid in a bathhouse yourself without any problems
The film floor is mounted on thin reflective insulation laid directly on the concrete under the tiles. In this case, the height loss is only 25-50 mm. Laying tiles on top of the heater in the wash bath will probably solve most problems. But there is one drawback: the film can only be laid on concrete; on wooden floors, the film heater does not last long.
Film heating is ideal under tiles in a washroom
Everything about installing and repairing ceilings with your own hands
A private home is most often associated with the presence of a good, high-quality bathhouse. But the usual approach to this building will not work; it has its own characteristics and difficulties in the design of all structures.
The extreme operating conditions of the parts of this structure also impose special requirements on materials and their installation. Let's consider the question of how to make a ceiling in a bathhouse efficiently, reliably and in accordance with all requirements for safety and, of course, comfort.
Criteria for the ceiling
The specifics of the room leave a serious imprint on the nature of the basic requirements for the ceiling surface. The urgent need to retain heat inside the bath requires special organization of the ceiling and forces us to look for new approaches to strengthening and preparing it. Judge for yourself: the critical temperature is up to 100 degrees in the steam room, constant humidity is from 90%. In such conditions, moreover, aggravated by cyclic heating and cooling, the deformation of any material is no more than a matter of time. We have identified the main criteria that will allow you to better understand what the ceiling in the bathhouse you are planning to do yourself should be like:
- correct functioning in extreme temperature conditions;
- complete fire and environmental safety;
- good hydro and vapor barrier of the attic;
- maintaining the desired temperature in the steam room area.
Evolution of tension production
At the very beginning of their appearance, stretch ceilings were not particularly distinguished by their excellent quality and richness of textures. But today, when the technology of their production has reached extraordinary heights, many properties of stretching materials have improved significantly. Both PVC film and fabric surface for ceiling decoration certainly have many privileges that allow these panels to be placed in rooms with increased humidity and temperature. The ceiling in the bathhouse is practically “extreme”, since it takes on the main functions, and these are: saving steam and protecting from severe cold.
Materials for finishing the ceiling in the bathhouse
The best material for the ceiling in a bathhouse is wood, but its choice differs for different rooms.
Larch and aspen wood is well suited for finishing a bathhouse, which becomes even stronger at high humidity.
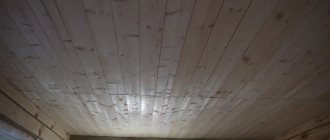
One of the best materials for covering the ceiling in a bathhouse is wooden lining. Since the bathhouse has high humidity and large temperature changes, only lining made from certain types of wood is suitable.
For ceiling cladding, it is best to use linden lining; it is not afraid of steam and direct contact with water. Aspen also tolerates moisture and heat well, but after drying it becomes hard, so problems may arise during installation and hidden rot may develop.
Pine is not suitable for a steam room, since at high temperatures resin begins to release from it, but for a washing room and rest room it is an excellent option.
Cedar has good qualities, but its price is high. When heated, it releases substances that not only smell pleasant, but also have healing properties.
Before installing the lining, it is necessary to lay thermal insulation and a reflective layer, thanks to which the heat returns to the bathhouse. After this, a sheathing is made on which the lining is mounted.
If only wooden lining is suitable for the steam room, then the washing room and rest room can be lined with plastic lining.
This modern material is often chosen for finishing the ceiling in these rooms, due to the following advantages:
- such lining does not need to be additionally treated with antiseptics and fire retardants;
- there is a large selection of colors;
- it has strict forms, so installation is simple and quick;
- it does not need to be periodically painted or coated with protective compounds;
- Compared to wooden lining, it has a significantly lower cost.
In modern washrooms and rest rooms, plastic panels are often used to decorate the ceiling. They can imitate various materials, are not afraid of moisture, and are easy to care for, but they can only be used in a washroom or rest room, where there is no high temperature.
When purchasing plastic panels, you need to pay attention to their quality, since low-quality material has an unpleasant odor that lingers indoors for a long time. Recently, tension threads have become very popular, as they do not absorb moisture, do not attract dust and are easy to care for.
Let's consider whether they can be used in a bath?
Recently, tension threads have become very popular, as they do not absorb moisture, do not attract dust and are easy to care for. Let's consider whether they can be used in a bath?
Conventional suspended ceilings cannot be installed in a steam room, since they are mainly intended for rooms in which the temperature is from 0 to 60 degrees, but they are quite suitable for finishing the ceiling in a relaxation room or in a washing room.
To create such a ceiling, a PVC film is used, under which communications can be hidden, the surface is perfectly flat, moisture does not accumulate on it and the ceiling breathes, which prevents the formation of fungus and mold.
Advice from professionals
In order to make a high-quality ceiling in a bathhouse with your own hands, you must adhere to the following expert advice:
- When using lining, it must be adjusted well so that there are no gaps; for this, a mallet is used.
- It is necessary to install the first plank correctly, since the quality of installation of the entire structure depends on this.
- It is recommended to have a higher ceiling in the washing room and rest room; this must be foreseen in advance.
- The lining is attached to the sheathing; the presence of a gap will allow air to circulate and moisture will not accumulate.
- Work on creating a ceiling in a bathhouse must be done efficiently and carefully, since it is through it that the maximum amount of heat escapes.
- Don't skimp on materials!
Installation of a flat bath ceiling
The design of this type of shelf is suitable for those baths that are small in area (maximum span width is 2.5 meters). Such a ceiling in the dressing room of a bathhouse and in the steam room is also constructed if there is a solid wall in the room instead of a partition in the form of a shield
It is important that the boards fit tightly against each other, butt-to-butt. Steam and thermal insulation should be laid on top of the boards
The material for vapor barrier can be roofing felt, foil or roofing felt. The laid layers must be sprinkled with peat and then covered, for example, with slate, which can be fixed to the beams with nails.
Alternatively, the coating can be fire-resistant slabs, which you can make yourself (cement + sawdust + water, maintaining a ratio of 0.3: 1.2).
Installation of a ceiling in a bathhouse, detailed video:
Dependence of height on type of room
The ceiling needs to be designed depending on the type of bath room - washing room, steam room or relaxation room. The height of the ceiling plays an important role; for a steam room it should be less than for other rooms. There are no strict regulations, the main thing is that you can swing a broom in the steam room without hindrance. In the washing room you can leave the standard height, but not more than 2.5 meters. There is no need to make the ceiling too low; the rule here is: more space means better breathing. In the rest room, the ceiling height is unlimited.
Options for finishing flooring in the sink
In the Russian bathhouse, it was customary to make wooden floors: both in the steam room and in the washing room. But times are changing, and tile or stone topcoats for concrete floors are considered the best option. They not only create a refined and unique atmosphere in the bathhouse, but are also a reliable and durable material.
Tree
If we consider wooden floors in the washing department, they can be treated with water-based paints. But it is best to avoid oil and alkyd compounds. But, as practice shows, wooden floors do not need to be painted. A simple treatment with store-bought impregnation is sufficient for them.
Tile
Tiled floors are modern designs that are quite popular not only in the construction of a bathhouse, but also in the organization of floor coverings in other rooms. Such floors are easy to insulate, they have a fairly high water resistance, are strong, reliable and durable. Therefore, ceramic tiles on the floor in the bathhouse sink will be an excellent option for flooring.
Linoleum
Finish coatings made from it have high moisture resistance, are quite durable and reliable. They are used for concrete floors as an excellent and cheaper alternative to tiles. But you need to understand that linoleum is a rather slippery material for a washroom, so its use creates a health hazard.
Rubber
This floor covering is a high-quality material that not only has high moisture resistance, but is also available on the market in a huge variety of colors. This allows you to create your own unique design for the washing room in the bathhouse. Also, compared to simple linoleum, the rubber coating is not as slippery. It prevents the occurrence of fungus, bacteria or mold, and also does not create difficulties in care. This is an excellent choice for those who want to have a reliable and durable floor covering in the wash room of the bathhouse.
Tile
To increase the wear resistance of the material and prevent moisture accumulation in the floor covering, experts recommend pre-insulating the floor. For a "warm floor" system, the best finishing coating is tile. It gives off heat well and is quite easy to care for. But the choice is still yours.
When using this or that floor covering in the washing section of a bathhouse, you must make sure that the material under such conditions will not emit harmful substances that have a detrimental effect on human health.
Types: hemmed, panel, floor
The ceiling in a Russian bathhouse is divided into several types:
- Hemmed. It is mainly installed in the steam room and washing room, but can also be used in other rooms. It is very popular due to its simplicity of design. It is mounted from the attic side - a layer of thermal insulation from selected building materials is laid between the beams, and covered with boards on top. The bottom is lined with wooden clapboard;
- Panel. The point is that special panels with layers of heat and vapor insulation are made separately. Then they are separately fixed to the ceiling, the joints are sealed with waterproof material, everything is sewn up from below with clapboard;
- Grazing. Option for baths with a small area. It is formed as follows: boards are laid on the load-bearing walls, the joints are coated with clay, then a layer of vapor barrier with insulation follows, and wooden boards complete the structure. Using an attic with this option is unacceptable.
Important! It is necessary to choose the type of insulation depending on the type of bath room, so as not to create additional load on the floors.
Required tools and materials
The optimal ceiling option for a bathhouse made of timber is a hemmed one. It will save money, simplify installation work and achieve reliable thermal insulation. For installation you will need:
- Vapor barrier material. As such, it is convenient to use thin foil insulation made of foamed polyethylene.
- Wooden lining for filing from the inside.
- Insulation (expanded clay or mineral wool).
- Waterproofing film.
- Boards or dense sheet material to create a floor in the attic of a bathhouse.
The tools you will need are the usual set for working with wood:
- building level;
- screwdriver, self-tapping screws;
- hammer, nails;
- wood hacksaw;
- stapler;
- an ordinary knife for working with steam and waterproofing;
- foil tape.
Providing the wash room with water
Panel panels for arranging this type of ceiling can be used in production, or you can install it yourself. The essence of the construction process is to assemble the structure on the ground and then lift it to the bathhouse. Don’t forget to impregnate the wood with fire retardants before starting work.
The ceiling is equipped according to the following plan:
- We install two bars on a flat surface at a distance of 0.5 meters.
- We fasten them together with planed boards 0.6 meters long, leaving a 5 cm exit on the sides. For reliable fixation, we use galvanized nails with a length of 10 cm. The thickness of the boards should be approximately 5 cm.
- Using a construction stapler, we secure the vapor barrier foil film inside the panel along the edges and on the folds.
- We stuff two temporary slats (jibs) diagonally between the beams. This will allow the panel to be transported to the top of the washing room without deformation.
- We mount the structure on the upper edges of the load-bearing walls. It should occupy at least 5 cm of wall thickness. We install all panels strictly according to the level until the ceiling is completely closed.
- We seal the resulting joints with jute.
- We lay the insulation on top of the vapor barrier material in the panels themselves and the joints between them.
- We fix the waterproofing layer on top.
- We fasten all the panels together with a board 4 cm thick. Its length should be equal to the sum of the width of all panels.
- We sew up the rest of the space with boards 0.6 meters long.
- We install an overhead board at the transverse joints.
Due to the large weight of individual structures, it will not be possible to carry out the installation yourself, so get an assistant in advance. By installing a panel ceiling above the sink, you can use the attic space.
Materials and tools
Let's immediately divide the materials into rough and white.
The rough board can be unedged, poorly processed, with defects and of low grade. Let's say moderately bad. All whiteboard for the ceiling or floor should preferably be of high grade and well finished. ADVICE! The finishing material in the steam room should be made of hardwood, in other rooms - optional.
The timber of the false ceiling can also be made of coniferous trees. Rough boards for any type and location of the ceiling, in principle, too.
The flooring is made from edged boards - they must adjoin without gaps. If no additional finishing is expected, they should be of good quality, pre-sanded. Tongue-and-groove or not tongue-and-groove – at the owner’s choice.
The finishing can also be done in the form of lining, but read about it below.
We wrote about materials that are suitable for vapor barriers in this article.
Here we will only say that plastic film is suitable, but it is not desirable in a steam room, because high temperatures are not for it. The main principle of vapor barrier is that it should not “breathe”, that is, it is a material with minimal capacity for air and water vapor. Foil, craft paper, and other materials are also suitable.
We also managed to talk about insulation materials suitable for baths in another article. Recommended reading.
In short: for a flat ceiling you need light insulation, such as ecowool, expanded clay, vermiculite. Any one will do for hemming.
Mineral wool must be isolated from moisture and be prepared for the fact that over time all phenols and other binders will evaporate from it, leaving stone dust. But there are no ideal insulation materials yet. It would be good if ceramic fiber became cheaper - it has excellent performance.
We do not give dimensions of lumber here, because it is correct to proceed from calculations for a specific bathhouse, and not from the “average temperature in the hospital.”
Anti-corrosion coating on nails, screws and self-tapping screws in a bathhouse is a given. Small things you will need are staples for a stapler and special adhesive tape for vapor barriers - if you buy a branded one, they also sell adhesive tape there. If you make foil, take metallized one.
In terms of tools, you will need everything you have to cut the boards and attach them. Options: from a hand saw or chainsaw to a machine, whatever is available to anyone. Fastening - a hammer, a screwdriver, an air gun, again - whatever is accessible and convenient for anyone.
If you're going to manually make a notch in a ceiling crown for deck boards, you'll need an ax and good ax skills.
Marking tool – square, level, tape measure, pencil. This is all clear. The insulation can be cut well with a knife (mineral wool, for example). For films or kraft paper, use regular scissors; you can also use them to cut foil.
Step-by-step installation
Let's consider step-by-step actions in the case of installing the most common and convenient option for organizing the ceiling surface in a bathhouse - a false ceiling:
- take measurements and make sure that after clean finishing the height of your bathhouse will be at least 2.2 meters;
- the ceiling is made of the same type of wood that was used to build the log house: the beams are laid along the short side of the log house, a step of at least 1 meter must be observed;
- the logs that you will use as matits must be cut from the top and bottom to one-eighth of the entire diameter;
- adjust the matrix to the beams;
- fixing the hydro and vapor barrier membrane: lay the strips overlapping by approximately 20 centimeters, the material used should also extend onto the walls at approximately the same distance, all joints must be treated with waterproof tape;
- ceiling lining with boards: rough and decorative. In the first case, they take an edged coniferous board and hem it directly to the mats, and then apply a vapor barrier layer on top. It all ends with facing lining. The result is the so-called “thermos effect”, which perfectly retains heat. What else do you need from a bathhouse? If you skip the stage of creating a rough ceiling, then it is best to choose a tongue-and-groove board for direct fixation to the floor beams.;
- laying insulation is done directly in the attic; the nuances of the technology depend on the choice of specific material, but in any case, a diffuse membrane must be fixed on top of the laid layer. It will act as an additional waterproofing agent and prevent the appearance of condensation on the floor beams, protecting the ceiling structure from the process of rotting and subsequent unwanted deformation.
- finishing the floor - if you want to use the attic, you can additionally cover its floor with boards, which will give another plus - reliable protection of the insulation from any mechanical damage.
Steam room finishing
The steam room is the main room of the Russian bath, and therefore maximum attention is paid to its arrangement. In the steam room itself, the main thing is the stove. Let's start with it. In terms of price-quality ratio, metal wood-burning stoves that have a container filled with natural stone win. Used:
They are used in combination with each other, since each rock brings something of its own to the steam. The number of stones, like the stove, is selected depending on the volume of the steam room. In this case, various techniques are used. The simplest one comes down to the rule: the volume of stones is 1/50 of the volume of the steam room. Wealthy sauna lovers prefer stoves made of brick to metal heaters made in factories. The cost of such pleasure exceeds metal options by an order of magnitude. In addition, heating a brick kiln takes longer and requires more wood. Instructions for using some brick stoves call for double firing. So, if the bathhouse is scheduled for Saturday, then it should be lit on Friday. This is for preheating the stove and steam room. They heat at half the wood consumption. Then, on Saturday morning, the oven is lit a second time. They make three full loads of firewood and give it time to settle so that the stove, stones and steam room are fully heated. A brick oven heated in this way retains heat for three days even in severe frost. You can use the steam room for two days.
The finishing of the walls in the bathhouse around the stove is carried out in accordance with fire safety requirements, clearly presented in the following poster, borrowed from the Internet.
The consequences of non-compliance with the stated requirements are presented in the author's photo:
Fire safety requirements for brick and metal stoves are identical.
Basic standards and requirements
On the other hand, in the serious business of construction one cannot do without norms and requirements. They are set out in SNiP 30-02-97, which determines that it is permissible to locate a bathhouse 8 meters from other buildings, and no closer than 15 meters from a neighbor’s house. The layout of the bathhouse must include at least three rooms, the area of each of which per visitor is:
- dressing room – 2 m²;
- washing room – 2.7 m²;
- steam room – 3 m².
The height of the walls is 3.3 m.
In private buildings, the stated requirements are not always and not fully met. However, for newly constructed buildings, compliance with fire breaks of 8 and 15 m is not even a matter of good relations with regulatory authorities. This is a matter of safety for residents and neighbors.
Insulation of a suspended ceiling
First you need to mount a frame from wooden beams, which will serve as a ceiling. Parts of the false ceiling system are attached to the frame, then it is sheathed with tongue-and-groove or edged boards no more than 4 centimeters thick.
A vapor barrier material is laid out on the ceiling frame, also known as the ceiling panel, and secured with a special stapler. It is imperative to provide an overlap of vapor barrier material on the walls (about 20 centimeters), then you can lay a layer of insulation. The result is a three-layer coating, which must be additionally protected with a flooring made of boards - they should be attached to the floor beams with nails.
A false ceiling, unlike a flat ceiling, makes it possible to use the attic for storing towels, brooms, etc.. Its disadvantages include only its high cost - a large amount of high-quality wood will be required for the cladding.