When constructing any facility for economic purposes, there are features inherent only to this type of structure. The bathhouse is no exception. High levels of humidity, huge temperature changes of up to hundreds of degrees - all this requires its own approach, fortunately, the capabilities of modern building and insulating materials have now been added to the accumulated experience of generations of carpenters.
Special mention must be made about the ceilings of bathhouses: it is on them that the extreme thermal load falls when the washable ones “steam.” According to all the laws of physics, the hot air, which at this moment escapes from the heater, all tends to the ceiling. And if it is made without taking into account such periodic exposure to heat and moisture, the ceiling itself, the space above it, and the roof will soon become unusable. Therefore, special attention should be paid to the ceiling of the bathhouse, and in our material we will consider three main ways of arranging it.
Step-by-step installation of a deck structure
The technology for installing a flat ceiling is not difficult. It is carried out according to the following plan:
Laying rough boards
The rough ceiling boards are laid on the walls, and a sheathing of bars is placed on top of them in increments of 0.5-1 m. You can knock the boards into a shield in advance using the bars and lay it on the walls in finished form.
Laying the thermal insulation layer
Mineral (basalt) wool is laid on the boards. The insulation layer should be 150-200 mm. Moreover, it is not necessary to use thick mats for this. You can take thin mats, for example, 50 mm thick, and lay them out in 3-4 layers to the desired height
Particular attention is paid to the junction of the chimney pipe and insulation
When creating floor ceilings, bulk insulation materials are very popular. But, when using them, there is a possibility that the fine fraction will spill out through the cracks of the rough ceiling. To prevent this from happening, a barrier, for example, kraft paper, is laid over the boards, along the beams.
The most famous bulk insulation is expanded clay. Granules of different fractions should be used to eliminate the appearance of voids and achieve a higher quality, dense layer. Expanded clay should be poured onto kraft paper, between wooden sides (from beams or boards) laid along the perimeter of the ceiling. The thickness of the expanded clay backfill is 200-300 mm.
Clay with sawdust or straw is another “folk” insulation material. Clay is mixed with water, sawdust or straw is added to the solution and applied in an even layer on craft paper. The thickness of such thermal insulation is 100-150 mm. There is a more complex “recipe”. Dry clay is poured with water, stirred until it becomes thick sour cream, and allowed to stand for 3-4 days. After this, a 5 cm layer of clay is applied to the ceiling. After a week, if cracks have formed, they are covered with clay mortar. Then pour 10 cm of dry oak leaves on top of the clay, then 5 cm of dry earth.
It should be understood that insulation materials made of clay or expanded clay have significant weight and place a lot of stress on the floor boards. They can be used in a flat ceiling version only in tandem with thick boards, with a small distance between the walls.
Installation of vapor barrier
A layer of vapor barrier is sewn onto the boards from the side of the bathhouse. This layer is necessary to protect the heat-insulating layer that follows it from moisture from the steam room. Fix the vapor barrier with a construction stapler or thin nails. The sheets are laid with an overlap of 10-15 cm, the seams are sealed with mounting tape.
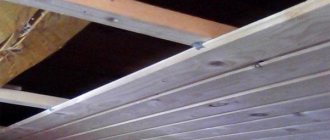
Finishing the ceiling with clapboard
Slats are placed on the ceiling vapor barrier in increments of 50-70 cm. The slats should provide a ventilation gap (2-3 cm) between the vapor barrier and the finishing cladding. The gap will allow any condensation that will inevitably appear on the vapor barrier to dry naturally. Otherwise, the lining will begin to become saturated with moisture and rot.
The lining strips are attached to the slats using nails or clamps. It is more practical for a bath ceiling to use not the usual thin eurolining, but its thicker and wider varieties - imitation timber or block house.
Methods
From the inside
To insulate the bathhouse from the inside, environmentally friendly, safe materials are chosen.
- Mineral wool is laid between the installed lathing beams.
- Foil on a thick paper base is attached on top with paper clips to a wooden strip with an overlap on the wall, which will reflect the rays of heat and retain it in the room.
- The joints are taped with adhesive foil tape.
- Planks measuring 2x5 cm are nailed to the beams for a frame under the lining (how to easily and quickly cover a ceiling with lining?).
Outside
- Mineral wool. The most common type of insulation, which requires laying a waterproofing layer.
- Polystyrene foam is usually used for baths made of brick or concrete.
- Expanded clay.
Floor type thermal insulation
- Thermal insulation material is laid directly on the laid, knocked down ceiling boards. Usually mineral wool is chosen as insulation. The thickness is determined according to the individual characteristics of the bath.
- Then they begin laying a vapor barrier to protect against condensation and steam of the new thermal insulation layer.
- The top layer is covered with roofing felt or plastic film. The method is suitable for baths without an attic.
Hemmed
How to hem or hang ceiling layers:
- Installation is possible in bathhouses with an attic space if there are ceiling beams that act as a supporting frame. All components of the suspended ceiling are attached to it.
- The lower part of the beams is sewn up with a vapor barrier using a stapler or additional strips.
- The overlapping sheets of material are glued with mounting tape at the joints. A film allowance of 15–20 cm wide is left along the perimeter of the film on the walls.
- Then the vapor barrier layer is covered with eurolining or edged boards.
- A layer of thermal insulation material is laid on the vapor barrier between the beams, followed by a waterproofing film.
- The last stage - the surface is covered with edged or unedged boards over the beams, forming the floor of the attic.
Panel
It is assembled from panels of the same size, forming an insulated solid ceiling.
- From two beams and boards 60 cm long, panels are knocked together so that 5 cm remains from the edge of the board to the edge of the slats. Such “visors” create gaps between the panels during installation. They are filled with heat insulator.
- The finished panels with thermal and waterproofing installed in them are nailed with boards to the cross beams of the floor. In this case, the first board - solid - supports all the ceiling panels, the next one can consist of parts, then solid again, etc.
- The inside surface should be sheathed with decorative materials, such as the walls of the room
The main requirements for the ceiling in the bathhouse
The ceiling of any building is a massive structure. It must be accompanied by a high level of reliability and load resistance. An attic space is often organized above the ceiling. It can be used to store equipment and other household materials. Often a person has to move along it in order to put or take the necessary tool or object.
Even if the possibility of storing anything in the attic is excluded, the ceiling is still forced to support both its own weight and the weight of the insulating layer.
Reliability and strength are qualities that the ceiling of any structure should have.
But the ceiling of the bathhouse must meet both these and additional requirements. The bathhouse offers wellness treatments aimed at strengthening physical health. A positive effect can be achieved by maintaining a specific temperature regime.
The ceiling is a structural element that provokes enormous heat loss. It is possible to prevent heat loss only in cases where the structure is equipped with effective thermal insulation.
At the same time, it is important to remember that when maintaining a high temperature, condensation begins to accumulate in a closed room
Its accumulation in the thickness of the insulation or inside a wooden structure can later turn into an unpleasant surprise. In order to prevent heat loss, but at the same time ensure that water vapor can freely escape outside the room, reliable hydro- and vapor barrier must be installed when installing the ceiling.
It is also important to pay attention to the selection and pre-processing of materials for the construction of the ceiling. They must successfully withstand constant exposure to moisture and high temperatures
Natural wood is used to create the ceiling. To give it increased stability, the tree is subjected to special treatment. To solve such problems, special means are used that reliably protect the wood from moisture and prevent the process of rotting.
Treatment of wood with special impregnations is also carried out for another purpose. High temperatures often act as fire triggers. It is possible to reduce the risk of fires by treating wood with such means.
And there is one more requirement that is important to comply with. All components involved in installation work must be environmentally friendly
The use of any materials or products that, when exposed to heat, begin to emit toxic substances is not permitted. This will provoke, instead of the expected improvement in well-being, a sharp deterioration in health.
Criteria for the ceiling
The specifics of the room leave a serious imprint on the nature of the basic requirements for the ceiling surface. The urgent need to retain heat inside the bath requires special organization of the ceiling and forces us to look for new approaches to strengthening and preparing it. Judge for yourself: the critical temperature is up to 100 degrees in the steam room, constant humidity is from 90%. In such conditions, moreover, aggravated by cyclic heating and cooling, the deformation of any material is no more than a matter of time. We have identified the main criteria that will allow you to better understand what the ceiling in the bathhouse you are planning to do yourself should be like:
- correct functioning in extreme temperature conditions;
- complete fire and environmental safety;
- good hydro and vapor barrier of the attic;
- maintaining the desired temperature in the steam room area.
Conclusion
In a bathhouse, the ceiling is the most vulnerable place, since the maximum amount of heat escapes through it. To prevent this, you need to choose the right material for the ceiling cladding; for the steam room it is wooden, and for the washing room and rest room it is plastic lining.
All installation work is carried out carefully and carefully, then you can independently carry out high-quality thermal insulation of the ceiling and make it beautiful, safe and durable.
Sources
- https://banya-expert.com/ustroistovo-potolka/potolok-v-bane-svoimi-rukami.html
- https://2proraba.com/banya/kak-v-bane-sdelat-potolok.html
- https://russkaya-banja.ru/potolok/230-kak-sdelat-potolok-v-bane-iz-breven.html
- https://rubanya.com/potoloc/potolok-v-bane-ustrojstvo-i-tehnika-vypolneniya.html
- https://HoroshijPotolok.ru/podvesnye/potolok-v-bane.html
- https://sazhaemvsadu.ru/potolok-v-bane-svoimi-rukami-poshagovoe-rukovodstvo/
- https://dom-s-ymom.org/stroitelstvo/konstruktivnye-resheniya/potolok/v-bane/kak-sdelat-svoimi-rukami-poshagovoe-rukovodstvo.html
- https://ProPotoloks.ru/potolok-v-bane-sovety-professionalov/
- https://parilochka.com/banya/potolok-svoimi-rukami
- https://maja-dacha.ru/potolok-v-bane-svoimi-rukami-poshagovoe-rukovodstvo/
Advantages and disadvantages of this option
As you have already seen, there is nothing complicated in the design of a false ceiling. Any self-taught craftsman can assemble the frame and then cover it with several layers. Moreover, even without an assistant. This is one of the main advantages of a false ceiling. But not the only thing. In addition, the suspended ceiling has:
- Versatility - it can be equipped in baths of different sizes. Including those where the span between the walls is more than 2.5 m;
- High strength - in the process of assembling the ceiling, thick beams and high-quality boards are used. This makes it possible to walk on the attic floor and arrange the attic floor with furniture;
- Maintainability - the false ceiling “pie” is made from quickly installed materials. They are just as easy to dismantle. If it is necessary to replace one of the components (the need to increase the thickness of the layer, its damage), the previous layers are easily lifted, the “unliquid” material is removed and new material is laid.
A relative disadvantage of a false ceiling is the use of expensive lumber in its construction: beams of large cross-section, boards 5-6 cm thick and long enough to cover the span between the walls.
Pros and cons of a flat ceiling
Everything in our life has both a positive and a negative side. This type of ceiling is no exception. Let's try to cite the advantages first:
- Quick and easy installation
- Small financial costs
- Lowest cost of building materials
Now let's move on to the disadvantages of a floor-type ceiling:
- Doesn't have enough rigidity
- Only used in small bath projects
- There is no possibility to use the attic space. You should forget about storing brooms, shovels, etc. - you can damage the waterproofing and insulation.
A flat ceiling in a bathhouse is a current budget option for small buildings. If you have a bathhouse of large, respectable dimensions, then you simply need another option - a false-type ceiling, which has a load-bearing frame and the ability to use the attic. But more on that next time, good luck with your construction!
Wisdom Quote: Nothing great in the world is accomplished without passion.
Vapor barrier
Foil material is considered a good vapor barrier that can be used to protect bathhouse ceilings. It is expensive, so it is mainly used for finishing ceilings in saunas. In other rooms, you can install polyethylene film, the density of which is more than 140 microns.
Bath ceiling vapor barrier
The dressing room can be finished with roofing felt, roofing felt or parchment. They cannot be installed in a steam room, as under the influence of high temperatures they begin to evaporate harmful substances.
The following tips will help you make a high-quality vapor barrier:
- All joints between insulators must be sealed with foil tape.
- It is necessary to leave 2 mm gaps between the vapor barrier and the finishing coating of the ceiling. Then the lining will not experience stress from accumulating condensate.
- The vapor barrier must also protect the insulation from steam, otherwise it is in danger of destruction.
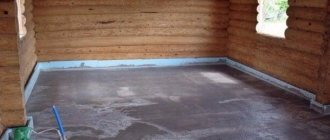
Ceiling steam protection
Its thickness should be at least 15 cm. It is also necessary to remember about the chimney pipe. A screed is made on the insulation, created using cement and sand. But when using the attic space as a living space, it is preferable to use special durable flooring boards to create the flooring.
Clay vapor barrier
Vapor barrier film
At the last stage, when creating the final covering of the ceiling surface, you can use natural wood materials. These include coniferous, larch or aspen tree species. The boards must be carefully processed, their surface must not contain cracks, chips or other deformations, and there must be no knots.
We invite you to familiarize yourself with the cinder block foundation: for a house, greenhouse, shed, fences
The speed of work and the amount of money spent creating the ceiling with your own hands will depend on how you approach studying the pros and cons of the type of ceiling you have chosen. A ceiling made without meeting the necessary requirements can negatively affect the microclimate in the bathhouse, and remodeling it can take a lot of effort and time.
Floor type ceiling in the bathhouse
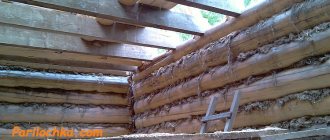
Next, we’ll look at how to make a ceiling in a bathhouse from a log house.
Flooring boards should be secured using nails or self-tapping screws directly to the wall beams. The thickness of the boards used is at least 5 cm and they should extend onto the wall by 5 cm. In this case, it is better to use high-quality planed boards. They fit tightly to each other, leaving no gaps. Then the boards are covered with steam and waterproofing on top. Next, the insulation material is laid. When using bulk insulation, it is additionally necessary to make partitions from timber so that the layer of material has the same thickness over the entire surface.
Quite often, home-made mats are used for thermal insulation. They are sewn from waterproof film and filled with existing insulation material. For example, the remains of padding polyester, dried pine needles and other materials can be used.
It is not necessary to lay boards on top of the insulation, since no one will walk in the attic. Laying a vapor-permeable diffuse membrane is also not necessary. Such a membrane is already present under the roofing material (provided that the roof construction work is carried out correctly), so free vapor exchange will take place. A well-made roof should protect against water ingress, and since the attic will not be used at all, accidental spillage of water is excluded. Therefore, in this case you can save a lot.
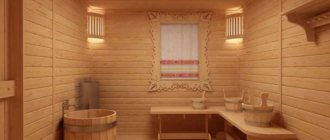
Features of dressing room finishing
- The dimensions of this room in the bathhouse should not exceed 150 x 250 centimeters. This should be a fairly comfortable place in temperature, without drafts.
- A small window is used for natural lighting. Artificial lighting must also be provided.
You should provide a place for clothes, benches for rest, and, if possible, a small table at which it is convenient to organize communication and drink traditional drinks that replenish fluid lost by the body.
In the dressing room, wall decoration is also important, but the requirements for materials here are not as strict as for the interior decoration of the steam room. Cladding with clapboard made of coniferous trees is allowed (and even encouraged).
The dressing room is also necessarily insulated with foam plastic or mineral wool. Mineral wool is attached to the walls and ceiling using wooden slats, and foam plastic is attached to special fasteners.
Installation of the sheathing precedes the fastening of wooden panels. The panels are attached using ordinary nails or self-tapping screws.
Following the recommendations of professional specialists will make visiting the bathhouse truly useful and give a person true pleasure.
Find out more about the secrets of finishing a bath from the video below:
https://youtube.com/watch?v=h4vAQZkujAs
Ceiling diagram depending on wall material
Does how your ceiling will be arranged depend on the material of the walls? We can immediately say that its design itself does not depend on this factor at all. But there are nuances associated with attaching the ceiling to the walls. We will discuss this point below.
In a log bathhouse
The ceiling in a bathhouse made of logs or timber can be attached to the walls in different ways.
Let's start with the flooring. In order to give the ends of the boards a fulcrum, you need to either use an ax to cut out a kind of “niche” in the log into which these boards will be inserted, or use a more modern method of fastening using metal corners.
A suspended ceiling needs beams, and these beams can lie on the walls, for which purpose a cutting is made in the walls themselves for the beam, or again you can use the special fasteners discussed above.
The ceiling beams on the log house are inserted into the grooves of the upper crown
Thus, there is a traditional method in both cases, when the integrity of one of the crowns is damaged, and there is a modern one, when you rely on the strength of the metal fasteners. However, we doubt that a full second floor with furniture will hold up... and even with anchors.
In frame
The frame is a lightweight structure and not particularly strong. Therefore, the ceiling in a frame bath should be light. If there is no second floor planned, you can limit yourself to the flooring option.
Technically, the base for laying the boards will be the top strapping beam. You can lay either the ends of the flooring boards or beams for the future shed floor on it.
By the way, a frame bathhouse may well be without an attic if you make a pitched roof.
You can read about how to properly insulate this fragile structure here.
For walls made of bricks and other blocks
It remains to talk about how ceilings are attached to block walls. At the top of such walls, regardless of what blocks they were built from, a wooden beam called a “mauerlat” is placed. If the ceiling is wooden, then it will be mounted on this beam.
Of course, in block buildings the ceiling can be slab, but this is extremely uncharacteristic for a bathhouse, so let’s continue with the Mauerlat. At the same time that it is the support of the decking or sheathing, this element will also be the support of the roof truss system. Therefore, there should be enough mounting space for everyone. The standard section of the Mauerlat is 10x10, 10x15, 15x15 cm. The Mauerlat itself is attached to an armored concrete belt, so it should be very reliable.
The ceiling material is fastened to the Mauerlat using steel studs.
What to hammer in: nails, screws or staples?
The lining itself is a board with a certain profile, which must have a tongue-and-groove locking connection. It is attached to the wall or ceiling using nails, screws or staples. The tools and material required to hammer in the lining in the bathhouse are as follows:
- nails, screws, staples;
- hammer, screwdriver, hardware gun;
- a mallet or a piece of clapboard for knocking a tenon into a groove;
- building level.
What nails should I take for the lining in the bathhouse? It is desirable that these are finishing nails 30-40 mm long, with an anti-corrosion coating. It’s worth taking coated screws (their length is the same, by the way). Regarding the length, you should proceed from the thickness of the board (if in a groove, then only the walls of the groove), plus you need to punch through the block to which the board is attached at least to the middle.
The staples should be the same size, although there are comrades who nail 14-mm staples with a construction stapler through a clamp, but this is rather an exception. To properly line a bathhouse with clapboard, it is better to use long staples and shoot them at an angle of 45 degrees (approximately).
Of course, it is tempting to wonder which of these methods is better. There cannot be a definite answer to this, because everything depends on the experience of a particular person. And if it is not there, then the easiest thing to do is to shoot the staples using a pneumatic gun. True, it is not cheap, and few people would agree to buy it for a one-time job. Other methods are a little more difficult to implement.
How to make a floor ceiling for a bath
With this design, the ceiling cladding is laid directly on the walls of the log house. This option is suitable for baths with a width of no more than 2.5 meters and with low ceilings. There is an opinion that making it is simple and quick, but for a log house the task becomes much more complicated. First you need to prepare the area on which the boards will be laid.
Floor ceiling diagram
- Two opposite crowns are selected and horizontal lines are drawn along them at a certain distance from the floor. These lines are the level of the future ceiling.
- The logs are removed from the log house and transferred to a previously prepared place. Next, you need to measure the width of the flooring area with lines on the upper parts of the crowns - it should be at least 5 centimeters.
- The sections of logs highlighted by lines are sawn through and then gouged out with an ax and chisel. The “shelf” should be as level as possible.
- Both crowns are laid back on the frame, the height of the platforms is also checked - it should be the same on both logs along their entire length.
First you need to prepare the area on which the boards will be laid.
Now the preparation of the boards and laying begins. For a flat ceiling, it is advisable to use tongue-and-groove boards 2.5-5 centimeters thick: thanks to the tongue-and-groove connection, they fit better together. In addition, the strength of this design is higher.
Step 1. The width of the bath is measured taking into account the areas in the crowns. For accuracy, it is advisable to take as many measurements as the boards are laid, at intervals along their width. Data is being recorded.
Step 2. The boards are cut according to the obtained width values. Next, the boards are marked with a pencil in the order of laying - so each board will be laid in its pre-designated place.
Step 3. The flooring is treated with an antiseptic and fire retardant.
Step 4. Take a board, lay it on the platforms on the crowns and nail it down. The length of the nails should be 2-2.5 times the thickness of the board. If necessary, holes are drilled in the right places with a drill, but you need to make sure that their diameter is less than the diameter of the nails.
Step 5. By adjusting one board to another, the floor ceiling is laid. Most likely, the last board will be wider than necessary, so you need to carefully cut off the excess from it and nail it to the crown areas.
Flat ceiling
Step 6. A vapor barrier film should be laid on top, making sure that there are no breaks in it and that the joints are overlapped. In addition, the seams are taped with special waterproofing tape.
Step 7. Next, the thermal insulation material is laid. If it is loose, like expanded clay or sawdust, then a sheathing of timber is made along the perimeter of the ceiling. This way you will achieve even distribution of the material over the flooring.