Proper construction of a chimney is a process as serious as the construction of the stove itself.
DIY brick chimneys
The extent to which this work is carried out correctly and accurately, the owner will protect his home and household members from fire or carbon monoxide poisoning. Therefore, the construction of this element must be taken very seriously and everything must be done as correctly as possible and according to the instructions. You can build brick chimneys with your own hands if you have experience in this work, but if it is unfamiliar, it is better to entrust it to a professional. If you are not confident in your abilities, it is better not to start.
How the chimney works
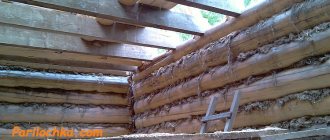
A brick chimney consists of several parts located inside and outside the room. The walls of the pipe in contact with the ceilings must be thickened as much as possible. This is required by fire safety regulations. Extending beyond the roof, the wall bricks must cover the hole in the roof.
There are three types of design - simplified, classic single and extended with ventilation holes.
The layouts of all brick chimneys are approximately the same. Let's look at the basic, classic one:
- Metal cap (umbrella). Manufactured in various types and forms. Designed to protect against the penetration of precipitation, dust and dirt into the pipe. Attached to the protruding parts of the head.
- Header. Consists of protruding bricks. Protects the pipe neck from drops flowing down the protective umbrella.
- Neck of pipeline.
- Waterproofed otter surface. Designed to remove sediments that have fallen on the neck. Most often it is insulated with a cement layer.
- Otter. Part of a pipe with thickened walls. It is located where the chimney passes through the roof. Thicker walls are regulated by fire safety rules; they protect the insulation and other flammable layers of the roofing cake from overheating.
- Roof;
- Lathing;
- Rafter system;
- Riser. Located in the attic.
- Fluff. Part of the pipe is similar in principle to the otter. It has the same thick walls that protect the ceiling between the living space and the attic from overheating. Sometimes, instead of fluff, a metal box filled with bulk non-flammable materials (sand, etc.) is mounted. The thickness of this protective layer is 100-150mm.
- Overlap;
- Insulation. Most often made from asbestos. Serves to protect wooden floor beams from overheating;
- Smoke damper (valve). Allows you to regulate the removal of combustion products.
- The neck of the pipe connecting the stove to the chimney.
General rules for the construction of brick chimneys
When building a chimney structure for a private home, it is important to consider a number of basic rules:
- Installation of chimney elements begins from bottom to top.
- The inner pipe is installed in the previous structural element, and the outer part is pushed on top. This provides protection against the formation of condensation on the insulating layer, which is located in the inner part of the circuit.
- Clamp connectors are used to secure a chimney pipe with triple and outlet elements.
- Connecting sections should not be located at the level of the ceilings or roofing pie.
- The tee is mounted on a support bracket.
- Every 200 cm of the chimney pipe is fixed in the wall using reliable fasteners.
- When fixing the pipe to the wall surface, there should be no deflections or deformations of the chimney. This will lead to a decrease in thrust in the finished system.
- The smoke duct should not come into contact with the main communications: electrical wiring, gas supply pipe, water pipes, ventilation.
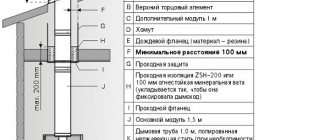
- When venting the chimney through the ceilings and roof, it is necessary to make a small indent of 15 cm for heat-insulated pipes and 30 cm for non-insulated pipes.
- Avoid creating horizontal sections of the chimney system whose length exceeds 100 cm.
In addition, when arranging a chimney, the thermal expansion parameter of the system should be taken into account.
When using flammable materials for roofing installation, the chimney is equipped with a special spark arrester made of metal fine mesh (mesh size 5x5 mm).
Principle of operation
The basic principle of operation of the chimney is based on the difference in air temperatures inside the pipe and outside. This difference creates cravings. The higher the pipe and the temperature difference, the greater the draft. Because The density of cold air is greater than that of warm air, which creates a pressure difference at the base of the house and the top of the chimney. This difference ensures the flow of cold air into the house. Thus, the stove not only heats the house, but also creates natural ventilation.
The draft depends on the cross-sectional area of the channel and the height of the pipe. For example, to create good draft in a fireplace, the cross-section of the chimney must be at least 1/10 of the area of the inlet.
At the same time, a pipe that is too wide reduces traction. Therefore, it would be better to increase its height. For stoves and fireplaces, the optimal pipe height is 5 m from the level of the grate.
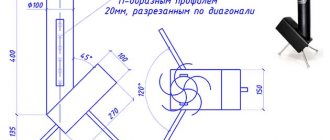
Otter and fluff with smoke channel 140 x 270 mm
The size depends on the thickness of the seams and the quality of the blocks. When calculating the amount of shift of bricks, the minimum amount of shift of blocks in each row of 70-75 mm is taken into account.
Performing the fluff order
The order of fluffing a chimney is 140×270.
Laying the fluff begins with laying the neck of the stove. The work is carried out in several stages.
| Row No. | Description of work |
| 1 | We lay out the neck of the furnace, for this we lay out an internal channel measuring 140/270 mm. The outer size of the chimney will accordingly be 380/510 mm. To lay the neck we prepare 5 bricks. |
| 2 | We begin to form fluff. We push the bricks out so that the size becomes 450/590 mm. Here you will have to use broken bricks after delivery or break off parts of the required size from the whole block. To do this, we use a mason's hammer (pick) or cut off the parts with a grinder and a diamond wheel. The internal cross-section of the channel must remain unchanged. |
| 3 | We push the bricks out a little more, bringing the size to 560/610 mm. We continue to use the cut parts. Be sure to check the correct installation using a plumb line or level. |
| 4 | We bring the pipe dimensions to 570/710 mm. Inside the masonry we place parts whose thickness is up to 100 mm. |
| 5 | We have formed the outer section of the fluff, so we maintain it. |
| 6 | We begin the dressing. We lay the first half or simply unfold the part across or lengthwise. |
| 7 | We lay the bricks, maintaining the size of the furnace neck of 380/510 mm. |
Performing an otter order
This part is performed with permanent dressing. You will need to lay out 9 layers of brick. In the middle part of the structure you will need to lay cut parts to maintain proportions.
| Row no. | Description of work |
| 1 | Lay out the neck of the oven. You will need 5 bricks. External dimensions 380/510 mm. |
| 2 | We enlarge only the long part of the pipe. Add 1 half to the row and 1 piece to ¾ of the whole block. We install plates in the inner row. |
| 3 | The length remains the same. We increase 1 side in width by ½ of the whole block. This is where the cut will be made. |
| 4 | We lay out according to the ordering scheme, we achieve an increase in the slope from the sides. |
| 5 -6 | We put it strictly according to the scheme. At 6 we bring the bevel length to 480 mm. |
| 7 | We complete the otter from 3 sides. |
| 8 | We release the slope from the 4th side, lay out the blocks according to the diagram. |
| 9 | We tie the 8th row of bricks and finish laying the otter. |
| 10 | In this and subsequent rows we reduce the outer size to 31-/580 mm. |
Note that the overhang masonry begins on the right side of the channel and extends ¼ of the length of the brick. To protect against the rapid formation of a layer of soot on the bevel, we plaster it with cement mortar. This treatment will not allow condensation and water to linger here.
Types and designs
What kind of brick is needed for a chimney?
Only red fired bricks are suitable for chimney installations. The use of silicate is prohibited due to its instability to high temperatures.
It is impossible to save on bricks; this is fraught with the destruction of the entire structure and large expenses for its alteration.
Red brick has its own characteristics and is divided into 3 grades:
- The first grade is the optimal option for a chimney. It is characterized by the highest clay density, low porosity, smooth edges and even edges. Frost-resistant. When tapped, it produces a moderately ringing sound. Color from scarlet to orange.
- The second grade (unburnt) is acceptable for use. It has a pale red or pinkish color and responds dully when tapped. The brick is quite porous, the ribs can be crumbled. It can be used in a chimney installation, but subject to additional processing.
- The third grade is burnt and not suitable for laying pipelines. Dark red, fragile, sonorous. Easily splits under the influence of temperature differences and mechanical stress.
A higher cost option is fireclay brick. More often used in the construction of fireboxes and fireplaces rather than exhaust pipes. It is a derivative of special fireclay (fireproof), mixed with quartz. Withstands temperatures up to 900C.
Advantages and disadvantages
Like any design solution, a brick chimney has its advantages and disadvantages.
Pros:
- Resistance to high flue gas temperatures;
- Brick retains heat for a long time;
- Low cost of material;
- Aesthetic appearance, style.
Minuses:
- There are turbulences in the corners of the chimney;
- Soot lingers on rough walls;
- Large weight of the structure and, accordingly, increased load on the foundation.
The service life of such a chimney
The service life of brick chimneys is short. In a good version, this is 7-12 years.
The lifespan of a pipeline can be increased by protection from the outside and inside, care and regular cleaning.
Types of brick pipes
There are three types of brick chimney structures, which differ from each other in location.
- Root pipes, they are also attached chimneys. They are built separately from the stove, that is, they are erected next to the heating element, connecting the latter with a chimney outlet (pipe). Typically, such chimney pipes are installed where it is necessary to connect several stoves or fireplaces.
- Mounted option . This is the most common type of chimney. From the name it becomes clear that the structure is installed on top of the stove, as if placed on it.
- Wall design . It is built along the outer wall, that is, the structure is located outside the house, and not inside, like the two previous options. In this case, the wall pipe can be either a mounted or a root pipe. This is the simplest option in terms of building a chimney, but it is more expensive, as it requires a large amount of thermal insulation work.
Wall chimney design Source reddit.com
Make it yourself or order it
Tips for choosing
At the beginning of the 20th century, when gas and electric heating were unavailable, stone and brick stoves were widespread. There were many good styling professionals, much more than there are now.
If you decide to order a fireplace or stove and seek the help of a specialist, be sure to pay attention to his professionalism. To do this, it would be a good idea to look at the documents confirming his qualifications and familiarize himself with the portfolio of work. A poorly constructed chimney is life-threatening. Insufficient draft will lead to the formation of dangerous carbon monoxide, which kills more than one and a half million people every year. In addition, the occurrence of backdraft can lead to fire. Even if a disaster can be avoided, the chimney will still have to be rebuilt, and this is a double expense.
Therefore, do not skimp on a good master. But it doesn’t make sense to overpay, for example, for fireclay bricks recommended by many layers. Regular red - can withstand temperatures up to 800C, and the price is almost 2 times cheaper.
If you decide to make a chimney yourself, carefully read all the requirements of building codes and fire safety.
I will provide all the necessary ones below. In addition, you should accurately calculate the dimensions, draw up a drawing, read all the necessary literature and watch a couple of dozen videos on the topic.
The chimney can be of 3 types:
- Mounted. Here the oven serves as the base. The minimum thickness of the furnace walls is 2 bricks.
- Root. Located on a separate foundation. The smoke outlet pipe of the boiler or stove is connected to the chimney through a connecting transfer hose.
- Wall. It is a channel in a load-bearing wall.
Whatever chimney you choose, I personally recommend that when choosing to install it yourself, do not neglect the advice and supervision of a specialist. I repeat - an incorrectly laid chimney will inevitably lead to tragedy.
By the way, for a metal stove you don’t need a brick pipe - an ordinary iron one is enough.
Building regulations
The installation of chimneys for private houses and baths is regulated by the following building codes:
- SP 7.13130.2013 “Fire safety requirements”;
- SNiP 41-01-2003 - “Air conditioning, ventilation, heating”;
- VDPO - “Rules for production work, repair of smoke ducts and furnaces.”
Fire safety requirements for chimneys
The fire safety requirements for chimneys come down to the following main points.
- The wall thickness of the outlet pipe must be at least 120mm;
- Between the inner layer of the roofing pie and the chimney, a fire-prevention retreat must be provided - at least 130 mm;
- When using combustible insulation in the attic floor structure, it is necessary to organize protection in the form of sand backfill;
- The fluff must end at least 70 mm from the upper and lower boundaries of the overlap;
- The distance from the inner surface of the hot chimney to the combustible ceiling structures (fireproof cutting) must be 500 mm or more;
- The walls of the furnace retreat from the combustible structural elements by at least 250 mm;
- The distance between the upper edge of the furnace and the roof slab is 350 mm for intermittently fired furnaces and 1 m for continuous furnaces. This condition applies to a stove made of three rows of bricks. If there are 2 rows, the distances need to be increased by one and a half times;
- You cannot connect two heat sources to one chimney system.
Traction force
The traction force is ensured by the correctly selected pipe cross-section and its height. The cross-section of smoke ducts made of brick is calculated based on the power of the heating device.
The height of the chimney pipe is calculated using special programs and formulas, but there is one rule - the elevation of the chimney above the ridge should be less than 500 mm (if the distance from the chimney to the ridge is less than 3 m).
In a vertical brick chimney, draft is generated by convection.
A prerequisite for the occurrence of an upward flow is the temperature difference between the ambient air and the exhaust combustion products: the greater it is, the stronger the thrust.
Therefore, for the normal functioning of the chimney, it is important to take care of its insulation. I’ll tell you how to arrange the insulation a little later.
Advantages of a brick chimney
A chimney made of bricks is most often mounted on a stove, taking into account its advantages such as:
- the ability of the material to resist fire;
- duration of operation;
- ease of brick laying;
- no need for specialized maintenance;
- easy repair.
A brick chimney can withstand high temperatures, but relatively often gets clogged.
A brick chimney can also be characterized on the negative side: it is rough inside and therefore quickly becomes contaminated with soot, the accumulation of which negatively affects the draft force. The disadvantages of a brick chimney also include its heavy weight, which often requires placing the stove on a separate base.
Making and installing a chimney with your own hands
Before you start assembling the chimney with your own hands, you need to familiarize yourself with the ready-made drawings and draw up your own according to your calculated dimensions. I will attach approximate drawings and diagrams for clarity.
Drawing and diagrams
Fig.1 Fluffing device:
Fig. 2. Connection diagram of the stove and chimney:
Calculation of the height of a brick pipe
For normal traction, it is necessary to correctly calculate the height of the pipe.
The optimal length from the grate is at least 5 m. This parameter varies depending on the cross-section of the pipe.
The recommended pipe height on a roof made of non-combustible materials is 0.15 m, on a roof made of combustible materials - 0.5 m.
Another calculation option is to start from the height of the ridge (as indicated in SNiP). Let me remind you that if the pipe is located at a distance of up to 1.5 m from the ridge, its height should not be less than 0.5 m above it, if further, it can be level with the ridge or higher.
If the required distance exceeds 3 m, the height of the pipeline outlet is calculated using the following method: a conditional line is drawn from the top of the ridge along the roof slope with a downward slope of 10 degrees relative to the horizontal. Such calculations must be made on the drawing.
Calculation of the chimney cross-section
Let us summarize the data on the dependence of the chimney cross-section on the power of the heating device in a table:
| Power, kWt) | Pipe cross-section dimensions (mm) |
| <3,5 | 140×140 |
| 3,5-5,2 | 140×200 |
| 5,2-7 | 200×270 |
| >7 | 270×270 |
If the furnace power is unknown, it can be approximately calculated using the formula:
W=Vt*0.63*0.8*E/t
Where:
- W – heat generator power, kW;
- Vt – firebox volume, m3;
- 0.63 – furnace load factor;
- 0.8 – fuel combustion coefficient;
- E – calorific value of fuel, kW*h/m3. Depends on the type of wood and the moisture content of the wood;
| Wood species | Calorific value E, at wood moisture content | ||
| 12% | 25% | 50% | |
| Poplar | 1856 | 1448 | 636 |
| Spruce | 2088 | 1625 | 715 |
| Pine | 2413 | 1882 | 826 |
| Birch | 3016 | 2352 | 1033 |
| Oak | 3758 | 2932 | 1287 |
- T is the burning time of one load of fuel.
This formula only applies to stoves and does not apply to fireplaces.
Advantages and disadvantages
Brick chimneys have the following advantages:
- relative cheapness, in comparison with modern materials used for it (now popular “sandwich” panels);
- long service life, can reach up to 30 years;
- brick chimney as an architectural element is ideally combined with many roofing materials.
But due to the fact that brick still belongs to the “old-timers” of construction, it has many disadvantages in comparison with its modern analogues:
- the significant weight of the brick structure requires the creation of a reliable foundation;
- erecting a pipe takes longer than when using a “sandwich”;
- for a chimney, the ideal cross-section is round, and the brick is rectangular in shape; square structures are better made from it;
- The inside of the pipe, even after applying plaster, remains rough, which is why it quickly becomes covered with soot, which impairs traction.
Installation features
The simplest option for installation is a mounted chimney. How to lay out a pipe with your own hands? Let's consider the method of laying a classic chimney for a sauna stove:
- We calculate the parameters of the chimney using one of the methods given above;
The standard channel cross-section for a sauna stove is 250x120mm, which is exactly the size of a red brick; in addition, you will need half bricks. They can be bought or cut off;
The mortar is laid with a thickness of no more than 1 cm, preferably a clay composition with the addition of cement;
- We prepare everything necessary - bricks, mortar, tools;
- Take measurements for fluff, gate and otter;
- Laying should begin from the stove, checking each row with a building level. Periodically clean the channel of excess solution;
- Advice - after laying the first two or three rows of bricks, fasten ropes at the corners of the future chimney and stretch them to the ceiling (strictly vertically). They are used to control the position of the chimney;
- It is necessary to secure the frame at the installation site of the gate valve;
- Continue laying the brick until it is fluffy. Before installing the fluff, it is necessary to count the number of its rows. In one row, the diameter of the channel increases by ¼ of the width of the brick. The brick terminals must be tightly attached to the floor beams, there should be no gaps between them, otherwise the chimney will wobble
- The fluff should be placed according to the diagram (see above, Fig. 1). It can be changed based on your size;
- After laying the fluff, we continue laying the chimney;
- We begin to lay the otter from the underside of the roof; the increase in the cross-section of the chimney when laying the otter should take into account the slope of the roof slope, gradually;
- Advice - to increase stability, metal plates should be embedded in the otter;
- If necessary, trim the ends of the bricks;
- Head device. To do this, we increase the outer perimeter by a quarter of a brick;
- Finish row. We install a bird net in it. We fasten the protective cap on top with dowels.
What is fluff?
To do this, let’s recall all the parts of a brick kiln:
- the main chimney pipe is laid out from the stove;
- not reaching the floor slab, we begin to form the neck of the furnace, which is essentially the beginning of the fluff;
- fluffing is a slight increase in the outer section of the pipe to prevent strong heating of wooden and other floor surfaces and walls;
- after exiting the ceiling, the chimney is reduced to its previous dimensions and discharged onto the roof;
- 7 layers of blocks before the pipe exits the roof, we begin to lay out the “otter”, a small extension of the outer pipe. This design prevents water from getting inside the chimney:
- above this part we form a neck with the same outer section as the main chimney;
- several rows before the top, we begin to form the head of the brick pipe, on which we install a protective cap.
Chimney diagram with elements
For presentation and general understanding, let’s post a photograph (a diagram showing the location of the fluff and the “otter”):
And the main ordering diagrams are shown below, where the independent laying of chimney parts is disassembled.
Recommendations for choosing bricks
Let us note right away that simple building bricks are not suitable for laying individual parts and the entire chimney. A prerequisite for long-lasting and trouble-free operation of all chimneys is the use of ceramic heat-resistant bricks.
Mostly red blocks are used. But one should not confuse and use porous fire-resistant bricks or hollow blocks for laying the chimney; the place of such materials is to construct the inner layer of the combustion chamber.
Separately, we note that for the construction of furnaces, a ready-made or home-made solution based on refractory or fireclay clay is used. The joints must be filled completely, without leaving even minor voids.
Bricks must withstand exposure to precipitation, temperature changes and strong winds. Let us present the necessary characteristics of such blocks.
| Minimum level of compressive strength. | 300-500. |
| Moisture absorption percentage. | From 7%. |
| Minimum value of frost resistance cycles. | F100. |
| The magnitude of the weight value from the volume of the material. | 2.1 g/cm3. |
Let's look at step-by-step instructions for self-construction of an “otter”, fluff of basic sizes.
Frequent errors and problems during installation
The main mistakes made when laying a chimney yourself.
- Choosing low-quality bricks;
- The seams are too thick;
- Incorrect composition of the solution;
- Incorrect calculation of the height of the chimney;
- Failure to maintain uniformity when laying the channel;
- Failure to comply with fire safety requirements listed above.
Due to errors in installation, turbulence, loss of channel tightness, and poor traction occur. All this leads to a deterioration in the performance properties of the chimney.
Maintenance and cleaning
During operation, soot deposits form on the pipe walls, which must be removed. Professionals recommend cleaning the chimney at least 2 times a year - at the beginning and at the end of the heating season.
There are several cleaning methods:
- Traditional methods
Periodic burning of aspen wood and potato peelings helps to blow away all the soot from the walls of the chimney;
- Chemical method
A special chimney-sweeping log is impregnated with chemical compounds that interact with deposits in the pipe and contribute to their destruction;
- Mechanical cleaning
The most effective method. For mechanical cleaning, you can invite a professional with special equipment, or you can try cleaning it yourself using a brush. Cleaning occurs not only from the roof, but also from below, through the cleaning doors.
Expert advice
Sometimes starting a fire can be difficult. One of the reasons is the presence of condensate, which impairs the movement of gases.
If the chimney is not insulated, heat transfer from hot gases to the environment is observed. When there is a significant difference in temperature inside and outside the chimney, a “dew point” occurs. At this point, the condensate vapor is converted to liquid. This liquid destroys the chimney.
Therefore, it is recommended to insulate the chimney pipe. In this case, all combustion products come out only in a gaseous state.
How to insulate
The easiest way to insulate the outside of brickwork is plaster finishing. To do this, a special mesh is put on the pipe, onto which several layers of plaster are applied. Practice shows that the lifespan of a smoke exhaust protected in this way increases by 2-3 times.
In addition, materials with a low heat transfer coefficient are used for insulation - mineral wool, glass wool, basalt fiber.
In recent years, polystyrene concrete has become popular for insulation. It can be used to make a protective casing for a chimney of any shape.
Some would-be craftsmen line the chimney with insulation without installing a metal casing, and cover the entire structure with foil on top. Such a system is fundamentally wrong and will do more harm than good.
Another, somewhat simplified version of the chimney
Another option for laying a chimney could be a simple straight design. It is suitable for those who have no experience in performing this type of construction.
- The entire chimney, from the stove to the head, is laid out in an even column with a channel inside, and all the elements necessary for it are made using formwork, cement mortar and reinforcement with a metal rod with a thickness of four to seven millimeters.
- In the area where the fluff should begin, formwork of the required size and shape is arranged.
- A metal rod or mesh is secured to the pipe.
- The formwork is coated with a thin layer of clay mortar. It is needed so that the formwork boards can be easily removed from the hardened concrete solution.
- Then the concrete solution is placed into the formwork and left until it hardens completely.
- After the cement has hardened, the formwork is removed and all concrete parts, if necessary, are leveled to give them a neat appearance.
In this way, the complexities of masonry configurations can be circumvented. Of course, this work will take much longer, but it is impossible to make a mistake. The main thing is to arrange the formwork correctly, neatly and evenly.
Channel requirements
The location of the chimney relative to the ridge is not the only issue during construction. It is important to take into account the recommendations and pay attention to the following:
- The material is selected depending on the fuel the boiler runs on. For a gas, stove or solid fuel unit, a stainless steel pipeline would be a good option.
- The number of heating devices should not exceed two per chimney. Otherwise, there is a high risk of incorrect diameter calculation. When using two heating devices, one type of fuel must be used, and the diameter of the pipes can be no larger than the chord of the chimney itself.
- It is preferable to construct a cylindrical or round pipe. This design allows you to create ideal draft, preventing smoke from returning to the room.
By following these simple rules, you can achieve efficient operation of your heating system.
Important nuances of calculating a chimney
Even with the help of a seemingly simple formula, it is not always possible to achieve the desired result. During construction, it is necessary to take into account several more important details. One of them concerns the diameter of the outlet. If you select it correctly, you can achieve additional advantages:
- Reduce fuel consumption.
- Regulate the operation of the heating system.
- Ensure absolute safety.
When making calculations, it is necessary to take into account the material used and existing ventilation. It depends on them how well the exhaust gas will be removed.
System Design Options
Ventilation ducts in a private brick house can have different designs. The design is chosen taking into account the characteristics of the rooms and one feature common to the hood. Along with the exhaust air, heat is also removed. To prevent cooling, a bend in the form of a brick staircase will be included in the ventilation system. It creates a barrier and prevents premature removal of heated air: after being delayed, the air flow has time to partially transfer heat into the room.
Conclusions from the premises
This design is used for arranging complex ventilation. In the upper part of the building, all the channels are combined into a common shaft and discharged through the roof, like a chimney. Its height and diameter depend on the volume of the premises and the distance to the roof ridge.
Wall pipe
A brick chimney is installed in the internal walls.
The air duct is installed directly in the internal wall. Installing ventilation ducts, and even more so chimney wall pipes, in external walls is allowed only in exceptional cases. The wall is in contact with cold outside air. In this case, the exhaust gas, passing through the air duct, cools faster and does not warm the room properly. For the same reason, condensation quickly forms inside the chimney or ventilation duct itself. This reduces traction and accelerates wear, as acid anhydrides are deposited on the walls of the shaft. The wall pipe in the outer wall must be additionally insulated.
A separate chimney is installed for each stove. In exceptional cases, 1 chimney outlet is installed for 2 stoves. A ventilation duct is installed on every 2 chimneys.
The chimney riser ends at the top floor and turns into a regular chimney. The height of the chimney and the head of the ventilation duct depends on the exit location.
Root pipe
A brick chimney on its own foundation
is usually installed in wooden buildings. A brick chimney is erected on its own foundation, and the latter is not adjacent to the foundation of the building. The thickness of the walls is equal to half a brick.
The root pipe can be connected to two hearths. For this purpose, reversible sleeves are installed.
Mounted pipe
Constructed directly on the stove. Experts recommend placing a brick chimney not directly on the neck of the stove, but by first laying a reinforced concrete slab with holes on it. This device allows you to repair the stove in the future without disassembling the chimney.
What is prohibited to do when assembling a chimney
Some actions when calculating the height and subsequent arrangement of the chimney above the roof are not recommended, so as not to create additional problems or emergency situations.
It is also not allowed to fix the chimney pipe to the rafters. The static position of the pipe is too easy to disturb, for example, when exposed to an intense gust of wind. If the chimney damages the rafters themselves, expensive and extremely difficult repairs will not be avoided. In the worst case, they will be completely destroyed, making it impossible to operate the house.
After laying
After completing all construction work, we be sure to check the quality of draft in the pipeline:
- If it is clogged with construction debris, we take out from the bottom of the chimney 4 halves left for this purpose.
- Having lowered the cable from the roof, we tie a brush of a suitable size to the 2nd end and pull it into the combustion chamber.
- We remove all debris, remaining mortar or brick crumbs. We place the halves of the revisions on the solution and check the traction.
Now all that remains is to dry the oven for a few days and eliminate possible defective areas in the masonry. To do this, we put 2-3 kg of firewood in the firebox and when it is completely burned out and the stove has cooled down, we repeat the operation again.
This time we carefully inspect all surfaces of the chimney pipe and mark the places of gas leaks. After the stove has cooled, we eliminate the shortcomings and heat the stove again.
Only after the surfaces have completely dried can you lay a full firebox of wood and proceed to operating the heating unit. Having completed all the work according to the rules, and making sure of the quality of the work performed, you get a warm atmosphere in the house, with the aroma of burnt firewood, even in severe frosts.
Criteria for determining the height of the chimney above the ridge with a table
There are many conditions that must be taken into account in order to calculate the length of the chimney. Some of them are more important, others less. Here's what you should pay close attention to first:
- Where will the chimney be located relative to the ridge fin?
- What wind rose is typical for the area in which the house is built, how intense the gusts are at different times of the year.
- How much precipitation falls in the region and what form is dominant. Snow, or more precisely, the thickness of its coverage in winter, is of great importance.
- What angle of inclination of the ceiling is planned to be arranged.
- Are there any obstacles near the roof that could change the strength and direction of air flow?
All of these factors should be correlated with the type of fuel that is planned to be used for stove heating and other construction features.
| Distance of the chimney from the vault | Height of the pipe in relation to the roof |
| 150-300 cm | equal to |
| less than 150 cm | 50 cm higher |
| more than 300 cm | is a horizontal line drawn from the ridge and a straight line connecting it to the chimney, forming an angle of 10˚ |
Oven with hob
In the simplest version, this design has small dimensions (width 2 and depth 3 bricks - 78x53 cm). However, even in such a limited area it is possible to place a single-burner stove.
Work goes smoothly when you have everything you need at hand.
Therefore, purchase the following materials and accessories in advance:
- Solid red brick – 107 pcs;
- Blower door – 1 piece;
- Grate – 1 piece;
- Single-burner cast iron stove – 1 piece;
- Fire door – 1 piece;
- Pipe valve – 1 pc.
Fire bricks are not needed for a wood burning stove. Buying it is a waste of money. But red should be chosen carefully, discarding cracked and uneven ones.
Preparation of the solution
The masonry mixture is made by mixing four parts clay with one part water and adding eight parts sifted sand. The normal consistency is determined simply: the solution easily slides off the trowel, leaving no drips on it. When laying, it should not leak out of the seams.
The volume of the mortar is determined based on the amount of brick. With an optimal seam thickness (3-5 mm), one bucket is enough for 50 pieces.
Having prepared the masonry mixture, you can begin laying the foundation. Its width is made 10 cm larger than the width of the oven. The height of the foundation is selected so that the bottom of the first row of bricks is at floor level.
An approximate prototype of a stove
If the underground is deep enough (50-60 cm), then there is no need to dig a hole for the foundation. It is enough to make formwork on the ground with a plan size of 76 x (51 + 10 cm). Two layers of roofing felt are placed on its bottom to protect it from moisture. Having laid the concrete, it is given a week to gain strength, after which they begin laying.
The dimensions of the stove with hob we are considering are 3 x 1.5 bricks (76x39 cm).
Expert advice: lay out each new tier of brick without mortar (dry). After adjusting the bricks to size, you can begin laying.
The first row is placed on a layer of clay mortar (4-5 mm). Having leveled the base, lay out the second one, leaving space for the blower door.
Before installing the door, you need to screw a soft wire to it and put its ends into the seams for better fixation.
The frame of the cast iron door has four holes for wire, which is used for fixing in the masonry
To compensate for the thermal expansion of the metal, a gap is left between the door and the brick. Before installation, its frame is wrapped with wet asbestos cord.
The third row is laid by overlapping the seams of the second. At this level, a grate is installed in the firebox.
Order scheme from 1st to 8th row
The fourth row is placed on the edge, observing the ligation of the seams, and the walls of the combustion chamber are formed. Behind it will be the first and only smoke circulation (see section A-A in diagram No. 2). To clean its bottom, a so-called knockout brick is placed in the rear wall without mortar, which is periodically removed to remove ash. Inside the chimney, two stands are made from pieces of brick to support the internal partition.
The stones of the fifth row are placed flat, leaving space for the firebox door. In the back of the stove, in order, we see the walls of two smoke channels. During work, their surface must be thoroughly cleaned with a wet cloth to remove any clay protruding from the seams. This is an important condition for ensuring good traction.
Helpful advice! When focusing on the order drawings, do not forget to look at the two sections of the stove. They will help you better imagine its design and not make mistakes when laying out the bricks.
Order scheme from 9th to 11th row
Having raised the masonry up to the eighth row, they close the furnace door, placing wire in the seams to secure its frame. At the same level, in the back of the fuel chamber, a brick with a beveled end is placed - a smoke tooth. It improves heat output by preventing flue gases from quickly escaping into the chimney.
Having completed the ninth row, an asbestos cord is laid along it on a clay mortar. It is necessary for sealing the joints of a cast iron slab and brick. On the tenth row, the firebox is covered with a hob.
On the eleventh, a smoke valve is installed in the pipe. It is also compacted along the contour with an asbestos cord soaked in clay.
Rows 12 and 13 - formation of the pipe walls. After they are completed, a lightweight sheet metal pipe is placed on the stove, leading to the roof.
General requirements
Today, construction companies offer a huge number of architectural roof solutions. Naturally, all of them are carried out taking into account individual characteristics and prescribed standards. But when determining what height the chimney should be, there are conditions that are met regardless of which project is chosen.
Optimal length and diameter
The chord of the smoke exhaust pipe must be greater than or equal to the Ø of the heating device pipe. Typically, this information is indicated by the manufacturer in the instructions that are attached to other documentation when purchasing a heating device. SNiP identifies the total length of the chimney as 5 meters and its elevation above the upper horizontal rib as 50 centimeters.
These requirements for the minimum height of the chimney pipe above the roof ridge must be observed. Otherwise, the use of the structure will be unsafe.
The smallest value does not have to be the real one. During construction this figure may be increased. In this case, operation is permitted and does not affect the reliability of the pipes, but at the same time the efficiency of the heating system decreases. The difference as a result can change by 20 or even 30%. The indicator is too high to simply ignore it, so during construction it is better to calculate everything in advance or stop at the rise recommended by the manufacturer.
Height above the ridge of a pitched roof
This type of roof requires a particularly careful approach to determining the correct size of the chimney. The fact is that the upper horizontal rib can become an obstacle to the free movement of air masses. Having encountered it, the wind will change its natural direction. As a result, the gas rising from the furnace will not be drawn out. On the contrary, it will return to the room, filling it. To avoid this, it is necessary to be guided by existing regulatory documents.
Diagram for determining the roof slope angle.
SNiP, in turn, prescribe the use of the following rules:
- If the gap between the chimney outlet point and the ridge is no more than 1.5 m in a straight line, then the height of the chimney above the roof should be 0.5 m.
- If the distance is in the range from 1.5 to 3 m, then the maximum point of the pipeline may coincide with the ridge.
- If the interval is more than 3 m, a special calculation is required. It is carried out individually by masters.
Correct sizing will allow you to use the heating system efficiently without creating additional problems.
Influence on the length of the furnace stroke of nearby high-rise buildings
As mentioned earlier, pitched ceilings themselves can become the strongest obstacle to the normal operation of the smoke duct. But besides them, tall buildings located near the house can become such a barrier. They also change the movement of air masses, making it difficult for the smoke to escape normally.
Calculation of the height of the chimney pipe above the roof should be carried out taking into account the surrounding architecture. For this purpose, specially developed schemes are used. It is better to turn to the experts for help. After taking measurements, they will prepare important recommendations.
Where it is not recommended to make a channel for smoke exit
To ensure comfortable and safe use of chimney structures, you should consider some general rules about where it is better not to install them. Among other things, architects advise avoiding installation in the following locations:
- In close proximity to the skylights. These structures themselves are complex and require the use of special fasteners during installation. The chimney can damage them, not to mention the fact that even a weak wind can blow gas waste towards the glass unit. Naturally, in such conditions you will not want to open them.
- On the inner corners of the roof. These areas of the roof are considered the most dangerous and short-lived, and repairs near the chimney are difficult and costly.
- When using several heating systems inside the house at once, it is not recommended to separate their chimneys. It is much more convenient and practical to remove waste through separate channels into a single wide opening. In this case, it is calculated according to an individual project.
Installation of the structure requires careful calculation. It is not always possible to do the work yourself, so it is better to get advice at the design stage.
Choosing a pipe section for the furnace
Experts do not recommend tapping ceramic bricks additionally to get them into place. During the tapping process, an air space is formed, which affects the draft of the flue gas. If it is necessary to lay 4-6 rows of bricks from the inside of the pipe, then the brickwork of the chimney is wiped with a damp cloth, and all seams are rubbed down. The masonry seam is usually 0.5 cm horizontally and 1 cm vertically.
The shape of a brick chimney for a metal stove or fireplace affects the level of hydraulic resistance in the pipe, so its cross-section can be in the form of a rectangle or square. The best option is a round chimney, but it is quite difficult to lay it out of brick with your own hands.
The chimney should not have turns or slopes, since these types of elements lead to the creation of additional air resistance. If you cannot do without a turn, it is easy to equip it at an angle of 60 °. Laying a pipe involves arranging a head, made of 1 brick. The upper part is laid out on a cement-sand mortar.
The level of heat transfer of the stove or fireplace should depend on the choice of cross-section. The cross-section can be within the range of 260x260 mm. For example, if the selected cross-section is 130x130 mm, then the heat transfer is 3.5 kW, and with a cross-section of 130x250 mm - more than 3.5 kW. You should not choose a very large pipe cross-section for a boiler, stove or fireplace, since this will result in a loss of heating efficiency, which leads to a decrease in heat transfer.