Correctly placing a log house on the foundation is an easy task at first glance. How many times have you observed that the bathhouse has moved or become distorted over time? But it will be difficult to carry out repair work, since the frame will have to be rolled out and reassembled. We will discuss together with our readers how to place a log bathhouse on the foundation correctly, what features need to be taken into account.
It is necessary to place the log house on the foundation correctly, observing all the details.
Types of log houses
Log houses are made from logs and beams, only the beams and logs are different. They all have advantages and disadvantages, and more about them below.
What types of log houses are there?
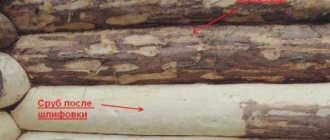
The logs are hand-processed—the bark is removed from them manually (with an axe, plane, or other hand tools), but the shape is not adjusted. So they remain on one side with a larger diameter, on the other - with a smaller diameter. When laying on the wall, the logs are turned so that thick and thin butts alternate. Assembling a log bathhouse from such a log is exclusively handmade piece work. Each bowl is drawn on the spot, it is adjusted to fit the log laid underneath. The process is lengthy - lay it in place, draw the recess and bowls, roll it back, make a groove the entire length of the log, cut out the bowls, “plant” it in place, if necessary, work on the groove and/or bowls (roll it back again and fix it if necessary). For a long time…
Hand-cut logs (chopped) are imperfect, but that’s what makes them attractive
Calibrated or rounded logs are processed on a special machine. They come out of it the same length. They are made standard - of a certain diameter. Immediately at the enterprise, a longitudinal groove and a deformation groove are formed in the log (longitudinal cut, which reduces cracking during drying). The company can also cut the bowl. With this approach, all that remains is to assemble the log house like a construction set. Saunas made from rounded logs are assembled quickly. But not everyone loves them: they have their drawbacks.
A rounded log has the same diameter
When processing a log on a rounding machine, most of the splint wood, the densest and most durable layer, is removed. As a result, rounded logs are more susceptible to fungi, insects and diseases. All this is “treated” with appropriate processing and good drying. However, for some this factor is important.
Regardless of the type of log, the assembly of the log house is carried out using a compactor. This is moss, jute, flax wool. They can be in the form of fibers - tow, but it is more convenient to work with felt cut into a tape. The insulation is laid on top of the log, usually secured with staples from a construction stapler. Carefully line the bowl, also securing the strips. The crown placed on top presses the insulation and it closes any possible cracks. It is impossible to achieve perfect filling right away; the remaining gaps will be filled later, when caulking the log house.
A sealant in a log house is required
Log houses made of timber - types and features
Log houses are also assembled from timber. It has a more regular shape - its edges are smooth or relatively smooth, which facilitates finishing work. There are three types of timber:
- Regular, planed timber. Cut from a single log, usually freshly sawn or slightly dried. In cross-section it looks like a square, but its geometry is not ideal, the sides are not processed and uneven. A bowl is cut along the edges of the beam, which ensures a good connection. The assembly of a log house from ordinary timber is also carried out using a compactor, as is the case with logs.
Planed timber - Profiled beads. It is also made from a single piece of wood, but has excellent geometry - deviations are minimal. Two of its faces are made with grooves/protrusions - profiles, and two are smoothly and evenly planed. Grooves and protrusions are the locks that connect the upper and lower beams in a log house. They serve as a guarantee that the joint will not be blown through. A log house made from profiled timber can be assembled without any sealant at all, but it is advisable to put it in bowls - just in case. But in practice, they still use insulation, even if it’s a thin underlay for laminate, but they put it...
Even the profiled timber is insulated - Glued laminated timber. In cross-section, it is similar to a profiled one, only it consists of several longitudinal parts glued together. Why is this good? The fact is that these parts are cut out of already dry wood and the log house assembled from laminated veneer lumber does not change its dimensions. But this material contains glue, and it does not allow moisture to pass through. That is, laminated timber is deprived of the main advantage of wood - it cannot regulate humidity. But there is no need to finish it - the surface is almost perfect and ready for painting and varnishing, and there is no need to wait until the log house “sits”; a week after assembling the log house, you can begin finishing.
Glued laminated timber
As you can see, there is no ideal material. You need to choose by weighing all the pros and cons, taking into account the price not only of the material itself, but also the cost of its installation, and taking into account the complexity of the finishing. So planed timber is the cheapest option. But if you plan to leave the walls without covering, putting them in order - leveling, sanding - is long and difficult on your own, and expensive with the participation of hired workers.
Prices for log houses
A little about the price of a cube of building material and the thickness of the walls. If you look at the price per cube, then a log costs much less. But a log house requires much more building material in terms of cubic capacity: it has a rounded shape and in fact the thickness of the walls is much less than the diameter. And if you take a beam with a cross-section of 200*200 mm, then your wall will be exactly 200 mm. So in reality the difference in costs for building materials is not that big.
Wall thickness depending on the diameter of the log (rounded)
The second point is the qualifications of the hewers and, of course, payment for their work. If assembling a log house with your own hands is not part of your plans, then you will pay more for the services of cutting bowls and assembling walls from logs. Hand-cut logs are especially expensive to assemble. As mentioned above, each bowl is drawn and cut “on the spot,” and this requires high skill and takes a lot of time. The thicket of timber is cut according to a template - it is cut out of plywood, outlined and cut, most often with a chainsaw. Here, of course, qualifications are also needed, but they are much lower.
There is another option - order a ready-made log house from a woodworking enterprise. You give them a project, they bring you a “constructor” with ready-made bowls. Each element is numbered, they just need to be folded according to a given pattern. Just one caveat: if you or the team you hired have started assembling the log house, and you see that the elements of the “constructor” do not fit, there are more gaps left, check yourself again. Do not start adjusting the bowls (especially if there is a large discrepancy). Most likely you have laid the logs/beams incorrectly. If there is some kind of diagram, double-check it again, or call the company where you ordered the log house. Let them tell you everything again. Usually such a discrepancy is precisely the incorrect installation of the crowns, and not unscrupulous manufacturers.
Large gaps are most likely the result of an error when laying the crowns
The cutting of log bowls, methods of connecting logs and beams in the corners, and joining partitions are described here.
Compiling a table: 6x6 sauna in a rounded bowl with price
Amounts are calculated in rubles as of June 2021:
Log house in the workshop without delivery RUB 79,170:
| Photo | Equipment | Quantity m3 |
| rounded log of natural humidity bath in a bowl according to the project diameter 180 mm number of crowns 14 4 walls, dimensions along the axes 5.5x5.5 m height of the bath after shrinkage 2.155 m in the workshop, delivery, unloading, assembly not included | 8,7 |
Log house with gables, ridge, lumber, consumables, delivery to the Moscow region 206,266R:
log rounded natural humidity in the bowl according to the project 180 mm number of crowns 22 4 walls, dimensions along the axes 5.5x5.5 m height of the bathhouse after shrinkage 3.915 m + non-business waste, pediment material, on the console 1 m and ridge
Log houses of baths with gables, ridge, lumber, consumables, delivery to the Moscow region
+ assembly only 326,070 RUR:
+Assembling a bathhouse: Assembling a bathhouse from rounded timber on a finished foundation Installation:
floor beams of the subfloor of the lining board Antiseptic treatment of the lining board Formation of working drawings, visualization, preliminary design Installation and dismantling of scaffolding Unloading and loading works up to 30 m
Installation of sheathing for roofing felt Fastening of roofing felt Installation of a temporary rafter system
Comparison of two log houses:
The company's standard bathhouse project is 100 logs.
Hand-cut log houses from third-party manufacturers.
What are they collecting for?
Logs or beams are not just stacked on top of one another, they are fastened together. It is impossible without fasteners. During the drying process, both the logs and beams “twist”. The installed fasteners hold them in place, preventing them from turning too much. If there is no fastener, the crowns fall out or in, depending on the direction of the prevailing forces. Most often this is observed on gables, in walls where there are windows and doors.
Loose crowns fall out
Fasteners can be metal or wood. It’s easier, of course, with metal ones - you don’t need to prepare them and it’s more familiar to work with them. But the metal does not change in size, and the wood dries out. As a result, the log house does not shrink during drying, but “hangs” on the studs. This leads to the formation of large gaps between the crowns. So metal pins are only permissible when assembling a log house from laminated veneer lumber: it does not dry out. Nails should not be used at all. They are not for the log house.
It is also not recommended to use pieces of reinforcement, spring units and, in general, any metal. Wood conducts steam, and it will condense on the metal with all the ensuing consequences (rapid oxidation and destruction of the metal, and wood “hangs” very well on rusty metal, another disease is the proliferation of fungi in a humid environment). So if you decide to assemble a wooden frame, it is assembled using wooden fasteners.
Nageli
Dowels and dowels are made from wood. Pins are long thin bars of round, triangular or square cross-section. More often they use round ones; holes of a slightly smaller diameter are drilled for them (1-2 mm less than the diameter of the dowel), into which the bars are hammered. For triangular or square ones, you need to select a larger drill diameter, and drilling with them will be very difficult.
Nageli
The length of the dowel is calculated depending on the cross-section of the beam: the height of the three crowns is multiplied by 0.8. If you have a beam 200*200 mm, then three rows is 600 mm, after multiplication we get 600 mm * 0.8 = 480 mm. The dowels should be of this length.
The most popular diameter/section of dowels is 25 mm or 30 mm. They are made from hard wood - birch or oak. Spruce resists torsional forces very well, so spruce can also be used. If you follow the SNiP standards, then the dowels must have a moisture content of no higher than 12%, they must not have knots or other defects, and they must be treated with antiseptics/fire retardants before use.
Drilling must be strictly vertical
Place the dowel at a distance of 200-600 mm from the edge of the log/beam, and then every 1.5-2 meters in a checkerboard pattern. They are placed strictly vertically, in the middle of the log/timber. To prevent the crowns from hanging on the fasteners when the wood dries, the holes for them are drilled 2-3 cm deeper. To make it easier to track the depth of the hole, wrap a strip of masking tape or bright electrical tape around the drill. They are used to navigate. Then, even with a significant reduction in size, the log house will sit evenly.
Assembling a log house on a dowel - installation diagram
When driving in dowels, it is important to control the effort and hit strictly from above so as not to crack the wood. To make it easier for them to “fit” into the holes, they are dipped in oil (you can use it for mining).
When assembling a log house from timber or logs, the work technology is as follows:
- The first two or three rows are fastened with dowels, spacing them at the required distance.
- Next, two more crowns are laid and fastened to the top row of the previous package. Only now you move the dowels so that they don’t end up on top of each other, but move in a checkerboard pattern.
- Next, two crowns are placed again and connected to the top beam of the previous package (also shifted).
Now a little about the prices of dowels. They are usually sold individually. The price depends on the size and type of wood, but we can definitely say that they are expensive. To save money, people buy rake handles (they have the right diameter), cut them into pieces of the required length and use them. Just note that knots and other wood defects must be cut out.
Square dowel
It’s even cheaper to buy a board of suitable wood (dry, “elite” grade, without knots or defects) and cut it into bars of the required size. For example, you can buy a 50*25 mm board, make 25*25 mm bars from it, cut it into pieces of the required length, and slightly sharpen the edges. Apart from the time investment, this approach is the least expensive.
Dowels
Assembling a log house using dowels is less popular because it takes more time. They only hold two crowns together, so there's more work involved.
Assembling the log house with dowels
You need to cut holes for each dowel in the top and bottom logs. Install the prepared fastening bars, then carefully “put on” the upper crown. The work is precise, long and hard.
What does a dowel look like when cut?
Rules for choosing good timber
Since we are talking about the type of forest, let’s touch on the topic of choosing a log. Pine is rightfully recognized as the optimal material for cutting a log house yourself, because:
- this type of wood is quite soft and easy to process;
- timber harvesting is carried out in latitudes close to the upcoming construction;
- the surface rarely requires additional processing;
- minimum number of knots on the whip;
- barrel escape, i.e. the difference between the largest and smallest diameter in a meter section of a log corresponds to the limits required in construction from 0.8 cm to 1.0 cm.
Pine attracts with its price, acceptable resin content and the advantages of easy processing. It does not crack as intensely as spruce. Due to their density, pine logs are ideal as wall material. With the exception of the lowest frame crown, which takes on the entire load from the structure being constructed. To form the first row of logs, it is advisable to purchase oak, which has maximum density, or larch that is resistant to ground moisture. The use of pine for the construction of a frame crown is not excluded, but logs must be taken with a diameter 5-7 cm larger than the entire timber.
An important criterion for choosing timber is the width of the longitudinal groove, which is formed along the entire log for row laying and joining of the underlying crown with its upper counterpart. The recommended value of this size is 2/3 of the average diameter of a standard log from the purchased batch. The average diameter is equal to the arithmetic mean between the diameter at the butt and at the apex.
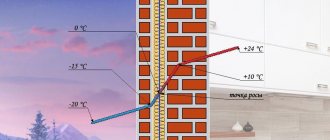
The width of the longitudinal groove is regulated by folk rules based on many years of experience in wooden architecture:
- with repeated winter thermometer readings in the region of -40ºС, the width of the base of the moon-shaped longitudinal groove, i.e. the distance between the projection of the extreme points of the recess onto an imaginary straight line should be from 14 to 16 cm;
- for regions with winter temperatures of -30 ºС, this size is 12 cm;
- for regions with frosts of -20ºС, the longitudinal groove should be made 10 cm wide.
This means that for the construction of a log house in the northern regions, the best wall material will be a log with an average diameter of 21-24 cm. Further, according to the degree of climate softening, 18 cm and 15 cm.
The harvested timber does not need to be stored for more than 2 weeks. Dry wood will make processing difficult. Logs should be stacked with timber or plank spacers between the rows. Gaskets are required for ventilation.
A log that is “overexposed” during natural drying warps and cracks more if a longitudinal notch is not made in a timely manner on the side opposite the groove. With notching, the wood will still crack, but the process will be less active, because The tension in the log will be relieved. And after the frame shrinks, the cracks will be almost invisible.
The timber must be stored on a level area prepared for its storage. It is advisable to arrange a canopy that protects the untreated whip from direct exposure to UV rays and from precipitation, and a kind of “pallet” made of timber laid at intervals.
The procedure for assembling a log house
Two layers of waterproofing are laid on the foundation. It may be ordinary roofing felt, but in its modern version it is very unreliable and breaks after just a few years. To waterproof a log house, it is better to use a more modern version, something like Gidroizol. In areas with high water levels or large amounts of precipitation, it is advisable to do a combined waterproofing: first coat the foundation with bitumen mastic, and stick waterproofing on it. For reliability, you can use two layers (the second one is also for bitumen mastic).
Example of waterproofing
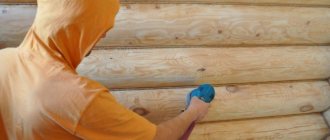
Before laying logs or beams, they must be treated with antiseptics and fire retardants. But the fact is that if you then plan to sand the log house, it is better not to treat it: treated wood requires many times more effort when sanding. On the other hand, there are parts that will be inaccessible after the frame is assembled. If they are not treated until the wood is dry, fungi may develop or it will darken. Darkening is not scary, it can be bleached, but fungi are worse. Especially for a log bathhouse, where there will be periodically high humidity. The solution then is to coat with impregnation only those parts that are closed, and impregnate the free surfaces after grinding.
After the logs/beams are soaked and dried, the actual assembly of the log house begins. The first crown is laid on the waterproofing, its geometry is checked - the diagonals are measured, the angles are checked. Then it is secured to the foundation with previously laid studs. If there are no studs, drill holes and install anchor bolts (holes are drilled under the caps so that they are recessed). Next - on technology. If you are assembling on dowels, then install them in two rows.
Anchors must be driven to a depth not less than the height of the beam/log
The first crowns can be laid by hand without any problems. As you gain height, it becomes increasingly difficult to lift logs. The problem is solved simply: two inclined beams are installed. Two slings are nailed from the inside to the lower rims of the frame and thrown over the wall. They are threaded under the log/beam that needs to be lifted, and pulled up along the inclined bars (see photo).
This is how logs or beams are lifted onto a log house
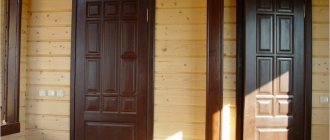
The log house is built with solid walls - no windows or doors. They are cut out after the walls are completely removed and the roof is installed. If the log house is left to spend the winter without a roof, you don’t have to cut out the windows/doors: there will be enough ventilation anyway. But if the log house is placed under a roof, then window and door openings are necessary for normal drying.
Before cutting them out, the frame is fastened (a fixing bursa is nailed in, which holds the crowns in a stationary state). After the opening is cut, a frame is installed (a beam that holds the opening and to which the door or window frame is then attached). The beam is held in the groove only due to the force of friction; it is not fixed by anything else. So the logs/beams remain in place and the log house can shrink.
A groove is cut out into which the timber is driven. It is no longer held in place by anything - no nails, no self-tapping screws.
If you cut openings, be sure to install a window frame. At least in this version, as in the photo above - a block driven into a groove. Just pay attention once again: it is not attached to anything. It is held in place only by friction. That is, it is simply driven into the groove. If you leave the openings unsecured, the logs/beams will most likely go in different directions and you will become the owner of walls like the one in the photo below. It is possible to level them, but it is long and difficult.
What happens if you don’t put the sapling in place for the winter?
In this case, the doors and windows themselves are not installed: a draft is necessary. If you want to prevent visits, cover the doors with mesh, membrane, and cross the openings with boards, but air must pass through.
After the walls are kicked out, the assembly of the roof truss system begins. The upper crown is used as a Mauerlat. If necessary, holes are cut in it for installing rafter legs. Roofing material does not need to be installed. You can leave the rafters with sheathing covered with a helicopter-protective membrane over the winter. You just need to fasten the membrane according to all the rules: start from the bottom, move up, lay the sheets overlapping one on top of the other, gluing the joints with double-sided tape. Fasten with wide-backed staples from a powerful stapler.
The log house is ready for wintering
Next, caulking of the log house awaits you and you can calm down on this until spring. In the spring - secondary caulking, if the main shrinkage is already completed, by the summer it will be possible to begin finishing work.
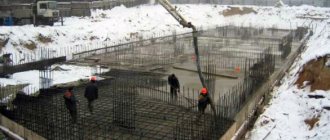
Bathhouse foundation
The columnar foundation protects the building from dampness.
The log house does not weigh very much, so a lightweight foundation is built for it. Which one depends on the nature of the soil.
Columnar or
It is recommended to choose for weak soils prone to heaving. It creates an air gap between the log house and the ground, which protects against dampness.
The foundation consists of columns made of brick and rubble stone, located around the perimeter of the building and under the partitions inside. Lay the brick on the cement mortar. The pillar can be made of concrete: for this, formwork is placed to the entire depth of the pit, reinforced and filled with concrete.
Metal piles are rarely used; concrete piles are more suitable. The easiest way is to use asbestos-cement pipes. They perform the function of permanent formwork, are lightweight and durable.
Tape
The strip foundation is very strong
. It is somewhat more complicated, since it involves digging a trench of the required width and depth - usually 50–70 cm, around the perimeter of the entire bathhouse. The technology is simple: the bottom is compacted with sand and crushed stone, formwork is constructed - it should rise 20–30 cm above the ground, reinforced, and filled with concrete.
The foundation is strong, but quite cheap, as it is shallow. Disadvantage: construction continues only after the concrete has set - no earlier than after 3 weeks.
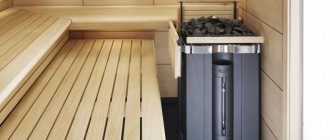
Independent foundation for the heater
If the bathhouse is heated with a wood or stone stove, a foundation may be needed for it. This is determined by weight: if the heater, together with stones and a protective screen, weighs less than 700 kg, it can be placed on the floor. At the same time, the logs underneath are strengthened.
If the weight of the stove exceeds 750 kg, it is necessary to build a slab base. They use brick, stone or pour concrete for this.
Arrangement of openings for windows and doors, caulking of buildings
The manufacture of door and window openings is carried out after the complete completion of the construction of the bathhouse. To do this, use a saw to cut gaps in the wall structures: four for windows, one for the front door and one for ventilation.
After this, all that remains is to insulate the finished structure in order to reduce possible heat losses during operation.
To eliminate inter-crown cracks and gaps formed after shrinkage, a log bathhouse requires mandatory insulation. For this, moss, ribbon jute and tow are used.
The insulation of a log house is carried out as follows:
- The insulation is laid out between the individual logs of the structure, starting from the bottom crown to the topmost.
- Next, corner joints, door and window openings are caulked.
- Finally, the ceiling surface of the log house is insulated.
After completion of construction work, the interior finishing of the steam room, washing room and other rooms of the bathhouse is carried out.
Stage 9. Roof
As soon as the tree shrinks, you can begin building the roof. If you do this earlier, the roof will simply collapse.
Step 1. Place wooden beams on the wall framing (we have already talked about this).
Step 2. Fix the beams and attach the rafter legs to them in 1 m increments. In the ridge part, cut the rafters at the appropriate angle for the connection.
Step 3. Nail a solid board deck to the rafters (if you plan to use rolled roofing material) or make a sheathing (if you use slate, tiles, etc.).
Step 4. Install the roofing according to the instructions for the specific material.
Step 5. Cover the ridge with galvanized sheet steel to protect it from aggressive environmental influences.
Step 6. Cover the roof gables with siding or clapboard.
After this, proceed to further planned work - pouring a concrete screed or building a wooden floor (in the second case, the logs are cut into the logs of the second crown and fixed), install insulation, carry out interior finishing and arrangement of the steam room according to your project.
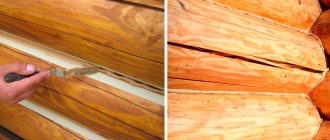
Effective ways to seal cracks
There are several methods for sealing gaps between the base and the crown, which are considered the most effective and act as waterproofing for the lower level of the beams.
The first method is to eliminate holes using small pieces or bars that fit the size of the cracks.
You just need to prepare the material and place the triangular bars in the right places between the crown and the base. And then the insulation is done with moss or tow. The second option for insulation involves removing the gap using construction foam. In this case, insulation occurs due to a layer of material applied to the hole. But after the foam has dried, it should be hidden with decorative trim.
Briefly about the main thing
The log house is most often made from pine or other coniferous wood.
The main advantage of a wooden log house is thermal insulation and environmental friendliness.
When choosing a log manufacturing technology, it is recommended to take into account the level of knowledge and skill. If it is not high enough, then it is better to contact specialists.
It is necessary to use high-quality thermal insulation and means to combat fungus and insects. This will extend the life of the building.
All logs for a log house must be treated with a fire retardant to avoid fire in the structure.