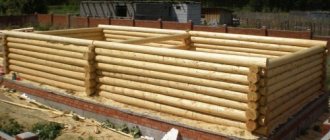
Wooden houses began to be built in ancient times. Previously, there was quite a lot of such building material, so all the walls were built in one piece and only at the end were openings made for windows and doors.
The process of installing a door in a log house depends on what material will be used for construction.
In the modern world, to achieve maximum savings, all openings are marked in advance. This will reduce waste. The installation of a door in a log house is carried out after the construction of the walls and roof has been completed. When building walls, it is very important to leave solid logs or beams in the area of the door opening; this will prevent the crowns from being squeezed out. After the entire structure is strengthened, solid logs are cut from the opening.
The process of installing a door in a log house directly depends on what material is used for construction. Regardless of what is used (log house or timber) for building a house, the installation of the door is carried out in the same way. It is very important to pause when installing the door. Such a temporary break should be counted from the moment of complete completion of the construction of the walls and completion of the assembly of the entire roof structure and be about 6 months.
Doorway arrangement.
During this period, the house will undergo partial shrinkage. Over the next year, the structure will shrink as much as possible. Shrinkage rates will depend not only on the technical characteristics, but also on the moisture level of the wood.
On average, the period of complete shrinkage can reach 6 years. Over the course of a year, a house can change its height by up to 5 cm. Based on these indicators, work on installing a door in a log house must be carried out using a special technology. By following certain rules, you can avoid such a phenomenon as skew. Today there are two options that can be used to install a door:
- installation of a special casing;
- installation of casing when using timber.
Features of doorways in a log house
However, precisely because of the ability of wood to change, equipping a log house with doors and windows is not an easy task. Modern designs - a door block, a metal-plastic window - require rigid fixation and a tight fit of the elements to the slopes of the walls. But it is precisely in a log house that the walls exhibit serious shrinkage - up to 1 cm per year, which does not allow the use of conventional installation methods.
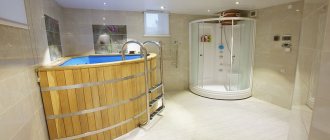
Exactly the same difficulties are faced when it is necessary to install doors to a bathhouse. However, as a rule, a wooden door block is installed in a bathhouse extension, made from the same wood that was used for construction, and this greatly simplifies the task. The entrance door to a residential log house requires sufficient strength and reliability, which a panel wooden door cannot provide.
In any case, it is possible to install a door in a log house only a year after its construction, when the most active stage of shrinkage is completed.
Window as an important power unit at home
What does this phrase mean? But here's the thing - after the construction is completed, the most intense moment of shrinkage begins, which will last at least a year. During this time, if the doors and windows are already installed, they will simply be crushed.
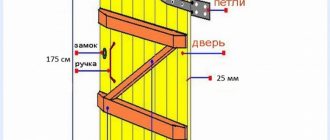
Before starting work, you should know in advance what size the entrance and swing structures will be. Usually, if the project is standard, then all measurements are put aside on drawings and diagrams and there is no need to bother. But if the log house is installed independently, then there is something to think about and decide quickly, since it is necessary that the cut opening fits together with the entire structure.
So, the installation stages:
- Before the log house has to be left to shrink, it is recommended to make the necessary openings. How to saw through a door in a log house? Actually this is not the most difficult question.
The required size is determined, and the diagonals must be taken into account, and the outline is drawn on the log house. You need to make sure that the bottom log is divided in half, and the top one too. Then 7 to 10 cm is added to these sides for shrinkage.
- If the log house assumes the presence of several entrances, one of which must be the front entrance, then the question of how to cut a door in the log house, when a greater distance is required, must be resolved more scrupulously. Board protection must be present on both sides - external and internal.
Also, after making the cut, it is recommended to place logs in the opening for a couple of weeks - during this time the log house will get used to the emptiness. Well, other aspects will no longer differ from an ordinary opening.
Moment of sawing
To avoid any difficulties with the question of how to cut a door in a log house, you must first determine the middle log of the opening and make slits on it. After that it is easy to knock it inside. Well, then working with a saw will no longer be difficult.
Let's move on. After the time allotted for shrinkage has passed, before installing the door, you need to measure the opening of the shrinking frame and determine the changes.
Deformation of logs in a log house
A log house, despite its external solidity, is a rather unstable structure. The reason for this is the round shape of the logs and the change in their geometric dimensions during shrinkage and shrinkage.
Under the influence of the weight of the roof and attic in a log house, distortion of the walls in the vertical plane often occurs. If the crowns were laid without additional fixation, the lower logs can be squeezed out either inside the room or outside. In practice, such displacements from the vertical axis can reach up to 3-5 cm, while the entire wall is under significant stress.
If you cut openings for windows and doors in such a wall without installing casing frames, it will simply collapse. Therefore, the entire structure of the window openings is not only a place for installing double-glazed windows, but also a power unit that gives the frame additional rigidity.
Note that this feature is inherent in all wooden buildings, including houses made of profiled timber.
Overhead hinges
No drilling or overhead. The most famous manufacturer producing glass doors is Leroy Merlin. This method is used only when the canvas is completely transparent and does not have a frame. Buying hinges for glass doors without drilling is required for systems installed inside apartments, shopping centers, and offices. Such canvases perform rather a decorative and delimiting function, so their canvases are light in weight and have a slight thickness. Canopies that are made in the shape of the letter P can easily withstand them.
A sheet of glass is inserted between two metal surfaces, after which it is fixed with clamps (pressure bolts). The adhesive gasket under such canopies is used for thin 5 mm glass, which is more often found in furniture doors. For thicker doors and interior partitions with a thickness of 8-10 mm, plastic or rubber gaskets are used. The weight of the canvas should not be more than 25 kg, then such loops will hold it. This hardware is much easier to install. Furniture hinges for glass doors without drilling are more noticeable on a transparent sash, so you need to choose neat and not too bulky models.
The main advantages of overhead fittings:
- the loops are installed opposite each other;
- they are suitable for interior doors and furniture;
- It is not necessary to fix such a canopy to the wall; it can also be fixed to the ceiling;
- You just need to clamp the glass sheet; installing such fittings yourself is not difficult.
There is a third mounting option - with partial drilling. In this case, no hole is made in the canvas, but only a small depression is made. This is a cross between the two methods. This approach provides a strong fixation, but it is acceptable for not too heavy sashes. This method is often used to install glass doors for furniture. Partial drilling does not violate the integrity of the glass sash and prevents its displacement, since the fastening elements fit exactly into the grooves made for them.
Features of installing a door structure
If you need to install wooden doors, then installation of the frame is not required; its role will be played by the casing system. An exception may be the situation when wood lining is used as a finishing material. Then the box is placed on polyurethane foam.
After installation, the box is closed with platbands. In case of severe shrinkage, they can be replaced with new ones or simply reinstalled by adjusting the dimensions.
If you plan to install a metal door, then the casing is done a little differently. Its upper part does not need to be installed. Instead, you need to leave a gap that allows settlement to occur naturally.
The main advantage of a metal door is strength. Its box is able to withstand the pressure of wood during shrinkage without any consequences.
When cutting an opening, a number of recommendations should be taken into account:
The above requirements are relevant and, if necessary, install a window. The casing must be carried out in any case, even if the opening cut in the log house is small.
When carrying out the work described above, the possibility of the formation of cold bridges should be taken into account. To avoid this, it is necessary to use thermal insulation materials, for example those with which the wall was insulated.
In other words, cracks and gaps formed during the installation process can be sealed with tow, polyurethane foam and other materials with similar functions.
It is preferable to use polyurethane foam, because it not only prevents drafts, but also gives strength to the structure. At the same time, it is much easier to use.
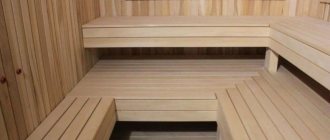
Installation of canvas in a log house
Construction of a doorway for a bathhouse
Correct installation of the entrance block begins with the installation of the flashing. This specialized structure consists of two bars connected at the top by a board.
If you plan to install doors for a bathhouse that are lightweight (for example, made from panel boards), you can get by with installing a door frame:
- from the end sides of the opening, select a groove with dimensions of 0.5 × 0.5 m;
- bars of identical size are inserted into the resulting groove;
- and the box is already attached to the latter.
Installing a door to a bathhouse
If you want to install a massive door in a bathhouse, it is recommended to use a U-shaped flashing and follow the following recommendations:
- First of all, correctly take measurements of the doorway. Moreover, its width should be identical to the thickness of the frame and the box on all sides.
- Make markings on the surface of the walls of a log bathhouse using a building level and a plumb line.
- Cut a hole in the wall of the bath house using a chainsaw.
- From all end sides of the doorway, form a tenon measuring 0.5 * 0.5 m in the form of a vertical ridge along the height of the door.
Flashing for mounting the door structure
Fix bars measuring 0.5 * 0.5 m onto this tenon. In the upper and lower parts of the frame jambs, securely secure them with a beam. The latter should be distinguished by the presence of grooves on the sides, which in size correspond to the protrusions of the bottom and top of the side posts. This design of the frame is reliable and can prevent the movement of the logs of the walls that lead to the opening. A log house in a log bathhouse should not be attached to logs. Indeed, in this case it is necessary to ensure movement in the doorway. And the insulation of cracks near the bathhouse frame can be done with a regular jute strip. After installing the frame, you need to hang the door leaf on several hinges. Their number must be at least four
To complete the task, it is important to combine the canvas and the frame with the exact location of the hinges on the sashes. Thanks to the use of wooden wedges in a log bathhouse, the position of the door leaf is secured. Moreover, it is important to leave a small gap of 20-30 mm between the canvas and the racks with hinges, and at least 50 mm between the other surfaces.
Door in a bathhouse made of logs
- Only then can you start attaching the frame with self-tapping screws. It is recommended to use at least two of them for each connection and final fixation of the pellet.
- Next, hang the door leaf on the hinges and double-check the verticality using a building level.
- Install fittings - handles - on the bathhouse door.
- Lastly, install the trims. If necessary, trim the logs.
If you purchased the door leaf and frame already assembled, the installation of the structure occurs in a simplified version. Grooves are created along the verticals of the opening, and bars are inserted into them. Moreover, the door frame is fixed to the latter
However, in this case, it is important to remember about the shrinkage of the fresh log house and leave a gap of 60-80 mm
If you follow all the described recommendations, you can easily install a wooden door in your log bathhouse, because there are no particular difficulties in this matter. The main thing is to be aware of all the subtleties, which are clearly described in our article.
Voted over 301 times, average rating 5
Tips for installing different types of bath doors
Following the installation instructions will help this element perform its intended functions. After all, the door protects from drafts and retains heat in the room. And its service life directly depends on proper installation. So, any door leaf should open outward. It is not advisable to remove the packaging from the product until the installation process is completed.
The entrance door to the bathhouse can be of the following types:
- wooden;
- glass;
- metal;
- from MDF, chipboard, plywood.
If your budget allows, you can opt for a metal door. It is durable, reliable and durable. However, this option is not in great demand. MDF, chipboard, plywood - all of them can be used as an entrance door. But such products are less durable due to the fact that the slabs quickly absorb moisture. This circumstance can lead to deformation of the product. The wooden option is the oldest and most traditional of all available. This canvas is attached to the frame.
https://vk.com/video_ext.php
The dimensions of the recesses should be 0.5 centimeters larger than the width of the frame beam. Such a reserve is needed to correct possible deformation of the canvas after its installation. The frame requires a beam with a section of 6 by 15 cm. When choosing a beam, you need to take into account the fact that the thickness of the canvas should be 5–7 cm less than the width of the frame posts.
You will see that the door leaf will fit tightly into the groove cut on the outside of the posts and crossbars. It protects the room from drafts. The main thing is not to confuse the location of the groove: the recess should be on the outside of the door leaf. After the timber is strengthened, you need to go over it with sandpaper to eliminate any unevenness on the surface.
The next step in installing the door is to tenon the top lintel of the frame with the posts at the corners. The entire door frame is leveled so that there are no distortions. Long anchors are used to attach the frame to the opening. After installation, you must once again check the strength of the fastening of the racks and the upper jumper. At the final stage, the threshold is installed.
After installing the door frame and threshold, the fittings are attached. It is recommended to use 3 sets of hinges: the first should be fixed 20 cm from the floor, the second - 50 cm, and the top - 140 cm. Then the door leaf with the installed fittings is hung on the frame.
When installing a glass door, you must first remove the panel. For this purpose, several screws are unscrewed using a hexagon on the hinges. Then the threshold is removed from the box. The side posts and the top crossbar are mounted in the opening, then the frame is attached. After fixing the box evenly, you can hang the glass sheet. The final stage is attaching the handle.
The steel product is mounted in the opening in the same way as wooden and glass panels. This means that the opening is first prepared, then the frame is installed using plates, screws or steel rods. The next stage is foaming the resulting gaps. The installation of the door leaf and fittings completes the work process.
Features of installing a door without deforming the frame
When installing a door block, you often have to secure the wooden frame with screws. Not everyone likes the fact that their heads are visible on the body of the box. This can be easily avoided. After all, in the design of the door block there are already visible screw heads that do not hurt the eye, and their presence is justified - these are the screws for fastening the door canopy. And so, if the place of one of them is used for the box fastening element, the replacement will be invisible from the outside.
To implement this idea, you should not use the upper or lower mounting hole of the canopy. The second one from the top is better, the one that moves deeper into the box. After installing the temporary fastening of the door frame using wooden wedges, the awnings are removed. The intended hole is expanded with another large drill to such an extent that the plastic dowel for quick-mount fastening together with the cap can freely pass through it. Then a hole in the wall is drilled through this hole using a Pobedit drill of the appropriate diameter and to the required depth. Insert a plastic dowel, pressing the cap all the way to the wall.
The same operation is performed with the lower canopy. At the next stage, the canopies are installed in place. A mounting nail is threaded through the hole intended for fastening the box and driven into the plastic dowel. It may happen that the gap between the wall and the frame is too large, then you should select a longer mounting nail from another quick installation kit. At the attachment point between the wall and the body of the box, a wooden spacer should be laid so that the mounting nail does not move the vertical part of the box towards the wall.
There are no canopies on the other side of the box, but there it is permissible to use a metal lock cylinder for hidden fastening. Here, to fasten the box, it is advisable to use both mounting holes of the cylinder. The end result will be an additional strengthening of the door lock.
In general, installing wooden spectacular doors with your own hands becomes an accessible task for everyone. Installing wooden doors is not difficult, but you should listen to the basic recommendations. In this case, it will be possible to correctly install the door structure and ensure the longevity of the wooden panel. Take into account the specific placement of the box and the insertion of hinges. The result will be a reliable door with an interesting appearance.
Lead and zinc white
The most important of them are lead and zinc white. In terms of chemical composition, lead white is a basic carbon dioxide salt. Pure white is called solid and is marked No. 0. White with an admixture of barite sulfate (heavy spar) is called graded and is marked No. 1, No. 2 and No. 3. The last two grades sometimes contain up to 40% heavy spar.
When painting with oil, the primer is usually filled with lead white and then covered with zinc.
In terms of its chemical composition, zinc white is zinc oxide. In trade, the highest grade of zinc white is called Schnweiss and is marked No. 0; zincweiss - No. 1.
From lower grades and a by-product of the production of zinc white, zinc gray paint is obtained.
Ways to fill the opening
There are several common solutions for how to remove a window in a wooden house:
- The most radical, but also the most reliable and aesthetic way is to disassemble part of the log house and replace the logs or beams. If we are talking about an attic or dormer window, this is not such an expensive solution, and it will allow you to forget about all the problems with blowing through the walls. But it should be borne in mind that old and new lumber will settle differently, so it is better to purchase dried wood and do not forget about laying insulation. When shrinkage is complete, re-caulking of the resulting cracks will be required.
- Installation of fragments of logs or beams of similar size and diameter into the hole. This is a rather labor-intensive method: the opening logs are cut at an angle of 45 degrees, the same angle is made at the ends of the insert pieces. There is also a minus: the new elements filling the hole will be very different in color. In this case, you will have to paint the entire wall to disguise the embedded part, or use another cladding option.
Frame method
How to install a window in a wooden building with minimal labor costs without cladding? There is a simple and effective method that will allow you to forget about the cold, and at the same time the structure will remain beautiful and neat. Sequencing:
The old window block is being dismantled. The doors are carefully removed and the frame is removed. There is no need to throw away the plastic system: it will be useful for a summer house, greenhouse or gazebo. The resulting hole is cleared of accumulated debris and dust. After this, a frame made of thin timber or wooden slats is installed in it. It can be attached to the wall logs with nails or self-tapping screws.
A frame is stuffed onto the frame from the outside, and material corresponding to the walls is attached to it. If the house is made of logs, they usually use a block house, if it is made of timber, a horizontal lining of the required size is used. As a result, the opening will not be noticeable from the street, and the surface will appear smooth. To avoid any difference in color tone, the wall should be painted.
What oils and drying oils are suitable for wood?
Most paints are diluted in oil, which can be of mineral, vegetable or animal origin. Mineral oils include petroleum, rock wax, etc.
In painting, oil and drying oil for wood are used exclusively of plant origin, extracted from the seeds of various plants and mainly flaxseed. You can find out which ones are suitable further in the article.
Vegetable oils are very diverse in their composition and are commercially available in solid (Japanese wax), thick (coconut oil) and liquid (linseed oil).
All vegetable oils when left in air for a long time oxidize, thicken and turn bitter.
Liquid and lubricating oils have the property of being viscous, harden and are able to form a beautiful elastic, rubber-like mass.
The second: wood, olive, almond, rapeseed, rapeseed, mustard, beech, castor, etc.
Flaxseed oil is extracted by pressing flaxseeds. Cold pressing produces the best type of oil with a pleasant smell and light yellow color, which makes it possible to eat it.
In oil mills, however, cold pressing is considered unprofitable due to the relatively low yield of oil and is replaced by hot pressing, and the resulting product will be darker in color with a strong odor. This unrefined oil is used almost exclusively for the preparation of drying oil (boiled oil).
As for the quality of the oil, it depends on the method of preparation and the quality of the seed from which it is prepared.
Since linseed oil is a rather valuable product, it is often mixed with various impurities that spoil its quality. The most common contaminant found in flaxseed oil is mineral oil. Such drying oil usually dries poorly and becomes tacky. If you look at it through the light, you will get a bluish tint, which, however, is not always noticeable, because recently they have begun to use well-refined mineral oil (colorless) as a mixture.
Of all vegetable oils, linseed oil is the most widely used in painting, representing the best product for preparing linseed oil.
Poppy oil is obtained from poppy seeds by pressing at ordinary temperatures, or by heating. In the first case, the oil will have a light color, a pleasant taste, and therefore such oil is usually used as food. In the second, the dark color and bitter taste due to the abundance of impurities make such oil suitable only for technical use, such as, for example, in the preparation of expensive dyes. This oil is rarely used for ordinary painting work.
Sunflower oil is extracted from sunflower seeds, which grow almost everywhere in Russia and are especially sown in Little Russia, the southern provinces and the Caucasus. The color of the oil is golden yellow, when fresh it has a pleasant taste and smell and is readily consumed. Sunflower oil is mainly used for preparing light drying oils and for diluting white and light paints. It dries much slower than linen. If prepared improperly, such drying oil becomes sticky and acquires a red tint.
Preparatory work for the installation of metal doors
Before you begin installing the doors, it is necessary to carry out preparatory work, and the whole process looks like this:
- The opening is being prepared;
- Sizes are customized;
- The box is fixed to the opening;
- The cracks are sealed;
- The door leaf is installed.
It is customary to install the block flush with the wall and secure it with anchor plates. If desired, the block can be made recessed into the opening and secured with anchor bolts or steel pins. The door frame inserted into the opening is pushed apart with wooden wedges to fix the product in the desired position.
The position of the box is adjusted using a building level; the position is adjusted by moving the blades to the side or inward. After adjusting the desired position, the box will be tightly fixed and will not move during the drilling process.
Afterwards, the canvas is put on and its movement is checked, which should be free when opening and closing the doors. Next, you need to remove the door in order to secure the lintel with the threshold on the narthex side and put it on again, checking the movement again. You can correct the position of the box by tightening or loosening the nuts.
Having finished installing the box, it is left without a canvas to seal the technological gaps with polyurethane foam, having previously sealed it with construction tape. Excess polyurethane foam is cut off and covered with casing.
How to install a door to a wooden bathhouse
A wooden door can be installed in any or all areas of the bathhouse. They install either a solid wood door or a frame door with cladding, for example, clapboard.
Hinges or canopies are mainly used either internal (butterfly) or external, or mortise (card).
The sequence of installation operations is described entirely above - everything was about wooden doors.
The difference between indoor and outdoor ones can only be in the number of hinges (for a heavier one, three are installed) and a more complex lock. Locks inside the bathhouse are made simple: roller, magnetic, etc.
In a Russian bath there is usually a high threshold at the entrance to the steam room, in a sauna there is no threshold, there is a gap between the sheet and the floor. Therefore, an important point is to determine the size of the door to the steam room of a Russian bath.
IMPORTANT! Wood impregnations can be used everywhere except doors in the steam room.
Features of installing a metal door
Installing an entrance door made of high-strength metal means creating reliable protection against sudden entry into your home.
To reliably protect a wooden building, install a metal entrance door
Installing a metal structure in a wooden house consists of several steps:
- Arrangement of the opening. If the opening was not provided during the construction of the house, then it is cut out in a blank wall with a chainsaw. When non-solid crowns are installed in its place, then apply markings and trim off the excess protrusions of the tree.
- Installation of the pigtail. Ridges are made on the sides of the opening, onto which carriages with a groove are subsequently placed. Then the cross bars are attached.
- Installation of frame and sash. If necessary, the metal box must be insulated. After it is inserted into the frame, level the structure and secure it with self-tapping screws. The number of fastening points must be such that the load is evenly distributed over the entire wall. After installing the box, hang the canvas on four loops.
- Sealing joints. It is performed with polyurethane foam.
- Decorating the opening. To make the opening look more attractive, it is decorated with overhead strips. They are attached not to the wall, but to a metal frame.
It is difficult to install a metal door alone due to its heavy weight. Therefore, it is recommended to call someone to help you. Strict adherence to the instructions and the presence of desire will allow you to cope with this not very easy job, even if you have no experience.
Installation instructions
Installation of the product requires a clear sequence of actions. Step-by-step instructions will allow you to get an overall picture of the entire scope of work and not lose your way. Installing a metal door consists of four stages.
Metal door installation diagram
Preparing the opening
The locations of openings in the building are provided for by the design. They are made at the construction stage or cut out with a chainsaw after the house is built.
During construction, an opening for the door is cut out
The width of the opening should be 150 mm larger than required by the door structure. This is necessary to install a casing box with a width of 65 mm. It is also necessary to leave a gap of 15 cm at the top, which will be closed over time by the settled crowns.
When replacing an old frame door, preparation of the opening begins with its dismantling. Disassembling the structure will not be difficult. To do this you need:
- Remove the canvas.
If it was held on collapsible hinges, then open the door and lift it with a crowbar. If the hinges were not removable, use a screwdriver to unscrew the screws holding the sash in the frame. Removing the old door - The easiest way is to disassemble a wooden box with your own hands.
To do this, unscrew all the fasteners or saw the racks on the sides and tear them off with a crowbar. The metal box is usually sawed off with a grinder. Removing the door frame - Clean the opening from worn-out insulation, remaining fasteners, and pieces of plaster.
Assembly and installation of casing
The frame or casing is the name given to the bars around the perimeter of the opening, which form a rigid base for fastening the door. It does not prevent the shrinkage of the wooden structure, but at the same time protects the openings from distortions that appear under the influence of settling crowns. When installing the casing, a groove is made at the ends of the opening using a router.
To install the frame, you need to cut a groove at the ends of the opening
Then a beam is inserted into it. It is also called a sliding bar, along which the entire house settles. The contours of the opening remain unchanged.
A sliding bar is installed in the groove
It is also possible to use other casing structures that perform exactly the same function. The choice of connection type is a matter of taste.
Casing options
A cross-bar is installed at the top, and soft insulation is placed in the gap. The beams are extended on the sides with boards, the width of which is equal to the width of the end. As a result of these actions, a rough frame is obtained to which the iron door will be attached.
The door casing is arranged by analogy with the window
Finished casing
Installation of box and canvas
For buildings made of wood, frames with a high degree of rigidity are usually chosen. As a rule, this is a welded mechanism made of sheet material with a thickness of at least 2 mm.
Before inserting the front door frame into the opening, it should be insulated with mineral wool and thereby seal the joints. Often there are products with an insulated box. In this case, no additional manipulations are required before installation.
The gap between the door frame and the casing should be in the range from 1.5 to 3 cm. It is filled with polyurethane foam.
Once you have managed to place the iron box in the opening, align it and secure it. To ensure that the load is evenly distributed over the entire wall, it is recommended to increase the number of fastening points.
After installing the box in the opening, it is aligned and fixed
The next step is hanging the sash. There are 2 fastening methods used in iron doors:
- Welded external hinges. To put the fabric on, you need to lift it and place the top of the loop on the pin. This fastening is considered unreliable, since the loops are easily cut off.
- Hidden loops. They are inserted into the sash or hatch and are considered burglar-proof. To carry out installation, you will need a hex key, which is used to tighten the fittings.
By opening and closing the door, check that it is hung correctly
The correctness of the door hinge is checked by opening and closing it.
Filling cracks with foam
After installation is complete, it is necessary to foam the cracks around the iron box. If you don't want traces of foam to remain on the frame, cover its edges with masking tape.
After the polyurethane foam has hardened, its excess is removed. As a decoration, the metal door is framed with platbands. The overhead strips are not attached to the wall, but to a steel frame.
First working stage: cutting out the opening
Alignment of walls
After the marking is completed, cutting out the opening begins. During this seemingly simple operation, the following rules must be observed:
- the cutting plane must be strictly perpendicular to the longitudinal axis of the logs;
- The cutting line should run in such a way that there are no distortions and spontaneous falling out of the logs.
After cutting the opening, it is necessary to check the condition of the end of the frame to ensure that the vertical axis is maintained. If deviations are noticed, then the next stage of work is leveling the wall.
This is done with the help of special devices that pull the logs into one line.
This screed is temporary and is dismantled after installation of the casing.
Please note that in cases where an increase in wall distortions is detected, it is advisable to install a U-shaped version of the frame.
Caustic quicklime for whitewashing walls is converted into slaked lime before use, which is achieved by slaking it with water. Caustic lime is placed in the box designated for slaking and a sufficient amount of water is poured onto it, and slaking occurs, that is, strong absorption of water. At the same time, the lime becomes very hot, boils and emits a lot of thick steam;
If a lot of water is taken during slaking, then the lime will weaken its strength, and if not enough, then unslaked and, therefore, unusable pieces will remain in the lime. These are the main aspects of how to properly dilute lime for whitewashing walls; if you follow them, then preparing a working solution will not seem difficult.
As for the amount of water required to slak the lime, it is not always the same and depends on the composition and quality of the lime taken. That is why water is not poured into the lime immediately, but gradually until all the lime is quenched.
Lime produces a very common strong white paint on water for cheap brick and plaster work.
Lime destroys organic colors, but with earthy ones it gives durable tones.
Spar, light and heavy, serves as an admixture in paints to reduce their cost; it does not affect the color, but weakens the roofing ability. The surrogate, although commonly used, is dishonest.
The drying of vegetable oils is based on the ability of these oils to absorb oxygen from the air, which in raw oils, however, occurs very slowly. To speed up this process, the oil is subjected to high temperature along with oxygen-rich substances, which partly dissolve themselves and partly give up their oxygen to the oil. For this purpose, red lead, silberglet, manganese peroxide and others are used.
When cooking to prepare drying oil from sunflower oil at home, one must not forget that excess oxides, or so-called drying, have a detrimental effect on the strength of drying oil and paints prepared with it.
Cooking butter in small quantities at home is quite difficult and requires a lot of skill, because the slightest oversight can ruin the whole job. If the oil is overcooked, it will dry poorly and become sticky, while undercooked oil will have its own, no less significant drawbacks.
Any clean, quick-drying vegetable oil without foreign impurities can be suitable for preparing drying oil. The best oil in this regard should be considered old linseed oil, precisely the kind in which, due to time and long standing, impurities and mucous substances have managed to settle and water has separated.
When cooking drying oil with your own hands from sunflower oil, do this at home: take a cast-iron cauldron of such a capacity that it can hold the required amount of oil, and place it on a brick stand, as far as possible from buildings and living quarters, preferably in the open air.
High-quality oil is poured at least 4.5-9 cm below the top edge of the boiler so that during boiling it cannot overflow and flare up.
Light a not particularly strong fire under the boiler and, without covering the boiler with a lid, allow the oil to boil for at least 2 hours, after which add a little red lead and zilberglet, counting 400 g of zilberglet and 100 g of red lead for 16 kg of oil, with constant stirring with a wooden paddle The oil is allowed to boil for 1-1.5 hours, and then the fire from under the boiler must be extinguished and the oil allowed to gradually cool.
How long it takes to cook drying oil from sunflower oil cannot be determined with accuracy, since here you have to take into account the quality of the oil. The following practical method is usually followed in order to find out whether the butter is cooked enough or not: dip the end of a goose feather into boiling oil, and if at the same time the feather curls into a tube, this can serve as a sign that the butter is cooked enough, otherwise the feather will not bend .
During cooking of drying oil, cases of ignition of the oil are very possible. Then the boiler must be immediately covered with a metal lid, but do not pour water into the burning oil, which can cause a dangerous explosion. Before making drying oil from sunflower oil, you need to study all the technologies and safety rules.
In general, it should be noted that cooking drying oil at home should be avoided; the quality of the resulting product is not always satisfactory. That is why there is no reason to cook it at home, but it is better to buy ready-made drying oil. By purchasing oil from reputable companies that are specially engaged in large-scale cooking, in devices and devices specially prepared for this purpose, you can be completely guaranteed to obtain a homogeneous product of good quality, which is especially necessary when performing painting work.
In some cases, you can make drying oil from oil using a cold process by adding 3 to 5% paint dryer to the raw oil.
Basic information
In timber buildings, doors and windows can be installed both during the construction of walls and after all construction work is completed. And the bathhouse is no exception to these rules.
In the first case, it is necessary to take into account that the log house dries out over a certain period of time and gives rise to sediment reaching 60-150 mm. Therefore, this factor can affect the quality of door installation as a whole. Therefore, the best option would be if it is installed after the constructed log house has stood for about 6-8 months, or even a year. As a rule, this is enough so that the degree of further shrinkage cannot adversely affect the geometry of the doors or windows. Moreover, to guarantee this, we will provide for such a possibility and take appropriate measures.
So, let's begin the process of installing the door in the steam room. We have already made its canvas earlier (see the article “How to make a door for a bathhouse with your own hands”). We will work with him.
Casing
This is a door element that has a longitudinal tenon, which is inserted into the vertical side walls and, thus, further shrinkage can only affect it, without affecting the door in any way. The question of how to embed a door into a log house can be solved perfectly with the help of a casing.
It cannot be left without a gap of 5 cm with the log house. Self-tapping screws and nails are suitable as fasteners. The bottom one can also be cut for a tenon.
Next, the canvas is hung - the fittings should be included by then. Thus, the question is resolved - how to install a door in a log house using a casing.