If the stove in a bathhouse is often compared to its heart, then the canopy is the soul of the steam room. The basic sensations of our relaxed and steamed bodies depend on its convenience and safety. It is this thought that makes many owners take on making their own canopy. How to make a bath canopy with your own hands so that it lasts long and reliably?
For an error-free result, you need to think through and consistently go through several stages:
- location;
- material;
- design.
Determining the location and execution of the drawing
The curtains are placed along the longest wall in the steam room, which has no windows, doors, vents or ventilation holes.
It is necessary to take measurements of the steam room and make a drawing on which you need to indicate the stove, heating boiler, location of windows and vents. Following the recommendations of experts, the location of the shelves is indicated. To make a bath canopy with your own hands, the drawings should be made in two projections.
The drawing should also indicate the dimensions and places where the benches are attached to the walls and floor. It is recommended to fasten the upper rows to the walls, and the lower canopy to the floor. The entire structure should be as compact as possible.
Next, based on the drawing, the required amount of wood is calculated with a margin of 5%.
When creating bathhouse curtains with your own hands, you should pay attention to the following points:
- The width of the canopy can be 40-60 cm. The benches should not be made too narrow or wide; the size of the canopies in the steam room should be such that it is comfortable for a person to lie stretched out to his full height; the hands should also be placed on the shelf.
- The bottom shelf should be at a distance of 45 cm from the floor. There should be 55-65 cm between shelves.
- The top shelf is located 120-130 cm from the ceiling.
- It is best that the height of the second shelf from the floor is 110 cm.
- Shelves should not be installed close to the stove, even if it has a protective fence. Otherwise, you may accidentally get burned or get heatstroke.
- The location of the bath shelves also depends on the circulation of steam: you should not install benches under it.
Briefly about the main thing
The bath canopy is made of wooden boards and timber. Sanded workpieces are pre-impregnated with protective compounds containing fire retardants and antifungal additives.
Self-assembly of the structure begins with drawing up a project. In this case, the recommendations of the craftsmen regarding the location of the benches should be taken into account: location, height, width.
Assembly begins with the installation of a supporting structure, then the sheathing for the boardwalk is constructed. Additionally, you can make a headrest and footrest. Installation of backrests is performed at the discretion of the bathhouse owner.
Ratings 0
DIY bath canopy
Take a steam bath in a real Russian bathhouse or spend an hour or two in a sauna, it would seem, what could be more pleasant? Moreover, for the happy owners of their own piece of land this is more than feasible. But installing a log house is half the work; properly organizing the interior space is an equally important stage in the construction of a personal piece of paradise.
Contents of step-by-step instructions:
Canopy arrangement
The steam room is the central place in a bathhouse or sauna, and the quality of the procedures performed there depends on how correctly and rationally its space is organized. The location and number of benches in the steam room depends on the size of the steam room and the needs of the owners. The canopies can be either single- or multi-tiered, go in a circle or be opposite.
How to make shelves in a bathhouse
Types of bench structures for steam rooms
Despite the great diversity, three main groups of designs can be distinguished.
- Stepped
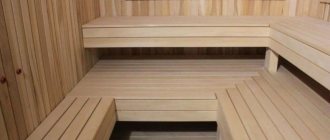
. The most popular type of canopies used to organize steam rooms. With this arrangement, the shelves are placed along one wall in several tiers, most often two or three. The degree of heating of the shelves increases from bottom to top. According to the rules for placing such structures, the top row of benches is located above the stove and heating boiler, but with sufficient height to the ceiling, allowing you to sit on the shelf while sitting. Stepped canopies are most suitable for large steam rooms. This is the ideal placement for a quality procedure: starting from the bottom row, gradually moving to the top. It is noteworthy that on the very last row it is very comfortable to steam in a lying position. - L-shaped.
This type of structure is characterized by the location of one or two shelves on the wall opposite the one where the stove is located, and another shelf is located on any of the free walls. In this case, the height of the shelves is selected individually. The best option for large steam rooms, as well as steam rooms combined with washing rooms.
How to make shelves in a bathhouse
Canopy sizes and shapes
Canopy sizes and shapes
The dimensions of the canopies are determined in each specific case, based on the area of the steam room. We should not forget about comfort during a person’s stay, therefore the length and width of the canopy should allow one to sit on it both sitting and lying down.
As for the shape of the benches, here you can give preference to the classic bench type of canopies, and it is possible to make sun loungers or even wooden sun loungers. The main criterion is the capacity of the steam room and the ability to place certain structures in it. Compactness is the guiding principle in placing canopies; benches should warm up well and not take up extra space.
Materials for production
Most often, the same material is used to make canopies as for lining interior spaces and steam rooms. Deciduous wood is preferred over coniferous wood due to the latter’s ability to crack and release resin when overheated, as well as low thermal conductivity and high density.
Combination of several types of wood at the same time
Shelves for steam rooms can be made from the following types of wood:
Blueprints
If you decided to make a shelf for a bathhouse with your own hands, then first you need to draw up a drawing of it.
To make a clear diagram, first of all, you should take into account the dimensions of the room, the location of the future structure, as well as the height of the ceiling in the steam room. In order to make your plans a reality, you should familiarize yourself with the standard dimensions of such structures:
- To lie on a shelf with your knees bent, you will need a bench 1.5 m long.
- The 1.8 m long bench will allow any average user to lie down on it without bending their knees. In this case, a lot depends on the individual parameters of the person - sometimes even a two-meter bench may not be enough.
- The shelves can have a minimum width of 40 cm. This parameter most often belongs to the lower tier, which is usually used as a footrest. This step is comfortable to stand on, but you can also sit down.
- Most often, bath benches have a width of 60 cm. This parameter is optimal, but is not entirely suitable for steaming in a supine position.
- To sit sitting (with your legs pressed) across the bench, you will need a structure with a width of 90 cm. A user with any physiological parameters will be able to lie on such a bed.
- The widest wooden shelf is 150 cm in size. It is comfortable not only to sit on, but also to lie on.
When designing shelves for a bath, it is important to take into account the installation height of all components:
- 1.1-1.2 m - experts recommend maintaining this distance between the lowest step and the second shelf.
- 40-60 cm - this gap is optimal if done between the first and second shelves.
- 20 cm is the minimum permitted distance that should be left between the floor and the step located at the very bottom.
- 1.5-1.8 m - these dimensional values are the minimum for the length of the bath shelf.
When drawing up a design project for a steam room, you need to pay special attention to the layout of the shelves in the room:
- There are 1-3 rows along one of the walls of the room, while the shelves can be installed one above the other.
- There are also L-shaped designs. In such options, any number of steps is possible. For example, there may be two or three along each partition. The upper and lower parts can be located along the longest wall, and the middle one along the shorter one located next door.
- There are also models in which there are two parallel structures located along walls opposite each other. These options are reminiscent of a compartment in a train carriage. These shelves can be either symmetrical or uneven with signs of asymmetry.
After this, it will be more convenient for the owner to choose the optimal solution. Moreover, you can correctly calculate the required volume of lumber based on the size of the benches.
It is not difficult to draw up a design for bath benches - to do this, you just need to take into account all the parameters and the expected location of the structure. If you have doubts about the correctness of your actions, then it is better to hire specialists who will prepare a finished drawing.
Structural features of the shelves
In order for the curtains in the steam room to last as long as possible, a number of features must be taken into account when assembling them:
- The design, open at the bottom, will allow you to easily clean the steam room, and will not interfere with air circulation and rapid ventilation.
- The sunbed should be positioned slightly at an angle so that any water falling on it can drain freely.
- Plastic or rubber pads under the vertical posts of shelves will extend the life of the wood and prevent it from rotting.
- During operation, the lounger should not creak or wobble, so all elements must be securely fastened. And smooth, polished boards with rounded corners will make the appearance of the structure beautiful and presentable.
Methods for fixing boards
Avoiding direct contact with the skin of any metal elements is one of the main conditions when fixing boards and other structural parts of the lounger.
So, you can fasten the boards in one of the following ways:
- By recessing the heads of nails or screws into the thickness of the wood.
- Driving the screws into the underside of the shelf.
- Using oak wedges, to do this, first drill holes in the wood. This method is the safest, but is labor-intensive.
You can attach several bars to the end wall so that you can rest your feet on them when lying on a bed - this way they warm up faster.
Criteria for selecting electric current consumers and fittings
For each bathhouse room, you need to select devices taking into account operating conditions. According to the international classification, the housing is marked with the IPXX code. XX – two numbers indicating the degree of protection against penetration of foreign objects (first) and moisture (second). Get acquainted with the proposed tables, they will help you choose the optimal devices for each bath room.
Class of housing protection against penetration of foreign objects and dust
Housing protection class against water penetration
Let us determine, for example, which lamps need to be chosen for the most “complex” room in the bathhouse – the steam room. There is no dust there, it is enough that the case protects against penetration of objects ≥ 2.5 mm (the first digit on the code should be “3”). In the steam room you can not only take a steam bath, but also pour water over your body. This means that the housing must protect against such influence; according to the table, the digital designation corresponds to “5”. This means that the lamp housing in the steam room must be designated IP35. We talk in such detail about the different protection classes not only because it directly affects safety, but also because the protection class of the housing significantly changes the price of the devices.
The same parameters should be used to select mounting boxes, sockets, etc.
Floor boards: types of material used as flooring
Several types of wood flooring are used to finish the floor. And each of them has its own characteristics, advantages and disadvantages. Beautiful and high-quality flooring not only determines the appearance of the room, but also withstands heavy loads
This type of material can be used not only as a rough coating, but also as a finishing coating. It is made from solid wood or by gluing several elements together. Visually, this material looks like a milled board. To make a floor from a floorboard, you can use ordinary material or one made according to European standards, the so-called Euroboard. For its production, special technologies and special European equipment are used.
The quality of the second type of floor covering is usually noticeably higher. On the one hand, it has lower humidity, and on the other, high standards do not allow the presence of even small defects, for example, holes, knots, stains, etc. This surface is smoother, ideally polished, but this material is noticeably more expensive.
Obviously, it is better to purchase a Euroboard if you plan to use it for a finished floor. But ordinary material is more often used just as a rough covering, on top of which laminate or linoleum will be laid. Whether it is worth spending money on buying Euroboards is up to each buyer to decide for himself. It is recommended that you familiarize yourself with both material options to choose the most suitable one.
Solid wood floorboards may contain knots, resin, and small bluish spots
This type of floorboard is always fastened into a groove, so the only question is how to make the installation procedure as simple as possible. Rectangular tenons are common, but mating them with grooves is quite difficult, especially if there is even a slight curvature. Laying closely in this case is a complex procedure. Sometimes, in order to make the task easier, the boards are sawn into pieces. But the appearance of the floor covering is greatly deteriorated.
A good option for fixation is quarters. In this case, one of the boards is cut half the width at the top, and the other - in the same way at the bottom. This is a very simple way of fixing, and this floor looks really beautiful.
Glued laminated boards are made from several elements, glued together in such a way as to provide additional strength. In this case, the fibers are arranged so that throughout the entire period of use, each element does not lose its original appearance and characteristics.
Glued-laminated floorboards have a high price due to the complex manufacturing technology
Drying of such boards is almost completely eliminated, which allows the floor to remain level. Laying such a coating is a rather labor-intensive procedure. In addition, laminated wood has a high cost due to complex manufacturing technology.
The main advantage of glued boards is its high resistance to heavy loads. That is, in rooms where there is heavy furniture or high foot traffic, this option will be simply irreplaceable. In addition, this material is often used to decorate children's rooms to provide the floor with an attractive appearance and the necessary durability.
Due to its structure, laminated boards tolerate moisture well. And although it should not be placed in a bathroom or bathhouse, where the humidity is too high and almost constant, it is perfect for ordinary living spaces, even for the kitchen.
The decking board is characterized by a special wavy surface. This is an ideal option for arranging rooms with high humidity, for example, a bathroom, bathhouse. In addition to being highly resistant to moisture, the rough surface reduces the risk of slipping and falling on wet floors.
Among the features of these boards, it is worth noting the presence of special compensation grooves, which are small in size (only a few millimeters), but perfectly relieve excess stress. This is necessary due to exposure to precipitation and sun.
Work progress
Before you begin making the canopy, you must take into account the following essential conditions.
Manufacturing conditions
Among the conditions that are highly desirable to comply with are the following:
- the entire structure - frame and main elements - must be made of the same type of wood;
- the canopy should be placed along the wall of the bathhouse, which does not have windows or vents;
- recommended height from the floor is at least 110 centimeters;
- It is equally important to maintain the distance from the upper surface of the canopy to the ceiling; let’s not forget, this is where hot air accumulates - the recommended free space at the top is 120-130 cm;
More often, bath canopies are made from such timber with rounded corners and a section size of 65 by 15 cm
- It is necessary to leave a gap of at least one centimeter from the wall for water to drain;
- the design should provide free access to the space under the canopy - drying this space will be the main concern after using the bathhouse;
- The lower supports of the structure must be located at a distance of approximately 60 cm from each other.
Manufacturing
After preliminary preparation:
- choosing a wall to place the canopy;
- creating a drawing;
- preparation of the dimensions of all material;
- preparation of fasteners
We begin to implement the plan, which consists of two stages - creating a frame and placing the flooring.
Any canopy design for a bathhouse must provide free access to the closed volume below
Creating a frame:
- first, we fasten the frame strips to the wall with self-tapping screws, according to the drawing;
- at a distance the size of the canopy at the same level along the entire length, we attach the outermost longitudinal strip of the frame to two opposite points of the wall;
- We additionally fix this extreme bar with vertical posts;
- We fasten two longitudinal strips - near the wall and the outermost one - with crossbars, there must be at least three of them; the crossbars should extend 5-10 cm beyond the outer planks;
- if the canopy has two or even three tiers, we perform the same operations with other tiers, but we strongly recommend starting with the top one.
Helpful advice! The frame is a simple design that requires only a very accurate initial drawing and thoughtfulness in work. The main thing in creating a frame is to ensure its good reliability. Be creative with the whole process. No one is stopping you from moving away from the original drawing and adding stiffeners that were not previously provided. We recommend using only galvanized iron as fastening metal staples, which can withstand future constant exposure to water.
One way or another, all do-it-yourself bath canopies have such a simple frame “architecture”
Completing the solution to the problem of how to make a canopy for a bathhouse:
- the final stage is quite simple - fastening with self-tapping screws to the transverse strips of the main canopy bars;
- the bars should not have sharp edges;
- leave gaps of 10-15 mm between the bars for water to drain;
- the vertical part of the frame, as a rule, is not covered, but if such a desire arises, then leave free space below, sufficient for access to the internal volume of the frame;
- upon completion of all work with wood and fasteners, we carefully clean all joints, very carefully control the entrances of the screws - they must be completely deepened;
- You can’t do without impregnating the entire structure of the bathhouse bench with a special composition of natural oils - impregnation will extend the life of the wood canopy; mold and rot will not be a problem for it in the near future.
When deciding how to make a canopy in a bathhouse, in the example in the photo we didn’t rack our brains too much - the design is simple, but it will fulfill its purpose perfectly
Helpful advice! We advise you not to rush to close the vertical canopy panel - for the initial tests of the structure “in action”, what has already been done will be enough. Over time, if there is a desire to close the front wall of the canopy, this can be done without major problems. Moreover, we advise you to create a folding panel, which will solve all the problems of access inside.
Do-it-yourself shelf manufacturing technology: step-by-step instructions for craftsmen
Making a shelf for a steam room is not such a complicated process as it might seem at first glance. It includes several sequential steps that should be followed clearly and confidently.
- Prepare the wood for further work (sanding, processing corners).
- The surface of the material is covered with a special liquid with antiseptic properties (this will eliminate the possibility of wood rotting in the future).
- They make a frame: install supporting wooden posts in a vertical position at a distance of 60 cm from each other, perform horizontal strapping (for durability, attach the shelves to the walls).
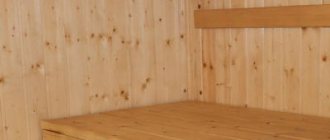
Shelf installation
- Prepared thin boards that will form benches are attached at a minimum angle (2-3 degrees). To fasten the boards, you must use special oak wedges (unlike nails or self-tapping screws, they do not heat up), which will reliably fasten the structure.
- The shelves are fastened, leaving a small wall gap of 8-10 cm (it is intended for natural ventilation).
These simple manipulations will allow you to independently make high-quality and reliable shelves for the steam room. Try to implement the proposed instructions, the result will not be long in coming!
Preparation of material
Timber and boards used for the construction of bath shelves must meet the following requirements:
- The material must be of high quality.
- No visible defects or defects.
- The wood should be well planed and smooth.
- No knots, cracks or nicks.
One type of wood is used for the entire structure of the benches. In order for bath furniture to dry out faster, thin boards should be used for its manufacture. The width of the board should be 4-5 times its thickness. With this ratio, it will not sag or crack.
It is not recommended to coat the wood for shelves with varnish or any other chemical composition (read: “How and with what to treat shelves in a bathhouse - proven treatment products”).
In the bathhouse even the bench has its own name
The range of wood on offer is huge, but it is important to choose the species and quality that best suits your conditions and preferences.
The structure will be wooden, so first of all you should think about the type of wood and its quality.
About suitable wood
Let's say right away that coniferous species - larch, pine, spruce - are not suitable here. The fact is that under the influence of temperature, the wood of these species begins to release the resin hidden in them.
Hot resin will cover the entire surface of the canopy on which you are located and, of course, no one needs such an environment. So, only hardwoods.
But here there is plenty to choose from:
- . The canopy will experience very significant loads from moisture and temperature, and this is where these two main advantages of this breed will be needed - strength and flexibility. And, in addition, resistance to fungi and insects, and, as a result, a pleasant atmosphere in the bathhouse. Oak will offer you a rich color palette, but there is one drawback as well as offering advantages - ideal sanding of oak wood is very difficult, but if you still set such a goal, you will have to choose a very durable tool.
- . A pleasant smell, low density, healing properties and uniform structure - this is what predetermined the widespread use of linden in baths.
- . This breed is very resistant to moisture. True, it will quickly lose its original color, but it will not dry out for a very long time.
- . If oak had been easier to process, it most likely would have turned into alder. Otherwise, this species is almost as good as oak in its protective and healing properties.
- . And if the oak had a softer color scheme, along with processing, then it would turn out to be ash.
Classification
When choosing a tree for a canopy, pay attention to its quality, first of all, to the number of knots on the surface - this is the main indicator of the quality of wood, which is divided into 4 classes:
Extra (example “A”) – maximum quality. The wood sample is uniform in color and does not contain either the core of the original material or knots. This class is also called “Premium” or “Zero”.
Drawings of a canopy for a bathhouse must contain information about the quality of the wood used, of which there are four
- Class “A” (“B”) - here the core is also unacceptable, the color is uniform, but you can find one knot per one and a half linear meters.
- Class “B” (“C”) - already 4 knots for every 1.5 m, through holes and contrasting spots are already allowed.
- Class “C” (“D”) - this quality allows chips and cracks.
The canopy in the bathhouse must have a folding top or side plane - the instructions for use strongly recommend a thorough periodic inspection of the entire bathhouse
Video description
Unique installation of a two-tier shelf:
Finishing
Oily products should be chosen with caution. This can be explained by the fact that the dry residue forms in the form of a thin film. Due to different coefficients of thermal expansion, the coating may crack. There is also a risk of burns. Therefore, when choosing, pay attention to the penetration depth and thickness of the film formed. Products containing wax are in great demand among craftsmen. They last from 0.5 to 2 years.
There are several popular finishing materials that are unacceptable for use in a steam room. This is important to consider, since you need to make a bench in a bathhouse resistant to high temperatures and humidity. The following compounds do not meet these conditions:
- Acrylic resin in varnishes.
This foundation copes well with water, prevents contamination, and has a long shelf life. But when heated, the base releases toxic substances, which is accompanied by an unpleasant odor. There are specialized products for processing wood in a steam room, but experts recommend considering them for a dressing room or washroom.
Acrylic varnish for baths Source ud-remont.com
Layout
The area of the bathhouse is an important factor for determining the location of the canopy and the number of its tiers. After all, when they create a canopy in a bathhouse with their own hands, they focus on the longest wall. But with the obligatory consideration of the absence of direct steam from the stove into the steaming space, as well as drafts. Depending on the size, the bath canopy allows you to sit, recline or lie down.
Typically, canopies are made of two or three levels to allow you to choose a more comfortable temperature zone. In the classic three-stage version, the middle tier is made stationary. The collapsible design, where the upper and lower shelves are removable, allows for better drying of the wooden parts of the bathhouse.
Along one wall there can be stepped and compartment options for the arrangement of shelves. The most economical option for arranging the canopy is like in a sleeping car compartment, one shelf above the other. They are attached with the ability to fold, freeing up space in the bathhouse if necessary. With the third L-shaped method, one of the shelves is located on the adjacent wall.
The ideal length for the canopy so that the average person can lie on it freely at full height without bending their legs. Typically the minimum bench length dimensions used are:
- sun lounger – 180–220 cm;
- recliner – 150 cm;
- seat – 40–90 cm.
The most important dimensions for the height of the canopy tiers are the distance from the floor and ceiling of the bathhouse, the optimal location of the upper and lower shelves. The main point of these dimensions is that there is enough space so that an average adult can sit down without hindrance when taking a steam bath. And also so that the steamer or massage therapist does not take uncomfortable, crooked positions during the procedures. Recommended height:
- from the ceiling to the top canopy – 110 cm;
- interlevel height – 60–80 cm.
The standard width of the canopy is considered to be 60 cm, but the upper bed should have a larger transverse dimension - 90 cm. It is quite acceptable to reduce or increase all dimensions to suit the existing standards of the bathhouse room. If the width of the main canopy is designed for two steamers, then this will already be paid. How to make a canopy in a bathhouse to suit the needs of a particular family is up to the owner to decide.
The constituent elements of any standard canopy are:
- frame - support post made of beams;
- the surface of sun loungers, seats made of boards;
- backrest for sitting on the top bunk.
All parts of the canopy must be from the same type of wood.
It is not advisable to use material made from coniferous trees, since with constant heating they begin to release resins that will stick to the bodies of vacationers. The minimum resin content of such popular hardwood species in our country:
- Linden - healing properties, homogeneous structure, darkens over time under the influence of steam and humidity.
- Aspen is relatively inexpensive, has a healing effect, is resistant to moisture, and never rots.
- Alder is a dense wood with healing properties.
- Poplar has a uniform texture; after drying, the wood becomes hard.
The wood of these trees tolerates high humidity, frequent temperature changes, and has a low level of thermal conductivity. Despite all these wonderful properties, they are additionally treated with special natural oils to protect against mold. Under no circumstances should it be impregnated with any chemicals or varnished.
Experienced craftsmen know that wood material is classified by quality. We recommend making your own canopy only from “Extra” or “A” quality wood. In appearance, this smoothly planed wood is distinguished by the absence of knots, chips and cracks. The more knots there are on the material, the more susceptible it will be to rapid destruction under extreme steam room conditions.
In sanded wood, all sharp corners should be smoothed with a chamfer to protect the skin of bathhouse visitors from possible cuts. Boards for flooring sunbeds and seats will last a long time if their width does not exceed four times the thickness. That is, in order for the boards to dry quickly and not crack, they must be thin enough.
To prevent the structure from swaying and creaking, the racks-bars for the canopy frame should have a cross-sectional size of 50×70 mm or 65×15 mm. Fasteners must be made of galvanized iron. When choosing the old fastening method, it will be necessary to drill holes at the joints for oak wedges - tenons. To avoid burns, the heads of metal screws - self-tapping screws or anchor bolts - are buried deep in the wood and protected with special decorative caps.
Rules of care
Over time, the canopy may darken, the protective composition may wear off and wash out. The first problem can be solved with the help of bleaching agents.
Efficiency of wood bleach Source kelohouse.ru
It is important to note that they contain chlorine derivatives or hydrogen peroxide. Bleach lightens wood and helps destroy fungus, mold, and bacteria. The penetration depth is determined by the percentage of the base component. Since active substances can cause allergies and harm health, the room after their use must be ventilated for 1-2 days.
Before you make the bench in the bathhouse updated, it must be thoroughly washed, wiped and dried. It is better to apply thick protective decorative compositions by rubbing in; liquid ones are processed using a brush or sponge. After 24 hours, excess oil can be easily removed with a cloth.
Features of the regiments in the national bath
The shelves in the bathhouse are formed under the unconditional influence of the national traditions of a particular region.
Germany
For example, in German baths, especially in the south, in Bavaria, it is customary to steam while sitting, laying a linen towel on the bath shelf. A broom, in German baths, is used rather as an attribute of the “master of the steam” - a specialist who supervises the “pouring” procedure - the highlight of the German bath tradition. He uses it to properly collect and distribute the fragrant “steam cake” in the space of the steam room. Hence, it is quite logical that the shelves for a bathhouse in the German province can be made narrower, relative to their distant relatives from a Russian or Finnish bathhouse.
Due to the fact that the conditions of stay in a German or Irish bath are milder, both in terms of temperature and humidity conditions, the number of tiers can be made more numerous. With a relatively low temperature below, at the same time, you can get quite a thrill at the very top. It was precisely this feature that influenced the great popularity of regiments made of African maple - abash - in the baths of Germany.
Finland
There is a myth circulating in the Internet community that the Finnish sauna is a high air temperature with low absolute humidity. This is wrong. We have already told you what a traditional Finnish sauna is. Finns prefer steam rooms with intense steam and moderate temperatures. They also have an ancient tradition of using birch brooms not only to collect steam cake, but also directly for steaming. Accordingly, their bath shelves are adapted for taking procedures while lying down rather than sitting. This has its own rational grain.
Thus, a tall person whose height is more than 182 cm can experience different temperature effects when sitting on the middle shelf, and if the lower part of the body is in relatively comfortable conditions, then the top of the head, the most vulnerable part of the body, is in the area of high temperatures. This is, in fact, why the adoption of procedures while lying down causes a more even temperature effect on all parts of the human body.
At the same time, it is worth saying that the European tradition of steaming while sitting came to the Finns in the 1950s, when compact saunas heated using portable electric heaters began to be installed throughout the country. But even here it is worth talking about a forced measure, related to the lack of space that bath chairs require. Again, it is electric heaters that produce dry, high-temperature steam, which is not typical for a traditional Finnish sauna. And the time spent in such a steam room is regulated somewhat differently, and the body’s reaction is primarily due to the active loss of water.
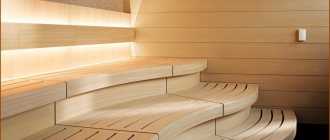
A striking distinctive feature of a sauna shelf of this type is the vertical plane between the levels covered with clapboard; in slang it is called a riser, by analogy with the element of a flight of stairs, to which the shelves in the sauna are very similar. The Finns themselves call the system of regiments an “amphitheater” in slang, which very subtly and accurately reflects the similarity of the steam room with the stands of an ancient Roman structure.
Russia
As we have already said, the classic traditional Russian bathhouse is in many ways similar to the Finnish one. Accordingly, the shelves in the bathhouse in the steam room closely resemble those of our northern neighbors. Here everything is aimed at the possibility of accepting procedures in both vertical and horizontal positions. Accordingly, the geometric dimensions and location and shape of such elements should be universal and ensure ease of use for various methods of adopting procedures. Let's take a closer look at these criteria.
Beautiful examples
A bath shelf is not always simple and inconspicuous. Sometimes such designs transform a room, making it more comfortable and welcoming.
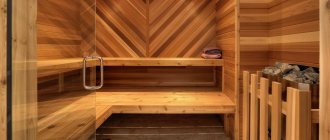
For example, a three-tier corner shelf made of light wood with a rounded edge will look amazing if you integrate upward-facing spotlights into its back. This beautiful furniture looks harmonious in combination with a compact stove with an open stove in the shape of a pipe.
A three-level shop looks very beautiful and fashionable, in which the inside of each step is equipped with blue or dark blue LED lighting. The diode strip should also be added to the backrest located above the seats. To dilute the “sea” glow, you can install corner lamps with warm yellow light lamps above the shelf.
A light wooden shelf installed along one wall will look great in a small steam room, in which one of the partitions is decorated with stonework. It is permissible to make the remaining surfaces of the room less noticeable - they can be sheathed, for example, with clapboard.
A shelf assembled from boards of different shades will look very original in a steam room, especially if the various details of its design are made into shapes - cut at an angle. The resulting design should be supplemented with warm wall lamps above the back and a white or yellow LED strip located inside the seats.
For a bathhouse in a slightly casual rustic style, you can build a rough shelf made of dark wood with a pronounced structure. Of course, the surface of the wood must be well processed and finished, regardless of the chosen style. Such designs do not need to be supplemented with LED strips - it is enough to install small lamps with wooden shades above them.
To learn how to properly make shelves for a bathhouse, avoiding common mistakes, see the following video.
Assembly
When making a canopy, follow the following procedure:
- First, choose the shape of the structure, depending on the size of the room, operating conditions and personal tastes. More often it is a stepped or L-shaped design.
- Determine the location: the shelves are mounted on a blank (without windows) wall.
The calculation of the required material is done based on the drawing Source cdlandia.ru
Design
The decorative side of the shelves is no less important. Benches made from wood of different shades (dark and light) look interesting.
The choice of lighting color is individual. Red makes the steam room visually even hotter, green – relaxes, blue – gives calmness.
It is allowed to install spotlights on the ceiling directly above the shelves. This will make the room seem larger.
You can approach the decoration of corner seats creatively by designing a carved or wavy backrest.
There are benches that resemble the shape of a chaise lounge or where the upper tier very smoothly transitions into the lower.
Seats with separate backs and corner carved fasteners for hanging towels look good.
If the room allows, then a separate stand for slippers and shelves for soap products are equipped.
By playing with the shape, design of the benches, and their placement, the steam room can be decorated in both antique, high-tech or modern style.
Common shelf shapes
When making shelves for baths, take into account several shapes that can be given to them:
- Stepped shelves. They are placed along one wall using the principle of steps. Massive benches with several tiers are being constructed. Those occupying the upper shelves feel a higher temperature. The heat in the steam room is always concentrated in the upper part.
- Varieties of corner shelves. The advantage is its compact size. A large spatial volume is not taken up. Installing corner structures is an ideal solution for small baths. The shelves are arranged in such a way that the upper and lower parts are adjacent to one partition. The intermediate part is attached to the adjacent wall.
- Designs of prefabricated models. They are convenient for small steam rooms. Most often, the installation of removable shelves occurs at the bottom and top of the structure. When the shelves are dismantled, warm air accelerates. In turn, this allows all wooden elements in the steam room to dry much faster.
- Shape of folding shelves. The second name they have is compartment shelves. The design of the compartment shelves in a railway carriage is similar. The design works simply. The upper shelf can, if necessary, be raised and installed vertically to the wall surface. This functionality is beneficial. The design of the folding shelves allows you to save space in the room.
It is necessary to competently equip the resulting structure, equipping it with all the necessary components.
Pull-out shelf
Retractable shelves in a bathhouse are a type of folding ones. Also a way to save space. Another advantage of these folding structures is noticeable when the bathhouse is frequently used by an uneven number of people.
At any time, all unused shelves can be pushed back and protected from unnecessary moisture. This way they retain their fresh appearance of natural wood longer.
A retractable shelf does not require such specific fittings as a folding one. It's much easier to do. If we take into account that the shelves in modern baths are arranged in steps in height, then there will always be a place for a sliding panel.
The good thing about collapsible shelves in a bathhouse is that they can be easily replaced with new ones. This option is implemented when the steam room should look fresh and presentable. Convenient pull-out shelves meet these criteria fully. With frequent use, you can make several spare canopies in advance - in reserve.