We cannot imagine a home without heating. Our concept of comfort unconditionally includes a suitable temperature regime. There is no central heating in a private house, and each owner solves the heating problem in his own way.
We welcome our regular reader and bring to his attention an article about chimneys for stoves - an absolutely necessary component of any heating system, be it a stove, a modern fireplace or a boiler with automatic fuel supply.
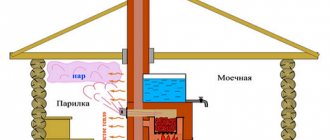
How the chimney works
The main part of any chimney is a vertical pipe structure. Structurally, the familiar brick stationary box differs from modern prefabricated counterparts made from ready-made factory-made modules.
A traditional brick pipe includes the following elements: a neck for connecting to the furnace, a riser with valves, a slope, an otter, a neck (at the point of passage through the roof), a headband, and sometimes a metal cap.
Homemade chimneys made of metal or asbestos cement include pipes, caps, adapters for connecting to the stove, and insulation.
The most modern types of chimneys are ceramic and three-layer sandwich pipes. The ceramic structure consists of an external expanded clay concrete frame, an internal prefabricated ceramic pipe, and a layer of insulation between them. The ceramic and sandwich structure itself includes the following blocks: straight blocks for collecting condensate, tees, modules for cleaning, transition elements for connecting heating units. An integral part of a modern chimney is the deflector.
Types and designs
The design features of the chimney primarily depend on the material from which they are made.
According to the material, chimneys are:
- brick;
- reinforced concrete (usually industrial);
- asbestos-cement;
- of steel;
- ceramic;
- three-layer metal - two layers of steel with mineral wool insulation between them.
By design, chimneys are:
- indigenous - the structure has its own foundation;
- wall, built into the load-bearing walls of the building;
- mounted - light pipes are mounted on a vertically located outlet pipe of a boiler or fireplace (and potbelly stove);
- Often lightweight structures are simply suspended from the supporting structures of the building;
- coaxial - arranged on the “pipe-in-pipe” principle. The most common example is horizontal gas vents of gas heating boilers. It is used in devices with a closed combustion chamber and ensures maximum safety for residents. Save fuel consumption. Recently, vertical structures of the Shidel system have appeared, taking combustion air from the roof of the house (just below the top).
Which one is better to choose?
The choice of chimney largely depends on the parameters of the installed heating unit (design, temperature, type of fuel used), the degree of readiness of the house (we are modernizing an old house with a stove and a wall pipe, the house is only “in design”, or the load-bearing structures have already been installed, or there is already finishing) ; heated volumes.
Features of various types of chimneys are given in the table:
Table 1
| Name | Advantages | Flaws |
| Brick | Durable and high temperature resistant masonry construction, durability depending on the liner material. | Complex installation requiring highly qualified masons; heavy weight, need for a foundation; long installation time, the need to replace the liner approximately every 10 years. When working with modern boilers and fireplaces, a brick without a liner can collapse in literally 10 years. Wall structures can only be installed during the construction of a house. |
| Ceramic | Service life up to 50 years, smooth internal surface, high installation speed; high acid resistance, good thermal insulation; withstands temperatures up to 550° | Expensive option; installation requires some qualifications; there is a need for a foundation; fragility |
| Single-layer steel (and asbestos-cement) | Smooth inner surface, lightweight, inexpensive, high speed of installation, easy to repair; resistance to corrosion and condensation | Insulation required; When passing through structures made of flammable materials, large offsets are required; They burn out in 10-15 years, there are no components - during installation you will have to make all the elements yourself. Galvanization will last five years (or less) |
| Steel sandwich type | Long service life, smooth inner surface, light weight, quick easy installation, easy repairs, high resistance to corrosion and condensation; can be installed/suspended outside the building; good thermal insulation | Quite expensive elements |
You should not use flexible steel corrugation - they burn out very quickly.
Despite the price, it is worth choosing modern ceramic chimneys or “sandwich”. If necessary, they can be installed both in a finished house and outside the house, they are durable, fairly easy to assemble, resistant to high temperatures, well insulated, and have a large assortment of ready-made factory elements.
If you want to use an old wall box from a conventional heating stove, you need to insert a stainless steel liner and insulate it. But perhaps you should choose a sandwich - there will be less hassle.
Material selection
The material plays a huge role; the service life of the chimney, its ability to withstand various aggressive chemical compounds, reliability and strength depend on it. A steel chimney for a stove is made from three main materials: stainless steel, galvanized and ferrous metal. Now let's look at each material in detail.
Stainless steel
Made from heat-resistant and acid-resistant stainless steel. A good chimney should have a thickness of 0.8 - 1 mm; a thinner one will not last so long.
Characteristics:
- Able to withstand temperatures of more than 600 degrees, and have a long service life.
- They are not afraid of many substances, and work calmly with constant contact with nitric acid, sulfuric acid, creosote and other substances that are part of the combustion products of coal and firewood.
- They can be either single-walled or double-walled, with thermal insulation between the pipes. Such a chimney is safe and can be installed in any buildings: residential buildings, baths, saunas, technical buildings, etc.
Cink Steel
It is a budget option for construction. The thickness of the pipes ranges from 0.3 to 01 mm. It is made of steel coated with a layer of zinc, thanks to zinc it has good characteristics of resistance to alkalis and acid combustion products.
They are installed in the same way as stainless steel pipes. They are used less frequently as a material for stove chimneys, as they have a shorter service life and are less reliable in terms of their design and metal thickness. To extend the service life of galvanized pipes, they need to be insulated, this will reduce the formation of destructive condensate.
Black steel chimney
They are now very rarely made from black steel, due to the fact that they have a short service life. Such a chimney is justified only when the budget is very limited. They are made from boiler or ordinary steel, the thickness of the pipes ranges from 0.6 to 2 mm.
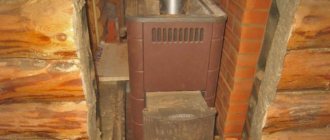
More often they are installed on small sauna stoves or in country houses, the use of which will be periodic. Can be used for stoves in greenhouses and outbuildings. When there is severe overheating, a lot of scale forms inside the pipe, which blocks the flow of the pipe.
Make it yourself or order it
You can make some elements yourself for installing single-layer pipes or lay out a brick structure (if you have the skills of a qualified mason).
But the installation of prefabricated structures can be done with your own hands - this will help save a considerable amount from the family budget. You will have to pay a lot for the services of a qualified team - the amount is comparable to the cost of materials. There is a risk of running into unskilled workers.
When deciding whether to do the work yourself, you need to carefully analyze your capabilities:
- How accessible is the roof;
- do you have friends or relatives who can help;
- Do you have a fear of heights?
- What are your qualifications in performing repair work?
Building regulations
The installation of chimneys is determined by the provisions of SNiP 41-01-2003.
The chimney design must meet the following regulatory requirements:
- the minimum height must be at least 5,000 mm or grate;
- when located on the roof slope at a distance of less than 1.5 m to the ridge, the pipe should be 500 mm higher than the ridge;
- when located on the roof slope at a distance of 1.5-3 m to the ridge, the pipe must be no lower than the ridge;
- when located on the roof slope at a distance of more than 3 m to the ridge, the angle between the horizontal and the line passing through the ridge and the top of the pipe should be no more than 10°;
- the head must rise above the flat roof to a height of at least 1,000 mm;
- the maximum length of each horizontal and inclined section should not exceed 1000 mm, the total length of their projections onto the horizontal should not exceed 2000 mm. If there are oblique and horizontal sections, it is necessary to extend the pipe by the length of the horizontal projections. For ceramics, horizontal sections are not allowed.
Fire safety requirements for chimneys
The distance from the surface of ceramic, insulated steel and asbestos-cement chimneys to combustible house structures must be at least 250 mm; for brick chimneys and sandwich pipe structures - at least 130 mm.
It is necessary to protect building structures made of combustible materials using cement or gypsum plaster on a mesh with a thickness of at least 25 mm.
If the roof covering can burn (roofing felt, bituminous tiles, ondulin), or leaves or fluff can accumulate on it, a mesh spark arrester must be installed on the roof cap.
Remember that the life and health of your loved ones depends on the quality of smoke removal.
Conclusion
The use of steel chimneys for a stove, with proper calculation and installation, will ensure efficient operation for the entire period of operation of any heating device. Good technical characteristics and high safety of this type of chimney will make you feel comfortable and safe in your home.
They have a fairly affordable price, which is very pleasing. Today, they occupy one of the first places in application in construction. The main thing when purchasing is to make sure of the quality and reliability of the purchased chimney elements. Savings must be balanced and justified, because safety and health depend on it.
Traction force
Factors influencing traction force:
- pipe height;
- condition of the surface of the internal channel - regularity of soot removal, wall roughness;
- the presence of inclined or horizontal sections. The presence of horizontal and inclined sections is undesirable, since lengthening the chimney is undesirable - the gases will cool, the draft will decrease until it tips over;
- installation of a deflector;
- quality of insulation;
- air supply to the firebox.
Your safety depends on the force of traction, so it is necessary to regularly check the presence of traction and take measures to clean the channel from soot and the pipe head from ice.
Making and installing a chimney with your own hands
What materials are best to make it from?
The easiest to install are steel structures. Single-layer steel products require insulation and the manufacture of components - in general, work for pathological workaholics, and here we will not consider their installation.
Installing a chimney made from a sandwich pipe is quite simple; the availability of a large number of various elements and components in stores allows you to assemble a device of any configuration.
Drawing and diagrams
Before starting work, decide on the dimensions and draw a diagram or drawing - this will help to correctly calculate the required amount of materials and properly organize the work.
Size calculation
The height of the pipe is determined in accordance with the requirements of SNiP 41-01-2003, but should not be lower than 5 m from the grate. The diameter is assumed to be equal to the diameter of the outlet of the heating device.
Highlights of exiting through the roof
Now the next stage: we need to “punch holes” in the roof and roof. The work is unpleasant, but necessary. Again we start with the markings. If we compare it with the ceiling, then here we mark it differently. The roof usually has a slope. And the greater this slope angle, the larger the area of the hole cut for the chimney will be.
With the lateral vertical markings, everything is simple: we retreat 10-15 centimeters from the sandwich pipe and cut out the wooden sheathing. With horizontal upper and especially lower markings it is more difficult. Here you should take into account the slope of the roof and be more careful with the bottom sheathing board. Make sure it is not too close to the chimney.
The roof itself will have to be cut in the form of an oval. Again, the greater the angle of the roof, the more stretched the hole will be. To close the cut hole from the street side, special rubber seals are used. In common parlance they are called “flash drives”. They are called roof penetration seals. A very convenient and practical thing.
Flash drive - roof passage seal
By the way, about the “flash drive”. Always purchase it with the desired slope, at the angle of your roof slope. Often managers in retail chains offer a direct version of the flash seal. In practice, it can only be properly placed on a horizontal surface. Take this point into account.
Installation features
Installation begins from the stove or fireplace. The first starting element is mounted on the boiler or furnace pipe. This element does not have insulation for technological reasons (the alt-free filler melts and sinteres into stone). All elements are designed in such a way that one end has a smaller diameter and is inserted one into the other, like into a socket. One of the docking options is to slightly pull out the inner pipe and insert it into another inner pipe. Press down. Then lower the outer pipe with insulation along it and press down. Secure the connection with a crimp clamp and tighten it with a bolt and nut. All joints must be coated with sealant.
Then a tee is mounted, modules with a cleaning hatch and a condensate drain are mounted below. There are designs for installing the lower part of the chimney on the floor.
Then the rest of the structure is installed. After a meter, the sandwich is attached to the wall with special brackets. An element with a cleaning hatch must be installed on each floor and in the attic.
It is advisable to connect the chimney elements “via condensate” - the pipes are mounted in such a way that the upper one is inserted into the lower one and the condensate cannot seep through the joints, but flows down the walls into the condensate drain.
An element with a gate is mounted under the ceiling.
The passage of the pipe in the ceiling is covered with a galvanized sheet and filled with insulation. The distance to structures must be at least 130 mm.
The most difficult stage of installation is the roofing. Mark a hole in the desired location on the roof. Make a hole in the roof. The under-roof sheet is attached from the inside, and the roof trim is installed on the roof. It is selected depending on the angle of the roof. The cutting edges are placed under a sheet of roofing material.
If necessary, install stretch marks. Install the deflector.
A little physics
Without knowing why and how smoke moves, making a chimney for a stove with your own hands is problematic; at a minimum, it may not be effective enough.
The mechanics here are quite simple: warm air has a lower density than cold air, and therefore less weight, therefore, according to the laws of physics, it “floats”, being pushed out by the heavier one.
Smoke from the chimney
During this process, it gradually cools down, mixes with the surrounding air and, finally reaching the same temperature, stops.
If we let warm air through a channel limited by walls that prevents it from mixing with the surrounding air, it will cool much more slowly, especially if the chimney for the stove is made of a material that does not conduct heat well or is additionally insulated.
The longer the chimney, the greater the volume of warm air in it, the greater the force it creates. Accordingly, the pressure of the air flow - thrust - is greater.
Frequent errors and problems during installation
The most serious mistake is the lack of a condensate collector and elements with hatches for cleaning.
In places where structures pass through ceilings, it is strictly forbidden to install joints of individual elements - leaking hot smoke can cause a fire.
A very significant mistake is the absence of a deflector or at least a cap over the chimney.
Snow and rain should not get inside the pipe - they increase the formation of condensation, and ice can block the cross-section of the pipe.
Maintenance and cleaning
Any chimney requires regular cleaning of soot. This will avoid fires and reduce draft. Cleaning should be done 2 times a year.
There are two cleaning methods - mechanical and chemical.
With chemicals, special products are burned in the firebox. They burn at a very high temperature and accelerate the wear of the internal walls of the chimney, so it is better to use mechanical cleaning methods for the sandwich.
Icicles and ice from condensate can freeze on the head - they block the cross-section of the duct and reduce draft, which increases the risk of carbon monoxide poisoning for residents.
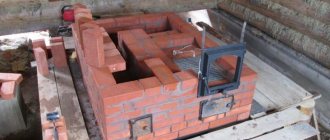
Brick pipe repair
To put the pipe in order, you can go in two ways: restore the masonry or perform lining - treat the channel inside with special means.
Reconstruction of masonry
In case of minor damage to the chimney masonry, they act quite predictably - instead of destroyed bricks, they install whole ones. To do this, the crumbled elements are carefully cleaned of the solution and removed. The empty cell is scraped out, after which a new element is placed in place of the taken brick, using a fresh mixture of clay and sand.
In case of minor damage to the masonry, it is restored by replacing individual bricks with new ones
Sometimes a situation arises when cracks appear in the pipe, through which moisture seeps in during heavy rains. In these cases, the outer surface of the pipe above the roof is primed and then plastered.
When the bricks in the masonry are damaged by more than 20%, partial repair of the chimney is out of the question. The smoke channel with severely damaged elements is completely dismantled to create a new masonry.
Video: one way to repair a brick chimney
Brickwork
Lining is an excellent way out of the situation if the problem is the loss of smoothness and strength by the chimney walls. To complete this task you need a mixture of Masan or Mordax. These compositions simplify the restoration of the chimney’s functionality and do not reduce its cross-section at all.
It will take only a few hours to complete the lining. The operation consists of the following steps:
- The area near the chimney is covered with film so that drops of a special composition do not stain the roofing material.
- Taking a brush with metal bristles, peel off fragments of bricks and soot from the inner walls of the channel.
Before lining, the brick channel is cleaned, achieving a smooth surface. - The channel, which has become completely clean, is wiped with a generously dampened rag.
- Using a special brush and winch, a special composition is applied to the inner walls. The mortar mixture should spread over the surface as the brush moves.
Masan lining mixture is used for repairing chimneys, as it is fire resistant - When the applied composition dries, the internal walls of the chimney are treated a second, and then a third time.
You may need several different brushes during the lining process. This is explained by the fact that the cross-section of the chimney in certain areas may not be the same. In general, the size of the brush should correspond to the parameters of the smoke channel.
If you comply with the requirements for the masonry process in a house or bathhouse, you can create a safe and durable chimney. A self-made structure can look no worse than the structures of real masters. If you have learned how to build chimneys with your own hands, then you can also make repairs of any complexity without outside help.
Expert advice
It is necessary to choose pipes in which the thickness of the outer metal layer is 1 mm (not 0.5 mm). It’s very easy to check - for a product with a thin wall, the wall bends if you squeeze it with your hands.
When installing sandwich structures, it is necessary to use a special sealant for high operating temperatures (automotive sealant with an operating temperature of 500° is not suitable).
If the pipe rises more than one meter above the roof, it should be reinforced with guy wires.
The places where the sandwich passes through the roof and ceiling must be additionally insulated.
When can you start heating?
After all the rows have been laid out, the stove must be coated with clay, or, if it is a beautiful new brick, all the seams must be thoroughly coated and the stove must be allowed to dry completely.
After a week has passed, which is the minimum time the stove should dry out, you can begin to gradually heat it, adding firewood in very small portions. In order to “break through” the draft, it is recommended to burn newspaper while cleaning the stove before starting a fire in the firebox.
It's okay if the oven smokes a little the first three or four times. This only means that she is still a little damp inside. If the stove continues to smoke even after a week of constant firing, this means only one thing - a mistake was made somewhere. And then you will have to either shift the oven completely, or look for ways to troubleshoot problems with minimal losses. Based on this, it is best to carry out this work in the summer, and not just before the heating season.
In any case, the construction of stoves is a much more complex process than ordinary brickwork. It requires spatial, even mathematical, thinking. But if you give it the proper time and attention, the result will warm your soul and warm your home for many years to come.