Today there are a huge number of types of foundations for various buildings. In this article we will dwell in detail on such a foundation as a pile-tape foundation. It is very often used on heaving soils. The peculiarity of such a foundation is that the foundation of the house stands on a conventional shallow strip foundation, along the perimeter of which piles are buried below the freezing point of the soil, which allows for good adhesion to fairly strong and stable soil, which is located below the level of soil freezing. This foundation allows you to reduce the cost of constructing buildings, while at the same time allowing you to achieve the required strength to withstand heavy loads from the building.
Advantages and disadvantages of a pile-strip foundation
Since this type of foundation is used very often, it is important to know what advantages and disadvantages it has. So among the advantages of the foundation we can highlight:
- The foundation can be used not only on heaving soils, but also on slopes.
- It does not require a large amount of materials compared to other types of foundation.
- It is resistant to heavy loads and ground movements.
- It is not expensive, which allows it to be used by almost all segments of the population.
- Easy to install, which allows you to build the foundation yourself without using heavy equipment.
However, the pile strip foundation is not without its drawbacks, among which are:
- In order for the construction to result in a solid foundation, it requires serious calculations, which should only be performed by specialists in their field.
- This type of foundation is not suitable for constructing walls made of heavy materials.
- Such a foundation is not suitable for a basement or basement.
The main pros and cons of SLF
- Application in areas with strong slopes;
- Stability on slightly heaving soils;
- Relatively small amount of building materials and inexpensive price;
- The ability to do all the work yourself.
- For installation you need a qualified technician. calculation. Necessarily!
- It is necessary to know the soil characteristics (including freezing depth);
- Heavy walls for SLF are not recommended;
- It is impossible to build a full-fledged basement with such a foundation.
Foundation design
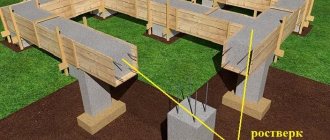
The base structure consists of two elements: a foundation strip, which is located around the perimeter of the entire building and under all its walls (partitions), as well as piles, which make it possible to strengthen the structure and make it much stronger, especially during seasonal and off-season ground movements. As a rule, piles and the foundation strip itself are always reinforced with reinforcement, but piles can be of different types. So they can be made using the bored method or made from asbestos-cement pipes, which are then filled with concrete. However, it should be noted that today the most popular are metal screw piles, the ends of which have a screw blade, which allows them to be screwed into the ground without much effort.
The foundation strip is usually made like a conventional shallow foundation and is filled with concrete.
Construction of a pile field
The piles are driven manually by screwing. There is no need to dig a hole for screw supports! Before immersing the products, if they are not galvanized, must be treated with an anti-corrosion compound. Installation of screw supports is carried out using standard technology: the pile is installed strictly vertically and screwed into the ground by rotating around it using levers or crowbars. The product is immersed to the required level, while one person must constantly monitor the vertical position of the pile with a building level.
After installing all the piles, they are leveled: the ends of the products are brought to the same size so that the strip part of the base lies perfectly flat on them. The ends of the supports are cut with a grinder. It is impossible to combine a reinforced concrete foundation strip with piles without installing special caps on them. In this case, square platform heads are perfect, which you can buy or make yourself from scraps of pipes and sheet steel. The heads are welded onto the ends of screw piles.
Scope of application of pile-strip foundation
Perhaps this type of foundation is the most common type of foundation, along with a strip foundation, and it is much less expensive than a recessed strip foundation. Strip foundations on piles are very often used in the construction of low-rise houses, cottages and other buildings and structures that do not necessarily need a basement. It can be installed on any soil except rocky, but most often it is used on heaving soils, as well as in areas with large differences in elevation.
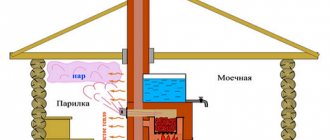
Foundation for a sauna or bath
On a site where there is a house made of foam blocks (aerated concrete), it is advisable to build a bathhouse. The construction of which also begins with the arrangement of the foundation. Different types of foundations - pile, strip, monolithic - give reason to calculate everything, foresee possible disadvantages and choose the appropriate option.
You should first consider the material for building the bathhouse. If the structure is heavy, then a deep foundation is required. Its construction can be done with one plate. The disadvantages of such a foundation are the high consumption of materials.
The nature of the soil for laying should also be taken into account. A good solution would be to build a pile-tape foundation with your own hands. The technology for laying it is similar to the construction of a foundation for housing from foam blocks.
Before you start constructing it, you should make an approximate calculation of all building materials. Moreover, the calculation must be done with a small margin. Excessively large surpluses will hit the family budget, and a shortage of material can slow down construction at the most undesirable moment.
Necessary materials
So, knowing the features and design, first of all, you need to prepare the necessary materials and tools. It will require the following materials:
- Sand.
- Gravel.
- Concrete solution.
- Fittings.
- Waterproofing.
- Primer.
- Antiseptic.
- Insulation.
- Asbestos-cement or metal pipes.
- Wooden panels or boards for formwork.
- Nails and screws for formwork.
As for the tools, you will need the following:
- Shovel.
- Boer.
- Level.
- Roulette.
- A concrete mixer for creating concrete, if you plan to make concrete yourself.
- Crochet hook and wire for reinforcement, or welding machine.
Having prepared everything you need, you can safely begin building the foundation, which is carried out using a special technology in several stages, which will be discussed further.
Piles
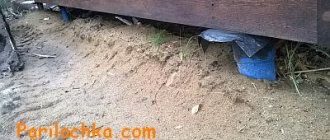
Screw, driven, bored... piles penetrate the entire heaving and loose layer of soil and “anchor” on hard, incompressible soils. If the house is frame or wooden, everything is generally great, but if you want to build aerated concrete walls that are susceptible to cracking, you will have to set up formwork and cast a concrete grillage, which in width and thickness will be similar to the shallow-depth tape we are already familiar with, with the only difference being that the work will have to be carried out “ Aweigh". And the gap between the ground and the house will serve as a dubious decoration.
It was then that the craftsmen remembered a course of lectures they had once attended at universities, and without bothering too much with understanding the fundamental principles, they decided to bury a concrete grillage in the ground. So you can get rid of “hanging” works and get a real base.
DIY technology
The technology of making a foundation with your own hands involves adhering to the following steps:
- Marking the territory.
- Excavation.
- Arrangement of piles.
- Reinforcement of the foundation strip.
- Installation of formwork.
- Pouring concrete.
- Final works.
Each stage has its own characteristics, but performing them yourself is not difficult.
Marking the future foundation
Before starting to mark the foundation, it is necessary to prepare the site for construction; to do this, the area is cleared of debris and the top layer of soil is removed. Marking the foundation is carried out in the same way as marking a strip foundation, however, with the only difference, recesses for piles are made along the perimeter of the foundation.
- Rods are driven into the corners of the future foundation, between which a fishing line or cord is then pulled.
- Next, mark the internal and external contours of the foundation in the same way.
- After marking the tape, the locations for the piles are determined (usually these are the corners of the foundation and the intersections of the walls inside it).
Technology for self-construction of a strip foundation on piles with step-by-step instructions
It should be immediately stipulated that this instruction is not a direct guide to the exact implementation of the points, but is advisory in nature. In each specific case, the developer makes its own adjustments to it related to local construction conditions.
Experts recommend following the steps below:
determining the distance between piles;- marking and excavation work;
- installation of piles;
- production and installation of tape formwork;
- reinforcement of piles and grillage;
- waterproofing and ventilation of the foundation;
- pouring the foundation with concrete;
- thermal insulation.
Determining the distance between supports
Despite the estimated number of piles, the distance between them is regulated by the standards for the construction of light buildings at the rate of 1500 - 2000 mm.
The minimum gap between the piles when the grillage is located above the ground surface must be at least 1.5 m. This is explained by the fact that it is necessary to minimize the load on the beam (grillage span).
The foundation plan is first marked with corner supports , and then pile installation points are placed every 1.5 - 2 m, depending on the position of the monolithic strip in space.
If the construction plan provides for the installation of a monolithic slab for a boiler or other heavy equipment, then supports are placed under it every 1000 mm.
Marking and excavation work
The work is carried out in the following order:
- Before starting work, debris, vegetation and the fertile layer of soil are removed from the construction site.
- The marking of pile supports and shallow-buried tape begins from one corner of the foundation plan and spreads it along adjacent sides. The route is punched with a double cord, which marks the width of the grillage. The centers of future wells are fixed with wooden pegs.
- The SLF plan can represent one or more rectangles. The correctness of their construction is checked by the equality of the diagonals between opposite corners using a cord.
- According to the markings, trenches are dug to the design level, taking into account the thickness of the crushed stone-sand cushion.
- Using a garden drill, holes are drilled in the ground to the designed depth.
- I fill the bottom of trenches and wells with crushed stone and sand with a thickness of each layer of 100 - 150 mm, followed by compaction.
- A laser level and a rod are used to check the equality of the bottom marks of trenches and wells.
Installation of piles
According to the recommendations of professional builders, the wells are made slightly wider than the outer diameter of the pile shells. This is necessary to adjust the verticality of the point supports.
The installed pipe can be moved or tilted if the hole in the ground is made with a slight deviation from the vertical. The position of the pile is fixed by securing it with pieces of timber.
Production and installation of tape formwork
There is a big difference between shallow strip formwork and above-ground grillage formwork.
It lies in the fact that in the first case, plank boards are placed only on the sides of the trenches, and in the other version, the formwork is an open box with a strong bottom .
If it is enough to use boards with a thickness of 25–30 mm for the sidewalls, then for the manufacture of the bottom of the box, wood with a thickness of at least 50 mm is used. In some cases, additional supports are installed between the piles for the formwork of the ground grillage.
To prevent liquid concrete from leaking through the gaps between the boards, the inner surface of the shield fences and the bottom of the trenches are covered with plastic film . It is attached to the boards with a stapler or small nails. The film contributes to the formation of a smooth surface of the monolithic tape.
The shields are reinforced with supports and spacers made of timber. The boards are nailed into panels. If the formwork is assembled from construction plywood, then its elements are assembled into a single structure with screws using a screwdriver.
In those places where the grillage should rest on the piles, holes are cut with a diameter equal to the pipe opening.
Reinforcement
After installing the pile shells and grillage formwork, they proceed to their reinforcement . Reinforcement is lowered into the pipes; this can be one or several vertical rods of a periodic profile ø 8 - 10 mm with smooth sections ø 6 mm, connected with a binding wire.
The vertical reinforcement rods are carried upward to a height sufficient to connect to the reinforced frame of the grillage. Reinforcement frame segments are placed in the formwork, which are connected with wire to each other and to the outlets of the pile reinforcement.
Waterproofing and ventilation
Protecting reinforced concrete structures from moisture is an important task in maintaining the integrity of the monolith. Waterproofing of the pile-strip foundation is carried out after removing the formwork.
Rolled material (roofing material) is fused to the sides of the grillage with hot bitumen mastic or liquid rubber is sprayed.
Piles, the shell of which is made of asbestos-cement or plastic pipes, do not need waterproofing. Their hydrophobic material is absolutely not susceptible to moisture.
Ventilation of the underground space, fenced with a shallow monolithic tape, plays a big role in preventing air stagnation, which stimulates the occurrence of:
- accumulations of harmful microorganisms,
- mold,
- fungi,
- increased humidity levels.
To avoid these negative phenomena, vents are installed in the foundation monolith.
Products are placed in the formwork before pouring concrete . They are made from scraps of polyethylene pipes. They form through holes in the tape, located opposite each other in opposite sides of the perimeter of the grillage. Typically, pipes are laid in increments of 3–4 meters.
How to fill it correctly?
Concrete mortar is prepared in a mortar mixer, observing the proportions of the parts of sand, crushed stone and cement.
For foundations, grade 300 concrete is used . To prepare it, you need to use cement M 400–500. This condition must be met.
While mixing the ingredients, water is gradually added to the mixer until a homogeneous solution of thick consistency is obtained. The solution is delivered to the pouring site by wheelbarrow.
First, pile pipes are poured with a layer-by-layer tamper. If possible, use an electric vibrator. After this, concrete is poured into the grillage formwork, also using a vibrator or tamper made from available material.
The concrete surface is covered with a film to protect it from drying out on sunny days and waterlogging during rain. After 30 days, the formwork is dismantled and the film is removed.
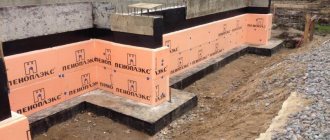
Thermal insulation
Shallow SLF is protected from cold penetration by insulating the blind area around the house. To do this, the gaps between the foundation and the plinth in front of the blind area are filled with expanded clay or covered with sheets of expanded polystyrene. When erecting a pile grillage at a height, the floors of the 1st floor are insulated.
You will find a lot of important and useful information about the construction of strip-pile foundations in this section.
Excavation
Excavation work for arranging a strip foundation with piles consists of digging a trench for the strip and holes for the piles. As a rule, the depth of the trench is not great and you can dig it yourself using a shovel. When the trench is ready, they begin drilling holes for the piles. Usually a hand drill is used for this, but when working with it it is necessary to pull the drill out of the ground approximately every 30 cm, otherwise it may get stuck there due to the soil sticking to it.
The depth of the holes for piles usually exceeds the depth of soil freezing and is about 1.5 m, however, for each specific region this value may be different.
Standards
When you get excited about the idea of building a house, it’s worth studying the building regulations. Below is a number of documents recommended for study before working on the project and installing the pile foundation. These standards will simplify the installation of the foundation so that it provides reliable support for the house.
- SP 24.13330.2011 “Pile foundations”.
- SP 50-102-2003 “Design and installation of pile foundations.”
- SNiP RK 5.01-03-2002 “Pile foundations”.
Each document specifies specific standards for the installation of pile foundations. Immersion depth, step between supports and much more. These documents can be intimidating, but it is a very good cheat sheet for beginners and even experienced builders.
Arrangement of piles
When the holes for the piles are ready along the entire perimeter, then first of all it is necessary to fill them with a layer of sand, which is about 30 cm. Then asbestos-cement pipes are inserted into them, the diameter of which is the same as the diameter of the hole. It is very important to make high-quality waterproofing of piles, so they can often use ordinary roofing felt, which is sewn together with fishing line instead of asbestos-cement pipes (although they are also considered a good insulator). When the pile is waterproofed, reinforcing rods with a diameter of 12 mm are inserted into the hole, which are usually welded together with transverse reinforcement of a smaller diameter. It is also necessary to ensure that the reinforcement protrudes to the height of the foundation strip (that is, it is 15-20 cm above the bottom of the trench) so that it can be connected to the metal frame of the strip base.
We reinforce the grillage
Metal reinforcement is laid inside the trench formed by wooden walls. The reinforced frame is best made in two rows of five rods, located horizontally and intersecting every one and a half meters. The internal connection is fixed with horizontal brackets. The sections of the reinforcement frame are connected vertically to each other.
Rice. : Grillage reinforcement
Foundation tape reinforcement
For reinforcing the tape, reinforcement with a diameter of 10-12 mm, connected together into a mesh with cells of 40x40 cm, is perfect. However, before laying it in the tape, you must first make a sand cushion about 20-30 cm high, that is, fill it up and compact it to the bottom trenches sand. After this, bars about 5 cm thick are laid on the sand cushion, on which the reinforcement frame is laid. Finally, it is necessary to tie the reinforcement elements of the piles and tape together using a hook and wire to give rigidity to the structure.
Creating a reinforcing frame
The reinforcing frame is made of hot-rolled reinforcement with a cross-section of 6-12 mm, produced in accordance with GOST-5781-82. The reinforced frame is created from 4-6 rods, which are connected to each other using annealed VRP wire with a cross-section of 0.15-10 mm. To uniformly distribute stress in the longitudinal plane, vertical rods are installed every 15-30 cm, 10 cm long less than the height of the shallow tape.
Sergey Yurievich
Construction of houses, extensions, terraces and verandas.
Ask a Question
Knitting of the reinforcing frame is done with special hooks or a knitting gun. The finished reinforcement frame is laid in the trench and rigidly connected to the pile part of the base.
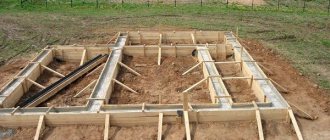
Installation of formwork
When arranging this type of foundation, you cannot do without formwork, since to create the tape you need a frame that will give it shape. Formwork is usually made of wooden boards, which are assembled into panels as follows:
- Prepared boards need to be knocked into panels using small bars using self-tapping screws or nails.
- When creating shields, it is important that the heads of the screws or nails are on the outside of the shield, just like the block, since the inside must be smooth enough so that there are no problems when dismantling the formwork.
- Ready-made panels are installed on the edges of the trench along the entire perimeter, if the soil is dense enough, and inside the trench, if the soil is unstable.
- The formwork must be strengthened on the outside with struts and on the inside with spacers. This can be seen in the photo below.
If the foundation is sufficiently high, the formwork must be secured on top with staples, and stakes must be driven in near the panels from the outside. This is done to ensure that the formwork does not crack during the process of pouring the concrete solution.
Technical features
Structurally, the foundation is represented by piles and a concrete strip. The first are located at design points along the central axis of the monolith. The second one must be poured along the entire perimeter of the future structure and under the construction of partitions in order to strengthen the supporting base. All structural elements are connected to each other with reinforcement and concrete mortar. Let's consider which piles can be used to construct a combined foundation, which must be taken into account at the stage of designing a house.
Types of piles
Initially, solid wood was used as support pillars in the pile-strip foundation for the house. These were blanks with a cross section of 250-350 mm, which, if necessary, were spliced in width or length. The lower part of the supports is sharpened, and a so-called “shoe” is installed to protect it.
Today, along with traditional materials, metal and concrete options are being considered as piles for strip foundations. The first are blanks with a diameter of 250-1000 mm from seamless pipes. The tip is made in the form of a thread to make it easier to immerse (screw) the products into the ground. After installing the supports in the ground, their internal cavity is filled with cement mortar for reliability.
An example of reinforced concrete piles ready for installation Source tildacdn.com
Monolithic piles can be manufactured in a factory or directly on the construction site. In order to increase bending strength, prefabricated reinforced concrete supports are cast with a square or rectangular cross-section. The immersed end has a pointed shape and, by analogy with solid wood, is protected by a “shoe”. The upper part is reinforced with a multilayer metal frame for resistance to impact loads during installation.
To carry out work with independent construction of piles, concrete with a grade strength of at least M200 B15 is used. Here a well is pre-drilled and, if necessary, a steel casing pipe is installed. Next, the cavity with the reinforcing frame is filled with solution.
An example of an installed casing pipe for pouring piles Source yandex.net
See also: Catalog of companies that specialize in repairing foundations of any complexity
Design
Before any construction work begins, a project is drawn up. It includes an action plan, estimates for certain expenses, various studies and calculations are carried out. In the case of designing a strip-pile foundation, a number of the following actions must be performed:
- Priming.
Geodetic research involves analyzing the soil for the composition, density, presence and location of groundwater. This is how the bearing capacity of the soil is determined and various types of risks that need to be eliminated are identified.
- Load.
Here we mean the total pressure from, for example, a house made of aerated concrete on a pile foundation, the objects filling it, including people. Snow cover and wind load are also taken into account.
- Load bearing capacity.
This property is considered in relation to the foundation. It is important that the supporting structure of the house is able to withstand all the loads taken into account. In this case, one or another reserve is necessarily added to the calculation plan.
Example of a program for designing and calculating a foundation Source apm.ru
- Piles.
Based on the results of calculations of the load and bearing capacity of the foundation, the size and number of support pillars and their location points are determined. Here the reliability of the performed engineering calculations is checked. In particular, how resistant the selected piles will be to horizontal shifts, vertical shifts and pressure from seasonal soil movement.
- Ribbon.
Engineering calculations are also carried out here. According to their results, the monolith should resist soil heaving to a sufficient degree for the construction of the house and withstand the load from the building. That is, one of the main parameters considered is the bending and compressive strength of the tape.
In practice, the best way to check the relevance of engineering calculations is test installation of piles. That is, the selected support is installed in compliance with all technological requirements and calculations. Next, the finished structure is tested for reliability using special equipment. Based on the results of the event, all necessary changes are made to the draft.
Carrying out static tests of a test pile Source avito.st
Depth
In the case of piles, the depth of immersion depends on the occurrence of hard layers in the soil. Three options are being considered for the tape. If the area is marshy or the soil is very heaving, then it is better to build a grillage above ground level. The surface arrangement of a strip foundation on screw piles or a slight deepening of the monolith is relevant for the construction of fences, light buildings such as a garage, a bathhouse or a small country house. The third option is to immerse the monolith to a depth of about half a meter. On such a foundation it is possible to erect block buildings, log houses of 1-2 floors.
Step between vertical supports
The distance between the support points for the strip foundation can be determined using special formulas. Another option is a reference to existing standards. For example, there are 4 options:
- Solid.
This approach is relevant for the construction of even light houses on soft soil. Here, approximately 1 meter is maintained between the reference points. In this case, the entire perimeter of the future building and the main partitions are considered.
Project for a foundation with frequently spaced piles Source stroy-podskazka.ru
Pouring concrete
As a rule, concrete mortar is ordered at the factory, since it is best if the foundation is poured completely at one time, but pouring in several layers using concrete prepared by yourself is often practiced. To prepare a concrete mixture, you need to mix sand, cement and gravel in proportions of 3/1/5 and add the required amount of water so that the solution is not too thick and too thin. When the concrete solution is ready, the piles are first poured, after which they begin to pour the grillage. When pouring concrete, it is extremely important to compact it to prevent voids from appearing in the structure. To do this, you can use a special construction vibrator, or an ordinary wooden pole; in addition, when compacting the grillage, you can tap the formwork with a rubber hammer.
If concrete is poured in winter, then frost-resistant additives must be added to the concrete mixture, and if the air temperature exceeds -20 degrees, then concrete must be poured using concrete heating transformers. If concrete is poured in the summer, then after pouring the base, it must be covered with film, and periodically watered with water throughout the month. This is necessary in order to avoid cracking of the foundation due to high temperatures.
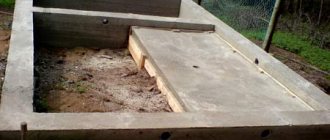
Final work
After pouring concrete, a pile strip foundation gains half its strength within a week, and after 2-3 its final strength. You can build the walls of your house within 1 week, but it is recommended to wait a little. When the concrete has completely hardened, it is necessary to take care of waterproofing and insulating the base. So, to ensure a high-quality waterproofing layer, the well-known roofing material or polymer/bitumen mastics are most often used. To do this, first of all, the surface of the foundation is primed with a special antiseptic, and then proceed to waterproofing.
The foundation can also be insulated to reduce heat loss, especially in winter. For this, polystyrene can be used, which has good heat retention. It is attached to the walls using glue of a special composition, and only after the glue dries, the material can be secured with dowels. In conclusion, I would like to note that it is quite possible to make a solid pile-strip foundation yourself, without the involvement of heavy equipment and specialists, the main thing is to approach all the work correctly and competently.
general description
A strip-pile foundation is one of the design solutions for constructing a support foundation for a particular structure. It includes vertical elements that are immersed in the ground to the level of solid layers. The tops of the pillars are connected to each other by a concrete strip with a reinforcing frame inside. All components form a single reliable system, which ensures uniform distribution of the load on the soil from the side of the building.
Structurally, a strip-pile foundation is similar to a grillage foundation, which is why they are often confused by novice craftsmen. However, there is a technically justified difference between them. The grillage connects the piles together and distributes the load from the structure between them. The monolith additionally takes on some of the pressure and transfers it to the ground. That is, the tape type of base is more durable.
Grillage type of support base for a house Source sk-resultat.ru
Relevance
One of the main reasons for constructing a strip-pile foundation for a house is the complex type of soil (heaving, loose, layered, with height differences of up to 2 meters in level). Here we could limit ourselves to a monolith, but this would require digging deep trenches and pouring a large volume of concrete. In the case of adding point supports to the structure, less labor and resources will be required. There is no need to deepen the tape (25% of the full height is enough), since the risks of its deformation due to seasonal soil movement are eliminated by deeply immersed piles. As a result, cost savings can reach 30%.
The technical strength of the supporting base is sufficient to build a cottage with a small basement. The material for the construction of load-bearing walls is selected at the discretion of the owner of the site. These can be wooden log houses, block or brick buildings. But more often, by analogy with Finnish developers (the technology of constructing a strip-pile foundation was first used there), everything comes down to two-story wooden houses with a small underground room.
Construction of a wooden house on a pile-strip foundation Source martand.ru
Advantages and disadvantages
A relatively budget-friendly foundation option for complex and relief soil can, among other things, be considered quick to install. Another advantage is the possibility of using ready-made piles or installing them on the construction site. The structure is not afraid of heaving or high groundwater levels.
Regardless of the reliability of the supporting foundation for the house, it is important to competently draw up a project with all site studies and engineering calculations. Attention should also be paid to the choice of the type and number of local supports, their immersion depth, location, and protection from aggressive operating conditions in the ground. But the main disadvantage of a strip-pile foundation is the impossibility of constructing a basement floor or a full-fledged basement. Also, due to the close location of the floor to the ground, it is necessary to insulate the ceiling and isolate it from moisture.
Project of a garage with a strip-pile foundation Source hozsektor.com