The popularity of the potbelly stove, even with a large selection of more modern stoves, remains high, and arranging a chimney for the potbelly stove is an important part of its stable and efficient operation. This can be explained by its compactness, low cost of the device itself, the ability to install it in any room, and the relative ease of making a potbelly stove yourself, even from scrap materials. But the simplicity of the design does not mean any concessions to the combustion product removal system - a high-quality and reliable chimney for a potbelly stove is just as necessary as for any other stove.
Chimney for potbelly stove
Traditionally, potbelly stoves are used for heating in a garage, workshop or in a small country house. In addition, modern potbelly stoves, which have a completely aesthetic appearance, are also installed in residential country houses, in addition to central or autonomous heating.
If the installation of the potbelly stove will be done on your own, then before moving on to the installation process, it is recommended to carefully understand the design of the chimney to the stove. Since the majority of potbelly stoves are made of metal, a metal chimney is also suitable for it. Today, retail chains offer a fairly wide range of different elements, from which it is not difficult to independently assemble a chimney of any design, if, of course, you know how to do it correctly.
Chimney design options
The schematic diagram of the design of a chimney for a potbelly stove can be designed in one of three types, differing in the location of the pipe and its exit from the room to the outside.
Three main layouts of a chimney in a room
- The chimney can go outside through the wall at a level of 200 ÷ 250 mm from the ceiling. This is a convenient and effective design, since the section of the chimney pipe that passes through the room will play the role of a kind of “battery”, a fairly powerful heat exchanger that is effectively included in the overall heating process, releasing the heat generated by the stove into the room. This helps to increase the overall heat transfer from the stove, which means that much less fuel will be consumed to achieve and maintain the desired temperature level.
- The second option is rarely used in garages or workshops, since the design is quite labor-intensive to install. In this case, the chimney also passes through the entire room, but does not turn into a hole in the wall, but rises through the ceiling and is led out into the street through the attic and further through the roof. The design is also very effective for heating the room, but in order to pass the pipe through the attic floor, a number of measures must be taken to protect all materials potentially susceptible to fire from overheating. To do this, in the thickness of the ceiling it is necessary to install a special box around the pipe, which is filled with a heat-resistant composition, for example, fine-grained expanded clay or mineral wool.
When running a pipe through the roof, you will also have to put in a lot of work, since the gaps between the roofing material and the chimney must be waterproofed. Improper work can lead to roof leaks.
If you use this design in a two-story house, then the pipe, passing through the rooms of the first and second floors, will also participate in their heating, but a large amount of work will need to be done to equip the passage through the two floors and through the roof.
- The third design option is less efficient in terms of heat transfer, but has a significantly higher degree of fire safety. In this case, the chimney pipe is immediately taken out into the street and fixed vertically along the outside of the wall of the building. When choosing this design, the heat for heating the room will come exclusively from the potbelly stove itself. The pipe, even with very high-quality insulation, will quickly cool down and draw heat from the stove, which means that more fuel will be required to heat the room and maintain the desired temperature in it. The advantage is that only one passage is needed through the vertical wall, which, however, will also require high-quality thermal insulation - it is located in close proximity to the stove, that is, in the high-temperature heating zone.
Most often, in garages or workshops, the first option is chosen, less often the third, and very rarely the second option.
Chimney drawing and production of necessary parts
Having outlined the installation location of the potbelly stove and decided on the basic diagram of the chimney according to its location, it is necessary to draw up a plan drawing that will visually show what parts will be needed to install the system.
The drawing can be a simple sketch - experts will help you understand the design
The drawing can be made by hand, but the main thing is to carefully measure and mark the exact distances and dimensions on it.
With this drawing, you can safely go to a specialized store, where an experienced sales consultant will easily, based on the specified parameters, select all the necessary components of the chimney.
If the chimney is made independently, then it is better to make a straight pipe, since the elements that will help position the chimney at a difficult angle are quite difficult to make independently.
It is very important to remember that if the chimney will pass through any kind of ceiling, then the connection of individual elements of the chimney system should in no case be located inside the walls or ceilings - the joints should be at least 300 mm away from them. This condition is mandatory! — when connections are depressurized, which cannot be completely eliminated under the influence of high temperatures, a fire hazard may arise.
In addition, this arrangement makes the chimney repairable - if the metal of the pipe burns out, it will be easy to disconnect the fire-damaged part without dismantling the entire structure.
Expert opinion: Masalsky A.V.
Editor of the “construction” category on the Stroyday.ru portal. Specialist in engineering systems and drainage.
Independent production of chimney pipes from sheet metal is not encouraged - this process requires specialized devices and tools, and serious experience in related work. Everything is important here - precise maintenance of the required diameter, and complete sealing of the joints in order to eliminate even the slightest possibility of smoke and combustion gases leaking through them. It’s impossible to do it yourself.
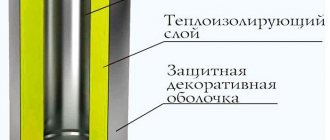
If you want to save money, then instead of expensive stainless or nickel-plated chimneys, you can use ordinary galvanized steel pipes with a thickness of 0.6 ÷ 1 mm, which can be purchased in a store or ordered from a master tinsmith.
By the way, experienced craftsmen even take on the production of sandwich structures. Two pipes of different diameters are made and, having wrapped the smaller pipe with a dense layer of mineral wool, a larger pipe is put on top.
To order, a tinsmith can produce not only straight elements of the system, but also elbows at different angles.
Prices for different types of chimneys
Chimneys
Components of a chimney system
Professionally manufactured chimney systems include all the necessary elements, from which you can select parts for any design of varying degrees of complexity. Moreover, the stores offer both conventional systems - single-layer metal pipes without insulation, and sandwich parts, as well as all the elements necessary to interface them. Therefore, when installing a chimney pipe, in order to ensure safety and for the long-term effective service of the chimney, it is recommended to use just such a system, thought out to the smallest detail, and not a “homemade” one.
Currently, it is possible to purchase any components for the chimney
When buying a chimney, you need to take into account the diameter of the pipe. If you purchase it for a finished potbelly stove, then you start from the diameter of the pipe already present on the heating device. If the potbelly stove is homemade, then the pipe diameter should vary between 80 and 150 mm, depending on the volume of the firebox. The diameter is calculated simply - it should be 2.7 times greater than the volume of the firebox, if we count the diameter in millimeters and the volume of the firebox in liters. So, for example, for the simplest potbelly stove “Gnome”, familiar to everyone, the pipe diameter is 110 mm with a firebox volume of 40 liters.
Having prepared all the necessary elements for the selected chimney model, we must not forget about the sealing materials that are necessary to seal the joints of individual pipe parts. For these purposes, heat-resistant sealant and asbestos cord are used.
Chimney installation
When everything is prepared, you can proceed to the installation of a chimney from individual elements. If there are quite a lot of them, then using the diagram as a basis, you can first lay out all the details in the desired sequence. This will make it much easier to navigate the actual assembly process.
The wall behind the potbelly stove and behind the chimney along its entire length must be lined with non-flammable and heat-resistant material.
- The first step is to line the wall behind the potbelly stove and chimney pipe with heat-resistant material, for example, asbestos sheets.
- Next, you need to make a through hole in the wall or ceiling. Its size will depend on which method of insulating the wall from the pipe is chosen.
- If the wall is wooden, then you need to make (or purchase) a box with a round hole in the center, the diameter of which should be 3 ÷ 5 mm larger than the diameter of the pipe. The edges of the box should separate the pipe from the wall or ceiling by 150 ÷ 200 mm.
Expert opinion: Masalsky A.V.
Editor of the “construction” category on the Stroyday.ru portal. Specialist in engineering systems and drainage.
The box, built into the ceiling, can be filled with maximum density with basalt glass wool, or with medium- or fine-grained expanded clay, which is filled in after installing the pipe. It is best to fill a box in a wooden wall with several layers of asbestos strips, in which a round hole is made.
If the wall is brick, then a special passage glass is usually installed in the hole.
Bringing the pipe out according to the first option...
... passing through a vertical wall
The passage unit must be securely fastened both on the outside of the building and on the inside.
- The next step is to put the lowest section of the pipe on the pipe of the installed potbelly stove using a heat-resistant seal. It must be fixed to the pipe using a special clamp - gas breakthrough must be completely excluded!
- If the outlet is located in the wall, then the next pipe segment may be an elbow made at the desired angle.
If the chimney will be discharged through the ceiling, then a flat section of the pipe is installed so that it either ends 400 ÷ 500 mm from the ceiling, or rises 300 ÷ 400 mm above the attic floor.
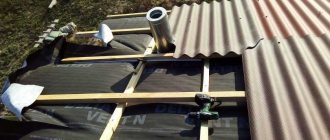
- Next, the work takes place in the attic or outside the house.
A hole is also made in the roofing material of the roof, which is framed on the side of the attic room by a metal panel with a round (for steep slopes - elliptical) hole for the pipe to exit.
The passage of a chimney through the roof of a building
- The chimney, after passing through the attic, is discharged to the roof. The gaps between the roofing material and the pipe must be waterproofed. Such an operation can be carried out using different elements - it can be a metal panel selected in conjunction with other segments of the chimney, or a special elastic heat-resistant element that tightly covers the pipe and is attached to the roof with a sealant.
A special block (flash) for waterproofing the passage of a pipe through the roof.
The latter is convenient because it is easy to install even on a complex, ribbed roof.
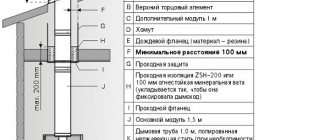
- The desired total height of the chimney is about five meters, but in the case of a pipe for a potbelly stove in utility rooms, the height can be slightly reduced. The main thing is to raise it above the roof, according to the established rules, which are clearly shown in the diagram.
The pattern of pipe location relative to the roof ridge
- When leading a pipe through a wall, from the outside of the building, an elbow is put on the pipe protruding from the wall, which sets the vertical direction of the pipe along the building.
- The outer pipe must be insulated or made of sandwich segments. For reliability, the chimney is attached to the wall with special brackets, which can also be included in the purchased kit, or can be made independently from a metal corner.
- Having raised the pipe to the level of the roof ridge and securely fastened it to the wall, be sure to put a fungus on top of the chimney, which will protect the channel from autumn leaves getting inside and from water during rains or snowfalls.
Video: installation of a simple chimney for a potbelly stove in a change house
Chimney maintenance
In order for the potbelly stove to always have good draft and to avoid smoke in the room, it is necessary to carry out preventive measures that will help keep the chimney in order.
Any chimney requires periodic maintenance work
- In order to keep the pipe clean from soot deposits, it is necessary to periodically add chemicals specifically designed to loosen carbon deposits to the wood being burned.
Aspen firewood is also used for the same purposes, which helps clean the internal walls. To clean the pipe with their help, only aspen firewood is used for preventive combustion. It is advisable that they do not burn out quickly, but smolder for as long as possible in the firebox. To create such conditions, the draft is artificially reduced by closing the ash pit after the wood has burned well.
- The pipes are mechanically cleaned annually to remove carbon deposits and rust. To do this, you can use a special cleaning brush with a weight.
Special brush for cleaning the chimney from soot deposits
- After each cleaning, be sure to inspect the surface, carefully lowering the switched-on light bulb into the chimney. This is necessary in order to detect burnouts or cracks in time.
Methods for cleaning a chimney
The process of installing a chimney from ready-made segments is quite simple, and you can handle it yourself. If you want to make parts of the pipe yourself, then it is better to abandon this immediately, especially if you have no experience in such work.
Since any chimney must be extremely reliable, and all segments must perfectly match each other when joined to seal them, it is recommended to install parts manufactured exclusively at a professional level. It must be remembered that the entry of carbon monoxide into a room from poorly sealed seams or burnt holes is, without exaggeration, a mortal danger.
Video: another option for installing a chimney for a potbelly stove
Calculation of a chimney for a potbelly stove
After the stove is installed and ready for use, it is necessary to install a chimney that can function properly, retain heat in the room and at the same time prevent combustion waste from entering the air of the room where the stove is installed. To do this, you need to correctly calculate the diameter of the pipe, its length and think about how it will exhaust the smoke into fresh air.
In order for the heating system to have the highest efficiency, it is necessary that the pipe for the potbelly stove provides sufficient draft.
Expert opinion
Pavel Kruglov
Stove maker with 25 years of experience
The best ratio of pipe diameter to combustion chamber is 2.7 millimeters to 1 liter. For example, let's take a potbelly stove with a combustion chamber of 50 liters: 2.7*50=135 mm. It is this chimney diameter that will be optimal for the efficient operation of a 50-liter potbelly stove.
Once the diameter of the chimney pipe has been determined, the length of the entire pipeline should be calculated. In these calculations, it is important to take into account not only the location of the potbelly stove, but also how far from the ridge the chimney is located on the roof.
The pipe outlet above the roof should be located according to certain rules:
- The chimney is located from the roof ridge at a distance of up to 1500 millimeters, which means the pipe outlet should be located at a height of 50 centimeters above the top of the ridge;
- With a distance to the canopy of 150-300 centimeters, the pipeline outlet can be positioned at the same level with it;
- If the chimney is located near the edge of the roof, then its outlet should be slightly lower than the ridge, or at the same level with it;
The second option for the pipe exit is through the wall, and not through the roof. In this case, the end of the chimney should be located just below the top of the roof ridge.
But the main long pipe will be the total distance from the pipe outlet to the potbelly stove itself - the calculations in each individual case will be different, it all depends on what floor, in what place in the room and at what height the potbelly stove will be located.
Possible installation errors
Installation errors affect the correct operation of the chimney. Let's look at some of them to prevent their occurrence.
- If the insulation of the passage through the wall is carried out poorly and the amount of heat-insulating materials is minimal, then the structure will overheat.
- If there is no low tide on the roof overhang, there is a risk of water flooding the insulation materials and compromising their integrity and functioning.
- Incorrectly calculated height of the chimney device impairs draft.
In addition, we recommend using high-quality sandwiches. In cheap and low-quality pipes, the materials are short-lived. Over time, the insulation shrinks and loses its positive qualities. Local overheating creates a dangerous fire situation.
Materials and their quantity
The list of materials required for the construction of a chimney varies depending on what kind of pipe structure it is decided to install. If the exit will be directly through the roof, then fewer corner bends will be required.
A standard size chimney will require the following number of pipes:
- 1 elbow 120 cm long, 10 cm in diameter;
- 2 elbows 120 cm long, 16 cm in diameter;
- 3 butt elbows 16*10 cm;
- Tee with a diameter of 16 cm and a plug for it;
- Fungus – 20 cm;
- Sealant.
In addition, for the construction of various chimney structures, other parts may be needed: an anti-spill canopy, a passage glass, thermal insulation materials.
Expert opinion
Pavel Kruglov
Stove maker with 25 years of experience
A huge role is played by what kind of pipes for the stove chimney it was decided to purchase, since the number, size and types of bends will depend on what kind of structure will be installed. If it was decided that the smoke exhaust system will be located outside the room, then it will no longer be possible to install it inside the building, since then a different set of parts will be required.
Principle of operation
The principle of operation of a chimney is the ability of heated gases to rise, reducing their density. As a result, the cavity becomes rarefied and is replaced by air coming from outside. The draft increases, supporting combustion. When the gases cool, an acidic precipitate appears. It affects the internal walls of the structure, deforming and destroying them. To reduce the threshold for the formation of acid condensate, thermal insulation materials are used.
Tools
You only need cutting tools: grinder, jigsaw, knife. All work is carried out manually and does not require special equipment.
Installation diagram
There are several types of chimneys; the most suitable type of design is selected individually.
Installation methods
It is important to take into account the collection of condensate in the system, so it is necessary to have a plug, a condensate drain and a container for collecting condensate.
If the potbelly stove is installed through a wall from a pipeline located on the street, then it would be advisable to lead the chimney through a window so that you do not have to prepare a hole for the pipeline in the ceiling.
The outer part of the chimney is insulated using thermal insulation and covered with protective material. A fungus is installed at the end of the pipe, which will protect the chimney from debris, rain, various small animals and foreign objects.
Floor preparation
The chimney pipe for a potbelly stove is most often installed in such a way that it passes through the ceiling, therefore, before installing and fixing the pipeline structure, it is necessary to make a hole for it in the ceiling: using a jigsaw or other cutting tool, having a diameter suitable for the passage of a glass for elbows of the internal chimney.
Example of a hole for a chimney pipe
Pass-through glass
The passage glass is installed in the hole before the chimney for the potbelly stove is assembled. The diameter of the glass should be selected according to the diameter of the inner pipe, although sometimes the joint is made before the chimney passes through the ceiling. It should be understood that it is important to secure the glass tightly - it serves as a retainer. But in addition to this, the pipeline must also be attached to the surface of the wall.
If installed incorrectly, the following consequences may occur:
If there are easily flammable materials, insulation or wooden parts in the ceiling, then they must be removed so that they do not come into contact with the passage glass.
Once the pipe has been inserted, the whole thing needs to be sealed with a fire-resistant material, such as heat-resistant sealant or special fire-resistant wool.
The following stages of work are shown in the photo:
Sealing
Pipe outlet to the roof
Roof work
At the last stage you need to put a deflector on the pipe
Tips for working
- The pipes used in the structure are located exclusively in a vertical position; to fix them, it is best to use special brackets with dimensions corresponding to the elbows of the system. To save money, you can make the brackets yourself using a metal corner.
- All connections must be treated with sealant so that there are no holes through which smoke can escape into the room air. There is a large selection of sealants on the market that are suitable for sealing pipeline seams for smoke exit:
- High temperature sealants;
- Heat-resistant sealants;
- Heat-resistant sealants;
- Heat-resistant sealants;
High temperature and heat resistant sealants are used to seal areas that reach temperatures of 350 degrees Celsius. Since the chimney for a potbelly stove heats up to higher temperatures, these types of sealants are only suitable for parts outside the piping system.
Heat-resistant and heat-resistant polymers can withstand enormous temperatures, up to 1500 degrees Celsius - they are the most suitable choice for a potbelly stove chimney.
Connecting the chimney to the stove
The chimney coming out of the potbelly stove, called internal, is connected to the street, external pipeline, in the attic or in the under-roof part of the roof. The beginning of the internal chimney is the segment coming out of the stove pipe, which is joined at the elbow to the ceiling.
When installing an internal chimney, it is important to correctly connect the pipe to the stove pipe - since if this is done incorrectly, smoke may escape into the air in the room, which will make it impossible for the heating system to function properly.
Expert opinion
Pavel Kruglov
Stove maker with 25 years of experience
The chimney is connected to the potbelly stove using a heat-resistant seal and a special clamp. It is important to make a completely sealed structure, since any breakthrough of gases can lead to poisoning of those inside the room.
Chimney connected to potbelly stove
How to assemble a sandwich using smoke or condensation
There are two types of element assembly:
- "by the smoke." In it, the lower part is included in the upper component. The upper part is put on top of the lower one. Both pipes are assembled in the same way. If the stove has a high combustion temperature, then this method is suitable;
- "by condensate". The inner pipe is assembled as follows: the upper part is inserted inside the lower one. The outer pipe is mounted differently. The lower part is inserted inside the upper one. When assembling the sandwich, the condensate flows freely into the sump.
Is it worth covering the pipe with bricks?
A metal chimney pipe for a potbelly stove does not require special protection from external influences, but due to the visual effect and possible contact with a hot pipe, enterprising owners often line the pipeline with bricks.
Expert opinion
Pavel Kruglov
Stove maker with 25 years of experience
But the construction of a chimney using brickwork is prohibited - such structures are not suitable for this heating system; only a galvanized pipe for a potbelly stove is suitable for this role, it will provide good draft, it is easy to clean and check for defects. Simplicity of installation and easy maintenance are the main advantages of this hood.
Care and cleaning
The overall quality and efficiency of the heating system directly depends on the condition of the chimney, so periodically attention should be paid to its systematic care.
Every year it is necessary to conduct a complete inspection of the pipeline to detect cracks, burnouts, rust and other defects that can lead to unpleasant consequences. During the inspection, the entire chimney structure should be simultaneously cleaned of soot - this can be done by burning aspen wood in the stove.
Features of operation
The chimney in the garage requires periodic maintenance. Which consists of examining the external appearance of the system and soot cleaning of the internal space of the flues. The number of servicing stages solely depends on the design of the chimney. If it is an asbestos-cement chimney, then it needs to be cleaned more often due to the rough surface on which soot accumulates intensively. An iron chimney from a potbelly stove can, over time, become covered in burn spots and completely burn out. These failures lead to additional costs - the chimney will need to be replaced.
For an iron chimney, the frequency of cleaning the pipe is once a year. It is also necessary to inspect the external condition of the material used - perhaps some parts may have burned out.
A thorough inspection of the external condition of the chimney makes it possible to timely diagnose the need to change one or another unit. This procedure cannot be ignored - since the children will begin to flow through the holes in the chimney into the garage, and subsequent operation of the heating device will be impossible. Systematic cleaning of soot, on the contrary, can help increase the period of operation of chimneys, and will also create conditions when the draft will be at a high level and the potbelly stove will work more efficiently.
Despite the simplicity and low cost of installation, a potbelly stove is a relevant source of heating today. Despite its modest size, it guarantees ideal heat transfer and the creation of comfortable conditions in the room, but for this you will need to properly arrange the chimney for the stove.
Conclusion
Installing an exhaust pipe for a potbelly stove is not a complicated process and can be done independently, without the involvement of specialists. The main thing is to follow fire safety rules, not allow the chimney to come into contact with easily flammable materials and monitor the tightness of the structure.
With a responsible approach to the installation of the potbelly stove and the installation of the chimney, as well as proper operation, no problems will arise when using the heating system. If the entire system is installed incorrectly, then like a boiler or fireplace, a potbelly stove can cause a fire.
Which one is better to choose?
The choice of chimney is governed by several factors that affect the installation and operation of the heating system.
Factors:
- type of potbelly stove;
- volume of the furnace section;
- method of connection to the structure;
- indoor location;
- the need to carry the stove;
- chimney material;
- requirements for pipe design.
In fact, the chimney is selected for a specific type of stove, and not vice versa. Otherwise, the heating system will not operate properly. This especially applies to the requirement for a minimum pipe diameter.
https://youtube.com/watch?v=GZSBTiboI3I