For heating private houses, a solid fuel boiler made of brick has proven itself well. You can easily make such a heat generator with your own hands if you have the necessary materials, tools, and an understanding of the intricacies of the design and production process. The availability of information allows you not to experience difficulties when assembling the boiler. Therefore, armed with a ready-made drawing, you can easily and profitably manufacture heating equipment.
How to make a new furnace with water heating
There are many drawings on the Internet for making a heating stove with your own hands. If the developer lacks practical experience, it is safer to entrust such work to professionals who will carry it out, taking into account fire safety requirements and operating rules.
Algorithm for constructing a furnace with a skeletal heat exchanger:
- The heat exchanger is prepared according to the dimensions of the combustion chamber.
- A brick foundation is built for the stove, and waterproofed roofing felt is laid under the foundation.
- The bottom of the firebox and the ashpit are laid out with fireclay bricks, separated by a cast-iron grate.
- A skeletal heat exchanger is installed and a brick wall is laid out using a pattern. Ensure the size of the firebox so that there is a gap of up to 2 cm between them.
- A door is installed in front of the firebox.
- A channel for the smoke exhaust system is left behind the combustion chamber.
- A cast iron hob can be installed on top of the combustion chamber.
- The smoke exhaust duct is made of brick or steel pipe.
- Allow time for the masonry to dry thoroughly, then connect the in-house heating system to the heat exchanger pipes, which should contain a mud trap, shut-off and control valves, air vents, an expansion tank and radiators corresponding to the thermal load of the heated room.
- Finally, the heating system is pressure tested, a test fire is performed, and the performance of the heating equipment is checked.
When constructing a stove heating source, it is important to pay attention to the thickness of the walls, which are made of fire-resistant fireclay bricks. It depends on the type of fuel; for coal-fired devices, the walls are made wider
This limitation should not be ignored, otherwise the stoves will burn out very quickly, and a new structure will have to be installed.
Preparation
To properly install a stove, you first need to carry out some preparatory procedures. We are talking about the base, because the stove is a fairly heavy structure that must be firmly fixed.
Making a regular foundation
We can make a solid foundation.
- We dig a hole about 25 centimeters deep.
- Mix the solution (we’ll talk about its technology below).
- Fill the hole with mortar and add crushed stone on top.
- We compact it.
- We wait for the mortar to dry and lay two rows of bricks on top.
Note! When working, you should use a building level; the surface of the foundation should be parallel to the ground.
Making a columnar foundation
If for some reason a conventional foundation does not suit you, you can use a columnar structure. It involves installing poles in places where a large load is planned. This type of foundation is reliable and economical; it is often used for lightweight stoves. You can install it without having any specific knowledge or skills.
In other words, we install posts in the corners.
- We mark the corners.
- We dig a hole half a meter deep.
- We fill a ten-centimeter sand cushion.
- Next, prepare the solution. To do this, take “three hundredth” cement and mix it with sand in a ratio of 1 to 2. The consistency should be like thick sour cream.
- Pour the solution onto the pillow along with crushed stone (about 10 centimeters).
- We install the pillars and the bottom trim. The best option is to install a channel over the entire area. You can use concrete pillars; they are laid on brickwork.
When the preparations are finished, we can consider how to line an iron stove with bricks.
Preparing the right solution
First you need to make a solution, preferably from clay - this is most suitable. The longevity of the stove will depend on whether we do it correctly. The solution should be plastic, not liquid. There are two types:
- liquid;
- skinny.
It is advisable to use a skinny one for the stove. Professionals say that it is best to use fine sand, preferably mountain sand. We sift the sand into one and a half millimeter cells.
Common mistakes
The brick chimney is crumbling due to the formation of condensation. When installing the channel, mistakes are made that contribute to the accelerated formation of moisture and reduce the service life of the structure:
- Insufficient pipe height. A thick layer of adhering soot due to untimely cleaning of the channel and incorrect dimensions of the air duct provokes weak draft.
- The presence of uninsulated areas of the chimney (for example, an attic).
- Incorrect connection between the gas boiler and the duct. The splicing should be carried out with a stainless pipe or corrugated pipe, extending it at least 0.5 m vertically into the brick well, the horizontal section should not exceed 1 m.
Disadvantages of a brick chimney
The latest models of gas boiler operate on the principle of economical consumption of resources. The heating gas is turned on when the temperature sensor is triggered, reaching the set temperature, and turns off. The chimney cools down and condensation forms in it. Natural gas contains various microelements in small quantities. When reacting with water, combustion products form solutions of hydrochloric, nitric and sulfuric acids.
An aggressive environment is formed inside the channel, which leads to rapid destruction of the brick and cracking of the seams. Every 5 years the pipe must be repaired. The gas service has many requirements for such chimneys, and inspectors are very demanding at the time the facility is put into operation. Low cost is a significant, but the only advantage of mono-brick chimneys. It is possible to repurpose an existing duct into a chimney for a gas boiler only if special liners made of steel or ceramics are used.
Many builders by “brick chimney” mean combinations of brick with stainless steel, ceramics or asbestos cement. Outwardly, it looks like wells made of stone, and liners made of other materials are not visible. Such systems almost completely eliminate the disadvantages of monolithic stone structures, but are significantly less expensive.
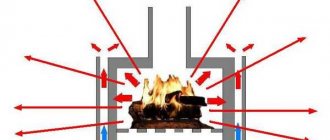
Furnaces - boilers
The compact dimensions of the furnace-boiler and high efficiency are achieved through the use of a U-shaped boiler. This form of its design allows the entire volume of water in it to be distributed around the burning fuel on three sides.
No. 217 POV – 2500 with central heating boiler
| Designed for cooking and heating a 1-2-storey house or cottage with a total area of 85±12 sq.m. with a ceiling height of at least 2.5 m. The boiler design is U-shaped, which ensures the efficiency and durability of the firebox (three walls of the boiler are the walls of the firebox). Boiler volume 75 l. Stove dimensions in plan (1020x1150) mm. The outlet and return pipelines can be connected to the boiler on the front or side left walls of the furnace. The dimensions of the stove firebox are (640x260) mm. Quantity of bricks - 650 pcs. The volume of the project is 34 pages in A4 format. The cost of the project is 1600 rubles. switch to mirror image |
Advantages of stove heating
- The main advantage of stove heating with a water body is that there is no need to purchase expensive units and components.
- Over many years of use, the stove will only need minor cosmetic repairs. This is much cheaper and easier than taking expensive equipment for service.
- Free design.
Craftsmen can build a stove of any shape and size, and the owner can decorate it to his liking if he wishes. The stove can fit perfectly into the design of the room - If we compare stove heating with a water circuit with solid fuel boilers, then there are additional advantages due to the fact that the stove heats not only the coolant, but also the smoke outlets. Directly during combustion, the heat generated is transferred to the heating radiators, and then the stove gives off heat for some time until it cools down completely.
- The heat exchanger can be built into an existing structure. In addition, even a cooking stove can become the basis of your heating system.
Stoves with a water circuit are easy to make yourself, but you can purchase ready-made heating devices in the store. The models are characterized by the following advantages:
- Furnaces with a water circuit do not need to be connected to electrical networks. They do not use gas as fuel. The devices run on coal, peat and wood, which are renewable fuels.
- Stove water heating is completely autonomous, but it can be combined with other systems.
- Adjustment is carried out using a manual valve.
- The walls of the furnace are massive, they transfer heat, heating the air and surrounding objects. The room is heated evenly due to the use of coolant. It passes through the pipes, heating them and radiators.
- Heating a private home will not require large expenses. Coal, peat and wood are available to everyone.
- Stoves not only heat the room, they are used for cooking and heating water.
- Devices, the front of which is covered with glass, allow you to contemplate an open flame. Fireplaces create a comfortable atmosphere in homes.
- The design of the stove is massive; during the cold season it accumulates a large amount of thermal energy. The stove cools down gradually, so it heats the room for a long time after the fuel has burned out. In summer, the processes proceed in the opposite way. If the stove in a wooden house is built on a separate foundation, during the warm season it releases excess heat into the ground, working as an air conditioner.
- The natural fuel on which the stove operates moderately pollutes the environment.
- Water is used as a coolant. It has a volumetric heat capacity, which allows heat to be transferred over long distances. Water is affordable. It does not burn, is not toxic.
But furnaces with a water circuit also have disadvantages. They must be constantly monitored, firewood must be placed in time and the draft must be adjusted. The chimney should be cleaned and the ash removed.
A powerful brick oven is large in size, so it is placed on a solid foundation. It takes up the usable area of the room, which is why large structures are installed in spacious rooms. Such a furnace has low efficiency.
When installing a stove, you need to build a chimney. The draft must be strong, then the fuel burns intensely and the smoke is quickly removed outside. The pipe is isolated from the wooden elements of the roof and ceilings. Having installed a stove in the house, it is necessary to maintain a fuel supply and dispose of ash and slag in a timely manner. This adds more work to the owners of a private home.
The main disadvantage of water heating is that the water freezes quickly. Turning into ice, it expands, damaging devices. Combining with air, it promotes corrosion on the metal elements of the heating system. If the water is hard, scale will form inside radiators and pipes.
- Cost-effectiveness of the system. Construction of a stove or re-equipment of an already finished one will not require serious financial investments, and as a heating device it does not require complex and expensive maintenance.
- You can combine a stove with a fireplace and get not only a heating device, but also a unique decorative element that can become the main attraction of the interior.
- The house creates a special coziness and atmosphere that can only be created with the help of this living heating method.
- Relatively high efficiency. If the stove is built by a competent specialist according to a good design, its productivity will be quite high, up to 60% in comparison, for example, with an oil-fuel boiler.
How to choose a project? Order
First of all, decide on the conditions in which the furnace with a water circuit will operate.
If this is integration into an existing OS, it is important to ensure interchangeability in the operation of existing communications. For the independent option, it is important to determine the area that the system will heat
For 100 square meters of a one-story house, a conventional stove is quite enough.
Another thing is if the area, number of rooms and floors is larger
Finally, it is important to understand whether the OS will be used all year round or only in cold weather. If people live in a house in the summer, and in winter it is idle, then after cold weather and frosts the system will require restoration work, which will entail additional costs
Photo 4. An example of the order of a brick kiln with a water circuit: the initial stages of construction from 1 to 20 are depicted.
What materials will be needed
For the furnace itself: concrete, mortar, refractory and red clay bricks, valves, fire door, grate, ash pan.
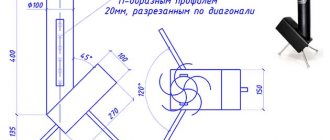
For the manufacture of a heat exchanger: metal pipes with a diameter of up to 50 mm or steel sheets 3 mm thick and a rectangular profile 60x40 mm.
For the manufacture of outlet and supply lines of the furnace: metal pipes. For distribution of hot water throughout the house: polypropylene pipes and radiators.
Required Tools
For laying the furnace, making a heat exchanger, installing communications and heating devices you will need:
- building level;
- roulette;
- Master OK;
- bucket;
- pliers;
- electric drill;
- welding inverter;
- wrench;
- screwdriver.
Other tools may also be required, since the laying of a furnace with a water circuit and the wiring in each case are carried out taking into account individual conditions.
Preparing the site
A furnace with a water circuit is located in a fireproof area that is waterproofed.
This area of the room should be well ventilated and access to the oven should always be open. Then make sure that the place for the stove is level and its walls rise up at a right angle.
It is important that the roof allows the pipe to be brought outside without obstacles. Then check how strong the foundation under the future structure is
After all, a stove is a heavy structure that requires a prepared base. The approximate weight of the stove is calculated by equating 1 cubic meter to 1350 kg. If a suitable location is identified, it is cleared and prepared for the construction process.
Attention! To achieve maximum effect, a stove with a water circuit is positioned so that it heats as much space as possible. This will reduce heat loss and reduce the cost of its production.
Building a stove with a water heating boiler with your own hands
Construction begins with the foundation. Its lower part is filled with concrete, and its upper part is laid out with bricks. Then the laying begins. The first row is laid out dry, and then - on the solution. In this case, the masonry is made from the walls to the middle.
During the laying process, a heat exchanger is installed in the firebox, and the pipes coming from it are distributed throughout the body right up to the point of entry/exit of communications. When external communications are installed, water is released into the circuit and the system is tested for leaks. If the test is successful, the furnace with a water circuit is considered ready for operation.
Difficulties during construction and commissioning
The main challenge when building hot water furnaces is their integration into the existing building layout. You have to look for a convenient place in it, and then adapt it to the operating conditions of the furnace.
If you put the design of the system into perspective at the design stage of the building, you will be able to calculate all the nuances and make the efficiency of the heating system as high as possible.
It is better to test the elements of the water circuit (heat exchanger, pipes for hot water outlet and return inlet) immediately after manufacture and before installation.
If everything is already built and installed, and the heat exchanger suddenly leaks, you will have to dismantle the masonry and disconnect the communications in order to eliminate the detected defect.
Another problem when building a system can arise from pressure. The liquid moves through the water circuit under its own pressure. But it is not always enough for the coolant to reach remote areas of the room. Then an electric pump comes to the rescue to distribute heat evenly throughout all areas of the building.
About the heat exchanger
When building a brick stove with a water heating boiler with your own hands, you should take into account many factors and calculate the project as a whole. Any type of materials and structures have their advantages and disadvantages.
There are several ways to install a water register in a furnace:
- Inside the hearth;
- In the chimney;
- In the body of the stove, next to the hearth.
Depending on the location, choose the material for the heat exchanger and its shape:
- Copper - effective due to the high thermal conductivity of the metal, but due to the low melting point of copper, constant circulation of water in the system is necessary;
- Steel - heat-resistant steel with a wall thickness of 4-5 mm is used for boilers. For long service life of steel structures, it is not recommended to drain water from them.
- Stainless steel is expensive, but the most suitable material for a boiler. The only disadvantages include the complexity of manufacturing.
When choosing the type of material and installation location of the heat exchanger, it is worth remembering that by placing the water circuit in the fireplace, in the summer the entire system will heat up; to avoid this, you will have to remove separate batteries to remove excess heat.
When installing a heat exchanger in the chimney, additional dampers are added to the stove design, which do not heat the boiler during summer operation of the stove. It should be taken into account that the heat exchanger must be larger in volume than when built into the fireplace. In addition, the boiler should not reduce the throughput of the smoke channels.
Calculation of power and dimensions
For normal heating of the room, it is necessary to correctly calculate the register area and its power. For a brick kiln, an approximate calculation is sufficient; it is impossible to make an exact one, due to many factors and variables.
It is known from practice that heating 10 m2 of space requires 1-1.5 kW of energy. From one square meter of heat exchanger you can get 5-10 kW. To determine the register power more accurately, you need to consider:
- Location of the coil in the furnace;
- Type of fuel - wood, coal. When burned, wood produces less thermal energy.
- Approximate temperature in the hearth and location of the heat exchanger;
- Average water temperature throughout the entire circuit;
- The heat transfer coefficient of the material from which the coil is made.
As the fuel burns, the power of the heat exchanger will decrease, so it is better to increase the calculated coil area by 10-15%.
Main types
When constructing stove water heating, you can go one of two ways:
- If the house already has a stove, then it is necessary to make a coil for installation inside the structure. This technique is used infrequently due to its complexity. In this case, it is quite difficult to make a firebox to fit the existing dimensions of the structure.
- Construction of a heating plant on your own, taking into account the size of the register. If everything is done correctly, the reliability and longevity of the furnace service is guaranteed. The internal dimensions of the shirt deserve special attention. Its thickness should start from 4-5 cm, in order to avoid the threat of boiling water. To protect yourself from problems with coolant circulation, you usually install a suitable pump.
- When choosing wall thickness, the calorific value of the selected fuel is taken as a guide. If it is intended to use exclusively firewood as energy carriers, then 3 mm will be sufficient. If you plan to use coal, the thickness should be increased to 5 mm. The distance from the furnace register to its walls is recommended within 10-20 mm. This will completely neutralize the thermal expansion of metal elements, preserving them from premature destruction.
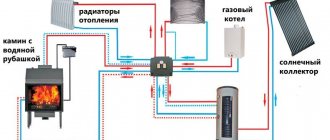
Operating principle of a gravity central heating system
The main task is to heat the coolant inside the boiler. The coolant in the central heating system is water (non-freezing liquid). The difference in its mass - hot, coming from the boiler and cooled, in the radiators - forces it to circulate through the system. The speed of water movement increases due to an increase in the height difference between the center of the boiler and the center of the radiators. Based on this, the installation of autonomous heating radiators in a private house is carried out as high as possible above the floor, and the return pipeline is laid above the floor no higher than the bottom of the boiler. The gravity system must be open, i.e. communicate with outside air. As water heats up, it increases in volume, and its excess flows into the expansion tank, installed at the highest place. The circulation of the coolant in the system begins when it is heated from 40 C°. The pipelines are connected to the boiler from the accessible wall of the furnace, based on the layout of the room. The elements of water heating are: central heating boiler, pipes, flues, radiators, expansion tank. Water is not discharged after the system is charged. Draining it will shorten the service life of the metal parts of the system, because... will lead to corrosion and increased solid deposits when adding new water.
No. 193 POV – 2700 with central heating boiler (mini-Russian stove)
| Designed for heating a 1-2-storey house or cottage with a total area of 50±7 sq.m, baking flour products, cooking on a cooking floor, preparing kebabs, stewing (including canning), smoking fish and meat, drying mushrooms and other products, preparing coals for the barbecue in the bread chamber, with a ceiling height of at least 2.35 m. Boiler volume - 42 liters. The stove has a heating element, which in the room heating mode heats the entire body of the mini-Russian stove. The cooking floor under the heating area is a platform for installing an external barbecue. The fire chamber is intended for cooking and performs all the functions of a Russian stove. In a separate application, the project contains the order of the location of the pipe channel on the right side of the smoke collector. Dimensions in plan (1150x1020) mm. Firebox dimensions: Fire chamber (640x450) mm. (lining is being done); Flooding (380x380) mm; Number of bricks: red - 595 pcs; fireproof - 265 pcs. The volume of the project is 39 A4 pages. The cost of the project is 2600 rubles. switch to mirror image |
Other projects of Russian stoves with a stove of a classical design.
Marking
Separate the meter from the floor, marking it from the side of the entrance metal door that meets the jamb, as shown in the photo; Place the body of the device against the line and draw a mark on the bottom. For everything to go smoothly, use a thicknesser, spreading its bars to a distance corresponding to the thickness of the mechanism you plan to install; Draw several lines perpendicularly through the center of the end. The thickness gauge should fit snugly against the door end when you mark the device parameters
Be aware of the location of the well; It is very important to choose the right drill bit. It should be of such a size that the spindle fits freely into the hole made; You need to start drilling according to the mark on the front side
The hole for the well is made in the same way. Do everything carefully, as the slightest mistake can lead to damage to the metal door.
Making a heat exchanger for a stove boiler with your own hands
Easy way
Let's say there is a ready-made brick stove (heating, heating-cooking or regular fireplace).
We are required to do the wiring around the house and spend a minimum of money. The easiest way to build a boiler into a brick oven is to make and place a regular coil in the firebox. Typically, a furnace with a heat exchanger is more efficient and economical. It is worth noting that any form of heat exchanger can be used.
It is worth considering these three nuances:
- The maximum height difference at the inlet and outlet.
- Maximum surface area.
- The heat exchanger should not interfere with the combustion process and fuel supply.
It is desirable that the heat exchanger be made of heat-resistant stainless steel. Although this material will cost you significantly more than steel, which can rust over time, it will last much longer.
A more complex and effective way
In cases where the kiln is just being built, it is possible to ensure that the water boiler in the brick kiln works as efficiently as possible.
To achieve this, you will need to meet the following conditions:
- Combustion products must leave the chimney at the maximum possible temperature. The greater the volume of heat released inside the furnace, the higher the efficiency of such a furnace.
- Ideally, the heat exchanger will be installed outside the firebox. This approach is explained by the fact that the flame, being a volatile substance, easily gives up its heat and cools, as a result of which we have partial combustion of fuel, the efficiency of the furnace deteriorates. Although it would seem that the highest temperature is present in the firebox.
- The circuit must be such that the water in the heat exchanger moves towards the heat flow. In other words, the cooled coolant must meet the coldest furnace gases, and the heated coolant must meet gases that have a higher temperature.
In this way, it will be possible to maintain a greater constant temperature between the two areas, and it will be possible to achieve more efficient heating. Among other things, much less condensation will accumulate on the heat exchanger, which causes rusting of ordinary steel.
This method of arranging a stove with a water heating boiler is very simple - it involves installing a bell-shaped chimney with a heat exchanger located inside, capable of holding a large amount of coolant. In this case, it is best to use a register welded together from several large-section pipes as a heat exchanger.
By installing the boiler in the stove with your own hands according to this scheme, we get the following results:
- Furnace gases will remain in the bell longer - the hottest ones will accumulate in its upper part, and their release beyond the bell will occur after the combustion products cool and fall down.
- There are no obstacles to combustion in the firebox. Fuel combustion will occur as efficiently as possible.
- The natural movement of flows in the heat exchanger located in the hood occurs from bottom to top. The coldest exhaust gases come into contact with the coolant that has just entered the heat exchanger.
If all the conditions for connecting a boiler for a brick kiln with water heating are fully met, the finished heating system, created by yourself, will be as efficient as possible. However, which heat exchanger option is best for you is up to you to decide.
Radiator assembly
Assembling radiators is a simple process, because it completely repeats the process of disassembling them. The sections are connected by nipples that have left and right threads on both sides. This way, the sections at the top and bottom will be pulled tightly against each other when the nipple is turned. When the gap becomes 2 cm wide, you should wind the asbestos-impregnated cord and only then tighten the nipples completely.
When the entire structure is assembled, you should wait for the drying oil to dry, and then check the joints for leaks. that is, supply water under high pressure to the radiator. This will ensure the subsequent use of the radiator and there will be no leaks.
The return and coolant supply pipes must be connected diagonally to the radiators. Holes that remain open must be closed with plugs. It is better to take inch pipes. On one side of the radiator there will be a right-hand thread, so there will be no difficulties with connection. On the opposite side, use a coupling with a squeegee and a nipple.
The process of making a solid fuel boiler from brick with your own hands
What materials and tools are needed for construction?
To build a solid fuel boiler with your own hands, you need to have the slightest knowledge of welding, mason skills and be able to use a gas cutter. It is advisable to understand the marking and cutting of working material, as well as have an understanding of working with power tools. With such a wealth of knowledge, you will be able to quickly build a high-quality solid fuel boiler at a minimal price. To do this you will need the following materials:
- clay, brick;
- grate;
- pipes;
- gravel;
- water;
- sheet metal;
- doors;
- water pump and water heating device.
It is necessary to prepare the following tools:
- welding machine;
- Bulgarian;
- cutting torch;
- a marker that is clearly visible on metal;
- spatula for putty;
- level;
- pliers;
- roulette;
- electric drill.
Stages of work
Vertical solid fuel heating devices are popular, which you can design yourself as follows:
- Prepare the heat exchanger and take dimensions from it for the manufacture of the combustion chamber.
- Build a foundation of brickwork or rubble stone.
- Lay the base of the boiler with a waterproof roofing felt pad.
- Line the bottom of the chamber and the ash pan with the door with stove bricks and separate them from each other with a cast iron grate.
- Install the TO and lay the walls out of brick, leaving a gap of 1.5-2 cm.
- A door is attached in front to cover the stored fuel, and a hole is left for the chimney at the back.
- A cast-iron hob or a thick metal sheet covered with a layer of brick is laid on top of the chamber walls if you do not plan to use the boiler for cooking.
- The smoke exit channel is located on the side or on top of the combustion chamber, made from a metal pipe or building material.
- When the masonry has dried well, the heat exchanger pipes are attached to the pipeline using couplings or welded.
- Finally, a test fire is carried out and the operation of the heating device is checked.
Advantages
A boiler made of brick is considered a simple and effective heating structure, which is advisable to use for heating private houses. The advantage of such a structure is the possibility of making it yourself, which allows you to save a lot, as well as be confident in the quality of the materials used and the finished boiler. The manufacturing process itself consists of a minimum number of steps that do not require a large amount of welding work. Having purchased a ready-made heat exchanger, do not use welding. A brick boiler is multifunctional, as it can be used as a heating device for rooms. Additionally, as a hob for cooking.
In addition, such a boiler has the ability to maintain the required coolant temperature for a long time, allowing you to maintain a healthy and comfortable atmosphere in the room. A brick kiln allows you to burn even plastic or rubber waste. However, it is important to know that the firebox should not contain more than 1/3 of the total amount of fuel.
Types of heat exchangers for furnaces
When creating an autonomous heating system, two types of heat exchangers are used: flat and tubular.
Flat type heat exchanger
Stove boilers with a flat configuration heat exchanger are a practical option for country houses, private cottages and baths. They are easy to manufacture, install and maintain.
Such devices are mounted vertically and horizontally and have a high efficiency. The flat design of the boiler is characterized by a large chamber volume, which ensures rapid heating of the water necessary for heating and water procedures.
A significant drawback of the equipment is the reduction in thermal output from the furnace wall structures. The heat exchanger is presented in a U-shape and is mounted around the entire perimeter of the firebox. This leads to a decrease in the heating temperature of the external walls of the furnace and an increase in the time for heating the room. This is only problematic in cases where the heating stove is installed inside residential premises, where the combustion process is carried out constantly.
You can increase the heating rate of a flat boiler in several ways: lengthen the heater and place it above the firebox, or use a metal chimney, first increasing its length.
Tube type heat exchanger
A tubular boiler for a stove differs in the type and size of the structure and installation method. If repairs or replacement are necessary, the heat exchanger can be easily removed from the furnace.
Seamless water pipes are used to make a tubular register for a brick stove, so it is considered the most reliable, safe and durable.
When choosing or manufacturing a heat exchanger, you need to remember that its design and dimensions must fully correspond to the shape of the firebox, which will allow heating the maximum amount of water. A high-quality register provides a large heat exchange area.
Features of Kuznetsov furnaces
In addition to high efficiency, these devices have the following advantages:
- Easy cleaning - due to the high temperatures in the combustion chamber, even ash burns, reducing the number of necessary cleaning operations.
- Multifunctionality - blacksmiths are often equipped with a hob, oven, and boiler for heating water.
- The design allows you to build stoves of various shapes and sizes, this ensures their more convenient location in the house, and also expands the choice of decorative design of appliances.
- Uniform heating of the furnace walls has a positive effect on the strength of the masonry, so blacksmiths are durable.
The construction of such a furnace will be quite possible for an experienced craftsman - if there is not enough experience, it is recommended to contact a specialist to calculate the drawing. When working independently using a finished scheme, you must carefully follow the recommendations without changing the order of the selected project at your discretion.
Design features of a furnace with a circuit
A stove with a heating circuit ensures uniform and rapid heating of the room thanks to the coolant (water or other liquid) located inside the system. The thermal energy released during the fire is used to heat the room and heat the water in the system.
Heating equipment of this type is equipped with a metal heating circuit. It is a tank with fittings and pipes connected to them.
Modern stoves with a heating circuit are made of metal or refractory brick, with different placement of the heater, as well as with a water tank.
https://youtube.com/watch?v=aUj_c4Eb9Bk
Structurally, the furnace boiler is presented in two types:
- Boiler in the chimney. This device is characterized by high performance characteristics, long service life and ease of use. The only drawback of the design is the inability to heat large rooms.
- Boiler in the firebox. It is intended for heating large areas, is accessible and durable. The disadvantages include close contact with open fire, which leads to severe overheating and destruction of metal structural elements. In addition, a high temperature of the heating circuit leads to the rapid formation of soot and a decrease in the efficiency of the device.
Installing a coil on a pipe
This is an excellent and fairly simple way to increase the efficiency of the stove. Flue gases heat the pipe to extremely high temperatures. The outer coil, like the inner one, helps reduce the temperature and somewhat cool the outer surfaces of the chimney. An external water heat exchanger is especially often installed on metal chimneys. This is an excellent auxiliary device for heating small spaces.
This heat exchanger has two pipes. The top one is connected to a pipe going to the storage tank, the bottom one is connected to the heating circuit. It is easy to make such a structure, as well as attach it to a pipe.
Use copper pipe or ready-made modules.
Furnace laying
How to lay a stove yourself? The installation of a stove for heating a house begins with a solid masonry of the initial row, except for one hewn brick to create a slope towards the ash pit. The masonry of the second row must be bandaged, with the installation of a blower door. The first blower door is installed on the third row. The fourth row is more complicated, except for installing the second cleaning door on the right stove wall, and from half a brick they prepare a support for the oven, where two grates are installed.
Fifth
Cleanout holes are left on the fifth row, and if there are cleanout doors, they are fixed to the masonry, with the simultaneous installation of a water heating boiler, the highest point of which is the point where the pipe exits, “supplying” hot water. This will avoid airing the system, and the boiler itself and wood heating will work well.
Sixth – tenth
The sixth row is similar to the previous masonry; dressing the seams is required. When laying this row, the firebox door is attached to the masonry. In the seventh row we close the cleaning doors. The eighth row, according to the order, with alternating masonry seams. This row covers two chimneys behind the boiler. The next two rows are laid in the same way, with suture dressing.
Eleventh – twentieth
As can be seen from the masonry, the water boiler does not touch the brickwork from the back, front, the gap left compensates for the expansion of the water boiler when heated. On the eleventh and twelfth rows, the previous laying is continued, the seams must be bandaged.
The thirteenth one begins to be laid out from refractory bricks; this is the beginning of covering the heating chamber. The fourteenth continues it. The heating chamber overlap completes the fifteenth row. The sixteenth row additionally covers the heating chamber.
On the seventeenth row, the horizontal channels of the upper heating chamber and their dimensions are determined. Cleaning doors are also installed on this row, four in total. The horizontal channel is blocked by the eighteenth row, the next row is the cleaning doors; when laying, they continue to bandage the seams.
Nineteen closes the cleaning doors. On the twentieth row, the dimensions of the chimneys are determined.
Final ranks
Further rows are laid in order, tying the seams. Further up to the thirty-third row - masonry according to the order, according to the rules for bandaging the seams. On the thirty-seventh, thirty-eighth row, a smoke damper is installed on the brick kilns.
On the 37-38 row, a smoke valve is installed.
The chimney begins from the thirty-ninth row.
The best performance of water heating is achieved when using a two-pipe heating system; in addition, an expansion tank must be installed at the top point, which compensates for the increase in its volume when the coolant temperature changes. The height of the supply riser is maximum, this improves circulation within the system.
Rules for the safe use of a water heating boiler
In order for a device with a heating water circuit to operate with the highest efficiency, it is recommended to follow a number of rules:
- The stove should never be heated with the heat exchanger drained - this will lead to irreversible damage.
- If you light the stove and supply cold water to an already heating heat exchanger, this will lead to its deformation and cracking of the metal.
- In the absence of a circulation pump, the speed of water movement through the pipes and the corresponding quality of heat transfer will decrease.
- In order to avoid water freezing in pipes located near external walls, special antifreeze is used in the circuit in winter.
- If you stop moving water through the pipes while the furnace is still running, there is a risk of an overheated heat exchanger exploding.
If all operating rules are followed, a Kuznetsov stove with a water circuit will provide the highest quality heating of the room and a long service life of all systems.
In this article we will talk about the features of the installation and operation of Kuznetsov brick kilns. You will find out what types of these furnaces exist, why there are two hoods in the design, and for what purpose they are installed.
What determines the strength of the masonry, what materials are used to arrange the Kuznetsov stove.
We will also tell you about the types of heat exchangers used in blacksmiths.
Safety regulations
Always follow safety precautions when using wood burning stoves
Never leave stoves burning for a long time without control, do not forget to clean the ash chamber in a timely manner and add firewood to the firebox. Pay attention to the chimney channel valves. keep them in the open position until you start to light the stove Use only in the cold season, its use in summer is not advisable
Significant overheating can lead to breakdown, and then the stove will have to be repaired
and seriously. High temperatures can cause destruction of the furnace walls. That is why you should avoid excessively high temperatures and using the unit in the warm season
Significant overheating can lead to breakdown, and then the stove will have to be repaired. and seriously. High temperatures can cause destruction of the furnace walls. That is why you should avoid excessively high temperatures and using the unit in the warm season.