Rules for the location of pipes on the roof
When designing the passage of a chimney pipe through the roof, you should be guided by the current rules and regulations, fire safety requirements. The following should be taken into account:
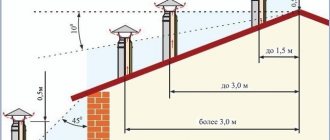
- The recommended location for installing the chimney is at a distance of no more than one and a half meters from the highest point of the roof (ridge). In this case, the upper cut of the pipe should be located at least 50 cm above the ridge.
- If the pipe is 1.5–3 meters from the ridge, its upper part can be located at the level of the ridge. When the chimney is removed by more than three meters, its height above the roof is calculated depending on the height of the ridge. The upper cut of the ridge should fall on an imaginary line drawn from the ridge at an angle of 10° relative to a horizontal line passing through the same point.
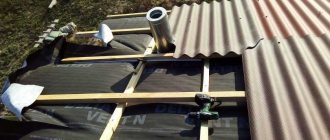
- The place where the chimney pipe passes through the roof should be located between the rafters at a distance of at least 25–30 cm from the wooden elements of the roofing system. If part of the rafter is removed, a special structure is installed so that the roof frame can withstand operational loads.
- A gap of 13–25 cm should be left between the chimney pipe and the edges of the roof covering, which is not resistant to fire (soft roofing, roofing felt), if the roof is made of sheet metal, natural or cement-sand tiles, slate, this distance can be reduced to a minimum.
Pipe in the valley area
It is not recommended to install a chimney pipe in the place where the valley of a complex roof is located. Precipitation flows down it, which flows here from two slopes, in addition, snow masses will accumulate near the chimney and melt. Increased load inevitably leads to depressurization of the joints between the penetration and the roof; they will have to be regularly checked and repaired.
The procedure for installing a chimney through the roof
When installing a chimney, you need to do the following:
- You need to choose the best location for the passage on the roof.
- It is necessary to install a box - a structure that ensures the safe passage of the pipe through the roof.
- A hole is cut in the slope.
- During work, the roofing material is folded upward and the thermal insulation layer downward.
- The pipe is fixed.
- The box needs to be filled with thermal insulation and secured.
Next, you need to use sealants to ensure complete insulation of the structure.
Fire safety precautions when using MASTER FLASH
MASTER FLASH made of silicone can withstand temperatures up to +300 degrees Celsius. This is quite enough to seal a sandwich pipe and, in many cases, a chimney made of asbestos-cement pipe.
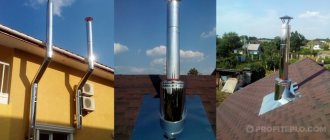
The passage through the metal tile is sealed using a Master Flash penetration. Additionally used bitumen tape
As for the metal mono-pipe, in these cases it is possible to use MASTER FLASH in cases where the length of the chimney from the stove to the passage through the roof is at least 3 meters. As a rule, in this situation the temperatures will not be critical, but if not, then thermal insulation of the area that passes through the roofing pie is necessary.
Determining the location and height of the pipe
Depending on which location is chosen, the pipe on the roof of the house is installed according to the following rules:
- If it is closer than 1.5 m from the ridge, then the upper edge of the pipe should be located 0.5 m above it.
- When the distance is in the range from 1.5 to 3 m, the height of the pipe on the roof is such that it is level with the ridge.
- At a further distance, to determine the height, use the following construction. It is necessary to lay a corner, the side of which is horizontal and located flush with the ridge of the roof. 10 degrees are laid down from this line. The resulting straight line determines the height that the pipe should have.
If the roof is flat, the pipe should extend 0.5 m out of it.
Waterproofing self-adhesive tapes: a flexible approach
One of the most popular and proven methods for arranging the connection between the roof and the chimney pipe is the use of special waterproofing tape.
For example, it is difficult to come up with something better for a roof made of piece materials, for which a galvanized steel apron is not suitable. It is easy to work with such tapes, the main thing is to adhere to the temperature regime – from +5 to +40°C.
In this article we will look at the highest quality and most popular tapes. In general, there are many options, because each manufacturer of roofing material tries to produce its own roofing element, which will be most suitable for a specific brand.
For example, if you need to go around a round chimney, an Ecobit type tape will help you. It is good because it has a self-expanding base and can be sealed without problems.
Its lower part must be placed under the tiles, and the upper part must be placed on the roofing. Next, press both layers and glue them to the walls of the chimney and to the tiles. Next, cover the edges of the top tape with metal profiles.
This is what these waterproofing tapes look like:
In total, today tapes are produced on two bases. Thus, butyl rubber has the highest waterproofing qualities, and aluminum allows you to hermetically fit even the most complex shapes.
Easy-Form: the strength of aluminum
Easy-Form is an aluminum tape with a butyl layer on the surface. The elongation of such a tape is 70%, and at the same time there is a rigid lining made of polyester material.
It is self-adhesive and is great for waterproofing a chimney. Does not rot, is resistant to frost and temperature changes, does not lose its properties within the temperature range from -20° to +80°C.
This tape completely replaces the use of lead sheets, and is cheaper and much easier to install. It comes with a 10-year warranty. And the work is quite simple, although the instructions look voluminous:
- Step 1. Even at the stage of construction of the sheathing, include additional elements made of timber with a section of 40x40 or 50x30 mm. Secure them along the chimney walls.
- Step 2. Cover the front of the pipe with a covering apron. Usually this is recommended by the manufacturer himself, from a specific material for each type of roof.
- Step 3. Install the apron in its place - along the lower edge of the pipe.
- Step 4. Make markings on the apron and make cuts along it. Make sure that the top of the apron is exactly the width of the pipe, and that the wavy part has one wave on each side.
- Step 5. Make markings with a pencil and cut off excess material along the lower crest of the wave with a sharp knife.
- Step 6. Press the finished apron onto the pipe and fix it to the surface with proprietary roofing nails, directly into the sheathing beam. Drive nails into the top of each wave, strictly vertically, except for the waves that extend on the sides beyond the dimensions of the pipe.
- Step 7. Now attach the cut piece to the installation site and give it the shape of a corner relief.
- Step 8. From the back of the tape, remove the protective film that covers the adhesive layer. Apply the tape to the pipe so that it covers the top and bottom of the apron by 70-80 mm. To ensure that the tape fits tightly to the roof, trim its corner.
- Step 9. Press the tape onto the entire surface with a little force. Do this on one bottom corner of the pipe, and then on the second.
- Step 10. Attach the side apron to the pipe, press it and mark the cut line. You will need to cut along the vertical boundaries of the pipe with a sharp knife. Do not press the knife itself too hard, so that it enters the apron only 2/3 of the thickness of the material. Then bend it and carefully break it off.
- Step 11. Nail the prepared side parts of the apron to the roof, three nails in each part: one in the center and one more at the bottom and top.
- Step 12. Cut a piece from the self-adhesive tape that will be 200 mm longer than the width of the pipe. This length is suitable for sealing the back of the chimney pipe.
- Step 13. Now glue the tape to the front side of the pipe. Now the length of the tape should exceed the width of the pipe by 200-300 mm. The tape itself will bend over the sides of the pipe and go under the side parts of the apron.
- Step 14. Press the top edge of the tape with the metal fixing bar and secure it to the dowels. Bend the edges of the apron away from the surface of the pipe.
- Step 15: Seal the corner between the pipe wall and the folded edge with a layer of polyurethane sealant.
- Step 16. Lay an additional piece of ondulin on the back side, from the ridge to the pipe.
Here's what it all looks like in practice. Part 1:
Part 2:
In the case of a metal roof, the whole process is as follows:
Wakaflex and Grind Line: modern waterproofing
Vakaflex is a reinforced polyisobutylene mastic, which is supplied in the form of a roll 5 meters long and 28 cm wide. On its reverse side there are strips of synthetic rubber, which are glued to the base using a stitching roller.
Let's look at the Wakaflex tape installation technology step by step:
- Step 1. Trim the waterproofing film so that there is an overlap of at least 10 cm on the pipe.
- Step 2: Make a drainage groove using waterproofing material directly above the pipe opening.
- Step 3. Trim the tiles around the pipe and lay them with a gap of 2-3 cm.
- Step 4. Now cut the Wakaflex to a length that is equal to the width of the pipe + 5 cm for each side of the pipe.
- Step 5. Bend the strip using a corner so that the resulting corner width is 15-16 cm.
- Step 6. Next, apply the wide part of the strip to the pipe, remove the protective film and press the Wakaflex to the base.
- Step 7. Stretch the tape over the surface with your hands and roll it using a roller.
- Step 8. Cut the upper part of the Wakaflex at an angle of 45°, but do not cut 1 cm to the line of the pipe and the slope. Glue with a roller.
If you did everything correctly, the side roll should start from the bottom of the glued strip and end 15 cm above the top of the pipe.
The following instructions are:
- Step 1. Remove the protective film and glue the top of the Wakaflex onto the pipe.
- Step 2. Step back 2-3 cm from the level of the pipe and cut the tape parallel to the pipe, but do not bring the cutting line to this same 2 cm point.
- Step 3: Now cut the side of the tape so that it is parallel to the water drain from the roof.
- Step 4. Using scissors, round the corners of the Wakaflex strips so that the junction has a beautiful appearance and is not torn off by the wind.
- Step 5. Next, glue the lower part of the roll to the tile and roll it with a roller.
- Step 6. Cut the top part of the roll and do not bring the cutting line to 1 cm. Glue the cut parts onto the pipe and tiles, then roll them.
- Step 7. Glue the left and right corners of the pipe with the remnants of the strip. This will protect them from sliding ice and snow. As a result, the overlap on the side of the chimney pipe should be about 2 cm.
The tape should be placed under the shingles above the row of shingles. At the same time, to protect the roof from melt water, make the top roll of tape double. To do this, cut two strips, remove the protective film and stick to the bottom strip with a 5 cm overlap and roll with a roller.
But it also happens that the tiles are not located in the best way, and the width of the double strip will not be enough. In this case, it will not be possible to install the upper waterproofing of the pipe under the roof. Then a flooring of boards is installed behind the pipe. By the way, a good alternative to Wakaflex is the tape from Grind Line:
Here's how to work with it:
- Step 1. Place the double roll with a slight slope into the groove and glue the tape to the pipe.
- Step 2: Remove the protective film and press the wood decking tape against the waves of the shingles.
- Step 3. Roll with a roller all places except the lower section - the one that is adjacent to the pipe and is not yet covered with tiles.
- Step 4. Now make a cut parallel to the pipe line to the bottom, and retreat 2-3 cm. Do not bring the cutting line to the slope line of 1 cm.
- Step 5. Cut off the excess part of the roll with scissors, round the corners.
- Step 6. To avoid leaks due to a large snow bag above the pipe, bend the top edge of the Wakaflex to a width of 2-3 cm.
- Step 7. Now lay the shingles so that they partially cover the tape above the pipe.
As soon as the junction assembly is ready, you can proceed to the installation of the ridge elements.
How to seal a chimney on a roof
Combustion products are removed through the pipe. Their temperature can reach 200 degrees. Sealing is designed to achieve the following purposes:
- Smoke must not be allowed to enter the room.
- The fire hazard of using the pipe must be ensured.
- Sealing must be done aesthetically.
This stage of work is carried out after the pipe and box have been installed.
Principle of operation
The principle of operation of a chimney is based on the tendency of hot combustion products to rise upward. Hot gases expand, their density decreases, and they tend to “float” into a higher layer of the atmosphere with the same density. When the waste combustion products rise in the furnace, a vacuum is formed and fresh air is sucked in. Thrust ensures a continuous supply of oxygen to the fuel.
Many factors influence cravings:
- Chimney height.
- Cross-sectional area of the internal channel.
- Insulation of the channel.
- The location of the head relative to the top of the roof (ridge).
- Sufficient air supply.
What are the consequences of violating the installation rules?
If the chimney box on the roof was installed improperly, this can lead to the following problems:
- Gradual destruction of the chimney.
- High level of heat loss.
- Formation and deepening of cracks in the structure.
- Disruption of the gas circulation process.
- Ingress of moisture, which leads to destruction of the pipe and duct.
- The presence of moisture can lead to rotting of wooden parts and the formation of fungus.
Therefore, it is important to install the pipe and the duct for it in accordance with the technological requirements.
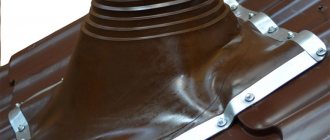
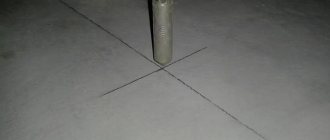
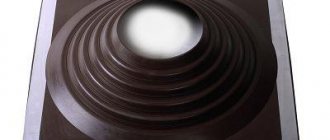
Elastic penetration
Most often in private construction they are faced with the installation of round metal pipes. To ensure the tightness of the passage, a special device is used - an elastic penetration. This is a product made of high-strength silicone or rubber, shaped like a funnel with a wide flange in the form of a square or circle, called an apron. Thanks to its properties, the elastic penetration takes any shape, adapting to the angle of inclination of the slope. It can withstand extremely high or low temperatures, exposure to aggressive chemicals and comes in a wide range.
Installation diagram of elastic penetration
Elastic penetration on a metal chain
When purchasing an elastic penetration, they are guided by the diameter of the pipe and the color of the roofing material. Universal models, in the form of a stepped pyramid, are suitable for any size; adjustment is carried out by trimming the penetration to the desired level. Installing an elastic apron on the roof is very simple, you need to place it on the chimney passage, apply a metal circle with holes for fasteners, treat the joint with fire-resistant sealant and secure it with a screwdriver. For roofs with steep slopes, a special type of plastic penetrations with a specified flange mounting angle is used.
Ensuring fire safety
The smoke that passes through the chimney has a high temperature. Because of this, wooden parts, layers of vapor barrier and waterproofing can ignite. To prevent this from happening, it is necessary to install a special box where the pipe passes through the roof.
Next we will tell you how to seal a pipe on the roof. The box is made from wooden parts. It is placed on the sheathing from the outer part.
Layers of vapor barrier and waterproofing from the outside are fixed along the perimeter. Since they are located at a considerable distance from the hot pipe, they are safe. The first of them is located on the inside, and the second on the outside of the roof.
For this purpose, you can use cross-cut material. If there is a vapor barrier and waterproofing in the inner layers of the roof, the resulting corners are folded down. A photo of a pipe on the roof will help you figure out how to do this correctly.
When the pipe passes through the roof, it is covered with insulating material. For this purpose, you can, for example, use mineral wool. The insulation layer cannot be placed close to the chimney. To prevent the heat from damaging the mineral wool, there must be a gap of 5-7 cm thick.
Basic provisions
The wiring of the chimney structure through the ceiling and roof must be carried out taking into account all fire safety standards and regulations described in SNiP 2.04.05–91. For a pipe in a private house or bathhouse, a necessary condition is the installation of a special passage unit. Let's consider the main provisions specified in the Rules:
- the distance from the surface of a brick or concrete pipe to rafters made of flammable materials must be at least 13 cm.
- the distance from a ceramic pipe (without thermal insulation) to combustible rafters should be at least 25 cm, and from similar pipes with thermal insulation - 13 cm.
Note! The above provisions must be taken into account when installing beams. Their pitch, as a rule, is approximately 60 cm. To obtain the required distance from the chimney structure to the ceiling with such pitch parameters, it is necessary to use insulated pipes. Special sandwich pipes, which consist of several layers, including insulating material, are excellent for such purposes.
The cross-sectional area of the furnace outlet pipe is usually 115–120 mm. If the sandwich pipe has an insulating material 100 mm thick, the outer diameter will be 315–320 mm and the distance will be 13 cm.
The chimney must be equipped with insulation made of non-combustible material of a certain thickness; ready-made sandwich-type pipes meet similar requirements.
For baths, pipes with an insulation thickness of 100 mm are relevant. If necessary, you can use 50 mm insulation for a bathhouse, but this is not recommended by experts. The most common pipes on the construction market are sandwiches, which have an insulation thickness of 35 to 50 mm. You can find a product with a ten-centimeter layer of thermal insulation material in a specialized store that sells bath equipment.
A chimney that is not equipped with insulation must have a distance of at least 250 mm from combustible ceiling materials.
Installation of square or rectangular pipe
Such pipes are most widespread. This is due to the fact that their installation is the simplest. In most cases, the chimney is located strictly vertically.
However, sometimes it may be necessary to adjust the location of the roof exit. In this case, an additional horizontal section is used. In the place chosen for access to the roof, a roofing pie is cut. The structure described above is installed here.
A steel sheet is placed on the attic side. It must have a hole corresponding to the cross-section of the pipe. After the box has been installed, it is necessary to protect the structure from precipitation.
The inside of the box is lined with basalt wool or asbestos sheets. The protective and decorative joint is attached to the pipe using self-tapping screws. The joint around the perimeter of the pipe is filled with a special fire-retardant sealant.
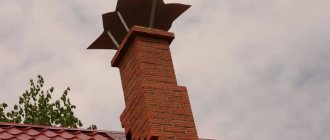
Next, install the inner apron. For this purpose, strips of galvanized steel are used. For them, grooves are made on the brick pipe. They should go along the brick and not get into the joints. The side slats at the bottom should have sides along which atmospheric moisture will flow.
To make the pipe look nice, you can use a metal apron for the entire part of the pipe located above the roof.
Roof sealants
In order to seal the joints of different parts of the bathhouse pipe passage through the roof, you need to use not just a roofing sealant, but always a heat-resistant sealant. It is advisable to use a neutral silicone heat-resistant sealant.
If Master Flash is installed on a metal roof (metal tiles or metal profiles), then it is necessary to use silicone sealant that does not contain vinegar (non-acetic sealant). This is necessary so that it does not enter into a chemical reaction with the metal and does not destroy it.
Roofing silicone sealant retains its properties in the range from -50°C to +300°C, which is sufficient for all weather conditions and is quite suitable for sealing a chimney.
Roof sealant must be neutral and heat-resistant
But you need to remember that the surface to be treated must be clean and dry. The time for complete hardening is indicated on the packaging, usually 24 hours.
How to install a round chimney pipe
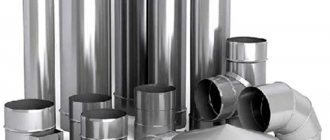
In practice, the following types of such chimney pipes on the roof are used:
- Made from asbestos. They are gradually falling out of use due to poor resistance to overheating and insufficient environmental friendliness of the material used.
- Steel coaxial pipes consist of two pipes - one inside the other. Smoke comes out through the inside, and the space between the pipes is used for air intake. This is used to operate a closed firebox.
- In sandwich products, a layer of heat insulation is laid between two pipes.
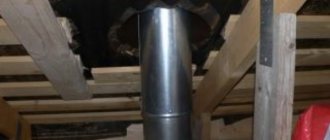
- Single-layer metal pipes are used.
If the last of the listed options is used in the house, then it is recommended that in places where it goes through the ceiling or roof, you yourself make sections in the form of a sandwich from two pipes of different diameters.
When running a round pipe through the roof, you need to make a steel sheet with a round hole. The design of the roof box must ensure the correct installation of vapor barrier and waterproofing layers. Manufacturers offer ready-made solutions for such pipes. When choosing, it is necessary to take into account the structural features of the roof and the topography of its surface.
Let's sum it up
Now you know how to simply and correctly connect metal and brick pipes to different types of roofs. If you have any questions about the proposed instructions, ask them in the comments. Do you know other equally interesting ways? Also tell us about them in the comments - everyone will be interested.
Did you like the article? Subscribe to our Yandex.Zen channel
October 10, 2021
Chimneys, Roofing, Roofing installation, Chimney laying
If you want to express gratitude, add a clarification or objection, or ask the author something, add a comment or say thank you!
Photo of installing a chimney (pipe) through the roof
Flaws
Although it has many positive factors, the structure also has negative sides. You need to familiarize yourself with them:
- An integral rule for installing a chimney through a wall is to create insulation on the pipes;
- Inside and outside the house you will need to allocate a relatively large horizontal area for the smoker;
- According to some experts, if this outer pipe is for a gas boiler, then the productivity will be low;
- This product will not be in harmony with the overall design, however, this can be played around somehow.
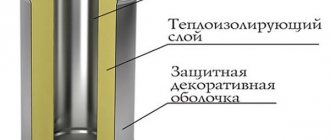
Features of this design
Sandwich is a good option for a chimney pipe with insulation. Insulation provides you with the following advantages:
- the possibility of functionality of the chimney pipe when located in a zone of low temperature conditions;
- provides the pipe with the necessary fireproof properties (inside the building).
Standard versions of such chimneys have an external galvanized coating. There are also options made of stainless steel, as well as painted in any color suitable for you.
Existing versions of sandwiches made of stainless steel are covered with a special protective film on the outside. The main thing is to remember to remove it before using the chimney for its intended purpose. There are also special adapters on sale that you will need when connecting the boiler and pipe. Be careful when choosing elements for a sandwich chimney.
Scheme of a sandwich pipe.
The necessary tools for work are:
Master flush
This penetration can be applied to any type of roof - slate, tile, metal roof, asphalt or tile.
Ideal for sealing stove and fireplace chimneys.
Used for straight roofs and for sloped roofs.
This type of product is an excellent combination of price and quality.
Master Flash is distinguished by high professional reliability and functionality - this is achieved through the use of high-quality materials for use.
The main feature of this penetration is the use of reinforced polymer rubber, which can withstand heavy loads (temperatures up to 138 degrees).
Polymer rubber does not become more flexible due to heat.