One of the most difficult components is the passage of a chimney through a roofing system. It is necessary to create high tightness and also eliminate the possibility of fire. In order for the goal to be achieved, many actions were taken at one time, and only professional roofers got down to business. If problem areas were found, they were filled with asbestos, roofing felt and tin were fixed, and cement mortar was used. Despite the difficult process, all this did not last long, since no one canceled the temperature and atmospheric effects. To significantly facilitate the work and extend the service life, we created the roofing “Master Flash”. It will allow you to avoid complex and lengthy procedures. Master Flash will provide protection from precipitation, while spending less effort, time and money.
Assembly
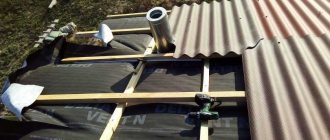
The Flash Wizard is installed as follows.
First, cut off the upper part so that the diameter of the resulting part is approximately one fifth less than the chimney pipe. This will ensure a tight fit. The resulting structure is placed on the pipe with the base down and moved along the pipe until it fits against the roof. When installing master flush on corrugated sheets and metal tiles, it is better to use a rubber penetration.
The next step will be to secure the resulting structure with sealant. At the very end, you should screw it to the roof using self-tapping screws.
Master flush, or kryza, perfectly performs the function of protecting the attic from precipitation
There are several tricks when installing master flash.
To make it easier to thread the pipes through the roof, cover them with soapy water.
This will make pulling easier. If you were unable to immediately successfully cut a hole in the master flash, you can try to use it, sealing it tightly with a clamp. When buying a sealant for master flush, make sure that it is resistant to moisture. There should not be too many self-tapping screws, since in any case the sealant will someday begin to let moisture through, and then it will seep through the holes. Try not to screw self-tapping screws into recesses in the roofing material, as this is where precipitation flows. When installing the master flush on a chimney ridge, place its top under the flashing.
There are some features that you need to know before installing master flush on metal tiles. And other roofing materials that are installed with one sheet overlapping another. When performing installation in this case, you need to bring the upper part of the canopy under the nearest adjacent sheet. By performing this maneuver, you will achieve free flow of liquid regardless of the tightness of the penetration connection. This way you can increase the service life of the connection.
If you use a chimney without insulation, as well as boilers running on solid fuel, temperatures can reach 600 º, which can lead to failure of the roof. How to install the master in this case? You need to select a pipe whose size exceeds the diameter of the chimney by about 10-12 cm. Its length should be up to 50 cm, or you can use regular galvanized metal. In the place where the chimney passes through the roof, it must be covered with basalt, and a selected sleeve must be placed on top. The master flash is installed, the dimensions correspond to the sleeve used. The open section of the insulation at the top is covered with a hopper, which is made of galvanized steel. You can attach it using a clamp.
The canopy with fastener is installed according to the following scheme. The top of the cone is also cut to a size 20% smaller than that of the pipe. Then the clasp is removed from the lock. The cuff is wrapped around the pipe, its sides are connected. Then the fastener returns to its place, the teeth tighten. The sealant is then applied to the appropriate area of the roof. Then the fastener and all places that need to be insulated are treated with it.
Having completed the installation, install the plate, thus giving the structure a finished look.
Thus, installing a master flush with your own hands is completely easy to do even for a novice, inexperienced builder. After all, all the tools needed for it can be easily found in many construction stores or even made with your own hands. This will not require special time or material costs from the master. At the same time, the installation of such a device will reliably protect the roof from precipitation, which otherwise could lead to unpleasant consequences.
Peculiarities
During installation, some nuances and problem cases may arise, which will be discussed below:
- Master flush can be installed both on a pitched roof and on a flat one. If the roof is flat, then you can use a roof in which the axis of the cone is located perpendicular to the plane of the base. And if the roof is pitched, then it is recommended to use those options in which the axis of the cone is located at a certain angle of inclination to the plane of the base.
- If the roof has an intermittent structure, that is, it has many overlaps, then the upper part of the master flush base must be laid under the nearest sheet, and the lower part must be reinforced with self-tapping screws . This will ensure that water, flowing from top to bottom, will not touch the seams of the foundation fastenings to the roof surface.
- If the roof is laid from corrugated sheets or slate, then it has rows along which water flows down. In this case, it is not recommended to tighten the screws for fastening the master flush in the rows of the roof along which water flows.
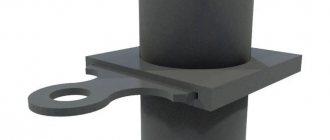
- As already mentioned, Master Flash, which is based on silicone, is susceptible to the harmful effects of ultraviolet rays. But this problem can be avoided. To do this, a special shape is made from galvanized steel, in the form of a “bowl without a bottom.” It is then placed over the master flash to protect against ultraviolet rays. In this case, it is necessary to select the diameter so that it does not dangle from the wind.
- When installing a master flash on a roof ridge, the upper part should be installed under the ridge masonry.
- It is not recommended to screw too many screws onto the base.
- Sometimes the pipe heats up to 600-650 degrees, in which case the master flush will simply begin to melt. To avoid this, you need to wrap this section of the pipe with bitumen, then put a metal sleeve made of galvanized steel on top of it. Master flash is selected according to the size of the sleeve. In this case, you can also use the so-called “sandwich pipes”. To do this, the chimney must be multi-layered, as a result of which the outer layers heat up less.
Furniture items
A few examples of furnishing a kitchen combined with a living room:
- 1. Sofa. It becomes an object that zones space. The sofa is placed with its back facing the place where food is prepared. In small rooms (less than 20 sq m) a corner is placed, which is placed against a wall installed perpendicular or parallel to the kitchen.
- 2. Set. According to designers, minimalist models without elaborate details look modern. The service, vases or glasses are placed on an open shelf. You can buy a fashionable display case for them. Furniture is placed near the wall. If the space is large (20 sq. m, 25 sq. m or 30 sq. m), then in the central part you can install an island, which also has sections for kitchen appliances.
- 3. Furniture set. The style should be combined with the design of both rooms. In small rooms, a compact table and chairs made of transparent material or painted in light colors look good. You can add a table with a round top to your living room interior. In spacious rooms, the kit is installed near the wall or in the central part. An elongated rectangular dining table would look good here.
Why is it needed?
Master flush is a universal type of sealant for effectively insulating roof penetrations. The device can be used for all types and coverings of roofs. Well suited for roofs made of metal tiles, corrugated sheets and tin. Installation of the penetration can be carried out both on a roof with a metal deck, and on a soft roof, sand-cement or slate.
An important advantage of the device is its resistance to temperature changes and exposure to sunlight. Therefore, installation of the penetration can be carried out at any time of the year and at any temperature.
- Flexibility. With the help of a sealant it is easy to create a tight fit to the chimney;
- Heat and frost resistance;
- Not susceptible to oxidation;
- High strength of the material;
- High level of sealing against water ingress;
- Resistance to deformation;
- Long warranty period up to 30 years;
- Easy to install;
- Savings on additional waterproofing work around the device.
Penetration sealants.
To install this “Master Flash” device, owners of private houses must select a suitable hermetic adhesive. Which sealant is best suited for these purposes will depend on the manufacturer and the quality of the glue. Thermal sealant “Titan” has good reviews; roofing sealant, bitumen sealant “OLIMP” and silicone sealant “STAYER” also have good qualities. Currently, you can study the properties and advantages of sealants for installing Master Flash protection by going to the Internet, where buyers share their experience in installing the device, and also leave various reviews about sealed adhesives.
Product characteristics.
The “Master Flash” device, used for sloping type of roof structure, has excellent characteristics of high frost resistance, excellent flexibility and elasticity. Technical data allows the roofing, protective penetration to expand when the product heats up, and contract when the temperature drops. The protective product has high strength indicators and does not perceive bright sunlight, strong winds and all kinds of precipitation. The “Master Flash” penetration is used throughout our country, can be made of silicone, plastic and rubber, the device also has excellent reviews from consumers. Installing the Master Flash protection is not difficult; it is easy to install on a sloping roof made of metal tiles and soft roofing. With the advent of the “Master Flash” protective structure on the market, owners of private households have solved all their problems associated with sealing the roof in the places where communications are discharged.
Installation
The elasticity of the flash master allows you to install the passage unit without any problems. All you need to do is select an element of the required diameter, cut a hole in the center, the size of which is 20% smaller than the diameter of the seal, and install it by pulling the seal onto the chimney to the base of the pipe.
The installation instructions included with the seal inform you that after carrying out the above steps, the base of the flash master should be secured to the roofing using sealant and, in addition, secured with self-tapping screws.
The standard instructions can serve as an algorithm of actions, but some details should be clarified. This will save you from mistakes and rework.
Depending on the type of roof: pitched or flat, you will need to purchase the appropriate type of sealant. In addition, you should take into account what material the roofing is made of and whether there are transverse joints.
When installing, be sure to take the following recommendations into account:
- In order to make it easier to thread the seal, it is recommended to open the surface of the pipe and the ring of the product with a slip agent.
- If the hole for pulling the flash master is cut incorrectly, do not rush to get rid of the element.
- For sealing, use only waterproof sealant.
- Do not overdo it with screws. Over time, the sealant will gradually lose its properties, and as a result, the waterproofing will not be as powerful. Due to the large number of holes, water will leak under the roof.
- When installing the ridge on a ridge, its upper half should be moved under the ridge flashing.
- If the pitched covering is characterized by a non-uniform shape with overlaps, then the upper part of the flash master should be moved under the adjacent part of the roofing material. This action will allow for free flow of sediment, regardless of the quality of the sealing work performed. This connection is characterized by a longer service life.
Tools required for work:
- self-tapping screws;
- screwdriver;
- scissors;
- hammer;
- pliers;
Materials for installing the element:
- the seal itself with a steel lining;
- clamp;
- sealant;
- means for ensuring the sliding of the seal along the pipe;
- building level;
Installation work for wiring the flash master is extremely simple to perform:
- First, you should choose a seal ring whose diameter is approximately 20% smaller than the size of the pipe; this nuance will ensure reliable contact of the elements. The unnecessary remaining part must be trimmed.
- Work on installing a master flush on an object is carried out extremely tightly, so it is recommended to treat the chimney pipe with a product that will ensure free sliding when the seal is threaded through it.
- The effect of maximum penetration of the seal to the roofing is achieved by crimping the flange. Joints should be sealed when using special compounds. After this, the plate is fastened at the base of the master flush to the surface, using self-tapping screws. Recommended installation pitch is 35 mm.
Algorithm of actions for the device
The chimney is installed and fixed in the base area.
During the construction of the canopy, it will be necessary to dismantle the pipe canopy, if it was already attached to it.
Next, perform the following steps:
- The size of the ring on the penetration is determined. It should be 20 percent less than the diameter of the chimney. Using a sharp knife, cut to the desired size. If the gap is unsuccessfully cut, do not rush to throw away the Master. You should try to correct such a flaw using a tightly installed clamp;
- The prepared Master pulls himself onto the pipe and with force lowers himself to the roof level. To make sliding easier, you can use soapy water as a lubricant;
- In the case of making a roof covering from ondulin, tiles, slate and other covering materials laid overlapping, the upper section of the base of the otter must be moved under the adjacent, outermost component of the insulation. This will create conditions for free drainage of water regardless of sealing;
- A moisture-resistant sealant or bitumen is applied under the base, and the flange is secured with self-tapping screws with a large press cap to the roof and sheathing. The distance between the screws should be maintained at 3.5 cm.
Expert advice: you should not screw in a large number of screws, since over time the sealant will gradually begin to lose its insulating qualities, and moisture will begin to enter through multiple punctures from the screws.
It is not recommended to screw self-tapping screws into depressions in the roofing material through which water flows. The flexible, sealing element can be easily bent to fit the roof profile and attached with minimal gaps. This completes the installation process.
In rare cases, a tight fit of the roof to the pipe is not observed. In this situation, the edges of the seal should be tightened with a clamp. This state of affairs serves as proof that the Master Flush was not selected accurately or the installation was carried out with errors.
Such auxiliary parts can be easily completed and installed with your own hands, or can be purchased at specialized construction stores. Such a “plate” is simply strung on the chimney on top of the otter. The size of the metal pad must be accurately selected to prevent it from oscillating due to wind.
The maximum operating temperature of Master Flash shows that the gasket cannot be used on every chimney. The otter will behave well if the chimney is insulated with a sandwich or on a chimney without insulation, which will heat up to no more than 100 degrees.
Expert recommendation: to avoid unpleasant situations - ignition or melting of the “master” during soot burning in an uninsulated pipe (temperature can reach 500-600 degrees), it is necessary to first perform thermal insulation work on the chimney.
For this purpose, basalt fiber is used, which is coated with galvanization.
According to numerous reviews, the widespread use of Master Flash roof seals is due to the convenience and speed of installation. Important advantageous factors are the affordable price, reliability of insulation, and long service life.
And there is no point in attracting highly qualified specialists or additional workers, since the instructions for the seals clearly and clearly describe the installation process, which any layman can handle.
Watch the video in which the master explains how to properly install and secure Master Flash for a chimney:
What is a flash master
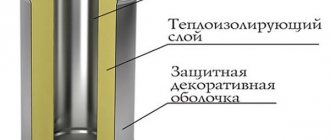
The problem of leaks can be radically solved with the help of a special elastic penetration - flash master. This device looks like a round or square base, in the center of which there is a set of rings installed one after another, in such a sequence that each subsequent one is smaller in diameter than the previous one, so that together they form a cone.
The material for the base can be either silicone or special rubber. The advantage of the first is the ability to withstand elevated temperatures, up to 350 degrees, while rubber melts already at 180.
But silicone is destroyed and deformed under the influence of ordinary ultraviolet rays from the sun.
Therefore, it is protected from direct exposure to the sun by covering it with another material.
The design of the flash master also includes aluminum elements, which impart rigidity to its base and evenly distribute the load on the system.
Such a flash system must have the following set of characteristics:
- Easy installation, allowing you to install such a structure yourself without inviting a specialist.
- Acceptable price.
- Durable and able to withstand both very low and very high temperatures. It also produces flexible materials that are resistant to corrosion and other impacts. Silicone models can work in conditions of 300 degree heat.
- Tightness ensured by the tight coverage of the pipe by the upper ring of the cone.
- The flexibility of the design allows it to be mounted on any roofing materials, including tiles, metal tiles, corrugated sheets, slate and on any roof structures - straight or sharply pitched.
All flash seals are divided into two types:
- Straight, which is a cone with rings placed relative to the base at an angle of 90 degrees and intended for installation on surfaces parallel to the ground.
- Angular, used to seal roofs with slopes, using a cone made of rings protruding at an angle of 30 or 45 degrees.
The flash master is designed to be installed on the roofing, so that its rings tightly compress the pipe section, so that the opening between the roof and the pipe is hermetically sealed from precipitation.
This design can be installed both during the installation of pipes and after their installation, for which some products even have special cuts.
What is it needed for
The place on the roof where the chimney goes outside must meet the following requirements:
- The space between the edges of the hole and the pipe must be sealed tightly. Otherwise, water will start flowing there.
- Corrosion resistance
- Resistance to low and high temperatures.
- Flexibility.
It is attached with its base to the surface of the roof, and with its rings it envelops some part of the pipe, as a result of which the space between the edges of the hole and the wall of the pipe is hermetically sealed.
Terms of Use
When building stoves for houses and baths, a hole was left in the roof for laying a chimney. Years ago, only experienced roofers could properly fill these holes. To seal roof breaks, roofing felt, asbestos, and tin were used, and the joints were filled with bitumen or cement. At the present stage of construction, it is customary to use Master Flash. It is also called otter or kryza.
Elastic rubber penetration Master Flash is the best option for waterproofing the gap where the chimney passes through the roof. However, it is not suitable for all cases. Professional roofers and manufacturers recommend using this device for DIY installation on the following types of smoke exhaust ducts:
- Sandwich chimneys. Between the two galvanized steel contours of these pipes there is a thermal insulating layer of basalt fiber. The insulation retains heat in the inner pipe, so the outer surface of the chimney remains cool. Rubber models are used to waterproof sandwich pipes.
- Stainless steel chimneys. Stainless steel chimneys that remove combustion products from solid fuel stoves are heated to high temperatures. Therefore, heat-resistant silicone penetrations are used to seal the target between the roof and the pipe. The use of conventional rubber models is possible if the chimney is connected to a condensing-type gas boiler.
Each passage of Master Flash is supplied with detailed instructions to facilitate DIY installation. Since the work is performed at height, you should follow safety precautions, use a safety rope and a helmet. Installation is performed as follows:
- If a protective cap is placed on the pipe, it is removed. The top of the penetration is cut with a knife to the required diameter.
- Pull the device onto the pipe through the head. If the penetration is too slow, the pipe is treated with a soap solution, which makes the task easier.
- A heat-resistant silicone-based sealant is applied to the base of the penetration in an even, thick layer and pressed against the surface of the roofing material.
- Additionally, secure the base using self-tapping screws with a press cap. Do not overdo it with the number of screws, because when the sealant is washed off, water will begin to flow into the holes.
- If the installation takes place on a roof made of bitumen shingles, the upper part of the base is tucked under the covering elements.
- A decorative plate in the color of the roof is installed on the penetration.
Important! If, while cutting the penetration, you made a mistake and made a hole of a larger diameter or damaged the device, you can try to secure it to the pipes using sealant and a steel clamp
Estimated cost
The cost of a master flush depends on what material it is made of. If the base is silicone, then such materials are more expensive than those based on rubber.
Prices for silicone wings range from 1,500 rubles to 3,500 rubles per piece. The price depends on the diameter and the size of the material.
Prices for rubber roofs range on average from 255 rubles to 600 rubles per month.
That's all! As you can see, master flush is an inexpensive material. It should be remembered that if everything is done in accordance with the rules, the gap will be closed hermetically, which will further prevent water from entering under the roof.
Also, when working at height, one should not forget about safety rules.
The craftsmen who installed chimney systems know what a complex element is the passage of a sandwich pipe through the roof. It is necessary to solve two problems, high tightness along with eliminating the possibility of fire. In the past, professional roofers were hired to solve this problem. Today, the services of professionals are not available to everyone.
Roofing work is one of the most expensive jobs. Areas of the roof with problems were filled with non-combustible material - asbestos. They fastened tin and roofing felt. Sometimes they made cement mortar. Often such actions were not justified. The completed system did not last long. Atmospheric precipitation and severe temperature conditions reduced the service life of the system. It took time to solve this problem.
What is Master Flash?
Master Flash is a kind of sealing cuff with high elasticity. They are used to seal the intersection of pipes and roofs. Different materials are used for manufacturing.
It should be noted that this device is not used as a seal for chimneys without insulation.
The main advantages of Master Flush:
- Tight fit to the pipe walls due to its elasticity.
- Withstands temperature changes.
- Corrosion is not a problem.
- High sealing due to low porosity.
- Returns to its shape after expansion from high temperature.
- High fire resistance.
- Long warranty.
- Installation without special tools.
- Can be installed in any weather conditions.
The main advantage is the reduction in material consumption in this process. No additional waterproofing required.
Differences between seals
Roof seals have become a replacement for pipe aprons. They are similar in design to their predecessors, but have some differences:
- Made of rubber, often silicone, in the form of a tapering cone with a flexible cuff. It ensures a tight connection of the pipe to the roof. In addition, it protects against moisture and dust. The top of the cone follows the shape of the pipe. Connects to the seal at the bottom.
- Flange - base. Made from various materials. Rubberized or silicone base for installation on a roof with massive ribs, has aluminum strips. It allows the flange to take the shape of the profile.
The insulation cuffs for a flat roof are located at a slight angle. An element in the form of a cone with corrugations, which forms the contours of oval holes with gradation in diameter. That is, you can change the angle by tilting at certain intervals. Sometimes it happens that the axis is perpendicular to the base, then the sealant is used for a flat roof.
How to install?
Flexible seals were able to outperform their outdated counterparts in many respects. They are able to withstand different temperature ranges, practically do not need to be repaired, and have a long service life. They are unpretentious in installation. You do not need to have any special skills to install. The upper part of the seal is cut off so that a narrow hole is formed. Then, the cone is put on the chimney. You need to move it down to the very base. To make the process go quickly, it is better to soap or moisten the surface of the pipe.
The method of fixing the flange depends on the roof material:
- Silicone glue or bitumen mastic is used for a flat surface with a roll coating.
- If there is a slope, then the entrance is provided with self-tapping screws.
After installation, the lower part of the flange and the cut of the cone are lubricated with silicone sealant to ensure greater reliability. Sometimes a clamp is used for the top edge. Despite the strength of the fixation, the master flash will be movable. For example, if thermal expansion occurs, the master flash will not lose its tightness. Also, the cuff will behave if shrinkage occurs at home.
Select product.
It is possible to purchase protective, silicone, plastic and rubber roofing protection “Master Flash” for a sloping, pitched roof without any problems. Select the required product based on quality and price. A silicone product has the highest qualities of strength, flexibility and durability, but at the same time, this design is more expensive than similar protection made of rubber and plastic. Rubber and plastic products have a more affordable price, but at the same time they have a significantly shorter service life.
Trade offers many items and types of products: a full range of equipment for baths and saunas, materials for construction and repair.
Construction companies
Working with us, construction companies receive a flexible system of discounts, an individual delivery schedule and provision of all necessary materials from our catalog.
Regional clients
Modern logistics and reliable transport companies will ensure the fastest delivery of your order anywhere in Russia.
Master Flash for a chimney: types, design and technological installation rules - House and site
The construction of a house, country house or other building of any kind is impossible without the use of ducting through the roof to release air from the chimneys.
To prevent dirt and precipitation from penetrating under the roofing material into the passage area, it is necessary to seal the resulting gap.
The ideal solution to this problem is to use Master Flush on chimneys.
Advantages of Master Flash penetration
Master Flash flexible products have won the trust of craftsmen and, thanks to their undeniable advantages, have become the most popular devices for isolating the gap between the chimney and the roof:
- Elasticity. Thanks to its plasticity, “Master” creates a high-strength seal around the pipe and does not leave a gap in the roof.
- Versatility. Used for roofs of any slope and shape. The roofing material can be very diverse: slate, roofing membrane, onyulin, metal tiles, profiled flooring.
- Fire resistance and resistance to high temperatures. After thermal linear tension, the product acquires its original shape and size. The maximum temperature at which Flash Flash Flash Flash can be used is 230-240 C°. Therefore, rooms can be equipped with heaters operating on all types of fuel.
- Condensation. Reliably protects the gap from moisture penetration and prevents the possibility of leaks.
- Durability and longevity. Resistance to strong temperature fluctuations, chemical and mechanical influences ensures long-term operation. The manufacturer guarantees the flawless operation of the product for up to 30 years. Typically, replacement is not required during the entire life cycle of the product.
- Basic installation. Allows you to install Master Flash even for beginners. The assembly process does not require special equipment or tools.
It should be noted that flexible eliminates the need for additional sealing in the penetration block and can significantly reduce the volume of construction materials and reduce financial costs.
Characteristic advantages
Elastic protective products, which can be used to easily seal a pipeline passage on the roof, are highly appreciated by craftsmen. They have replaced many traditional materials previously used to seal gaps. Do-it-yourself flash master is a task that even an inexperienced person can handle, and all thanks to certain qualities of the device:
- Elasticity. Rubber penetrations are very flexible and fit tightly to the pipe, enveloping it on all sides. Such products fit well even on profiled material, which is used to cover roofs with any slope and various shapes.
- Tightness. Reliable protection of gaps is provided from leaks through which atmospheric moisture can enter inside.
- Simple and uncomplicated installation. One person can complete the described task in a short time; no additional help is required.
- Versatility. Master Flash is installed on roofs covered with slate, metal tiles, corrugated sheets, bitumen shingles and others.
- High strength indicators. The structure of the material is porous and quite dense, withstands large mechanical loads.
- Durability. Rubber penetrations are not damaged for a long time and do not need to be replaced due to their resistance to chemical environments and temperature changes.
- Operation at high temperatures. The maximum permissible value at which silicone insulation for the chimney inlet can work is 240°C. Such heat resistance allows the described devices to be used when equipping heating systems operating on various fuels.
Types of roofs and their area of application
There are the following types of roofs:
- ridge;
- single-slope design;
- decyl;
- decylless;
- universal.
Let's look at some of them in more detail.
Skate. It is used during installation work and installations with access to the outside through the roof through the ridge. This insulation option allows installation above the roof with an overhang of only 500-600 mm
It is important that the rules of wind support are not violated.
There's no point in talking about installation. The photograph clearly shows the working parts. It is better to watch the video material presented by specialists on our website about installation possibilities.
Watch the video
Watch the video
Recommendations
- For flat roofs, any “master flush” with a wide, compacted base will do. But for corrugated sheeting, it is always better to choose something more flexible, with reinforcing elements around the perimeter of the fold due to the high edges of the sheet. A dense base will be more difficult to bend and therefore more difficult to ensure a seal.
- For roofs with a slope of 45 degrees, a roof with a round or square flange is suitable. For roofs with a slope of 60 degrees, it is recommended to choose penetrations with an elastic base that are much larger in area for better installation.
- If there is no corner “master flush” on sale that corresponds to the angle of inclination of the roof slope, then you can purchase a straight one, but with a larger base area. Due to the flexibility of the material and the corrugation of the cone, the tilt will be invisible.
Installation nuances
To install the penetration, you will need the following equipment:
- Hardware with a press head;
- Pliers;
- Drill-driver;
- Sharp knife;
- Carpenter's hammer;
- Flash master device;
- Steel clamp;
- Silicone glue;
- Lubricant for parts;
- Level.
Installation of the Master Flash penetration includes the following steps:
- Before starting installation, you should check that the hole in the Flush Master seal for the chimney is 20% smaller than the pipe diameter. To adjust the product to the required size, you can independently trim the edge of the penetration hole by 20%;
- Next, the Master flush is put on the pipe. To make it easier to put on the device, you can use a lubricant without petrochemical impurities;
- Now the sealant is pressed down and fits tightly under the roofing profile. Any blunt object can be used for adjustment;
- Next, a special sealing agent is introduced into the gap between the roof and the lower area of the seal;
- The resulting structure is attached with self-tapping screws to the roofing deck. The fastening pitch should be 0.15 cm for optimal sealing.
For those cases when it is impossible to put the penetration on top or it is necessary to repair the chimney insulation, Master Flash systems with a lock on the cuff are produced.
To install it correctly, installation is performed in this way:
- The top of the cone is cut off with special scissors;
- Next, the metal toothed fastener is removed and the pipe is wrapped around the penetration;
- The lock is fastened and its teeth are pressed with pliers;
- A layer of sealant is poured into the joints and onto the fastener;
- The remaining glue is distributed over problem areas of the structure to seal them.
A seal with clamping clips is used for flat or sloping roofs.
Its installation is carried out as follows:
- The upper area of the rubber cuff is cut to fit the size of the chimney;
- The penetration is wrapped around the pipe;
- Next, the clamping clips are installed using pliers;
- Using a marker, outline the contours of the penetration;
- Raise the base and treat the roofing deck with sealant;
- Apply the seal to the surface and attach its base with self-tapping screws.
Additional recommendations from roofers for installing Master-Flash:
- When adjusting the penetration to the required diameter, it is necessary to first remove the protective element from the pipe;
- If the penetration hole was cut too much or damaged during cutting, it can be fixed with sealant or a clamp;
- When installing, it is recommended to put the penetration through the pipe head;
- Silicone sealant can serve as a sealing agent for treating the joint areas of the structure and coating. It is applied in a dense layer to the joints between the seal and the roof;
- Self-tapping screws for sealing the system are inserted into the press head;
- When installing penetrations on a bitumen roof, the base of the seal is tucked under the roofing elements;
- An architectural plate is placed on the sealing product to match the color of the roof surface;
- With a non-uniform pitched flooring, the upper part of the penetration is moved under the roofing material. This ensures uniform drainage of water from the roof surface.
Installation errors:
- During installation, it is prohibited to join chimney elements at the intersection of floor beams and roof;
- The penetration should only be put on the pipe itself, but not on the chimney opening;
- The layer of silicone sealant must be at least 10 mm;
- The chimney in the roof opening must be fixed with steel clamps to seal it from moisture.
Equipment
The sealing product consists of the following elements:
- A flexible cuff, which is a truncated rubber cone. The cone is usually made of silicone or ethylene propylene materials. The cuff serves to connect the pipe to the roof deck. In the upper area, the cone fits tightly to the chimney pipe, and in the lower area it is connected to the base of the sealing structure;
- The flange serves as the base of the structure and is made of the same materials as the cone. Can also be made of galvanized steel or aluminum. The base of the flanges has special aluminum strips for mounting on the deck. This gives the structure the tightest possible fastening.
For a pitched roof, special penetrations with cuffs located at a certain angle to the flanges are purchased. On the cone of such a device, corrugations with gradations in diameter are clearly visible. Such corrugations help change the slope of the penetration in the required direction.
Installation of seal
On a flexible basis
On metal roofs, cuffs with a flexible base are used. The installation itself looks like this:
- Determine the location of the cut. Do not forget that the cutting diameter will be 20 percent smaller than the chimney;
- To ensure that the cut part is even, find roofing scissors;
- We soap the chimney pipe with soap or moisten it with water. This is done to make it easy to put on the cuff;
- The installation is done, then we draw lines along the edges of the base;
- We lift the seal and apply the adhesive;
- We press;
- We apply sealant where needed.
If there are metal strips at the edge of the seal, then installation is similar to the installation of soft equipment. The following items are added. Before installation, the base coating must be profiled so that it adheres well to the roof. To work, you will need hexagon-shaped self-tapping screws. Fasteners are screwed onto the bottom of the profile.
A special seal design for roofs with a technological gap is needed when it is not possible to attach a seal to the chimney. They are often used for repair work on old chimneys.
The installation will be like this:
- Using strong scissors, cut off the upper cone to less than 20% of the chimney cross-sectional size.
- Unscrew the shutter and wrap the pipe.
- Align the gap in the seal and close the locking system.
- Raise the edges of the base to apply silicone sealant to the roof.
- Press everything with force, spread the adhesive solution on the desired areas, the locking system.
For tile or slate roofs, seals are made with a lead or aluminum flange. The cone system is also cut off. This is done in order to ensure good adhesion of the remaining cone to the chimney.
Installation of master flush on corrugated sheets is carried out in the same way as installation on a tile roof.
When installing, remember the following recommendations:
- In order for the seal to pass through the pipe easily, you need to coat the pipe with a substance that will support sliding.
- If you made a mistake with cutting a hole on the cone, well, you need to throw out the element.
- We take waterproof sealant for sealing. We screw screws on top of the sealant. As time passes, the sealant will perform its duties worse. The self-tapping screws will come to work. But, you don’t need to screw in a lot of screws. A large number of holes for screws increases the likelihood of moisture getting inside.
- When we place the kriza on the ridge, its top needs to be placed under the ridge cap.
- If the pitched covering is not uniform, with overlaps, you need to move the top of the seal under the adjacent part. This action promotes continuous flow of water, regardless of how well the roof sealing is done. This will ensure long, continuous operation.
- Installation of master flash on corrugated sheets is carried out similarly to a tiled roof.
The Master Flash roof penetration is compatible with all types of roofing. Goes well with corrugated roofing surfaces. Made of thermo silicone, EPDM rubber (vulcanized). A huge selection of options for use: cable ducts, ducts, ventilation pipes, chimney pipes.
The roof is reliably protected from water and snow. Guaranteed heat resistance of vulcanized EPDM rubber: 185C
On a flexible basis
Seals with a flexible base are used on metal roofs.
- You need to choose a place for the cut. We must not forget that it should be 20 percent narrower than the diameter of the chimney.
- For this you need roofing shears. Try to keep the cut part straight.
- The surface of the chimney must be moistened. Then, tighten the seal onto the pipe.
- After installation on the roof, you need to draw a line along the edges of the base.
- Lifting the seal, apply adhesive.
- Press.
- Apply sealant to all required areas.
DIY installation
The “master flush” always comes with instructions. It is so simple that you can install it yourself. The entire work will take no more than one hour. It is important to remember safety precautions at height, use a safety rope and protective equipment.
For installation you will need:
- construction scissors or knife;
- silicone glue;
- silicone sealant;
- self-tapping screws with a press washer;
- screwdriver
Since the “master flash” will have to be mounted on a profiled sheet, a model with reinforcing aluminum inserts on the base is selected.
- First, the top of the cone is cut off depending on the size of the chimney. The diameter of the roof should be 20% less than the diameter of the pipe. This will ensure a snug fit.
- The penetration is then pulled onto the pipe. To facilitate sliding, it is moistened or soaped in advance. If suddenly the hole turns out to be larger than necessary, the cuff of the kryz can be tightened on the pipe with a metal clamp.
- The reinforcing aluminum should be bent in advance in order to properly fit the profile of the corrugated sheet.
- Next, glue the base to the roof surface with silicone glue and press until it sets. Then secure with self-tapping screws.
- At the end of the work, it is necessary to coat all joints with silicone sealant (pipe and base) to increase waterproofing properties. At the same time, the “master flush” itself remains movable, which will help maintain tightness during thermal expansion of the pipe or shrinkage of the house.
- If necessary, a protective apron or plate is placed on top.
It is important to note that you cannot use too many screws. The fact is that any sealant does not last forever and will begin to dry out over time, allowing moisture to pass through these holes.
For the same reason, it is better to fix the screws on the waves of the sheet, and not in the recesses through which rain and melt water flows.
If heating is carried out with solid fuel, for example, coal, then the smoke temperature can reach 500-600 degrees Celsius. Even silicone will not withstand such changes. Usually this problem is encountered with uninsulated chimneys, for example, near bathhouses. The problem is solved by insulating the contact area:
- for this, take a galvanized metal pipe with a larger diameter of 10-15 cm and a height of up to 50 cm;
- the chimney itself is wrapped in refractory material, then the resulting box is put on top;
- the edges are tightened with steel clamps;
- Now you can install “master flash”.
Insulation will protect against high temperatures. The algorithm for attaching to a bathhouse is similar.
Facing with wild stone
This material gives the house an aristocratic appearance and allows its owner to distinguish his home from the gray and monotonous mass of other buildings
When using facing stone, pay special attention to caulking all seams, especially for interior finishing. But, wild stone is often used as a means of cladding on the outside, giving its natural and presentable appearance. In addition, the wear resistance threshold of such elements is also surprising.
In addition, the wear resistance threshold of such elements is also surprising.
Stone-lined chimney on the second floor.
Marble plaster
This is a crumb where particles of small pebbles are mixed into a solution. Cladding, therefore, is only permissible inside buildings, since the crumb does not like exposure to cold temperatures. It goes well with fireplaces and traditional stoves, especially if the kitchen area is additionally finished with such chips, not to mention brick chimneys.
Venetian plaster
On sale it is a white powder, which must be dissolved in water when applied. If desired, you can add different colors, resulting in a rich selection of shades. Keep in mind that decorative cladding must be carried out on a pre-prepared base - plaster. After application (use a spatula), it is recommended to dry with a hairdryer.
Expert advice
The construction of a proper chimney system is the basis for the efficient and safe operation of heating equipment. If you plan to assemble it yourself, then advice from masters - professionals in this field - will not be superfluous.
Subtleties of switching from a brick pipe to a sandwich
At the point of transition from a brick pipe to a sandwich, it is better to install not a homemade, but a ready-made metal adapter. Its lower part corresponds in size to a brick channel, and the upper part has a round shape with a diameter equal to the diameter of the sandwich. A reliable heat insulator is already installed inside. The use of this device ensures the necessary tightness and fire safety of the connection.
Subtleties of passing through a wooden roof
When using ready-made polyurethane foam, it is necessary to take into account that wood can expand at high humidity, so there should be a small gap between the walls of this device and the opening, approximately 3 - 5 mm. In addition, it is important to impregnate the wood in the joint area with anti-friction agents, which increase its fire resistance.
Where is the best place on the roof to install the pipe?
It is better to move the place where the pipe exits through the roof slightly from the ridge to one side. If it passes through the ridge, then when installing the passage unit, it will be necessary to violate the integrity of the rafters and the ridge beam.
Necessary materials
— Master flush for a pipe of the appropriate diameter. When choosing, also focus on the temperature of the exhaust gases, since the choice of material from which the roof is made depends on it.
Advice! When choosing a penetration, keep in mind that a flash master with a reinforced base has a longer service life, but provides insufficient adhesion when installed on metal tiles, corrugated sheets or other embossed roofing materials.
— A plate used to protect the wing from sunlight. It can be purchased at building materials stores or made with your own hands. It looks like an ordinary plate without a bottom.
— Screwdriver, self-tapping screws, metal scissors and heat-resistant silicone sealant
What harm can foam plastic cause when used for exterior decoration?
The use of polystyrene foam is considered absolutely safe for humans, since even the small amount of harmful substances that can be released from this material completely dissolves in the air upon contact with warm air or moisture.
However, in this case, a very important point is the correct installation of the material. After attaching the foam plastic, it must be plastered or covered with other finishing material in order to protect the material from ultraviolet rays and heating in the summer, as this can provoke an increase in the amount of harmful substances released into the air.