Principles for selecting ready-made models
To choose a good camp sauna in a store, you need to know what criteria should be taken into account when purchasing and study models of ready-made structures.
Criteria
Criteria for choosing a ready-made sauna tent:
- Number of visitors. You need to calculate in advance how many people will go to the steam room. This will allow you to choose the size of the tent. The tourist steam room is suitable for 2-3 people visiting at the same time.
- Frame material. It is better to choose structures made of aluminum rods or hollow metal tubes. The former are used to assemble a semicircular canopy, and the latter – a rectangular or cubic frame.
- Number of layers of awning. It is not recommended to buy three-layer products, since moisture begins to accumulate inside, which can leak onto visitors during bath procedures.
- Awning material. It must be solid and manufactured. Products made of water-repellent material should be used.
- Availability of additional elements. Often a floor is included with the kit. It is better if it is a product made of flexible material with PVC coating on the front side.
- There is a hole for the chimney. It should be located in the roof or side wall.
- Build speed. It's better to check it right away in the store.
You need to think in advance whether a waiting room is needed. It will retain cold air from the street and add free space for preparation for bath procedures.
You also need to pay attention to various little things (hangers, windows, shelves, etc.), furniture for a camp bath
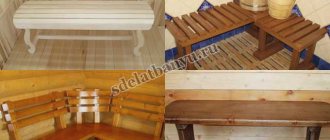
Some ready-made baths are equipped with folding shelves and chairs.
Folding chair (Photo: Instagram / wood_in_zp)
Advantages and disadvantages
Positive sides:
Bath procedures can be carried out in nature, without postponing them until you come home. To build the frame, it is enough to find a flat surface and secure the structure with spacers. You can assemble a steam room using available materials
It is important to have a thick film with you to cover the frame. Disadvantages:
Flaws:
- Excess weight if the steam room consists of a metal stove and hollow frame tubes.
- Low level of comfort. It is very difficult to lift it in a tourist steam room.
- High price of finished structures.
It is impossible to lie down and relax in a portable steam room.
Models and prices
The highest quality steam rooms for travel:
- Nova Tour;
- "Mobiba".
Price - 12,000 rubles.
Hiking steam room "Mobiba" (Photo: Instagram / mobiban.ru)
What to look for when buying
To ensure that a bathhouse does not “let you down” on a camping trip, you should choose it carefully. Proceed according to the recommendations below.
Bake
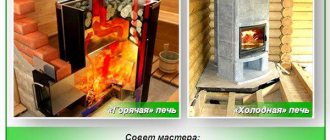
Do not confuse it with a regular tourist one, you need to take a special one. A steam room stove produces maximum heat in a short period of time, while conventional appliances, on the contrary, must maintain a comfortable temperature for as long as possible.
There are two types of sauna stoves:
- With built-in steam generator. This one works like a samovar - water constantly boils in the container, saturating the space with steam. The humidity rises very high.
- Kamenka. Stone masonry is laid in it; it becomes heated from the heat, water or a flavored infusion is poured on top. The good thing about this method is that you can regulate the humidity level yourself; but in the end the steam will be much less than from a steam generator.
Which option to choose is a matter of taste; both have their supporters.
What else should you pay attention to? On the quality of the material. Almost all mobile ovens are made of stainless steel
But steel comes in different grades: AISI 430, 321, 304.
All brands are considered heat-resistant and corrosion-resistant, but they differ in composition.
Also, when purchasing, do not forget to find out:
- Chimney diameter. Check that it fits your awning.
- Weight. For a hiking trip, you will need a model no heavier than 10-15 kg.
- Availability of a spark arrester. This is a mandatory element to ensure your safety.
- Ease of assembly. Do I need to screw the legs, doors, how long will it take?
Tent canopy material
The main difference between a bathhouse and a regular tourist one (except for the hole for the chimney) is the mandatory fire-resistant fabric. In addition, in order for the temperature inside to rise to the desired level, the awning must have waterproof and windproof properties. Oxford is considered the best material. Some combine it with nylon or polyester.
Nylon Oxford is stronger and resistant to chemicals.
Polyester has higher heat resistance.
Overall, both options are good.
Frame
There are two main options:
- Collapsible aluminum tubes are lightweight and fireproof. An oxide film forms on the surface of aluminum, which prevents corrosion; You should not choose painted, shiny, attractive-looking tubes - these break quickly. A good tent skeleton is made from unpainted, stain-resistant aluminum; To assemble the frame, you will need gloves. The exception is anodized tubes. They look beautiful, do not get dirty, but are expensive, and have no advantages over unpainted aluminum.
- Frameless designs. To install the canopy, the tourist will need to collect suitable poles in a wooded area. Do not use too dry ones: they are fragile and flammable.
Frameless sauna tent
Frames vary in volume. The diameter determines how difficult it will be for you to set up a tent: straightening a wide awning and pulling it over a skeleton alone is quite difficult.
The weight of the structure depends on the diameter of the aluminum tubes:
- 10 mm - the lightest, used in backpack-type baths. Optimal for hiking. The weight of such a tent does not exceed 8 kg.
- 13 mm - lightweight design. The weight of a tent for 3-4 people will be around 10-15 kg. Can be used on hikes.
- 16 mm - reinforced design with increased strength. Such a frame will not lose its shape even if it is knocked over by the wind. But it is heavy: a tent for 3-4 people weighs 30 kg or more. Suitable for a summer residence, for a beach holiday, for winter tourism on wheels.
It’s good if the frame design includes several arcs and the model has detachable internal partitions. The presence of a vestibule eliminates the need for tourists to change clothes in the car.
Features of operating a field bath
When installing a field bath, you must choose a level landscape with dense soil. Additional pleasure will be provided by a pond located near the installation site.
When organizing a bathhouse on your own, laying coniferous spruce branches with foliage (birch or oak) on the floor is suitable.
Heating a field bath
Everyone chooses a heat source for relaxation based on their own preferences.
When organizing a bath yourself, it is permissible to use heated boulders or smooth pebbles, which you buy or find nearby. Boulders and pebbles are heated over a fire to a high temperature, then they are moved to a sauna tent using a poker. To maintain the temperature, the stones are watered. This method is simple and economical, however, it is associated with a low level of efficiency, since the stones quickly lose temperature.
Terms of use
A temporary steam room differs from a regular one not only in its design, but also in its operating rules. Let's look at them in more detail:
- if the walls are already installed and the fire is still burning, you must leave one side open for smoke to escape;
- Place a container of water on the hot stove - it will be used to water the stones and generate steam;
- after the required glow temperature is obtained, the heat is removed, since water entering it can lead to the formation of smoke in the tent;
- after the heat is extracted, everything is tightly closed to prevent heat loss;
- If all rules are followed, the room cools down within one and a half to two hours.
Preparatory work
Since a homemade iron sauna stove is made from a material that is prone to incandescence, it must be hardened before assembling the device. After all the necessary parts have been cut out, they must be heated in any way until the metal turns red. When this moment comes, you can begin to slowly cool the material. It often happens that after the raw material release procedure, it warps. It's not a problem. You can return the shape using a hammer. It is also worth measuring all the sheets again. If some are too far out of bounds, then you need to trim them again to the required dimensions. This is a very important point, as it will eliminate the possibility of metal warping during operation of the furnace.
Gas infrared
In this method we will tell you how to assemble such an installation yourself, because... building an infrared burner is very difficult.
Materials and tools
For production you will need:
- Infrared ceramic burner.
- Gas cylinder.
- Oxygen hose 2 m with a diameter of 0.4-0.6 cm.
- Clamp 2pcs
- Screwdriver
- Nozzle for liquefied gas or natural gas (depending on the fuel used).
- Retaining ring
When choosing a ceramic heating pad, it is better to give preference to small models - gas is consumed more economically. The peculiarity of infrared heating is that it heats objects, not air, so if possible, it is good to have a stand under the heating pad, which will allow you to direct the energy.
Manufacturing instructions
The diagram clearly describes the principle of operation of the stove. The gas-air mixture allows you to achieve high temperatures with the least risk of fire.
Principle of operation
Essential elements
- Place the nozzle into the connection hole of the infrared burner.
- Attach the retaining ring on the reverse side.
- Place a clamp on the oxygen hose to prevent gas leakage.
- Connect to the nozzle, tighten the clamp with a screwdriver.
- Connect the gas cylinder to the hose, also using a clamp.
- To light the heater, you need to hold a match to the ceramic heating pad. It is forbidden to ignite gas near the nozzle. Fuel can be propane, argon and natural gas. When replacing fuel, you need to change the type of injector. The gas camp stove is ready.
Type of infrared gas stove for a tent
Operating rules
A camp stove for a tent should not only heat the space, but also serve as an assistant in cooking.
Infrared heaters are not intended for this, but craftsmen have learned to cook on the following tiles:
- You need to place the heating pad with the radiating side up, and place two stones or bricks on the sides.
- Place metal rods or skewers on the bricks.
- Place dishes on top for cooking and heating canned goods.
A 200g can will last for 2 hours, after which you need to replace it with a new one. The gas cylinder must stand upright. It is prohibited to leave the stove unattended. Ventilate the tent from time to time. The surface temperature of the ceramic heater is 800-900 degrees.
What are camping stoves for?
A camp stove is an effective “substitute” for a fire. But, unlike the same fire, it requires very little fuel. It can be:
- dry branches;
- tree bark, chips, cones;
- reed;
- coals left over from an old fire.
Note! The ratio of heat generated to fuel loaded in a camp stove is several times higher than in a campfire. In other words, with the same volume of fuel, the amount of heat is not the same
It turns out that, having the same amount of firewood, you can cook dinner on the stove, but, alas, you won’t be able to do this on a fire. Thanks to domestic craftsmen, today there are many different modifications of camping structures. Conventionally, they are all divided into single- and double-walled. You can them:
- build at a resting place, using available materials;
- make ahead using an old pan, tin cans, sheet metal, etc.
At the same time, the camp stove itself should consume minimal amounts of fuel, be small-sized, light, convenient, and also heat the dishes, not the surrounding air.
Advantages of a factory-made camp sauna
Among the disadvantages of a homemade portable bathhouse are:
significant costs of time and effort for assembly; the importance of preliminary preparation and the availability of a number of materials; difficulties with dismantling the structure and moving the wet awning.
The use of factory products is associated with the following difficulties:
- high cost of the finished structure;
- mandatory availability of transport to move equipment.
For more domesticated steam room lovers, the option of installing a mobile sauna-tent on a personal plot is suitable. There you won’t have to periodically assemble and disassemble it. Although, not everyone will agree to exchange unity with nature on the banks of the river for a simple relaxation at their own dacha.
Of course, the process of installing and subsequently dismantling a bathhouse in a tent takes a lot of time and effort. So you need to have a very strong desire to combine active recreation with bath procedures in order to agree to such difficulties. However, there is a certain romance in such a vacation, understandable only to avid tourists.
For more domesticated steam room lovers, the option of installing a mobile sauna-tent on a personal plot is suitable. There you won’t have to periodically assemble and disassemble it. Although, not everyone will agree to exchange unity with nature on the banks of the river for a simple relaxation at their own dacha.
Decoration
To create a unique, attractive appearance that will decorate the site, decor is used. The most common methods of decoration:
- Plants are planted at the bottom of the pond. They are usually sold in ready-to-use containers;
- Plants in tubs and pots that are installed on the shore. The advantage of this option is the ability to change the location of elements and thereby create a unique design;
- Placing fish with bright colors;
- Creating compositions from natural materials, such as stones.
To prepare a more beautiful composition, it is better to alternate the sizes of stones and their shapes.
Portable sauna with stove
The most popular models are field bathhouses-tents with long-burning stoves or portable bathhouses.
Portable baths with a stove are distinguished by their versatility and the possibility of all-season use. A special feature is quick assembly and a reliable, stable frame. Complete installation of a sauna with a stove takes from 3 to 5 minutes!
When selecting a kit, pay special attention to the stove. It must meet increased safety requirements, and the metal used in production must facilitate long-term operation under significant temperature changes.
When choosing the manufacturer from whom you plan to buy a portable bathhouse, it is important to remember a number of requirements:
- The materials used in the manufacture of the external awning should not emit toxic substances when heated;
- The presence of a chimney for the pipe outlet and a heat-resistant wall at the installation site of the stove;
- Equipped with a ventilation system. The presence of entrances and windows that will provide free access of air and make it possible to regulate the temperature;
- Possibility of installing an internal awning. The air gap between the outer and inner awnings will allow you to maintain a high temperature even at sub-zero temperatures in the autumn-winter period.
Portable saunas from PF "Bereg" have all the listed characteristics necessary for a comfortable stay in a sauna tent.
Preparing to install a mobile sauna
After arriving at your destination, you will need to decide how to make a camp sauna with your own hands. There are no significant difficulties in preparing for this work.
The sequence of actions will be as follows:
- Choose a place where the camp bath will be located. It is best to install it on the shore of a body of water - a lake or river, where you can plunge into cool water. If this is not possible, then you will have to stock up on water.
- Materials are prepared for the construction of the frame. For installation you will need stands - aluminum or carbon fiber. You can also use wooden poles, but they are not reliable or durable. In addition, wood is a flammable material, and such racks will need to be monitored at all times. The ready-made products included in the tent, designed for 4 people, are easy to use. As practice has shown, such racks are safe and durable.
- Prepare covering material. If you do not plan to purchase a special awning, then you can use a piece of wide plastic film. The main thing when buying material is not to make a mistake when calculating its quantity. Typically, a size of 6x6 meters is enough to make a steam room that can comfortably accommodate 6 people. It is allowed to use used advertising banners as material for constructing the frame. You cannot use awnings for modern tents, as they will quickly become unusable. At the same time, canvas tents, preserved from Soviet times, can withstand high temperatures.
- They prepare firewood and collect stones. Before making a mobile sauna, you should make sure that you have the required amount of dry firewood, the diameter of which does not exceed 15 centimeters. But thick logs burn poorly. As for stones, they should be prepared in advance. For one pass you need about one bucket of rounded specimens. It is necessary to immediately discard flat or layered stones with chips or admixtures of other rocks.
Camping industrial sauna
Basically, modern tourists prefer the Novoturskaya mobile bathhouse. It combines quality, reasonable price and meets all expectations.
For a small family or a company of several people, a Mobiba industrial bathhouse is suitable. If you want to take a steam bath at the dacha or you like to go out into nature using a personal car, this is the best option for a tent-type bathhouse among the proposed structures of this type on the modern market. It has a stylish design, good construction and excellent vapor. However, if you decide to go hiking on foot or are a supporter of water tourism, this sauna option will not work.
As for other options for industrial baths, they are not popular among tourists. This is due to low stability in windy weather. You have to properly support the structure with stones so that the bathhouse does not move. Otherwise, these portable baths, like the options proposed above, are similar to a tent or awning that can easily fit into a hiking backpack. No additional accessories, such as a stove or frame, are included in the kit. Therefore, everything else will have to be made with your own hands directly at the place of rest from what is at hand.
Bathhouse on a camping trip - how to organize it
Regardless of what type of bathhouse we are talking about - mobile or stationary - it must contain the steam room itself , which holds the steam and hot air, as well as the stove that produces this heat and steam. But shelves - if possible.
Accordingly, if there is no ready-made steam room on site, you need to bring it there , and the stove for the steam room can either be assembled from scrap material or use a purchased one . An intermediate option is to take with you some blanks to create a stove on site. But first things first.
Another factor will be the nature of the hike.
The hardest thing is for those who want to take a steam bath while hiking .
They will have to carry extra pounds on themselves. It’s easiest for those who drive to the place by car - they don’t have too strict restrictions on weight, so they can take a heavier stove, for example. The remaining cases (water tourism, horse tourism) are somewhere between the first and second. The easiest way, of course, is to take polyethylene with you , cut racks on the spot, and use stones found on the spot , heated by a fire, as a stove. In this case, the load will increase only by the weight of dense polyethylene.
But let's not get ahead of ourselves. Below we will describe various homemade and purchased options, but for now we will talk about their pros and cons.
Differences between metal stoves for baths and saunas
Steam rooms in a bathhouse and a sauna differ significantly from each other. The sauna is accompanied by high temperatures - over 85 ºС. Such indicators make it impossible to greatly increase the humidity, since skin burns are inevitable. At the same time, the broom crumbles in such conditions in just 5 minutes. Therefore, the humidity is adjusted to 5-15%. The Russian bath has a temperature in the region of 55-65 ºС, which makes it possible to raise the relative humidity to 50-60%.
To create certain conditions in the steam room, different stoves are used, and different approaches to their installation are also used. If you are setting up a sauna, you will need to maintain the maximum area of contact between the stove body and the air and ensure rapid circulation of air flows along the walls. Quite often, a camp sauna with a stove is made independently.
It all comes down to heating the air in the steam room as quickly as possible. A small open heater, located above the firebox, can heat the stones to 200-250 ºС. It makes it possible to get a little steam - as a rule, this is enough for a sauna, because you only need to achieve 15% humidity.
Basic formats
Devices of two schemes are very popular - “Beg” and “Poshekhonka”. All stoves for tourist baths, one way or another, belong to one of these two versions.
“Poshekhonka” is a particularly compact stove. Its dimensions are 0.3x0.3x0.5 m, weight is 8-9 kg, depending on the nuances of the design. To make Poshekhonok, stainless steel sheets 0.08 cm thick are used.
This design is completely disassembled. You can shoot:
- legs;
- insulating screens;
- fire door.
After dismantling, all these elements are placed inside the stove. The product is equipped with a pipe with two elbows with a total length of 1.5 m. Such a device ensures ease of installation of the pipe in any convenient place in the bathhouse. Although there is no heater here, there is a flat surface on top, on which stones also rest well. A special feature of the design is the air intake, thanks to which firewood can burn for a long time - up to 6 hours in a row. Side screens not only prevent accidental touching, but also help improve heat transfer.
The design of “Bereg” is noticeably different from “Poshekhonka”. In this version, the combustion chamber is thicker, and there is a characteristic bevel at the bottom. And also thanks to the monolithic casing, effective containment of entrained heat is guaranteed. From 20 to 25 kg of stone are placed in the “Bereg”.
The removable door has an opening that allows you to vary the air flow rate. This solution, coupled with the absence of hinges, made the oven more convenient. Some modifications may have a removable water tank with a capacity of 12 liters. Both the legs and the pipe can be detached. They can be put away in a case without any problems.
The top of the "Berega" firebox is equipped with a spark absorber. This device ensures safe operation of the stove. The total weight of all components reaches 11 kg, which is very light compared to other models.
Folding camp fires can heat a sauna to 80 or 100 degrees in a maximum of 40 minutes, achieving good steam. But not all people prefer to buy ready-made devices - many people prefer what they do with their own hands.
What options are possible?
It is worth recalling that in any case, the camp stove must be assembled strictly according to proven drawings. Otherwise, the safety of its use cannot be guaranteed. When building stoves from scratch (as well as when choosing ready-made versions), special attention should be paid to the design of the chimney. It directly affects the safety of structures and the efficiency of the entire fireplace as a whole.
A home-made stove can save money and is also somewhat lighter than pre-fabricated ones. Store-bought options are quite expensive (pay for high-quality stainless steel), but they fully meet the needs of travelers.
Important: tourism experts believe that finished products will be useful mainly to genuine fans of hikes made in different seasons. For everyone else, it is more profitable and practical to make a fireplace for a tent bathhouse with your own hands. But first you need to figure out whether it will be heated black or white.
There is a completely original version - in it hot air is supplied through a long pipe. The scheme is as follows: a fire is lit at a low point in the terrain, and the tent is placed higher - where the pipe itself can be stretched. The opposite end is brought closer to the fire, and air is drawn there naturally. This is also a kind of metal stove, albeit very conventionally. However, in most cases, this term means something completely different.
A fairly simple version of a homemade hearth would be a structure made from a profiled pipe. Its dimensions are 0.2x0.2 m, while the length of the section will need 0.45 m. It makes no sense to make the wall thinner than 0.06 cm, because it will quickly burn out. A pipe with a diameter of 0.16 m is enough to insert firewood. The grates can be replaced with semicircular perforated sheets .
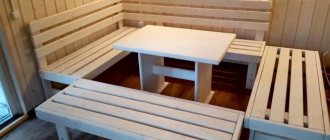
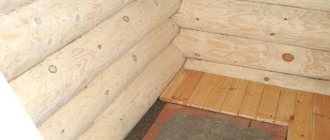
Option for building a mobile sauna from timber
The most reliable option is a mobile sauna made of timber. You can do it like this:
Stages of building a camp bathhouse on a solid wooden frame - an ideal low-budget option for a summer residence
But the simplest and most proven option is a strong and comfortable camping sauna with a stove. Its cost, including sewing and accessories, is three times cheaper than store-bought, which is also smaller in size. And the money raised can be spent on a good camp stove, quality stones and, of course, meat for barbecue.
The bathhouse made according to this project can accommodate 8 people - and there will still be a lot of space left due to the inflating of the bathhouse with hot air. And such a bathhouse can even be safely used as a quickly deployable rain shelter, which cannot be done with a store-bought version.
So, its width is 2 m, height – 2 m, length – 2.5 m, weight – 1.9 and dimensions when folded – 40x20x20 cm. And here is what you will need from materials:
- Slings 50 mm 0.5 m long and 25 mm 2 m long.
- 2.5 meters of 15 mm braid.
- Reznik (2 cm) – 2 meters.
- Lavsan or nylon threads - 1 spool.
- 7 mm zipper with two-way pawl, 2 meters.
- Polyester cord - 16 m.
So, all the pieces according to the pattern need to be sewn together with nylon threads with a double seam - first the wall parts, then the lower moulds, which are not sewn together at the corners. The last thing you need to do is attach the roof, zipper and connecting tape. To make guy loops, you need to double fold a 50 cm piece of sling with a 25 mm diameter and 12 cm of sling with a width of 5 cm - as shown in the diagram. A cord should be tied to the outermost loop, which will stretch and secure the bath tent.
Cutting fabric for making a camp bath
Now you need to make elastic loops - from a piece of elastic folded in half and sew them in the lower corners of the awning. In the resulting middle upper loop, when installing the bath, the upper ends of the columns will be inserted. In addition, the elastic bands themselves can be pulled directly onto the pegs, without even threading the posts through them.
All that remains is to sew a beautiful and comfortable cover for the new camping bathhouse, and you can go camping.
Projects
A transportable bathhouse made of timber can be selected in accordance with the finished project, which differs in size and layout, or ordered according to your own project.
In addition, ordering a finished bath involves delivering the goods to the client with full installation and assembly on site.
We invite you to read: Installation of beacons for plastering walls
An important point is the fact that the cost of the project is affected only by the number of partitions, doors and other components, and not by their location. If you want to move this or that element, the cost should not change.
Among standard projects, the most popular are baths with dimensions:
- 3 by 4 m;
- 4 by 4 m;
- 5 by 3 m;
- 6 by 4 m;
- 6 by 5 m;
- 6 by 6 m;
- 6 by 8 m;
- 8 by 9 m;
Types of heating for tents
What tasks should heating solve:
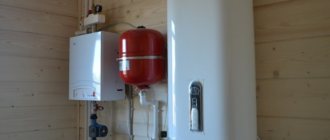
- Heating and lighting a tent in moderate frost without providing sleep. Ideal for fishermen - so that the holes do not freeze. Open fire systems are suitable - a gas burner, a multi-wick candle in a tin can casing, a kerosene bat lantern with a heat exchange nozzle. Some fishermen use catalytic heaters - disposable chemical heaters based on aluminum alum (they do not provide a significant increase in heat).
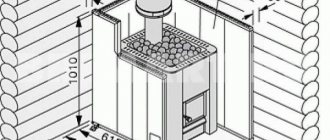
Photo 1. When installing a metal stove in a tent, you must take care of a safe chimney.
- Heating overnight stays during short hikes. A massive stainless steel metal stove or a gas infrared heater with a chimney are suitable.
- Heating tents using wood for long hikes. The main characteristics are lightness, reliability, absence of carbon monoxide, and the ability to use local fuel.
- Heating tents in extreme conditions of mountain passes. The main thing here is ease and efficiency. Gas burners with a 5-liter tourist cylinder are perfect.
Attention! The problem of carbon monoxide is the main thing to pay attention to! Just three breaths lead to severe poisoning, loss of consciousness and death! Don't neglect common sense for the sake of momentary comfort. Heating of the tent, depending on the location of the firebox, can be internal or external
Heating of the tent, depending on the location of the firebox, can be internal or external.
- Internal heating requires removal of combustion products, as well as placing the stove in a tight space.
- External heating - transfer of temperature from the combustion source to the tent without the admixture of carbon monoxide.
Secrets of stove mastery
Any stove must be used with safety precautions. Even the most reliable stove is a source of fire hazard
The stove structure should not come into contact with the awning. You should try to protect it with wooden, or better yet, light metal posts.
Particular attention must be paid to the soil on which the camp sauna is being built. The soil should never be loose
Only on hard and dense soil will it be possible to securely fix the posts holding the awning. If this condition is not met, during operation of the camp sauna, the awning may collapse on people and the hot stove.
Walking stone
There are different options for stoves for camp baths. The basis for their classification is the method of covering the furnace vault. The jumper is quite easy to install and does not take much time. There are three types of masonry: solid, vaulted and with a lintel. It's better not to choose the first one. Its use is a common mistake of many novice tourists who decide to set up a camp bathhouse in nature. Solid masonry prevents the flame from penetrating to the upper stones, and the stove does not warm up as needed for water-hygienic procedures.
A homemade stone sauna stove requires maintenance. When it is warm, dust and ashes are washed off. The ash removed from the camp stove is poured with water or buried. There is an even simpler option for making a camp stove using stones. In order for the stove to warm up well and function, they make... a multi-level fire. This homemade design resembles a sandwich. The first layer is firewood, the next is stones, and it is on them that the fire is built. Next comes a layer of firewood, then stones. This algorithm is repeated exactly as many times as necessary for the improvised stove to function for the required time.
If you don’t want to build a stone camp stove, you can make your own sheet metal structure. It will differ from a stationary stove in its simplicity. For those who have welding skills, solving this problem is very easy. Sheet metal with a width of about 5 mm is selected. The entire stove will consist only of a firebox and a metal tray, which will be located on top. Welding work will not take much time.
Option #1. Miniature stove made from a tin can
The most primitive single-wall option is a DIY camp stove made from a tin can. In the process of creating it, you will need an ordinary tin can or an iron mug, but always of a minimum size (about the size of a tall glass). In the future, you will have to perform such actions.
Step 1. First, make a couple of holes in the bottom of the mug or jar to create draft (they will serve as sources for supplying air to the body)
It is important that these holes coincide with the internal air flow channel. There is another option - to make one large hole in the bottom, but in this case the coals may fall out
Step 2. Then fill the jar with small (about the thickness of a finger) wooden blocks so that they do not extend beyond the edges of the jar. The stacking of firewood should be strictly vertical (something like an “Indian candle”).
Step 3. After this, remove the block from the body, which is located in the center - this will provide a channel for the passage of air.
Step 4. Place paper or dry grass into the formed channel and set it on fire.
Step 5. This design, the volume of which will be approximately 500 ml, will burn for about 25 minutes, which is more than enough to whip up something. The area will not be filled with smoke!
Step 6. Of course, if many people take part in the hike, then the jar should be larger - at least by one or two liters. But in this case, to obtain stable combustion, thicker firewood must be used, and in larger quantities.
The flame “produced” using this design will burn for about 60 minutes. This is enough to properly boil potatoes and fry shish kebab on smoldering coals. This is just one of the manufacturing options. Now let's move on to the next one.
Features of the design of a camp bath
Design features of a camping sauna Description Frame It is better to make it from aluminum posts (for example, from a sales tent), since this material is safer than wood. In the absence of such, you can make supports from young trees, but in this case you will have to carefully ensure that the wood does not ignite. To fix the frame elements, you can use both rope and soft wire. Covering material The simplest option is thick polyethylene film, but due to its disadvantages - low thermal insulation qualities and density - it is preferable to use tarpaulin
It is important that it is a large and solid piece of material. The dimensions of the covering material depend on how many people will be steaming at the same time, but if there are no more than four or five people, then a piece of 6x6 m will be enough. Travel heater Portable metal heater
Here the choice is also quite wide: you can install a factory-made stove-heater, you can make it yourself in the form of a mesh metal box made of metal rods or thick wire, or you can simply build a well of rounded stones and line it with firewood.
Technologies and methods
A homemade stove for a camp sauna can be made without any problems. The simplest version of this design is based on the use of gratings made of a thick steel rod or a welded product similar to a taganka. In this case, the assembly is carried out like this:
- lay flat stones in the base;
- allocate space among them for the firebox;
- lay a grate or rods;
- cover them with pebbles.
In this case, the following will be useful for a mobile oven:
- unnecessary steel boxes;
- parts of masonry mesh;
- pipe sections.
All steel frames are filled with stones of suitable size. Then they just need to be laid on the fire. Such a solution is beneficial due to:
- maintaining cleanliness;
- minimal risk of stones falling off;
- reuse possibilities;
- speed of preparation;
- quick warm-up.
But when preparing the simplest improvised oven, they often encounter certain problems. It is quite difficult to choose the right building material. Stones for placing in the oven must be perfectly smooth and flat, without a single crack. You need to put smooth and heavy stones into the heater. Basalt and pebbles are best.
A do-it-yourself metal stove made in this way will have to be placed at a short distance from the walls of the camp bathhouse. This will prevent burning of the canopy. You can prevent the spread of ash and cinders throughout the tent by digging the fireplace to a shallow depth. In winter, the bottom is covered with spruce branches or special heat-protective mats. When placing a stove in a camp sauna, you need to choose a place with a flat and solid base, close to a water source and away from the entrance.
Features of installing a camp bath
How to install a camp sauna: video tutorial
We won’t talk about the specifics of installing a ready-made camp bathhouse, because... all the nuances and safety rules are provided in the instructions that come with the structure. If you decide to make a camp sauna with your own hands, now we will tell you how to properly install a homemade camp sauna. There are 2 options for installing and operating a bath: traditional - “black” and cleaner - “white”. Let's consider both options.
Installing a sauna “in black”
The black sauna is a classic of the genre, because... in this case, the stove-heater is located and operates directly in the steam room. In this case, you must accept in advance that the steam room will be smoky, and you will definitely get dirty and stink of smoke. Despite this, a camp sauna “on black” will be hotter and you can steam in it longer.
Installing a black sauna consists of two main stages: heating the stones and installing the steam room.
Heating the stones
First of all, we look for suitable stones for a camp bath. You should use only round stones without chips, cracks or delaminations. It is recommended to select larger rounded stones, because... they give off heat longer (although they take longer to heat up).
Next you need to make a stove-stove. To do this, we lay the collected stones in the shape of a pyramid, and lay dry firewood on top of the stones. A more effective option is to make a metal box from twigs, place firewood at the bottom of the box, and place stones on top.
As soon as the stove-heater is made, we light a fire and wait until the stones heat up until they turn red, usually this takes from 2 to 4 hours.
Steam room installation
Installation of a steam room for a black bath
While the sauna stones are heating up, it is recommended to assemble the frame of the camp sauna. This should be done to the side so as not to damage the posts and covering material by fire. After the entire frame is completely assembled and the stones are warmed up until reddened, we proceed to installing the steam room.
First of all, we remove the remaining coals and unburnt wood from the fire so that only hot stones remain. Next, the area around the stove must be generously filled with water in order to extinguish all the small hot fragments that can burn you and expose the steam room to spontaneous combustion. After this, we place a rug or pine branches next to the fire to make the rest more comfortable and protect ourselves from illness (a warm body can easily catch a cold on cold soil).
As soon as the place is prepared, we transfer the assembled frame of the camp bath to the heated stones, covering them. That's the whole process of installing a bathhouse “in black and white”.
Installing a bathhouse “in white”
Heating the stones
Heating the stones is similar
Installing a camp sauna “in white” is no more difficult or easier than the previous method, the only difference is in the installation of the steam room and the design of the stove. First, as in the first case, we light a fire with previously prepared stones. When creating a camp sauna “in white”, the fire should have the following design: first, stones are laid out, firewood is laid on them, then the remaining stones and another layer of firewood are laid out. This design of a homemade stove will allow the stones to heat up faster, and the entire volume of the stones.
Steam room installation
Camping sauna “in white”
While the stones are heating up, we prepare the frame elements and use them to fasten them into one structure, and it is too early to cover the steam room with a vapor barrier. The assembled steam room should be located close to the fire so that you can quickly move the hot stones inside.
As for the stones, they will need to be rolled into the steam room. To do this, it is recommended to dig a shallow groove from the fire to the place where the stove is installed. Once the stones are hot, we get down to business. Using a small shovel or a thick branch, we remove all burning and burnt wood from the fire so that only stones remain. Next, we carefully roll the stones along the ditch, assembling a small stove-stove in the steam room. After all the stones have been delivered to the camp bathhouse, we pour water into the ditch to extinguish small pieces of coals and other residues from the fire. Now you can cover the bathhouse. This must be done carefully so that the covering material does not ignite from hot stones. The covering material from below must be fixed using available means (logs, stones or even sand) and that’s it, the camp sauna “on white” is ready!
Replacing glass-ceramic inserts in fireplace stoves
In case of damage to the glass-ceramic screens, metal plates are supplied with the Fireplace stove to replace them.
The replacement process consists of the following steps:
1. Place the oven in working position;
2. Unscrew the fasteners, remove the plate securing the transparent screen;
3. Carefully remove the glass ceramic insert. Do not remove the heat resistant seal;
4. Insert the metal plate in place of the transparent glass-ceramic screen;
5. Install the fasteners to fix the insert in its original position.
Detailed video instructions for replacing the glass-ceramic insert with a metal plate.
Do-it-yourself camping sauna and stove equipment
You can build a tourist bathhouse yourself, or purchase it partially or completely in specialized stores. The design of such a steam room is simple and usually includes:
- frame;
- canopy;
- bake;
- stones.
The most profitable option, from a financial point of view, is, of course, to build a camp sauna with your own hands. But you can’t do this kind of work spontaneously. Setting up a tourist steam room in nature requires timely preparation.
First, you need a foundation, that is, a frame. Craftsmen can make it in advance from light hollow pipes, and care should be taken to ensure the mobility of such an installation so that it can at least be folded for transportation. The simplest option is a frame made from improvised means. Suitable branches and sticks are already in place, connected to each other with rope or wire in such a way that the simplest stove-heater and a certain number of people can fit in the internal space.
Secondly, it is necessary to build something like a tent, that is, cover the frame with material. It is not recommended to use regular synthetic tents for these purposes, because the fabric from which they are made is not intended for use in high temperatures. A thick tarpaulin or ordinary oilcloth is much more suitable. The material must be strengthened onto the frame in such a way that only one side can be used to enter/exit during further improvement of the bathhouse.
The third, no less important stage is assembling the heater stove. To build a stove, you need to bring stones with you or find them on site. They should be flat, preferably oval in shape and about the size of your palm. Such stones will retain their temperature for a long time and heat up fairly quickly. You can easily fold the stove by alternating stones and sticks, so that at the bottom you get a kind of niche for lighting a fire, and stones are laid around it and on top, which will maintain the temperature. Having assembled the stove, you can start lighting it directly. It should be noted that while the stove is burning, one side of the camping sauna tent should be open to avoid the accumulation of carbon monoxide and smoke.
While the fire is burning and the stones are warming up, you should think about installing a floor for a camp sauna. You can throw pine paws and tree leaves under your feet, organize seating areas, benches and chairs. It is worth maintaining the fire in the hearth until the stones turn red or white. As soon as this happens, you should put out the fire, take the ashes out of the tent and close it hermetically. Now, the camp sauna is ready for use.
So, the construction of a camp bath requires:
- a great desire to take a steam bath in nature;
- homemade preparations in the form of a frame, coal, film or tarpaulin for covering. In the end, you can bring stones for the stove so as not to waste time searching for them;
- improvised means and materials that will be collected on site - logs, sticks, leaves, etc.
https://youtube.com/watch?v=0vwUNnCehME
Preparatory work
Selecting a gas cylinder
For work, it is better to use a propane tank. It is most suitable for this design due to its dimensions. You can buy a cylinder at any scrap metal collection point, the main thing is that it is intact, without holes or large dents.
It doesn’t matter when the cylinder was produced or when it was tested. Do not pay attention to the uniformity of the paint coating on the walls of the container; it will still burn out immediately during the first tests of the oven
The main thing is that rust does not eat through the walls; it is better if they remove the tap before you and release the gas from the cylinder.
Gas cylinder
Expert opinion Pavel Kruglov Stove maker with 25 years of experience
You should not purchase a new vessel; it is better to use these funds to purchase sheet metal and other materials. Ask your neighbors and friends if they have an unnecessary cylinder collecting dust, which they will gladly give you as a gift or sell it for a small fee.
Materials and their quantity
It is difficult to indicate the exact quantity of materials. Much depends on the size of the water container or the size of the compartment for stones. Here is a list of the necessary materials, and how many you will need is up to you:
- gas cylinder;
- sheet of metal, 2-3 mm thick;
- if after construction there are pieces of reinforcement or rods left over, you can use them to make a grate and handles for doors;
- for the legs you can use a corner or a profile pipe. If the farm has a piece of large diameter pipe, you can cut a piece 60-70 mm wide, cut it in half and weld it to the cylinder;
- pipe, cross-section 120 mm, length 400 mm for the chimney outlet;
- rod or reinforcement for making a mesh in which we place stones;
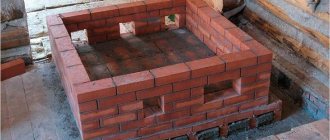
- bricks for the foundation of the bathhouse stove.
Do not use mica stones or granite. In the first option, carbon monoxide will be released when heated, and granite will quickly collapse when exposed to high temperatures. It is better to lay the heater with diabase.
Tools
You will need:
- welding machine with hand and eye protection;
- workbench with a vice;
- clothing with long sleeves made of thick material;
- electrodes for welding structural steels. An inexpensive option is ANO-21 or MP-3, with a diameter of 3-4 mm;
- Bulgarian;
- cutting and cleaning discs;
- metalworking tools;
- sandpaper, metal brush.
Making a sauna tent “the black way”
The main difference between this option is that the heated stones will not need to be transferred from the fire to the steam room. In this case, a large frame will be placed directly on top of the hot cobblestones after removing the coals. The manufacturing procedure begins with the construction of the furnace.
Making a sauna tent “the black way”
Stage one. Bake
There are two possible options here, let’s take a look at each of them.
Option #1
We put a pile of stones and make a hole in it for loading firewood (in the image the hole is on the back side - where the smoke comes from). You will need much more stones than for a white bath, but neither the shape nor the size play a special role.
It is worth noting that this option is quite difficult to implement, so you should be prepared for the fact that the heap will constantly collapse.
Stones for the stove
Option No. 2
Using a welding machine, we make in advance a small frame (40-50 cm high, similar width) from reinforcement rods with a diameter of 5 mm. Once in place, we cover the finished frame with stones. The main advantage of this design is that the stones will rest on the frame, so they will not fall apart. However, they will take longer to heat up than in the option described above.
The principle of laying stones on a frame
Small welded structure for a camp sauna
Camping sauna stove
A camping sauna stove that can easily be converted into a teapot stand or table
Popular models and prices
In specialized stores for tourists you can find various models of camping stove equipment. Several models stand out among them:
- "Bannaya Shore". It is equipped with five pipes for chimney assembly, 50 cm long. Additionally, protective screens 0.5 mm thick are supplied. Without stones, the entire oven weighs 13 kg.
- Camping stove "Yarillo". A small but powerful stove with which you can heat a homemade steam room with a volume of up to 20 m3. The total weight of the structure is 9.5 kg.
- "Therma Sonita". A large camp stove with a heater located on top of the body. The kit includes a chimney. The total weight of the structure without stones is 19 kg. The peculiarity of this model is that it has a gate. It is needed to make the wood burn longer.
The average price of camping stoves is 14,000 rubles.