The passage of a chimney through the ceiling is a very important moment in the construction of a private house or any other building (for example, a bathhouse). This is primarily due to the fact that work related to the installation of a chimney must comply with fire safety standards and other requirements described in SNiP. Many fires in various private buildings occur due to non-compliance with fire safety rules when installing a chimney.
The chimney outlet through the ceiling and roof must be carried out taking into account fire safety rules
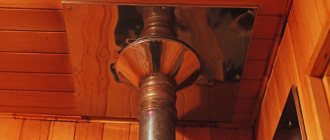
Passage of a round chimney pipe through a wooden ceiling using polyurethane foam of various designs
To pass the chimney through wooden structures, you can use a ready-made ceiling-passage assembly (see photo).
It is selected based on the outer diameter of the pipe. Before installation, this ceiling passage unit must be prepared: all surfaces that will come into contact with the wood of the ceiling sheathing, and all internal surfaces of the passage box, are lined with thermal insulation. Factory-made ceiling passage unit. Before use, it must be covered on all sides except the front with heat-insulating material.
Usually basalt wool serves as thermal insulation, but it must be special: it can withstand high temperatures. When purchasing material, make sure that it is designed for use at temperatures of 800-1000°C. These materials have a higher cost, but it is unwise to skimp on safety. Cheaper options contain binders that sinter at high temperatures, causing the thermal insulation to lose all its properties, and this can lead to a fire. In addition, it is advisable to use foil heat insulator - this will make the structure even safer.
Having insulated the passage unit, prepare a place for its installation. Mark on the ceiling where the chimney will be located. Draw a hole of a suitable size: slightly smaller than the size of the front panel of the pass-through unit in such a way that it is convenient to attach it to the ceiling trim with self-tapping screws. Having cut a hole, cover its edges with the same heat insulator as the pass-through unit, or any other with similar properties. To increase the level of fire safety, metal strips can be strengthened on top of the heat insulator. Insert the prepared passage unit into the finished hole. It can be put on the pipe and installed with it. Having installed this structure in place, secure the panel of the passage unit with self-tapping screws (the holes can be pre-drilled).
Preparation and installation of ceiling penetrations
After checking the vertical installation of the chimney pipe, proceed to complete this stage. The voids remaining in the passage unit are filled with thermal insulation. You can use pieces of the same basalt wool or fill the voids with expanded clay. In theory, you can use sand, but you shouldn’t. It is inferior in terms of thermal insulation properties to both expanded clay and basalt wool, in addition, sooner or later it will end up at the bottom, since there are cracks, and through them grains of sand will fall onto the stove.
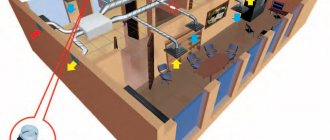
Further actions depend on where you led the chimney: to the second floor or to the attic. But the main difference is in aesthetics and the availability of finishing. If you led the chimney pipe into the attic, the passage through the ceiling can be considered complete. If you brought the chimney to the second floor or into the attic, you put a protective metal screen on the pipe, which is now attached to the floor with the same self-tapping screws. After this, you proceed to the next stage - output through the next ceiling (this is if you are on the second floor) or through the roof, if in the attic or attic.
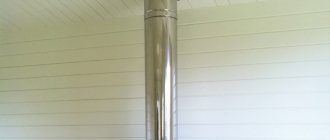
This is what the finished ceiling penetration looks like
The chimney passage through the ceiling may also look like this. This is a ready-to-use option that consists of two boxes. The inner box is made of metal, the outer one is made of heat-resistant material (in this case, mineralite).
Minerite roof passage assembly. It is completely ready to use
There is an air gap between them, ensuring fire safety. According to the manufacturers, the remaining free space between the sandwich pipe and the cutting box does not require filling with a heat insulator. You can leave everything as is, or you can, for greater reliability, still add heat-resistant thermal insulation. In such a case, such as a chimney passing through a wooden ceiling, it is better to be on the safe side than to put out a fire later.
This is how a mineralite assembly for passing through the roof is installed. Just put it on the pipe and inserted it into the prepared method
The passage through the ceiling can be like this (see photo). In this case, sealing the edges of the hole in the ceiling is mandatory (remember, there is thermal insulation around the edge first, metal on top).
The factory aisle assembly may look different. Depending on the shape, the installation method varies slightly
Construction of a crossing over the ceiling
Let's look at how to make a chimney in a bathhouse through the ceiling. This can be done in two ways.
- Use ready-made cuts;
- Install the pass-through unit with your own hands.
Application of ready cuts
In order to fully protect the roof elements from the effects of high temperatures that arise when combustion products pass through the chimney, and at the same time secure the pipe in the required position, the so-called ceiling cutting is used.
To construct a chimney passage through the ceiling, you need to purchase a chimney passage through the ceiling at a hardware store. It is a box made of mineralite or metal connected to a stainless steel plate. There is a hole in the center of the structure into which the sandwich is placed. Such a device also performs, among other things, a decorative function. A plate attached to it covers the ceiling hole, giving it a more aesthetic appearance. In addition, insulation rests on this plate, which fills the space between the ceiling elements and the pipe.
They come in two types:
- with insulation, looking like two plates combined with an insulated pipe;
- without insulation, which is a box made of metal, which must be filled with insulating materials with your own hands and a hole intended for installing pipes.
Cuttings come in different forms. Sometimes they look like a metal cylinder, in which case the plate is significantly larger than it. If such a device is used, and the ceiling hole is square in shape, then it is still necessary to comply with all the listed parameters required to ensure the fire safety of the structure. At the same time, it is necessary to strengthen the protection of wooden bath structures using metal strips.
https://youtube.com/watch?v=OloeKgcB2Yo
Installation of a ready-made adapter
- Cut a hole in the ceiling, taking into account the overall dimensions of the cut;
- If necessary, carry out insulation;
- Install the chimney passage unit into the ceiling;
- Bring the pipe to the ceiling, and its length should be 100-150 mm less than the height;
- Connect the section of pipe located on top of the roof;
- Seal all joints that occurred during the passage of the chimney through the wooden ceiling.
Installation of an adapter made by hand
It is possible to carry out a chimney through the ceiling in a bathhouse without factory components.
Let's look at how to make a ceiling passage unit with your own hands. To do this you will need:
- chimney pipe;
- material chosen for thermal insulation of the pipe passage through the bathhouse ceiling;
- metal plates.
The pipe in the bathhouse through the ceiling and roof is installed following the recommendations described below.
- Cut a hole in the ceiling that is 13-18 mm larger than the size of the pipe;
- One edge of the pipe is inserted into the hole made;
- From inside the room, a plate is placed on the ceiling;
- The chimney passage through the ceiling is insulated. It is optimal to make thermal insulation for the ceiling passage unit from mineralite.
- The space remaining between the ceiling and the plate must also be filled with a layer of insulation.
- The plate is attached using self-tapping screws.
When considering how to install a pipe in a bathhouse through the ceiling, be sure to pay attention to such an important factor as choosing a suitable location for the passage of the ceiling for the chimney. The main function of the adapter is fire protection
The main function of the adapter is fire protection
It can be installed either directly on the ridge, providing good traction and no accumulation of sediment; or next to the ridge.
Cutting a chimney installed by yourself will require a little more time than purchased in a store, but will help save money, which is so necessary during construction.
When installing a chimney in a ceiling-roof slab, craftsmen are often faced with such a difficulty as the need to make a chimney in a bathhouse through the ceiling strictly vertically, placing it in the center of the passage. To do this, we can recommend using a plumb line. It is lifted up and lowered into the center of the chimney. This point is marked on the ceiling and used as an appropriate mark before making a pipe passage through the ceiling of the bathhouse.
Pass-through unit: structure and dimensions of the box
There are several names for a box that is installed in the gap of a hole cut in the ceiling: these are “pass-through unit”, and “cutting box” and “ceiling cutting”, and PPU (ceiling pass-through unit).
What is he? Quite simply, it is a box with insulating material that should fit into the hole you cut, and also keep the chimney pipe exactly in the center.
Box for the passage of the chimney through the ceiling for installing a stove in a steam room
In addition to this, there is also the finishing of the hole itself, which is very desirable to be reinforced with a material that can withstand high temperatures, is non-flammable and has low heat transfer. Below we will talk about specific materials, but the problems that should be solved by them are exactly the same.
The pass-through unit is made of metal. In particular, it can be stainless steel. In any case, the part that is visible from the steam room is usually made of stainless steel. On sale you can find boxes made entirely of stainless steel, and entirely of galvanized steel, and combinations thereof.
The boxes vary in size. And not only the box itself, but also the internal hole through which the chimney must pass. Diameter varies from 115 to 300 mm.
As for external dimensions, everyone interprets GOST in their own way. We already understand why this happens - some believe that a box with a side of 1 meter corresponds to GOST, others that 26 cm + pipe diameter is quite enough. And all this is based on technical standards.
IMPORTANT! If there is any discrepancy, one has to rely on common sense. What is the main limitation when passing through the ceiling? Ceiling beams, if the ceiling is suspended
If the dimensions of the box are greater than the distance between the beams, you will have to cut the beam and insert the cross member in another place. This will affect the load-bearing capacity of this beam. That is why they try to fit the box between the existing beams without additional waste of effort and time
What is the main limitation when passing through the ceiling? Ceiling beams if the ceiling is false. If the dimensions of the box are greater than the distance between the beams, you will have to cut the beam and insert the cross member in another place. This will affect the load-bearing capacity of this beam. That is why they try to fit the box between the existing beams without additional waste of effort and time.
The ceiling in the bathhouse and the chimney. Photo StroyDom
Of course, if the position of the furnace had been thought out at the design stage, then the beams could have been positioned so that the foam would pass between them. Consequently, the size of the PPU would need to be thought out in advance.
On the other hand, there are now materials with low heat transfer that can withstand heating up to 1000-1100 degrees. If you use them, there is no need to cut out a large piece of the ceiling. For example, watch a video showing a test test of a calcium silicate slab. We then looked at the technical characteristics of this refractory - they are simply excellent! Find out for yourself (we do not advertise or sell).
For now, let’s summarize the data. It turned out that, according to SNiP and other standards, there are the following options:
- radius of ceramic pipe + insulation + 13 cm;
- ceramic pipe radius + 25 cm;
- pipe radius + 38 cm;
- pipe radius + 50 cm.
ATTENTION! There are no data for steel pipes in the first two cases. As for the device, everything is simple: the metal box has the height of the ceiling, and is closed at the top and bottom with lids with holes for the diameter of the pipe
Lids are larger than the box size
As for the device, everything is simple: the metal box has the height of the ceiling, and is closed at the top and bottom with lids with holes for the diameter of the pipe. The lids are larger than the size of the box.
The box itself is lined on all external surfaces with a heat insulator - mineralite or basalt cardboard. Expanded clay is poured inside the box or basalt wool is laid. This is the standard option and is done most often. But in the video you saw that you can get by with a calcium silicate slab and use it to insulate the pipe in the bathhouse from the ceiling.
Organization of passage
In most cases, a special sandwich pipe is used to construct chimneys. It is a structure of two pipes of different diameters, nested one inside the other. Between them, non-flammable heat-insulating material is laid. The outer shell is made of thin metal, and the inner part is made of thicker steel.
The passage through the ceiling of such a sandwich chimney is carried out in the same way as a regular pipe. Perhaps there will be a little less work on arranging the passageway. You can use either a ready-made solution already made at the factory or assemble the required unit yourself.
In any case, it is necessary to first prepare the place where the entire device will be installed. A square hole is cut in the ceiling, with a side of about 45 centimeters. This size is large enough to fit a standard chimney through.
The ceiling assembly itself for the passage must be lined outside and inside with a heat insulator capable of withstanding high temperatures. The most popular for such purposes is special basalt wool.
According to the size of the square part of the assembly, approximate lines are drawn on the ceiling. The opening should be located strictly above the stove pipe. The hole itself is cut out slightly smaller than the connecting square plate. It is necessary to leave such a gap so that it is possible to attach it to the ceiling with self-tapping screws. The finished opening is lined with the same heat-insulating material as the passage unit.
The finished assembly must be inserted into this hole to check all connections. Before bringing the chimney through the ceiling and finally securing it, you need to make sure that the pipe is vertical and that it is located exactly in the center of the opening.
If you look from the top floor or attic, you can see that there are voids in the passageway. They are filled with non-flammable heat insulator. You can use expanded clay, clay or leftover basalt wool. The main thing is to fill the void very tightly.
To have a more complete idea of what the entire assembly looks like in section and what the passage for the chimney through the ceiling looks like, you can look at the drawing below.
The diagram shows the main elements of the chimney and passage unit, as well as parts of the ceiling through which the passage was made. The pipe is passed through the roof in a similar way. The only difference will be the hole in the square metal plate - it will not be round, but oval, since it will be located at an angle.
Options and features of exterior finishing
The chimney trim on the roof plays a decorative role. To avoid maximum smoke removal and prevent the formation of condensation, the outer part of the pipe must be insulated, and insulating materials require mandatory external protection. The finishing of the chimney pipe should be in harmony with the design of the roof, and it will make the smoke exhaust structure a full-fledged decorative element.
There are a lot of finishing options, the most current ones can be named:
Plaster. This is a simple solution that allows you to protect the pipe from the cold and provide it with a pleasant appearance. At the request of the house owner, mineral chips are added to the plaster mortar, which allows the finished cladding to be given a beautiful relief structure.
Decorative brick. This is another common solution that is widely used in finishing brick buildings. This finishing of the fireplace chimney allows you to maintain the temperature in the chimney; it lasts for a very long time and does not collapse even from very strong heat. Artificial or natural stone
A stone chimney looks very solid and stylish; it attracts attention to the roof and performs its functions perfectly. This is an almost eternal facing material that will make the smoke removal system more reliable.
Finishing the chimney with corrugated sheeting. An interesting option is one in which the smoke exhaust duct is designed in the same way as the roof itself. Finishing a chimney with a metal profile is a fairly strong and durable option; such lining is installed on a metal frame and reliably covers the insulating material.
These are just some of the external cladding options that will help make the chimney beautiful and very noticeable. An ordinary pipe can be turned into a real home decoration.
Finishing the chimney with a metal profile on the outside
Finishing a chimney on the roof with corrugated sheeting is one of the simplest options; even a novice home craftsman can handle such work. A galvanized sheet equipped with an anti-corrosion coating will be a strong and durable solution: it does not burn, does not collapse under the influence of high temperature or strong vibrations, and installation of such cladding does not take much time. However, this is a cold material, so the chimney will have to be insulated.
Finishing the chimney with a metal profile is carried out after the construction of the metal frame. Metal sheets are installed overlapping on it to ensure the strongest possible connection. To ensure that the sheets are positioned evenly, a building level is used when attaching them.
The metal profile is attached with self-tapping screws; this work is more convenient to carry out using a screwdriver. Between the metal sheet and the smoke exhaust pipe there is a layer of non-combustible insulation.
Finishing the chimney inside the building
A fireplace or stove is usually installed in a living room or study, so it becomes necessary to conduct smoke exhaust ducts through the second floor and the attic or attic room. The decoration of the chimney inside the house can be very diverse in appearance, but in any case it is installed on a common basis. The interior finishing of the chimney is carried out as follows:
- To line the chimney, a metal profile frame is built around it, which is sheathed with special plasterboard sheets. They must be fire-resistant, this will ensure the fire safety of the house. Such sheets are designated by the special abbreviation GKLO.
- The frame is insulated: a layer of mineral wool or other non-combustible insulating materials is laid around the chimney.
- Smooth plasterboard sheets are finished with any selected materials: it can be ordinary wallpaper, ceramic tiles, plaster and much more. This decoration of the fireplace chimney allows it to be harmoniously integrated into the space of the room, and the choice of material depends on the style of interior design.
The interior decoration of chimney ducts can have a wide variety of colors, so it can be chosen to suit every taste. However, in any case, it is recommended to choose non-combustible materials so as not to increase the risk of fire
This is especially important in a wooden house: walls located near the chimney, and especially all bending areas, must be treated with fire retardants
External and internal finishing of the chimney will allow you to turn it into a full-fledged decorative element: the choice of materials depends on the design features of the building and the financial capabilities of the owner. Self-installation of the cladding will allow you to save a lot, but it must be carried out in strict compliance with all technological requirements.
You need to enable JavaScript or update your player!
Chimney: types of pipes
What can a modern chimney for a sauna stove be made of? There are not many options:
- brick (we will talk very little about it in this article, because this is a topic more for brick stoves),
- metal;
- ceramics;
- glass.
It is noteworthy that the best material will be impact-resistant, heat-resistant glass, ceramics are in second place, and then come steel of various grades. Below is a video in which the author compiles a list of the highest quality steels, but for those who are too lazy to watch, we will present it in text form:
- austenitic AISI 310 and 310S;
- austenitic AISI 316 TL;
- austenitic AISI 321;
- austenitic AISI 304;
- with the addition of manganese AISI 201-202;
- ferritic AISI 409;
- ferritic AISI 430.
At this point, the list is interrupted by a description of enameled chimneys, then those made of aluminum-zinc, after which the author moves on to black carbon steel, which can only be used if painted with heat-resistant enamel.
Here's the video itself:
We agree that ceramic chimneys are better than metal ones, but they are also more expensive. As for which brands have become better, we trust the author of the video.
Self-construction of chimneys
The technology for installing a smoke duct has much in common with the installation of a conventional air duct. The difference lies in the presence of more stringent requirements for the operation of the chimney. Therefore, the process of arranging pipes for furnaces requires accurate calculations, selection of building materials, fasteners, refractory putties and other things.
Modular pipe
In the case where the chimney is planned to be laid in the wall of the house, this nuance should be taken into account at the stage of wall construction, otherwise the hole will need to be punched using a jackhammer. It is possible to install a stove duct in an already equipped ventilation duct, but as a result, the fire safety of the smoke exhaust structure will significantly deteriorate.
To implement a hidden pipe scheme, you need to use the services of an experienced architect, since during the operation of the furnace, temperature deformations are possible - the dimensions of the channel increase from the influence of hot gas, thereby exposing the walls to destructive processes.
Chimney sections inside load-bearing structures can be constructed from multilayer blocks. They are placed over the entire surface of the wall, using a temperature-resistant adhesive for fixation. This material is able to level out thermal deformations, thanks to damper gaskets, and thereby ensure the integrity of the building.
The main advantage of this design is that there is no need to insulate the pipe on the roof of the house - the channel will go outside above the roof level inside the gable.
Mounted steel chimney
Installing steel chimneys does not require special skills or a lot of time, so they are often preferred by homeowners, and such structures are relatively inexpensive.
It should be taken into account that:
- Any metal pipe must consist of at least two parts and must be disassembled accordingly. After a few years, the first section burns out from high temperatures, not the entire structure will need to be replaced, but only a section of it.
- Where the chimney will be brought out through the roof and wall, fire-resistant insulation is laid, otherwise the building may catch fire.
- The section of the pipe located in an unheated room must be properly insulated so that cold air masses do not cool the gas and thereby affect the performance of the heating unit. As a result, condensate will not collect on the surface of the pipe and it will not rust.
- It is imperative to waterproof metal pipes using non-combustible materials.
Install the metal shell structure in stages:
- The first elbow is placed on the screen pipe or on the outlet of the furnace air duct.
- The second ring is brought out through the attic into the room and fixed on a fire-resistant spacer.
- Connect both knees.
- The third segment is led out into the attic through a through opening in the roof. The place where the pipe exits to the street is covered with a spherical casing.
Root brick pipe
This type of brick stove chimney will last for many years. The main pipe is installed on a foundation, which is laid separately during the construction of the basement floor.
The installation technology of this chimney is more complex than that of a mounted metal structure. The fact is that the main pipe must withstand the longitudinal load from the weight of the entire unit, so it is laid out from baked bricks.
Features of the structure:
- To build a chimney channel, leave a hole the size of a brick or half a brick. To lay one layer, 4-6 bricks will be enough.
- The layers are laid out so that the bottom joining seam of the row is under the whole brick.
- Before the chimney pipe is brought out through the roof, a special module is made in the place where it passes through the ceiling to shift the axis of the section piercing the roof relative to the axis of the part of the chimney located in the room.
The design of this type is complex, and it is installed when there are no other options.
External chimney
A pipe mounted from metal or asbestos-cement modules is installed along the facade of the building, moving in the direction from bottom to top.
External structures have the following features:
- in the place where the pipe enters the building, a hole is made, through which a horizontal segment of the chimney is then brought out;
- the junction of the horizontal and vertical sections is designed in the form of a tee, one part of which is closed with a plug. This element is used when cleaning the chimney;
- the pipe is attached to the facade using detachable metal clamps. The lower part of the chimney is strengthened with a superstructure specially erected on a separate foundation.
Installation technology
Increased requirements are imposed on buildings made of combustible materials. When venting a chimney through a wall in a wooden house, you must take into account all fire safety standards.
Step-by-step instructions on how to make a chimney correctly:
- For the pipe, a passage is made through the wall in accordance with SNIP standards. The distance from the pipe to a wall built from fire-resistant building materials is at least 25 cm. To a surface made from materials susceptible to combustion - 45 cm. In the second case, it turns out that you need to punch a fairly large hole. To make the hole for the chimney through a wooden wall smaller, the surface is sheathed with metal or other fire-resistant material. Make a hole of 25 cm, since the surface is insulated from fire.
- A metal box is mounted into a hole in the wall.
- The pipe is passed through a metal box, secured in the middle, and taken out. The pipe must be solid; elements cannot be joined inside the wall, as they will be problematic to maintain.
- All free space in the wall is filled with non-flammable thermal insulation material.
- The hole on both sides is covered with metal or other heat-resistant raw materials.
- A support platform for external pipes is mounted outside, which is held by metal brackets attached to the wall.
- An adapter in the form of a tee is installed on the outgoing segment.
- The lower part is removable. It functions as a glass to collect condensate. Some models are equipped with a fitting with a tap to which a hose is connected, through which the water accumulated inside is poured out.
- A chimney is connected to the upper part, which is brought to the desired height. To prevent debris from getting inside the pipe, a cap is installed on it.
The pipe brought out is secured to the wall using stainless steel clamps.
In a frame house, it is recommended that instead of a support platform, build a small foundation that will hold the outer pipe in order to relieve the load from the wall.
For more details on how to install a chimney through a wall, watch the video:
Safety regulations
When installing a chimney in a bathhouse through the ceiling, you must follow the recommendations of Sanitary Norms and Rules 41 – 01 – 2003. According to clause 6.6.22, it is necessary to ensure a distance of 130 mm in the case of a brick pipe passing through the ceiling for a chimney, which provides protection for wood. But given that in most cases metal pipes are used in baths, you need to focus on the following standards:
- It is necessary to maintain a distance of more than 380 mm to flammable objects protected by insulation;
- The minimum distance to flammable objects without insulation must be more than 500 mm.
In this case, these distances must be ensured before the pipeline comes into contact with the tree.
Ideally, these distances would not be covered with anything at all, but this option will contribute to increased heat loss, which is economically unprofitable. Therefore, this volume is covered with non-combustible materials.
The maximum length of the pipe passing through the ceiling in the bathhouse should not be more than 1000 mm. The chimney cannot be fixed to the roof in a rigid manner, because when the temperature changes, the pipe may change slightly in size, which can lead to deformation of the ceiling.
The bathhouse often uses pipes of a special design, called “sandwich”. They are two pipes of different diameters, one of which is located inside the other. The space between them is filled with a layer of insulation. Not many people know that the outer part of such a structure has almost the same temperature as the inside of the chimney.
Often, in order to quickly heat the bathhouse, owners allow the stove to overheat. If the temperatures of the external part of the pipe exceed the permissible values of 400 ºС, then this threatens the failure of the external part of the sandwich, which will lead to a fire hazard. Therefore, under no circumstances should the distance between the pipe and surrounding objects be reduced.
SNiP 2.04.05-91 (clause 3.83) gives the following recommendations.
The distance to combustible structures when using brick or concrete pipes must be at least 13 cm. For ceramic pipes not equipped with insulation, the corresponding distance will be more than 25 cm, for pipes with insulation - 13 cm.
It is advisable to set these parameters at the bathhouse design stage, since the step when installing floor beams is usually not large. If it is 60 cm, then it will be possible to use only insulated pipes.
The diameter of the outlet part of the pipe is often 11.5 - 12 cm. If a sandwich uses 10 cm thick insulation, then we get a diameter of the outer part of 31.5 - 32 cm. We add the distance recommended for insulated structures of 13 cm on each side, we get a width of 57, 5 cm. That is, this design fits perfectly into the existing distance between the beams of 60 cm.
Now let's see what distance between the beams should be when using an uninsulated chimney. If the internal diameter is 11.5 mm, then we add to it the distance required by safety rules on all sides of 25 cm, we get 61.5 cm. The result obtained does not fit into the existing distance between the beams. Moreover, the diameter of the pipe can be even larger, and then the discrepancy between the size of the chimney and the pitch of the beams becomes even more noticeable.
Types of chimneys for baths
There are two fundamentally different types of chimney:
- Internal (classic). The pipe is routed through the ceiling of the room and the roof.
- External, which became widespread in our country not too long ago. When installing this type of chimney, the pipe is routed through the wall, the main part of it is routed along the street.
Internal chimney
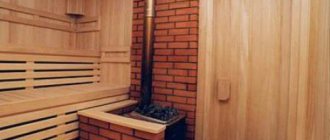
The internal smoke exhaust device in the bathhouse is traditionally used for brick stoves. In this case, the pipe is also made of brick. Install a classic traction control valve. The channel is led vertically from the stove through the ceiling covering, then to the street through the roof.
We recommend that you read: How to properly replace pipes in a sewer system
This type of smoke exhaust device involves two technological openings that require thermal insulation and high-quality waterproofing. Not every person who likes their own steam room can do complex work on their own. The disadvantages of a budget bath include the bulkiness of the brick stove and pipe design. In small steam rooms, such a structure can occupy up to half the area.
An internal chimney with wells and a stove bench can also be made in a bathhouse. A warm wall will allow you to retain maximum heat, which will be useful in northern latitudes. Here it is better to hire a professional and arrange the crossings according to the requirements. At the same time, the internal chimney in the bathhouse will save money on heating.
It is much easier to install a ready-made solid fuel stove in the bathhouse and run the pipe through the wall in the bathhouse with your own hands.
How not to do it.
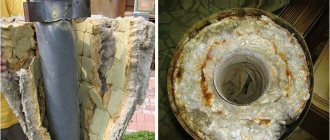
1. Previously, ready-made polyurethane foam made of steel and basalt wool was actively used in our country. Such devices are now considered obsolete and not considered safe!
Firstly, they transfer the thermal load from the pipe to the flange and then to the wooden structures. Secondly, the distances from the inner pipe required by fire safety rules are not observed. All this leads to the risk of fire. Especially over time. When the insulation inside the sandwich bakes, it decreases in volume and sags. Such a passage turns into a time bomb.
Second: you definitely can’t do it like in the photo below. Small drink with poor quality and thin insulation. This is another common mistake.
And in the next photo are the consequences of low-quality polyurethane foam. In this case, the fire was tracked almost immediately and quickly extinguished. Unfortunately, you are not always so lucky.
Do-it-yourself installation of polyurethane foam
The hole should be approximately 0.5 mm larger than the thickness of the channel diameter. This will ensure ease of insertion. Thermal insulation is packed along the outer and inner walls. The distance between them is 1-2 cm.
If you do not have a ready-made kit, you can perform high-quality stove heating in your home without it. To do this, the free space in the ceiling is sealed with fire-resistant thermal insulation, on top of which steel strips are installed. A plate made of heat-resistant metals is installed on it, in which a suitable hole is cut. This plate is secured with a bolted connection. It is most convenient to make it from metal.
When installing it, we comply with all requirements and maintain the established distances to fire hazardous objects. The resulting voids on the side of the second floor or attic should be filled with expanded clay or other non-flammable insulation.
Passage of a brick chimney through a wooden ceiling
Laying out a stove chimney is a complex process where many nuances must be observed. Therefore, it is better to entrust this matter to specialists. In addition, errors during construction can lead to poor draft and fire.
An important point: simple building bricks are not suitable for laying individual parts and the entire chimney. A prerequisite for long-lasting and trouble-free operation of a brick pipe is the use of a ceramic heat-resistant type of brick.
When building structures, it is necessary to lay them out in a special way in the places where the floors pass. The ideal option would be to cut the chimney on the ceiling. The height of this section of the masonry must be at least three rows of bricks. The thickness of the chimney walls when passing through the roof or wall (partition) should be greater than along the main height. The distance to flammable materials must be at least 25 cm.
Two passages of a brick chimney are possible. In the first option, the passage unit is mounted by increasing the thickness of the masonry, the so-called “fluff”. The second option for passing a brick pipe through the attic floor without laying out the “fluff” is carried out in almost the same way as for a metal pipe. In this case, the chimney along its entire height has the same cross-sectional size, without increasing the thickness of the walls.
The hole in the ceiling is secured with a stainless steel sheet or mineralite slab. A window is cut out in the center of the sheet through which the chimney will pass. The length and width of this opening should exceed the similar parameters of the pipe by literally 3–5 mm. When laying a chimney, approximately three or four rows up to the ceiling, a sheet with a prepared opening is placed on it, and then the laying is carried out further up to the height of the finished attic floor. Wooden floors are laid with mineral wool to reduce heat transfer from the pipe. But a more reliable way would be a stainless steel box into which a brick chimney will pass; the distance from the pipe to the walls is also laid with mineral or kaolin wool at 5-7 cm.
Sealing joints
This stage is considered the most difficult when removing through the roof. To do this, install a lower apron made of tin.
A “tie” made of metal is placed under it, the purpose of which is to drain liquid into the drain. Outside, you can install a decorative apron, the purpose of which is to create an aesthetic appearance.
When using a flexible coating, the task of waterproofing is greatly simplified. It is quite easy to bend such material onto a pipe that has been pre-coated with impregnation to create a better fit. It is also recommended to treat the joints of the wall and roof with sealant.
Video tip - assembly of a chimney pipe passing through a wooden ceiling
From the following video you can learn how to properly lay the structure without spending extra effort.
What do building codes and regulations (SNiP) say about this?
SNiP 41-01-2003 Ventilation, air conditioning and heating regulates the main aspects associated with the arrangement of various autonomous heating systems. Since this publication is devoted to an analysis of the design features of the passage of a chimney through the attic floor, it is necessary to pay special attention to section 6.6 - this is Stove heating, and its subsections.
In some cases, these existing rules become a real problem for owners of private houses when arranging their home heating system. Such difficulties arise due to the fact that some of the requirements for modern heating systems and materials used for thermal insulation are clearly outdated. However, despite possible obvious contradictions, regulatory organizations rely on this guidance and demand compliance with established standards.
It must be remembered that if a stove is installed in a newly built house, then it will be necessary to legalize its presence with the fire services, otherwise it will simply not be possible to register the property. Such a permit is issued on the basis of a document drawn up by an employee of the controlling organization who accepts the building. If during the inspection serious violations of current standards are discovered, then there is no escape - the mistakes will have to be corrected. Therefore, it is best not to immediately deviate from the established standards.
The design and location of both the stove itself and its chimney are strictly regulated by current building codes and regulations
Not everyone likes the dry language of regulatory documents, and that is why they are simply afraid to look into them. Let's try to outline these rules for them in a few paragraphs:
- The thickness of the walls of a brick chimney in the area of its passage through the floors, roofing or walls (partitions) must be greater than along the main height. This thickening is called cutting.
According to existing standards, the cutting thickness is calculated taking into account the thickness of the pipe itself. Craftsmen often use the colloquial term for smoke in this regard. So, the standard cutting size is:
- 500 mm if the pipe borders a building structure made of flammable material (which, of course, includes a wooden floor).
- 380 mm - for those cases when the materials of the building structure are protected from fire by a layer of plaster of at least 25 mm reinforced with steel mesh, or a metal sheet with an asbestos lining underneath with a thickness of at least 8 mm.
- The height of the chimney cut must be at least 70 mm greater than the thickness of the ceiling. By the way, SNiP does not stipulate from which side these millimeters should look out - from below, on the ceiling, or in the attic. Judging by the forums, there is also no unanimity among the masters. But, as a rule, customers ask for a flat ceiling in the room, so a 70-mm step can be located in the attic. However, if you again read the forums, you can come across cases where fire inspectors demanded a 70-mm side at both the top and bottom. And it was not possible to convince them otherwise.
- It is not advisable to attach the chimney section rigidly to the floor materials or to rest it on any building structures. True, there is no categorical prohibition in this regard, but one should still adhere to such a recommendation so that the deformation of one element that occurs for some reason does not entail the destruction of another.
- The space between the cutting and the building structure is filled with non-combustible materials. The list of materials is not specified, but in practice those that can be classified as thermal insulators are usually used - expanded clay, vermiculite, mineral wool.
- If the pipe is cut through the opening of a wall or partition and flammable materials, then its thickness cannot be less than the thickness of the partition itself. In this case, the cutting must be done along the entire height of the wall.
- When the pipe passes through the roofing, cutting is also often performed, which in this place is called otter. In any case, the distance from the outer walls to any elements of the roof structure made of combustible materials must be at least 130 mm for a brick pipe, and 250 mm for a ceramic pipe without thermal insulation (when using insulation with a heat transfer resistance of at least 0.3 m²×ºС/ W – 130 mm). The roof section at the passage point should only be made of non-combustible material.
- When constructing a stove and its chimney, it is important to maintain the distance to walls and partitions. This gap has its own name - retreat. The amount of derogation is also regulated by the requirements of SNiP:
What is it used for?
PPU is designed for pipe passage through wall and ceiling ceilings; it is a round or square box with a hole. The main task is to ensure the protection of wooden floors from overheating, since during operation the temperature of the external contour of the chimney increases and heats objects in the immediate vicinity.
Such a device can be purchased in specialized stores or assembled with your own hands. When choosing a finished product, it is necessary to take into account the diameter of the chimney, as well as the location of the stove and ceilings.
For thermal insulation of the unit, basalt cotton wool rolls with a foil screen, which can be used at high temperatures, are perfect.