In a private house or in a bathhouse with stove heating, there is always an increased risk of fire due to the close proximity of the heat source to flammable materials. Therefore, the installation of stoves and fireplaces and, in particular, internal chimneys requires compliance with fire safety rules established in SNiP. The most dangerous area of a stove heating system in a house is the place where the chimney pipe passes through the ceiling, ceiling and roof truss system. Since the chimney pipe becomes very hot when smoke and gases pass through it, if flammable materials are located close to them, they can ignite and cause a fire. You can avoid a dangerous situation by observing the requirements for chimney installation and using special ceiling-passage units.
Step by step installation guide
If you do not have enough skills in this area, then it is better to choose a strictly vertical chimney with a pipe cut on the ceiling of the bathhouse. Installation is carried out according to the following algorithm:
- The first step is to purchase the materials that will be needed in the process. These include: directly pipes of the correct diameter, clamps, rubber gaskets for waterproofing, expanded clay, umbrella, fire-resistant asbestos;
- Before installing the stove, the surface behind it is polished using fire-resistant asbestos;
After installing the stove structure, we proceed to installing the chimney in the bathhouse. To do this, a damper is installed on the stove pipe, which is the primary part of the chimney, equipped with a special valve. It serves to regulate the draft force in the chimney. If the valve is half closed, the flow of passing air will be reduced, and therefore the heat in the bath will remain longer; A drawing of the future hole is made in a predetermined place on the ceiling. Its diameter must exceed the diameter of the chimney. Next, according to the finished drawing, an opening for the pipe is cut out. We strongly recommend that you install a metal box with which the chimney will cut into the ceilings. After the pipe is passed through this unit, it is tightly covered with expanded clay or laid with basalt wool. The part of the ceiling closest to the pipe is cleaned with fire-resistant asbestos; Next, using the same principle as in the case of the ceiling, a hole is cut in the roof. In order to carefully guide the pipe through the rafters, bends are used
It is important to remember safety, so if the material with which the roof is covered is flammable, the outlet location is protected with a metal or asbestos sheet; When the pipe is removed through the roof, it is necessary to attach a thick rubber seal on top of it, which serves as waterproofing for the chimney. The seal is treated with a fire-resistant sealant to completely prevent moisture from getting inside; The chimney components must be installed until you reach the desired height of the structure
After this, a special umbrella, called a “fungus”, is attached to the top of the pipe to protect it from various atmospheric precipitation, debris and tree branches.
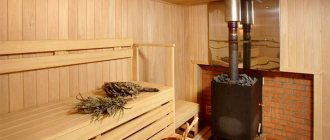
Information. The key feature of a well-equipped chimney is that even 7-8 hours after heating the bathhouse, heat remains in the room.
Final works
Cutting a chimney pipe on the ceiling or roof with your own hands is finished. All that remains is to dry the oven. But before that, we check the draft in the pipe. To do this, we bring the torch to the open door of the firebox; if the flame draws inward, the draft is normal. If there is insufficient ventilation, you will need to remove construction debris from the pipes and only then proceed to the next stage of the final.
We put no more than 3 kg of firewood in the firebox and set fire to it. During the first burning of wood, grease, dirt and paint materials will burn off from the surfaces of the stove, and moisture will be removed from the bricks. Therefore, we recommend opening windows and doors.
After the surfaces have cooled, we dry the stove a second time and check all the joints and the chimney itself for leaks and that there are no leaks of gases into the room. We eliminate possible malfunctions and only after the final check can we begin to operate the furnaces.
Only by qualitatively completing the main stages of work and carefully checking the finished chimney, you will be able to protect your home from fires and inhale the fragrant smell of burning wood, and not carbon monoxide pouring out of the cracks of the chimney.
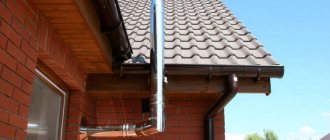
Exiting the pipe through the roof
When equipping a pipe passage through the roof, care must be taken to ensure that two conditions are met:
- passages through the roofing pie must be fireproof;
- the under-roof space should be protected as much as possible from moisture penetration.
Exiting the chimney through the ridge makes all the work quite simple. Due to the fact that the formation of snow pockets on the ridge is impossible, it is possible to achieve better protection against leaks. But at the same time, this method of installing a roof passage means that in the design of the rafter system the ridge beam will not have load-bearing functions. And this requires additional strengthening of the rafters themselves. If there is an attic, installing additional rafter supports may be undesirable or simply impossible.
That is why developers prefer installing a chimney passage on the slope, directly at the ridge. A snow pocket also does not form in this place, and besides, the rafter system does not need additional strengthening. But besides this, the choice of location for the roof chimney is also influenced by the location of the heating equipment. It should be remembered that the horizontal sections of the chimney should not be more than 1 meter in length. In some cases, it is the location of the boiler that becomes the reason for choosing the method of passing the chimney pipe through the ridge.
Professionals recommend avoiding installing a passage element in the valley (the point where two slopes meet an internal corner), since it is especially difficult to install a roof passage at this point. As a result of rain and snowfall, the junction may not be able to cope with moisture and, as a result, the roof will leak.
It is important to maintain a distance between the rafters and the roof in the range of 25-30 cm. If the roof is made of combustible materials (various types of roofing felt, soft roofing), then a gap of 13-25 cm must be maintained between the material and the chimney wall. If the material is resistant to high temperatures, then this gap can be left minimal, and the pipe on the roof of the house is removed only from the sheathing
If the material is resistant to high temperatures, then this gap can be left minimal, and the pipe on the roof of the house is removed only from the sheathing.
If the roof is a “pie” consisting of hydro-, steam- and thermal insulation, then when installing the passage element, some difficulties may arise due to the violation of the integrity of this layer. As a result of an error, the protective properties of the roof can be significantly reduced. In this case, the chimney can be installed in a separate box, which will isolate the roofing materials from the hot walls. The distance between the inner wall of the box and the chimney should be about 15 cm, while the free space is filled with non-flammable heat-insulating material. It is recommended to use mineral or basalt wool, as it is resistant to moisture.
The waterproofing and vapor barrier is applied to the box using the standard method: the “pie” is cut in the shape of an envelope. The film sheet is brought to the rafters and cross beams, where they are fixed with nails or staples. Then the waterproofing layer is pressed on top with bars, and the vapor barrier is pressed with the base frame under the finishing materials of the attic or attic. After this, the joints of the films and the box are treated with sealant and glued with a special tape.
A number of rules for fastening the passage
To correctly install a metal chimney to a wall, you must follow simple rules:
- For a pipe with a tee and a condensate drain in its lower part, it is best to use a special bracket.
- When installing sections one into another, the chimney should be secured to the wall using clamps every meter.
- It is necessary to ensure that the fastenings do not coincide with the joints of the sections.
- When going around the roof overhang, it is necessary to use elbows whose angle is only 30° or 45°.
If the installation of the drainage system has not yet been completed, then you should leave space for laying the gutter using fasteners of a suitable length.
Is it possible to make a chimney in a small bathhouse without making holes in the roof?
Hello! I want to make a small steam room, 4-5 squares. I don't want to put holes in the roof. Is it possible to bring the chimney directly into the wall and then up? Oleg
Expert answer
Hello, Oleg!
The chimney you are interested in is called an external (or attached) chimney and is widely used by European and American builders. In Russia, they prefer internal chimneys - they allow you to increase the heat transfer of the stove and correspond to domestic architectural traditions.
To lead the pipe through the wall, special elbows are used, or, in other words, bends with bends at different angles, which allows installation to be carried out in the most convenient way. From the outside, a tee is installed on a horizontal or inclined section, to one branch of which the vertical part is connected, and the second is closed with a plug and subsequently used to clean the channel from soot and carbon deposits. To secure the chimney in a vertical position, special clamp holders are used.
To properly install an attached chimney, we recommend listening to the recommendations of experienced stove makers:
- to avoid a drop in draft and also reduce soot formation, the length of the horizontal section should not exceed 1 m;
- the upper cut of the pipe must be protected with a cap, which will protect the gas duct from precipitation;
- the outer part of the chimney must be insulated - this will prevent the formation of condensation and normalize draft in winter;
- the use of round pipes is preferable to rectangular ones, due to the fact that the former create less resistance to the movement of heated gases;
- the cross-sectional area of the chimney must correspond to the power of the heating unit;
- Where the pipe passes through the wall, it is necessary to install a fireproof cutting. Joints inside cuts are not allowed.
We, in turn, recommend that the horizontal section be arranged under the ceiling. Thus, the hottest part of the chimney will be located inside the room, giving off additional heat. In addition, a water heat exchanger is often installed in this area, with the help of which hot water is obtained.
As you can see, a properly designed external chimney allows you to get the same benefits as an internal one, and at the same time does not require, as you say, “to make holes in the roof”, although it has a slight complication in terms of configuration.
stroy-banya.com>
Other articles
Traction concept
Do not allow dripping condensation to form in the chimney, which gradually destroys the inner surface of the channel. This especially happens in the cold season, when there is a significant decrease in outside air temperature. The process of moisture droplets falling out in the chimney also causes disruption of normal draft. A decrease in the rate of passage of gases from combustion products occurs not only with the internal formation of condensation; the draft force is affected by the humidity of the outside air, which can have different values depending on the weather. A deflector installed above the chimney will help you ignore this indicator.
Metal knot
Today, sandwich type pipes are widely used. Essentially, these are two metal cylinders of different diameters inserted into one another.
But how to do everything? The work will be carried out as follows:
- First, you need to purchase a ready-made metal feedthrough, which is otherwise called a box due to the characteristic shape of the cube. It can also be made independently from galvanized iron, taking into account the diameter of the pipe and the thickness of the ceiling material. In this case, the diameter of the hole should be slightly smaller than the size of the chimney of the ceiling-passage unit.
- The next step is to prepare the pipe for installation. Due to the thinness of the metal, it is not able to isolate the heating chimney from combustible material. For this you can use basalt fiber with a foil surface. It is glued to the inner walls of the box, as well as to those parts that will come into contact with the ceiling.
- A place is marked on the ceiling, which is subsequently cut out with a jigsaw.
- Now you can install the box.
- A special metal panel (often made of stainless steel) with a hole cut in the middle should be fixed to the ceiling, and its diameter should correspond to the size of the circle in the box.
- At the final stage of arranging the ceiling-passage assembly, you should arrange a chimney on the floor of the second floor (if it is a house) or attic (whether it is a one-story house or a bathhouse). This is done using the same panel or metal sheet with a hole cut out in the middle.
- The location of the pipe must be calculated in such a way that the junction of its two parts does not fall on the internal cavity of the box, which is already located in the ceiling. It should be lower or higher.
As previously noted, instead of basalt fiber it is better to use other materials - sand (although also not the best option), clay, expanded clay.
The material will not only serve as insulation, but will also be a good heat insulator.
What thermal insulator to use
After the device is fixed to the ceiling, they go up to the attic or second floor and fill the gap between the outer wall of the pipe and the beams with heat insulator.
Basalt wool can be used as thermal insulation. But be sure to check that the operating temperature range should be greater than 600°C.
You can use mineral wool or clay to insulate the pipe.
Some people think this option is not the best. Firstly, during production, resins are used as a binder, which release formaldehyde when heated. Secondly, condensation sometimes runs through the pipe. And mineral wool (and basalt wool too) lose their heat-shielding properties when wet. And when they dry, they are only partially restored. So this option is really not the best.
The penetration is also covered with expanded clay of medium and fine fractions. This is a natural material that is relatively light in weight. Even if it gets wet, it then dries and restores its properties. When wet, the thermal conductivity increases slightly, but it is already worse for expanded clay than for mineral wool.
In the past, sand was often used. The option is not bad in all respects, except for one detail: it gradually wakes up through the cracks. Refilling the sandbox is not difficult, but constant sand on the stove is annoying.
If we talk about natural heat insulators, then you can use clay. It is diluted to a paste-like state and the entire gap is covered. Sometimes expanded clay is used as a filler.
One of the heat insulators is expanded clay
Here is a review of the use of clay when passing a bath pipe:
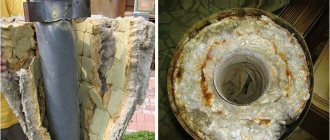
“Clay rules in cutting! I dismantled the chimney in my bathhouse. Or rather, I took apart what was left: there was a lot of snow, and when it melted, it blew off the entire top. Once you change the top, you need to look at the bottom: the pipe has been standing for 7 years. So here it is. There is zero burning inside, and there is no burnout of the pipe either. Condition: as soon as installed. My penetration is lined around the perimeter with basalt wool, and then everything is covered with clay. This is definitely the best option."
Not everyone recommends using insulation in the passage unit. There is an opinion that it is better to leave the gap unfilled: this way it will be possible to avoid overheating and burning out of this section of the pipe - it will cool better due to air blowing. This may be true, but the radiation from the heated pipe will dry out the nearby wood, and in this case the temperature of spontaneous combustion is significantly reduced - to +50°C.
As you can see, the pipe burned out
There are several ways to avoid overheating. The first, and most rational, is to use the heat that flies out into the pipe and heats it to extreme temperatures for your own needs. There are three options:
One way to avoid overheating is to place stones on the pipe
- Make a water jacket on the metal chimney and use hot water for showering or heating. The system is not so simple; it also requires a remote tank, as well as pipe connections, cold water supply, etc. But temperatures above the water jacket will not be nearly as high, and the pipe will not burn out.
- You can also heat water, but it’s easier: install a samovar-type tank. Hot water is also provided, the chimney does not overheat and is protected. But there are some nuances here: do not let it boil, drain the heated one in time, add the cold one. And doing this is not entirely convenient, since the tank is located quite high: above the stove on a pipe.
- Adapt a net for stones. The water will have to be heated in a different way, but the advantage here is this: after the procedure is completed, the stones dry the bath. Here, too, difficulties may arise: the weight of the stones is considerable, it is unlikely that you can do without support, unless you use the factory version (on the right in the figure). In a homemade version, a structure will be needed to redistribute the mass.
When using any of these methods, the pipe temperatures in the ceiling passage are significantly reduced. The likelihood of burning becomes very small. That's not all. There is a way - simply cool with air. To do this, another one of larger diameter is put on the heat-insulated pipe. A grate is made at the bottom and top through which air enters/exits. For a steam room this is not an option - it will draw out all the steam, but for a washing room it can be used. The method is especially good in the attic and when passing through the roof.
Device for passing a round pipe through the ceiling of a bathhouse with different types of polyurethane foam
The most convenient option for installing a chimney for a wooden bath is a ready-made factory-made polyurethane foam for the chimney, taking into account the diameter of the pipe. Before installing the unit, time is devoted to preparing the surfaces in contact with the wood finish of the ceiling, as well as the inside of the box surface, which needs proper thermal insulation.
When it is necessary to install factory-type polyurethane foam, before starting work, it is covered with a heat insulator on all sides except the front. The optimal solution is practical and environmentally friendly basalt wool with increased resistance to high temperatures. This heat insulator contains binders that can withstand temperatures up to 1000 degrees. An additional advantage will be the insulation of the pipe with foiled wool to improve the safety of the structure during operation.
As soon as the ceiling passage of the chimney is correctly and reliably insulated, we begin to prepare the site for installation:
- To do this, markings are made on the surface of the ceiling - at the location of the chimney.
- The contours of the hole should be slightly inferior to the parameters of the front panel of the assembly so that there are no difficulties with fixing it to the casing with self-tapping screws.
- A hole is cut along the contours, the edges are insulated with the same insulator that was used to protect the pass-through assembly.
- To increase the level of safety, sheets of thin but durable metal are additionally used.
- A ceiling-passage assembly for the bathhouse is installed in the prepared hole; for convenience, it is initially placed on the pipe, after which the structure is secured in full assembly.
The finished passage with the pipe is secured with self-tapping screws using pre-prepared holes.
ugra.ru
Summary:
Ceiling pass-through without insulation Diameter: 115 mm
Review:
Chimney diameter 115 mm;. CEILING PASSAGE UNIT WITHOUT INSULATION UNDER SANDWICH PIPE F 200, 0.
ceiling passage unit with insulation, 115 mm - buy with delivery throughout the Russian Federation. Description, characteristics, photos | Beneficial loyalty program - discounts and bonuses on the Maxidom card.
Ceiling passage unit 600*600 (500*500) (430-0.5/OTs-0.5) f 115 45.78 rub. ̶S̶T̶A̶R̶A̶Ya̶ ̶TS̶E̶N̶A̶: 50.358 rub. In this case, with an internal diameter of 115 mm, the safe distance from the outer edge of the pipe to flammable materials is 250 mm. The distance between the beams in this case should be 250 mm * 2 + 115 mm = 615 mm.
HOMEMADE SANDWICH PIPE. For a BATH WITH YOUR OWN HANDS
Comments 12
I agree with you, thanks for the explanation. As always, everything ingenious is simple.
Absolutely nothing.
I agree, it's a funny thing
Now one question: who will get me out from under the table!?
Thank you, thank you
Certainly. This happened to me too. Let's discuss this issue. Here or in PM.
Of course, I apologize, this doesn’t suit me at all. Thanks for the help.
I consider, that you are mistaken. Let's discuss this. Write to me in PM.
What can I say here?
I agree. I agree with everything said above. We can communicate on this theme.
Interesting. just the name is kind of frivolous.
Add a comment Cancel reply
- &
- (black)
- 100
- 1000
- 2.0
- 200
- 300
- 500
- ABS
- ASUS
- Audio
- Benro
- Blue
- Bluetooth
- Bosch
- Box
- Brother
- Bulros
- Canon
- Case
- Cisco
- Classic
- Digital
- DVD player
- Electric
- Electrolux
- Epson
- Falcon Eyes
- Galaxy
- Garmin
- HAMA
- HUAWEI
- IPhone
- Kit
- LED
- Levenhuk
- Light
- Master
- Mini
- Nikon
- Office
- Panasonic
- Philips
- Pioneer
- PLA
- Plus
- Power
- Premium
- Pro
- Pro sKit
- REXANT
- Samsung
- Series
- Silver
- Smart
- Sony
- Style
- SUPRA
- TV tuner
- Ultra
- VoIP phone
- White
- Wi-Fi router
- Xiaomi
- A4,
- Automotive
- Adapter
- Battery
- Accessories
- Acoustic system
- Antenna
- Art.
- Audio cable
- White
- Wireless
- Binoculars
- Block
- Bracelet
- Keychain
- Paper
- Hob
- Webcam
- Fan
- Camcorder
- Vinyl
- Wine
- External
- Water
- Undermount kitchen sink
- Flash
- Built-in
- Gamepad
- Grill
- Door
- Double
- Holder
- Children's
- At home
- Home
- Board
- HDD
- Lock
- Charger
- Charger
- Green
- Gaming
- Integrated amplifier
- Interactive
- Infrared heater
- Cable
- USB cable
- Balanced audio cable
- Coaxial cable
- Microphone cable
- Camera
- Fireplace hood
- Karmana
- Map
- Cartridge
- Book
- Ring
- Switch
- Complex
- Set
- Computer
- Computer case Black
- Envelope
- Controller
- Skates
- Box
- Red
- Fastening
- wall bracket
- Laminator
- Lamp
- Ribbon
- License
- Magnifier
- Magnetic
- Marker
- Motherboard
- Car
- Typewriter
- Media player
- Metal
- Weather station
- Microwave
- Microscope
- Chip
- Microphone
- Mm)
- Mm,
- Mobile
- Model
- Module
- Monopod
- Music Center
- Mouse
- Kit
- Navigator
- Storage device
- Storage water heater
- Floor
- Wrist watch
- Nozzle
- Wall
- Board game
- Headphones
- Knife
- Laptops
- Lens
- Optical drive Black
- Office
- Air purifier
- Glasses
- Plastic bag
- Panel
- Adapter
- Printing
- Power
- Tablet
- Plastic
- Plastic
- Player
- Gift
- Backlit
- Stand
- Pillow
- Shelf
- Polarizing
- Portable
- Printer
- Projector
- CPU
- Remote controller
- Size
- Connector
- Frame
- Walkie Talkie
- Repeater
- Socket
- Pen
- Manual
- Backpack
- Napkin
- Alcohol mashine
- Lamp
- LED
- Selfie
- Grey
- Network
- Signal
- Blue
- Cooling system
- Scanner
- Folding
- Dictionary
- Cm)
- Cm,
- Smartphone
- Mixer
- Split system
- Glass
- Stand
- Washing machine
- Rack
- Table
- Studio
- Bag
- Tablet
- TV
- Telephone
- Thermometer
- Trimmer
- Pipe
- Cabinet
- Humidifier
- Universal
- Destroyer
- Gains
- Amplifier
- Device
- Iron
- Filter
- Flash drive
- Camera
- Cameras
- T-shirt
- Fridge
- Color
- Color:
- Colored
- Digital
- Kettle
- Watch
- Black
- Case
- Mop
- Sewing machine
- Closet
- Gateway
- PC.
- Tripod
- Manfrotto tripod
- Brush
- Forceps
- Screen
- Electric
- Electric shaver
Features of the passage for a brick chimney
Among materials that can maintain temperature for a long time, maintaining a comfortable indoor microclimate, brick rightly occupies one of the leading positions
When it is necessary to properly equip a pipe passage for a brick kiln, the main thing you should focus on is the installation of a special penetration to thicken the chimney wall in the area of contact with the ceiling
If it is not possible to make a penetration, then a hole with a diameter slightly larger than the diameter of the chimney is prepared in the surface of the ceiling base, then following the previously described algorithm for drilling a round stove through the ceiling:
- arrange protection for the edge from metal strips or mineralite;
- sheathe the entrance from the living space with a metal sheet;
- fill voids in the attic or second floor area with heat-insulating, high-temperature resistant material;
- mask the cutting from the attic or second floor with a metal sheet.
With such a passage arrangement, you can be sure that the brick pipe is reliably insulated and has retained its aesthetic component.
Construction of a crossing over the ceiling
Let's look at how to make a chimney in a bathhouse through the ceiling. This can be done in two ways.
- Use ready-made cuts;
- Install the pass-through unit with your own hands.
Application of ready cuts
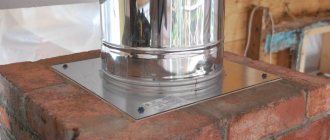
In order to fully protect the roof elements from the effects of high temperatures that arise when combustion products pass through the chimney, and at the same time secure the pipe in the required position, the so-called ceiling cutting is used.
To construct a chimney passage through the ceiling, you need to purchase a chimney passage through the ceiling at a hardware store. It is a box made of mineralite or metal connected to a stainless steel plate. There is a hole in the center of the structure into which the sandwich is placed. Such a device also performs, among other things, a decorative function. A plate attached to it covers the ceiling hole, giving it a more aesthetic appearance. In addition, insulation rests on this plate, which fills the space between the ceiling elements and the pipe.
They come in two types:
- with insulation, looking like two plates combined with an insulated pipe;
- without insulation, which is a box made of metal, which must be filled with insulating materials with your own hands and a hole intended for installing pipes.
Cuttings come in different forms. Sometimes they look like a metal cylinder, in which case the plate is significantly larger than it. If such a device is used, and the ceiling hole is square in shape, then it is still necessary to comply with all the listed parameters required to ensure the fire safety of the structure. At the same time, it is necessary to strengthen the protection of wooden bath structures using metal strips.
https://youtube.com/watch?v=OloeKgcB2Yo
Installation of a ready-made adapter
- Cut a hole in the ceiling, taking into account the overall dimensions of the cut;
- If necessary, carry out insulation;
- Install the chimney passage unit into the ceiling;
- Bring the pipe to the ceiling, and its length should be 100-150 mm less than the height;
- Connect the section of pipe located on top of the roof;
- Seal all joints that occurred during the passage of the chimney through the wooden ceiling.
Installation of an adapter made by hand
It is possible to carry out a chimney through the ceiling in a bathhouse without factory components.
Let's look at how to make a ceiling passage unit with your own hands. To do this you will need:
- chimney pipe;
- material chosen for thermal insulation of the pipe passage through the bathhouse ceiling;
- metal plates.
The pipe in the bathhouse through the ceiling and roof is installed following the recommendations described below.
- Cut a hole in the ceiling that is 13-18 mm larger than the size of the pipe;
- One edge of the pipe is inserted into the hole made;
- From inside the room, a plate is placed on the ceiling;
- The chimney passage through the ceiling is insulated. It is optimal to make thermal insulation for the ceiling passage unit from mineralite.
- The space remaining between the ceiling and the plate must also be filled with a layer of insulation.
- The plate is attached using self-tapping screws.
When considering how to install a pipe in a bathhouse through the ceiling, be sure to pay attention to such an important factor as choosing a suitable location for the passage of the ceiling for the chimney. The main function of the adapter is fire protection
The main function of the adapter is fire protection
It can be installed either directly on the ridge, providing good traction and no accumulation of sediment; or next to the ridge.
Cutting a chimney installed by yourself will require a little more time than purchased in a store, but will help save money, which is so necessary during construction.
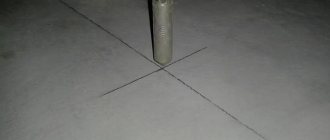
When installing a chimney in a ceiling-roof slab, craftsmen are often faced with such a difficulty as the need to make a chimney in a bathhouse through the ceiling strictly vertically, placing it in the center of the passage. To do this, we can recommend using a plumb line. It is lifted up and lowered into the center of the chimney. This point is marked on the ceiling and used as an appropriate mark before making a pipe passage through the ceiling of the bathhouse.
Make it yourself or buy it?
You can make a ceiling assembly at home, and it can be no worse than a ready-made store-bought version. But this will require time, skill and a special tool:
- metal scissors;
- Bulgarian;
- riveter;
- manual bender, etc.
In addition, do not forget that you will not only have to watch the video or read the SNiP yourself: you will also need to find time to go to the hardware store. There is no talk yet about the assembly and installation itself. But if you still decide to play “crazy hands”, then especially for you I have prepared step-by-step instructions for assembling the ceiling-passage assembly.
approximate price
For those who do not have time and prefer to spend their weekends with family or friends, I have collected current and inexpensive offers of ceiling units on the market.
Types of ceiling penetrations
When crossing the ceiling, it is necessary to protect the “pie” materials from heat, and also somehow fix the pipe in a certain position. This task is accomplished by a ceiling cutout or, as it is also called, a “passage unit.”
The pass-through units are industrially manufactured. They are a box made of metal or mineralite, to which a stainless or galvanized steel plate is attached on one side. A hole is made in the middle of this assembly into which a sandwich is inserted. The plate on the side of the room closes the hole in the ceiling, decorating it. It also serves as a support for the heat insulator, which is used to fill the gap between the pipe and the floor beams for better thermal insulation.
This is a mineralite ceiling penetration. View from the attic
There is no disagreement regarding what material to use for the penetrations in the bathhouse: only stainless steel. The fact is that at temperatures that are typical for steam rooms, galvanization releases far from the most useful substances. Therefore, there is only one option: stainless steel.
Everything is installed simply. If the ceiling was made without taking into account the passage of the pipe, a square hole is cut in the right place (between the beams), which is 1-2 cm smaller than the size of the decorative panel. Beams and boards are covered with a layer of thermal insulation. If available, you can nail down strips of mineralite, basalt or asbestos cement cardboard (asbestos is harmful, so use it only as a last resort), just a strip of stone wool insulation. In some cases, padding of the insulation with metal strips is required (when it is needed, see below).
You can't do that - you had to cut a square hole. And the lining on the ceiling near the pipe is already charred...
When installing a pipe on a stove, the device is placed on a straight section that will cross the ceiling. The passage unit simply rises to the desired level. A strip of thermal insulation is placed under its edges that touch the ceiling boards, then everything is fixed with self-tapping screws. In many units, manufacturers even make perforations for self-tapping screws, so even this is not a problem.
The configuration of these products varies. Sometimes a metal cylinder is made around the hole for the pipe. The edges of the decorative plate protrude significantly beyond this cylinder. When installing a pass-through unit of this type, the hole is still cut in a square shape. A circle is also possible, but from the pipe to its edge there must be a distance of at least 130 mm if the pipe is insulated, and 250 mm if it is without insulation
With this option, please note: the size of the plate should be sufficient to mask the hole. In addition, with this form of passage through the ceiling, it is imperative to protect the wood of the ceiling not only with heat insulators, but also to cover it with strips of metal
Pass-through units through the ceiling come in different configurations
There are passage units in which there is no cylinder around the pipe, but there are outer sides around the perimeter. They are made of metal, and can also be made of mineralite. If the sides are made of metal, the edges of the cutout in the ceiling must be lined with a heat insulator (for example, basalt cardboard or the same mineralite). If the sides are made of mineralite, then they themselves are a good heat insulator. So additional thermal insulation of the edges of the cutout is not necessary (but you can play it safe).
Preparation and installation of penetration
The method of installation and insulation of the penetration depends on the specific type of construction of the unit, as well as the width and material of the chimney pipe.
Preparatory work for installation of the unit may include:
- cutting a square hole in the ceiling of a bathhouse or house, if it was designed without taking into account the installation of stove equipment and a chimney;
- thermal insulation of beams, rafters and other roof elements using non-combustible materials
Attention! If the ceiling and rafter system in the bathhouse are made of wood, you can cover the section of the structure with special fire-retardant compounds that prevent fire and the spread of flame. Minerite, basalt wool, and asbestos-cement cardboard can be used as insulating materials.
Some experts also recommend checking the load-bearing capacity of the ceiling in the area where the chimney pipe is supposed to pass. If the strength of the structure is in doubt, then it is better to additionally build a frame from wooden beams, making a square window from lumber corresponding to the area of the existing unit. The frame cross members must be firmly fixed to the beams of the rafter system. It is also advisable to treat the finished frame with a fire retardant.
We recommend that you read: Sealants for durable connections of sewer pipes
Pipe passage through a chimney without a factory passage unit
It is possible to remove the chimney without a passage device. In this case, the edges of the hole in the ceiling are also sealed with a fire-resistant heat insulator, and metal strips are placed on top of it. A protective plate made of non-flammable material is put on the sandwich coming from the oven, in which a hole of a suitable diameter is cut, and holes are drilled along the edges for fasteners. Traditionally this is a sheet of metal. Next, the sandwich is passed into a hole in the ceiling and fixed there using some non-flammable guides. For example, you can use drywall profiles or something similar. The main thing is to securely fasten the pipe and observe the basic rule of fire safety: there must be a distance of at least 36 cm from the edge of the pipe to the flammable material.
You can make a passage through the ceiling with your own hands
Important! When installing and securing the chimney, keep in mind that the pipe changes its size due to thermal expansion. It must be secured so that it can move relative to the roof. Then from below (from the ceiling) the pipe is hemmed with non-flammable material
From the attic or second floor side, the voids formed in the groove are filled with a heat insulator. The requirements for it are still the same: tolerance to high temperatures. Expanded clay may be the most budget-friendly. Actually, this completes the exit of the chimney pipe through the ceiling
Then the pipe is lined with non-flammable material from below (from the ceiling). From the attic or second floor side, the voids formed in the groove are filled with a heat insulator. The requirements for it are still the same: tolerance to high temperatures. Expanded clay may be the most budget-friendly. Actually, this completes the exit of the chimney pipe through the ceiling.
You can make a passage through the ceiling with your own hands
Homemade ceiling cuts
It is possible to install a chimney through the ceiling in a bathhouse without using factory components. You will need:
- Find or cut a sheet of stainless steel that will cover the hole of the required size.
- In its middle, cut out a circle, one or two millimeters larger than the diameter of the pipe that will pass through the ceiling. If it is a sandwich, then slightly larger than the outer diameter of the sandwich.
- Cut a hole of the required size in the ceiling.
- The edges of the cutout along the perimeter are sealed with a layer of basalt wool.
- Place strips of metal on top of the heat insulator.
- You begin to assemble the chimney. Place the first single-walled piece of the stove tube, put a stainless steel square with a cut-out hole on it, and install the sandwich.
One of the options for fixing a pipe in a cut hole - Place the pipe strictly vertically. From the attic side, use metal strips to secure it in the desired position. The planks serve only as guides. The chimney itself does not need to be fixed: it should move freely when changing dimensions (occurs when heating and cooling).
- On the side of the room, place a layer of heat insulation between the ceiling and the plate, and screw the plate onto self-tapping screws. It is better to drill holes in advance: four along the edges, and at least one or two on each side.
- Next, insulate the resulting passage.
As you can see, ceiling cutting is easy to do with your own hands. This is the simplest, but quite reliable option. Another option is presented in the video. The work is more complex, but if you have the appropriate skills, this option of passing a pipe through the ceiling can also be done with your own hands.
Node installation
Having prepared the window in the ceiling, you can begin installing the ceiling-passage assembly.
A metal or mineralite box is installed in the cut opening. The structure is fixed using purchased or standard fasteners (bolts, self-tapping screws), which are screwed directly to the ceiling.
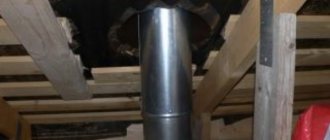
- After the ceiling-passage assembly has been installed, it is necessary to install the chimney pipe, first putting it on the stove, then leading it through the box into the attic, and from there through the outer layer of the roofing pie (a hole is also pre-cut in it). After the chimney pipe is removed, it is insulated with a selected non-combustible material (you can put a layer of expanded clay on top of the box).
- Another important final stage of work is protecting the structure from moisture. Since when the pipe passes through the roofing pie there is a gap between it and the materials, water will flow into the attic through it. To waterproof the joint, it is recommended to use various finished products - the so-called. ties and aprons, which are selected according to the diameter and geometry of the chimney and are installed using simple fasteners. For a round chimney, you can purchase special ready-made penetrations with a flexible sleeve, choosing a product to match the color of the roof and other parameters. They can be installed using self-tapping screws or glued using special adhesives. It is also recommended to use additional liquid and paste sealants to seal the edges of the protective elements. If waterproofing is carried out correctly, the area where the chimney passes through the roofing pie will always be protected from rain and snow.
Regulatory requirements and fire safety rules
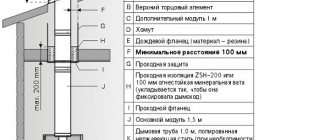
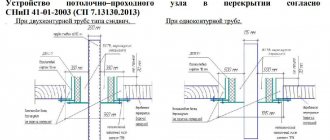
The exact requirements and figures regulating the rules for installing a chimney and its passage through the roofing and rafter system are contained in SNiP 41-01-2003, namely in section 6.6. The key condition that determines the safety of the chimney pipe through the roof is that the maximum heating temperature of surrounding structures and materials should not exceed 50°C.
We recommend that you familiarize yourself with: Shaped products for the transition from a round pipe to a rectangular air duct
This cannot be achieved with direct contact with the pipe.
Therefore, the main ways to protect the roofing pie, rafter system and ceiling from fire are to protect them with an insulating layer or to leave empty space between the chimney and the components of the roofing structure.
If a factory-made metal chimney is used, it is necessary to study the manufacturer’s documentation and adhere to the recommendations given in it regarding the installation of the passage unit.
Traditionally, to protect floors and rafter systems when using a metal chimney pipe, special protective sleeves made of non-combustible material are used. Its diameter must be greater than the cross-sectional area of the chimney.
Regardless of the distance between the outer wall of the chimney and the surrounding structures, the passage through the roof must be sealed with non-combustible materials. Ideally, the class of insulating material should be NG, in extreme cases - G1.
Cutting protection
To protect against overheating, the ceiling in the area where the chimney passes must have a thickening, which in professional jargon is called a groove:
- The cutting thickness when passing a pipe through an area with flammable materials (primarily wood) must be at least 500 mm.
- If the structure is protected by non-combustible materials (for example, a 25 mm layer of plaster reinforced with steel mesh), then the cutting thickness can be reduced to 380 mm.
- The height of the chimney cut should be at least 70 mm greater than the thickness of the ceiling.
Indentation amount
SNiP also regulates the distance between the outer wall of the chimney and the wall or partition. This distance in professional jargon is called a retreat.
- The amount of indentation for combustible materials should be from 260 to 500 mm (depending on the materials from which the chimney walls are made).
- For materials protected from fire, SNiP provides for a setback value of 200 to 380 mm.
Attention! The greater the thickness of the chimney wall, the smaller the size of the indentation can be. For example, if the chimney is made of 120 mm ceramic baked bricks, then the distance between the chimney and the roofing system may be only 260 mm. For a pipe made of heat-resistant concrete with a thickness of 65 mm, a distance of 320 to 500 mm must be left.
Tips for choosing thermal insulation material
When choosing thermal insulation, price often plays not the first role, because safety is more expensive, and without insulation it cannot be achieved.
Until now, in private housing construction they like to use mineral wool to insulate chimneys, but this is not a completely suitable material. At high temperatures, it changes its structure, although it remains the same in appearance. This metamorphosis negatively affects the thermal insulation functions.
It is better to use basalt wool, which is capable of operating at temperatures from 800 to 1000 °C. Minerite, asbestos or basalt cardboard are no less safe. There are economical old-fashioned methods: insulation with sand or expanded clay, which is used for backfilling. The third old-fashioned method is to coat the box with a 2 cm layer of clay.
Fire protection
So, what insulating material is best to use for thermal protection when constructing a chimney passage through the ceiling with your own hands?
- Mineral wool. Retains its properties up to 300 ºC. Rigid mineral wool PZh - 175 can withstand higher temperatures (up to 1000 ºC). The disadvantage is the release of formaldehyde, which can be harmful to health. Also not resistant to water;
- Expanded clay. Tolerates wetness well. The disadvantage is the need to construct additional containers to accommodate it;
- Basalt cardboard. Environmentally friendly. A sheet 5 mm thick can withstand temperatures up to 900 ºС;
- Asbestos. It copes well with fire protection, but at the same time emits harmful substances. Therefore, if it is used for a chimney, it is necessary to isolate the room from it using metal sheets;
- Minerite. Able to withstand heating up to 600 ºС, without being destroyed by water and being an absolutely environmentally friendly material.
Basalt cardboard in action.
Excellent fire protection. Some experts still use sand or clay for thermal insulation, but this method is gradually becoming a thing of the past.
You can reduce the likelihood of a fire using several other methods.
- Construction of a water jacket on the chimney. This will require a remote tank. It will also be necessary to supply cold water. But the hot water generated can be used in the shower or for heating. But the temperatures above the water jacket will drop significantly, which will reduce the likelihood of the pipe burning out;
- You can place a water tank above the stove, which will also protect the chimney from excessive heating. But with this method, you will have to constantly ensure that the water in the tank does not boil and pour cold water in time;
- Place stones on the pipe. You will need support to redistribute their mass.
Using all these methods, it is possible to reduce the temperature in the installed passage, which will significantly increase fire safety.
To increase fire safety in the bathhouse, you can use materials such as glass-magnesium sheets and fire-resistant plasterboard sheets. They are used to cover the ceilings themselves and the openings in them through which the chimney passes. Only Premium class sheets marked “NG” are suitable for fire protection. If such marking is absent, then such products cannot be used for fire protection.