Autonomous heating, be it a multi-story house or a small bathhouse, requires a properly installed chimney pipe. The safety and efficiency of the entire heating system depends on how correctly it is installed.
One of the most important components of a complex smoke exhaust design is the chimney box. You can install it yourself when the roof is ready or provide for this possibility at the construction stage.
What is it and why is it needed?
Any chimney is designed to discharge combustion products to the street. Naturally, they pass through it in a hot state, so in areas of ceilings (ceilings, attics, roofs) a hot stove or fireplace pipe will be a fire hazard.
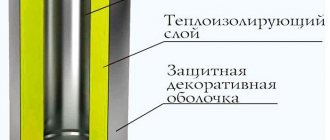
For fire protection, thermal insulation of the chimney is provided, in particular through the so-called cutting. This is where the construction of a box around the chimney plays an invaluable role. The cutting material is placed in a casing, which is made of non-flammable material and can be of different heights.
Its second important function is the decorative decoration of the pipe protruding on the roof, especially if the pipe does not fit into the overall design.
How to properly install a ventilation outlet
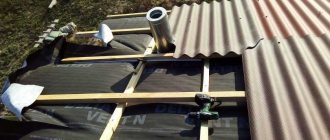
Installing a ventilation outlet requires cutting a hole in the roof in accordance with a pre-designed outlet layout. Sequence of actions using the example of a pitched roof made of corrugated sheets with the installation of ventilation outlets next to the ridge:
- At the site of the intended pipe exit, markings are made corresponding to the diameter of the outlet hole.
- A hole is cut in the roof with a special tool, first in the outer covering, then in the layer of insulation and insulation.
- The sealing gasket is attached using liquid sealant.
- A passage element is installed on top of the gasket, which is attached to the roof using self-tapping screws.
- After installing the passage element, an air duct pipe is installed, fixed with screws.
Important! It is necessary to ensure that the pipe is installed strictly vertically, using a building level if possible. From the attic side, it is necessary to additionally seal the air duct exit to the roof to prevent rain and melt water from entering the room.
When constructing private buildings with a small number of floors, it is important to draw up in advance a design of all engineering systems and components that ensure the functionality and durability of the facility. It is imperative to consider where the ventilation outlet to the roof will be located, since without this component the building will not meet regulated sanitary and hygienic requirements.
Advantages and disadvantages
The construction of the duct creates the following advantages for chimney owners:
- the chimney will be protected from the destructive effects of natural forces - wind, rain, snow;
- protects brick chimneys from the formation of condensation and its destructive effects;
- by insulating the pipe, it ensures normal traction;
- pipes with a beautiful finish look aesthetically pleasing on the roof;
- a correctly constructed element reliably protects the building from fire.
The disadvantages include:
- additional expenses.
Make it yourself or buy it
It is quite easy to construct the device, but this will require free time and tools; with this solution, all dimensions can be perfectly adjusted on site. Finished products are also in demand, so the choice is entirely individual.
I advise you to do it yourself, because confidence in the high-quality assembly and components will allow you to completely rely on the casing and be maximally protected from various troubles associated with destruction and fire.
By doing the production work with your own hands, you can significantly save the family budget without losing the practicality of the product, which is an important factor for most owners.
Types and designs of boxes
The boxes are:
- stoves;
- for roofing;
- for ventilation;
- decorative.
Usually the boxes are made of metal. They are painted in a suitable color and last a long time.
Stainless steel products are used for decorative elements on the roof and indoors.
Galvanized devices complete with plastic elements are cheaper, so they are used more often.
Boxes in the form of a wooden frame are installed only for lining brick chimneys. In addition, they must be additionally covered with a metal casing.
Boxes made of fireproof plasterboard are installed indoors for decorative purposes, in attics; they cover channels embedded in the wall.
The smoke exhaust area on the roof is protected by a metal decorative casing with an umbrella.
Why do you need a pipe casing?
The chimney pipe on the roof is a very important part of the chimney structure. Its location, the material from which it is made, as well as additional devices on the chimney - all this affects the draft performance in the system. This part of the chimney structure is located outside the building, so it is affected year-round by various destructive environmental factors: precipitation, wind, temperature changes.
Regardless of what material the chimney is made of, these factors gradually destroy it, which inevitably leads to a deterioration in draft performance in the system. And as you know, traction is the main indicator that determines the performance characteristics of the system as a whole . Therefore, installing a protective casing on a chimney pipe not only provides its protection, but also extends the service life of the chimney structure.
Let's look at the main functions performed by the box covering the part of the chimney located above the roof:
- such cases protect the chimney from mechanical damage and pipe destruction under the influence of environmental factors;
- covers create an additional margin of safety (this function is especially useful for regions where the wind load exceeds the permissible level);
- thermal insulation of the chimney. Boxes installed on chimneys reduce heat loss, which has a positive effect on draft in the system.
The casing can be used to protect chimneys made of different materials; this element is placed on an already finished pipe
Note! The chimney cover is also a decorative element that can be used to hide an unpresentable structure.
The installation of such casings, as a rule, is carried out after installing the chimney structure, however, this measure is also relevant for old buildings, since it allows you to protect the old chimney from destruction.
Tips and tricks for choosing
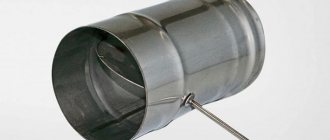
The choice of duct is determined by the type and size of the chimney. The main selection criterion is the diameter for the passage of the pipe.
For the passage unit in the ceiling, a product is selected that consists of a stainless steel plate and a neck, the diameter of which is slightly larger than the chimney.
The design of the stainless steel platform is quite suitable for mounting on the ceiling of the house.
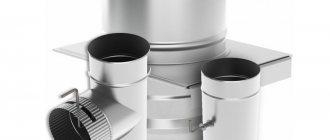
The photo shows the main configurations of manufactured boxes:
The roof box shown in the bottom photo can be purchased according to predetermined dimensions or ordered to be manufactured.
The cost of finished products varies from 550 to 1900 rubles and more.
Planning ventilation passages
Ideally, planning of ventilation passages should occur at the design stage of a residential building, or during the construction process before closing the building contour (arranging windows, doors and roofing).
But in practice, it is often necessary to reconstruct engineering systems in an already finished house and build on the existing design features and layout of residential and technical premises.
If there are defects in the design of the system, this is fraught with the accumulation of unpleasant odors in the room, increased concentrations of carbon dioxide and carbon monoxide, and the occurrence of reverse draft during changes in weather conditions.
Making and installing a box with your own hands
If you want to save money, you can make the casing yourself. At the preparatory stage, the location of its installation is determined, the required dimensions are taken, the material is purchased, and the tool is prepared.
Required tools and materials
You will need:
- metal scissors;
- riveter;
- hammer;
- pliers.
Materials you will need:
- galvanized sheets
- rivets.
The approximate price of materials will be about 500 rubles.
Drawings and diagrams
Box for ceiling cutting:
Scheme of the casing of the ceiling-passage device:
Installation of the box in the ceiling:
Exiting the chimney through a ceiling duct:
Ceiling trim installation diagram:
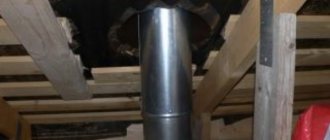
Passage to the roof:
Size calculation
The size of the box is determined by SNiP standards based on the cutting dimensions of 500 mm for wooden floors. When the floors are protected with a reinforced layer of plaster of 25 mm, or iron with an asbestos lining underneath of at least 8 mm thickness, the size is reduced to 380 mm.
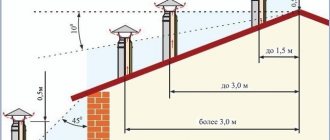
On the roof, there must be at least 130 mm (13 cm) from the outer surface of the pipe to the border of combustible structures.
The thickness of the cut should overlap the thickness of the ceiling (ceiling) by at least 7 cm.
The diameter of the hole in the box should be made approximately 0.5 mm larger than the outer diameter of the pipe, so that the pipe can freely fit into the hole.
The perimeter sides of the casing base must be cut 5 cm larger than the cutting size so that they can be attached to the ceiling.
Work progress
A homemade box is made from galvanized sheets, cut to size:
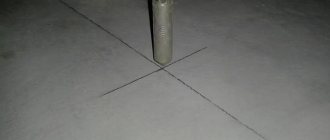
- the center is found in the bottom through the drawn diagonals;
- punch a hole with a nail, draw a circle;
- Through the hole, use scissors to cut a hole to fit the diameter of the pipe.
The sidewalls are made of 4 sheets, fastened with a riveter, no less than 4 rivets per seam.
First, the lower parts are bent to a width of 5 cm and the resulting structure is riveted to the base through them.
Installation stages
The box is installed in a pre-drilled hole in the ceiling.
At rafter connections, supports are made of a wooden frame or metal profiles.
The finished casing is installed on these supports.
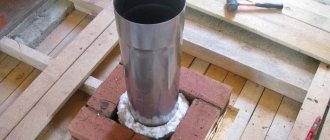
A segment of the chimney pipe is inserted into it through the hole and secured with the previous element.
The free space in the box is filled with mineral wool and expanded clay.
The roof cutout for “sandwiches” is made in the form of an iron cone located at a certain angle on the plate. The pipe structure is inserted into the cone. Sealing is done using a sealant. Part of the apron is inserted under the overlying sheet of roofing.
Roof trims can also be of a different type, for example, made of polymer materials on a metal base.
Decorative finishing of chimneys is carried out by cladding a material suitable for the style of the roof over a frame made of metal profiles.
Installation stages
Installation of the chimney box begins from the bottom, before the pipe itself is laid. The process is divided into stages:
- A frame is created for the opening in the ceiling. To do this, U-shaped elements are installed alternately on opposite walls. The rectangular halves are overlapped, forming a continuous metal insulation. Then screw the bottom to the ceiling with self-tapping screws.
- After this part of the casing is assembled, the chimney is passed into it and fixed on 4 clamps bent in the central part of the rectangle.
- The upper parts are installed and secured, thereby reaching the top of the pipe.
- At the end, the empty space is filled with expanded clay, dry earth or other insulating material. The end is covered with a metal lid.
Before installing the facing covering on the roof, the place where the chimney comes into contact with the passages must be insulated with roofing felt or plastic film. Install it overlapping the casing and the overlap plane. To prevent the waterproofing from being visible, it is covered with a decorative corner around the entire perimeter.
Frequent errors and problems during installation
Violation of the standard dimensions for the placement of the duct and smoke ducts in the ceiling opening, which leads to conflict situations with the fire service.
An umbrella that is too large and installed on the top can cause brown streaks on the roof. Condensation formed on its cold surfaces all winter. The area of the umbrella must be reduced.
The same situation can arise with a metal box on the roof that immediately covers the smoke and exhaust ducts. Expanded clay poured to the edges of the channels in this casing will help.
A wide gap between the pipe and the penetration - as a result, the laid fine expanded clay falls down.
Using penetration without backfilling with thermal insulation material. There is practically no protection.
Final works
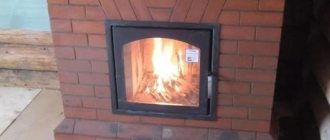
Cutting a chimney pipe on the ceiling or roof with your own hands is finished. All that remains is to dry the oven. But before that, we check the draft in the pipe. To do this, we bring the torch to the open door of the firebox; if the flame draws inward, the draft is normal. If there is insufficient ventilation, you will need to remove construction debris from the pipes and only then proceed to the next stage of the final.
We put no more than 3 kg of firewood in the firebox and set fire to it. During the first burning of wood, grease, dirt and paint materials will burn off from the surfaces of the stove, and moisture will be removed from the bricks. Therefore, we recommend opening windows and doors.
After the surfaces have cooled, we dry the stove a second time and check all the joints and the chimney itself for leaks and that there are no leaks of gases into the room. We eliminate possible malfunctions and only after the final check can we begin to operate the furnaces.
Only by qualitatively completing the main stages of work and carefully checking the finished chimney, you will be able to protect your home from fires and inhale the fragrant smell of burning wood, and not carbon monoxide pouring out of the cracks of the chimney.
Installing corrugated sheets
Oddly enough, this is the easiest part when covering a chimney with corrugated sheeting.
- Cut the corrugated sheets to the required length, taking into account the diagonal bevel at the bottom. Use existing guide sizes.
- Secure the corrugated sheet to the guides with self-tapping screws with an EPDM gasket.
- To frame the corners, use a simple outside corner strip. For fasteners, also use self-tapping screws with an EPDM gasket.
- To aesthetically design the top edge, you can use different options: simple outer corner strips or cornice strips. Fasten with the same screws.
If you have a special canopy to protect against snow, just install it on top. It is also called a weather vane or cap.
Ready! You have just learned how to cover a chimney with corrugated sheeting.
General characteristics of tiles as a roof
Using metal for roofing allows you to get a reliable and durable roof that can stand for many years without additional investment. Today, metal tiles, as a roofing material, are preferable for roofing than roofs made of slate or euroroofing material.
Metal tiles are produced from metal with a thickness of 0.5 to 1.2 mm. The length of the metal strip of metal tiles can vary from the standard 1.2 meters to 6 meters or even larger if the order is made to a custom size. Metal painting is usually done with UV-resistant paints. According to manufacturers, the paintwork can withstand a 50-year service life without mechanical damage.
What does an installed chimney look like through a metal tile?
In addition, metal tiles are not only sheets of profiled metal, they are also a whole set of different additional elements that allow you to assemble a roof that meets all regulations and standards. These additional elements also include several specific parts intended for arranging roof passages for internal communications and systems through the roof. These elements include:
- Antenna leads;
- Ventilation duct outlets;
- Dormer windows;
- Light tunnel windows;
And of course, such additional elements include a set of parts for arranging the passage of the chimney through the metal tile.
Video description
Watch the video on how to line a pipe:
Corrugated sheeting is considered one of the best. Due to its positive qualities, low price and the ability to accept any color from a range of options, it is extremely common. But this material also has a negative side, like any other metal - low sound insulation.
Metal tiles have the same disadvantage. In all other parameters, this material is in no way inferior to corrugated sheeting.
Ceramic tiles are only suitable for cladding inside a building. For this material it is necessary to carry out high-quality preparatory work. Installation must be carried out on a flat surface. But the tiles look great.
Clinker brick is suitable for those who value durability and strength. But not everyone will like its appearance. The main disadvantage is the high cost and weight. Due to the last drawback, reinforcement structures are installed during construction.
Briefly about the main thing...
Chimneys can be single- or double-walled. Based on the material of manufacture, metal, brick structures and structures made of sandwich pipes are distinguished. The last option is optimal for private houses. When installing a chimney, the rules for its placement in the room are observed. Its functionality, as well as the presence of draft in the heating equipment, depends on the correct determination of the diameter and height of the structure.
The installation technology through a wooden and brick wall is the same, but there are some nuances: wood is more susceptible to ignition and requires maximum protection. During installation, you must comply with fire regulations, and also take into account possible errors.
Chimney installation and securing services in the house and on the roof from
For more than 20 years, it has been providing a wide range of services for design, installation, commissioning and maintenance of heating and smoke removal systems of any complexity. The company's installation department has extensive experience in providing such services, which amounts to hundreds and thousands of successfully implemented private and industrial projects.
Professional services include a set of actions, or, at the client’s request, individual types of work:
- Preparation of a technical work plan for the project: calculation of all parameters of the heating and smoke removal system based on the type of heating equipment and its power, the layout of the house, its materials, number of storeys, design and length of the smoke exhaust route, type of floors and roofing and many other factors
- A specialist will visit the customer’s site to accurately calculate all technical parameters
- Preparation of proposals for the selection of equipment, chimney and its elements, taking into account individual project parameters and customer wishes
- Coordination of project and budget with the client
- Delivery of equipment and components to the client’s site
- Prompt and professional execution of work on the installation of the entire chimney string, its output to the roof with subsequent fastening to the roof (if necessary), connection to the heating product, insulation of all required sections of the walls, places of passage through the ceilings, walls and roof
- Comprehensive commissioning of a smoke removal and heating system for a house
- Concluding a work acceptance certificate and providing guarantees for work performed
Reliable warranty obligations for the installation of smoke exhaust equipment are the key to peace of mind and safety of both the life and property of the user of the heating system. Saving on professional installation and attempting to carry out such complex work yourself can lead to dire consequences - at a maximum, and to unnecessary spending of a lot of money - at a minimum.