Despite the fairly simple technology for building a bathhouse, in the process of performing the work it is necessary to solve a number of rather complex issues. One of them is to lead the chimney pipe out through the ceiling. This operation must be given special attention, since the safety and service life of the structure depend on the correct execution.
If miscalculations are made at this stage, it will be impossible to comply with fire safety requirements. So it’s better to do everything to the maximum than to underdo it. Hardly anyone will doubt this. Therefore, every private developer must follow the rules regarding the proper manufacture of a chimney passage through the ceiling in a bathhouse.
The legislative framework
Let's start with the fact that the chimney from a sauna stove heats up quite strongly. Especially if the stove is wood-burning. And since the ceiling in this building is most often wooden, there is a correspondingly high probability of it catching fire upon contact with the chimney. Of course, if the chimney is a brick structure, then the likelihood of a fire is reduced. But today, in the age of modern technologies and materials, sauna stoves are metal structures with metal chimneys. This means that the temperature of the metal shell is exactly the same as that of carbon monoxide gases passing inside the chimney pipe.
Therefore, there are several legislative acts, namely SNiPs, which clearly indicate what needs to be paid attention to, and what points during the installation of a chimney from a sauna stove must be taken into account in order to guarantee high fire safety of the facility.
SNiP 2.04.05-91: “Heating, ventilation and air conditioning” Source en.decorexpro.com
So, the main set of rules and regulations that are used in the process of installing a chimney in a bathhouse is SNiP 2.04.05-91 called “Heating, ventilation and air conditioning.” In this code, namely in the section “Stove heating”, which begins at position 3.62, it is clearly described what requirements apply to stove chimneys. We will not delve into each point of the document, we will simply identify those that relate to the topic of our article.
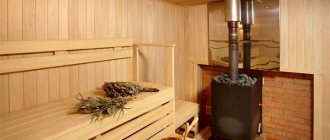
First of all, a few words about the stove itself. Firstly, the temperature of its walls should not exceed +120C. Secondly, if a fan is installed on the chimney, providing the necessary removal of carbon monoxide, in other words, an exhaust hood, then accordingly it will be necessary to provide an artificial flow of air from outside the room. Thirdly, stoves should be installed only near the internal walls of the bathhouse, which are built from non-combustible materials, or the walls should be sheathed with non-combustible materials.
A stove in a bathhouse next to a wall lined with stone Source stroisovet.com
Now about the chimney pipe.
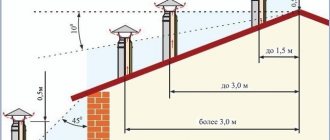
- It is placed above the ridge at least half a meter , or the same parameter is used above the plane of the flat roof of the bathhouse. Particular attention to pitched roofs , where the pipe can exit anywhere on the slope , not necessarily near the ridge. But the height of the outer part of the chimney is determined by the same parameter.
- If the bathhouse is a building that is attached to the main house , or is part of this house, then the chimney must above the ridge of the roof of the house by the same half a meter.
- A brick chimney must be vertical.
- Metal pipes can be partially laid at an angle , but with the condition that the angle of inclination will not exceed 30°, and the length of the inclined section will not be more than 1 m. In this case, the inclined part in terms of section must be exactly the same as the vertical one . Plus, its internal surfaces must be smooth .
- If the roof of the bathhouse is covered with flammable roofing materials, then a spark arrestor in the form of a metal grid with cells no larger than 5x5 mm must be installed on the chimney.
Spark arrestor for a chimney pipe Source banyaprofi.ru
See also: Catalog of bathhouse projects presented at the exhibition “Low-Rise Country”.
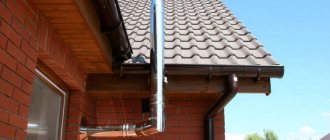
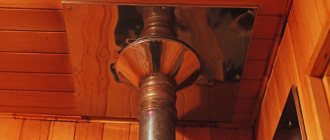
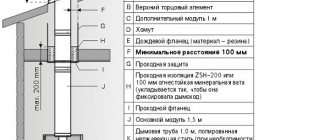
Now, what does SNiP say about the pipe exiting the bathhouse onto the roof. To begin with, the passage through the ceiling structure is called an opening. And the part of the pipe structure passing through the opening is cut. So the latter should be at least 70 mm larger than the thickness of the opening along the length of the chimney on each side. That is, it turns out that the protective element that protects the opening from the pipe should protrude into the room and towards the attic at a distance of at least 7 cm. This is done in order to ensure fire safety.
Next, as for the width of the opening relative to the cross-section of the chimney. It should be noted here that SNiP has a clause that this parameter should be looked for in the recommendations from the manufacturer of the furnace equipment. And use it as a basis for installation work. But there is an appendix in the document numbered “16”, which is designated as “mandatory”. It indicates these ratios, which are often taken as a basis by many builders and installers.
The opening for the chimney must be wide in accordance with SNiP standards Source allremont59.ru
So, in this application it is indicated that the distance from the chimney pipe to the edge of the opening, not protected from fire, should be 0.5 m, and when protected from fire - 0.38 m. And this distance must be filled with non-flammable material. And one more important point. It is impossible to join parts of the chimney pipe inside the opening. That is, the passage part must be solid to avoid depressurization of the chimney during its operation.
So, that's all with SNiP. As you can see, in this legislative document everything is, in principle, laid out on the shelves. If you strictly follow these standards and requirements, you can guarantee the high quality of the final result. Now let’s look at how to properly install a chimney pipe through the ceiling in a bathhouse.
Safety regulations
To ensure that the bathhouse is comfortable and safe, and that the heating device operates without interruption and does not cause a fire or injury, the following safety rules should be followed when installing and operating the chimney:
- Sagging and warping of the elements of the smoke exhaust system are not allowed.
- Turning the pipe is allowed, but not more than three.
- The distance from the chimney to the walls must be at least 50 cm.
- All connections must be made in such a way that none of them end up inside the wall, ceiling or where the roof passes.
- The margin for thermal insulation in the ceiling and roof made of combustible materials is made at least 100 cm when installing a single-wall pipe, at least 20 cm when installing sandwich sections and 6 cm for a smoke shaft or combined chimney. To pass a non-combustible roof, a margin of 13 cm is sufficient.
- If the chimney rises above the roof by more than 1.2 m, it must be additionally secured with braces.
- All connections must be reliable and tight. If a unit is found to be depressurized, it should be repaired immediately. If smoke appears at the junction of pipes or shaft elements, the operation of the heating device is stopped and the joint is repaired.
- During operation, it is necessary to carry out preventive maintenance: cleaning the pipe from soot deposits, discharging condensate from the drip line. This will extend the life of the chimney and heating device.
- When the draft decreases or reverses, as evidenced by smoke in the steam room or boiler room, as well as sparks and hum in the firebox, it is necessary to clean the chimney.
- After a long break in using the sauna, the chimney and heating device may become clogged or airy. In this case, it will not be possible to light the bathhouse. It is better to carry out inspection, repair and cleaning of the chimney before starting up the heat generator.
We recommend that you read: PVC pipes for swimming pool equipment
Laying a chimney through the ceiling
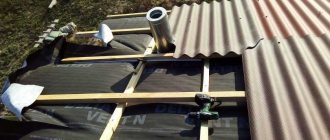
Typically, an opening in the ceiling is planned at the design stage. Therefore, a hole is immediately left in the ceiling: square or round. But sometimes you have to make a hole in an already constructed ceiling. How to do this simply:
- Install the stove at the place of its installation.
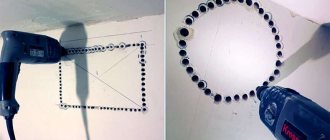
- Apply a plumb line so that the tip of the weight exactly coincides with the center of the chimney pipe of the sauna stove .
- A mark in the form of a cross is made on the ceiling.
To determine the location of the opening in the ceiling, use a regular plumb line Source samibm.ru
- A small through hole using a drill and a drill bit.
- Then they move into the attic and hang a plumb line so that its load exactly coincides with the drilled hole in the ceiling. Place a mark on the roofing material.
- Then you need to decide on the size and shape of the opening . And apply them to the ceiling and roof using a pencil or marker.
- Typically, the floor material and roofing are cut with a jigsaw or hacksaw .
So, the opening is ready, now all that remains is to make the cutting. There are many options, we suggest considering one of the simplest.
Roof sealants
In order to seal the joints of different parts of the bathhouse pipe passage through the roof, you need to use not just a roofing sealant, but always a heat-resistant sealant. It is advisable to use a neutral silicone heat-resistant sealant.
If Master Flash is installed on a metal roof (metal tiles or metal profiles), then it is necessary to use silicone sealant that does not contain vinegar (non-acetic sealant). This is necessary so that it does not enter into a chemical reaction with the metal and does not destroy it.
Roofing silicone sealant retains its properties in the range from -50°C to +300°C, which is sufficient for all weather conditions and is quite suitable for sealing a chimney.
Roof sealant must be neutral and heat-resistant
But you need to remember that the surface to be treated must be clean and dry. The time for complete hardening is indicated on the packaging, usually 24 hours.
Thermal insulation materials
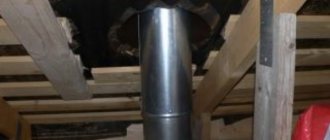
Metal chimney pipes must be insulated to prevent condensation from forming.
When arranging a chimney in a bathhouse, the type of heat insulator is of great importance. Most often used:
Mineral wool that can withstand heating up to 600°C. Among the disadvantages of this material are the release of formaldehyde when heated and the deterioration of protective properties when wet.
Minerite, which contains cement, cellulose and mineral fillers. The material heats up to 600°C without releasing any substances harmful to health and does not lose its qualities when exposed to water.
Asbestos also has good heat-insulating properties, but when heated strongly, it releases substances harmful to health.
Basic rules and regulations
In fact, there are not so many standards in cutting. To be honest, only one thing is correct, everything else is purely recommendations obtained through long construction experience. The rule dictated by SNiP states: when making a chimney made of concrete or brick, as well as any other insulated materials, the distance to the rafter beam and any other flammable surface must be at least 13 cm. In any other case: at least 25 cm.
Experienced roofers advise that when making a passage through the roof on the inner surface of the roofing pie, make an apron made of rectangular metal with indentations from the end of the passage opening of approximately 30 cm.
Brick device
The classic model of a pipe for removing combustion products is a structure based on brickwork. The design of this type of chimney is somewhat complex, but its design can be simplified. At the same time, the changes made should not negatively affect the reliability of the channel and traction power.
The section of the chimney from the stove to the ceiling should be constructed using clay mortar. Then it is replaced by cement-sand, which is also used for masonry above the roof.
Stages of canal construction work
To properly route a bathhouse pipe through the ceiling, you need to follow eight steps. Below we have tried to provide as clear instructions as possible.
Stage 1. Marking the ceiling and roof for the openings for the chimney. Make openings, maintaining strict verticality. Prepare the mortar for masonry.
Stage 2. Placement of the nozzle. It is necessary that the passage diameter corresponds to the minimum permissible dimensions, guaranteeing the required traction power regardless of the operating mode of the furnace and climatic conditions.
The surface inside the chimney should not have serious unevenness, as this may cause the air flow to swirl, leading to a decrease in draft. In this regard, there is no need to delay sealing the seams.
The chimney masonry should be half a brick thick, which is considered the norm for baths. At the same time, it is necessary to constantly check each row for verticality, since in the future it will be impossible to correct errors without removing the bricks. This can be done using an ordinary thread stretched from the corner of the ceiling hole to the corner of the nozzle formed by the first row.
Stage 3. Laying the fluff, which provides additional reliability to the chimney structure and protects it from fire. The fluff itself is created by expanding the outer walls of the channel, the stability of which is imparted through the use of reinforcement
In this case, the following conditions must be observed: additional parts should not be visible on the surface of the structure, and it is also important that they do not protrude inside
Each row going on top of the next must be laid so that it protrudes by about a quarter. As a result, the maximum width of the chimney must be reached by the time the masonry rests on the ceiling.
Stage 4. Fixation of the vertical channel using edged boards nailed along the perimeter of the fluff with maximum tightness. This use of lumber allows for strong fastening of the chimney, which eliminates the possibility of the structure oscillating under the influence of wind. The optimal solution is to carry out the expansion in close proximity to the ceiling beams.
Stage 5. Reducing the width of the chimney around the perimeter in order to transfer the fluff into the riser and continue the masonry up to the roof.
Stage 6. Installation of an otter - a section of a vertical channel through which rainwater is drained. Its dimensions exceed the dimensions of the riser and amount to a quarter of a brick. This part of the structure is laid in exactly the same way as the fluff.
In order to maintain the internal dimensions of the chimney, it is necessary to use thin inserts. The angle of the roof affects the height of the otter. The bottom of the upper covering element serves as the starting point for the laying of the section of the chimney intended for drainage of rainwater, which must rise at least 2 rows above the top point.
Stage 7. Laying the neck of the chimney with the optional arrangement of the head and installation of a metal lattice cap.
Stage 8. Sealing the joints of the roofing and the otter, achieving maximum sealing of this section of the chimney using one method or another. It is the chosen method and a number of factors that determine how the sealing will be carried out.
A brick chimney is an expensive structure, characterized by the complexity of construction, the use of which is not the only possible solution. Modern technologies and materials make it possible to install simpler and more efficient structures.
Types of pipes
Today, several types of chimney pipes are used:
- pipe made of stainless steel or black metal sheet with thick walls;
- double-walled pipe with a layer of fireproof insulation (sandwich pipe);
- chimney brickwork.
Increasingly, people are beginning to pay attention to more expensive options for chimney finishing, preferring reliability and safety. Conventional metal chimneys can cause a fire in the room, while a brick pipe or sandwich chimney reliably protects the bathhouse from fire.