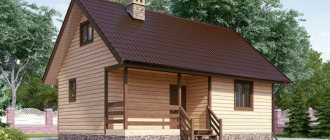
Frame baths 6x8, 6x4 and similar structures are widely used, not only in regions with mild climates, but also in places with harsh weather conditions.
Bathhouse made of timber
Briefly, the technology for constructing such houses includes the following stages:
- Laying the foundation;
- Frame assembly;
- Covering the assembled frame with OSB boards or boards on the outside;
- Installation of thermal insulation materials into wall cavities;
- Indoor finishing work (cladding walls, ceilings and floors with boards);
- Finishing work on the facade of the building.
Peculiarities
It is very difficult to build buildings, even such minor ones as a bathhouse, with your own hands from bricks or logs.
You will need to spend a lot of money on materials and prepare perfect drawings. And without the help of someone, it will not be possible to complete such work. Therefore, frame projects deserve increased attention. Moreover, the consumption of wood compared to conventional timber structures is reduced by exactly half. The buildings turn out to be relatively light, even if they are made in dimensions of 6 by 4 or 6x6 m; if the size of the structure is 3x4, 4x4 m, this circumstance is even more pronounced. Therefore, there is no need to prepare solid foundations. You can simultaneously finish external and internal walls, and the overall installation speed increases noticeably. The smallest area of the steam room is 250x250 cm. It is recommended to use asbestos-cement pipes with a diameter of 100 and a length of 4000 mm, which are filled with concrete, for the foundation.
All wooden elements are thoroughly dried before installation. The rafters are assembled on the ground, after which they are lifted one by one and placed above the frame posts. The roof is made only in a ventilated version.
5
We insulate the walls, roof and floor of the bathhouse
To insulate the walls you will need:
basalt wool 150 mm thick and density 25-35 kg/m3; vapor barrier film; moisture-windproof membrane (super-diffuse); wooden slats.
To vapor barrier a steam room, it is more advisable to use foil vapor barrier material. It will not only protect the structure from moisture, but will also reflect heat into the room.
Let's start with insulating the walls from the inside. To do this, apply self-adhesive double-sided sealing tape to the racks. Then glue the waterproofing film to the tape. Be sure to place the canvases with an overlap of at least 15 centimeters. Seal the joints with double-sided sealing tape. Additionally, secure the foam with a stapler. The result must be an absolutely sealed circuit, otherwise moisture will penetrate inside the walls and the frame will quickly become unusable.
Insulation of bath walls
Then lay mineral wool slabs into the frame space. Make sure that the insulation fits tightly to the structural elements and to each other. Carefully fill all the resulting cracks with cotton wool scraps.
Next, you need to secure a moisture-windproof membrane on the outside of the walls. It is installed according to the same principle as a vapor barrier - a sealant is glued to the racks, then the membrane itself is attached using a stapler. On top of the film on the racks it is necessary to fix slats with a thickness of at least 20 mm. Place the same slats on the racks on the inside of the walls; they will serve as lathing for the lining.
The same technology is used to insulate the roof - mineral wool is laid between the rafters, then covered from the inside with a vapor barrier. A lathing for lining or other finishing materials is mounted on top of the vapor barrier.
The floor is insulated a little differently - first of all, you need to make a rough flooring between the floor beams from the boards. Then a waterproofing film is laid on the beams and flooring (you can use a regular vapor barrier). Logs are laid on top of the film as when installing a regular floor.
Insulation is placed in the space between the joists. You can use any material, both slab and loose, such as ecowool or expanded clay. Another layer of film is laid over the logs and then the flooring is made of boards.
To insulate the ceiling, attach a vapor barrier on the side of the first floor, and then make a rough ceiling from the boards. Then, on the second floor side, you need to fill the space between the beams with insulation. A vapor barrier and plank flooring are laid on top of the beams.
Roof arrangement
The roof of the bathhouse is made of the same boards with a cross-section of 150×50 mm. In this case, you can assemble the rafter system on the ground and install it ready-made on the top frame. But first, you will need to install and secure a special beam (mauerlat) over the frame, which is used as the load-bearing base of the roof being built.
Types of sheathing
After you install the rafter system, you can proceed to arranging the sheathing, made from boards 20 cm thick. Upon completion of laying the sheathing (which is usually carried out starting from the ridge), you can proceed to laying the roofing covering you have chosen.
Floor
We insulated the floors in the bathhouse. The steam room and shower have tiled flooring, and the dressing room has laminate flooring. First, I’ll tell you about the steam room and shower; there are many more important nuances there.
Laying tiles
The tiles were purchased with a matte finish and rough so that they would not slip. We decided that tiles are much better than wooden floors - they don’t rot and are easy to clean. The glue was purchased with the best moisture resistance characteristics.
Waterproofing was laid on the subfloor, overlapping the walls. On top of the waterproofing, insulation was laid - EPPS (thickness 30 mm). For better adhesion of EPS to the waterproofing, assembly adhesive was used.
A screed was poured over the insulation along the beacons with a slope towards the drain funnel. Before pouring the solution, a reinforcing mesh and a set of beacons were laid. The photo shows that we attached the beacons not to the floor, but to an asbestos solution - we laid out piles and pressed profiles into them. The solution (cement with sand) was mixed in a rented concrete mixer, because
It was important to fill the entire floor in one day. The solution was laid out from the bucket with a trowel onto the grid between the beacons and leveled with a wooden plank - the rule
The floor was finally leveled with a wide trowel and grout.
The tiles were laid away from the drain gutter to make it easier to maintain the slope. Each one was pre-soaked in water. The glue was applied with a notched trowel onto the dried and primed screed. In this case, glue was not applied to the entire surface of the floor at once, but only to the space for laying 1-2 tiles. The glue hardens quickly and should not be used to cover a large area of the floor at once. The thickness of the adhesive layer was kept approximately equal to the thickness of the tile. I collected the excess glue around the laid elements with a simple narrow spatula.
First, all rows of whole tiles were laid out, then parts along the walls. We cut the tiles with a manual tile cutter. By the way, for precision masonry we pulled the fishing line and used crosses for the seams. And for better contact of the tile surface with the binder, immediately after laying, I lightly tapped each square of tile with a rubber mallet.
Laminate
The laminate flooring was installed very quickly. We covered the floor with film over the insulation, nailed down moisture-resistant plywood, and rolled out the backing.
I unpacked the package with a knife. He took out the first panel and laid it down, turning it with a small protrusion towards the wall. I inserted 2 plastic wedges between the wall and the board. I took the second strip and snapped it into the end groove of the first. I leveled it and placed the wedges again. When I reached the opposite wall, I used a circular saw to cut off the extra piece of the laminate panel. The next row began from the segment. The second row was assembled in the same way as the first, after which I lifted the entire floorboard at an angle of 45 degrees and carefully connected it to the latch of the first row, and then hammered it through the block with a mallet. The last row had to be sawed lengthwise, precisely measuring the cutting line.
Materials for building a bathhouse
For the construction of a modern wooden bath, advanced materials are used, which are manufactured industrially and have improved characteristics.
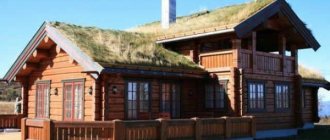
A modern bathhouse looks very impressive on the site. Source sarlbethart.com
A structure made of timber or logs is constructed very quickly, does not require a long time for shrinkage, does not deform due to temperature changes and does not collapse under the influence of high humidity. But there are significant differences between logs and beams, and they must be taken into account in order to correctly determine the material.
timber
This is a wood wall material with a square cross-section. For the construction of a bathhouse, glued laminated timber is usually used, which has more attractive characteristics than ordinary rounded timber or logs.
The advantages of laminated veneer lumber are obvious. Firstly, a 4x6 bathhouse made of timber does not require additional exterior finishing. Secondly, all elements fit perfectly together, and the walls are obtained with excellent thermal insulation and sound insulation characteristics. Thirdly, any structures made of laminated veneer lumber are very quickly and easily assembled. In addition, this material does not crack, does not rot and gives minimal shrinkage - from 2 to 10%.
Glued laminated timber also has its drawbacks - price and reduced environmental friendliness of the material due to the use of glue. However, it should be noted here that the price is fully justified by the durability and quality of timber buildings.
Bathhouse 6x4 made of timber with a terraceSource doma-medved.ru
At the same time, any wooden materials are treated with chemical compounds to protect them from moisture and harmful insects, and from fire. Absolutely environmentally friendly wood is a difficult-to-use and very short-lived material that is practically not used in modern construction.
Log
A rounded log has a rounded shape in the cut, and therefore buildings made from it have the appearance of classic log houses. The advantages of logs include such qualities as easy installation, good sound insulation, tight fit of elements without cracks or gaps.
The characteristics of a rounded log directly depend on its manufacturing technology, which includes the stages of harvesting, drying, and processing. Unscrupulous manufacturers supply logs to the construction market that become deformed and crack over time.
Therefore, such material must be selected with extreme caution.
A correctly manufactured rounded log is still inferior to laminated veneer lumber in some respects. It gives a more noticeable shrinkage - up to 13%, and the shrinkage process lasts from six months to a year. But the log costs less.
Construction of a bathhouse from chopped logsSource bashecostroy.ru
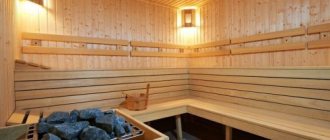
More about the steam room
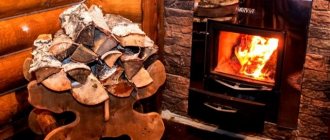
In this room, the central part is occupied by the stove. It is also important to pay attention to the main finishing materials. The steam room should be a small room with excellent insulation. It is important to provide comfortable benches for sitting. It is worth taking into account the high temperature, so do not use materials that can melt or heat up excessively in finishing; wood is the best option in this case.
What's the best way to set up a stove?
There is a special technology. We build a furnace taking into account ideal steam. To do this, it is important to direct the heating, create a compartment with stones, and also choose a reliable system. the structure that is most valued .
It is worth examining in detail the features of such a system; many standard options are offered, among which everyone will definitely be able to find one that is suitable for themselves.
Tips for choosing material
When choosing a material, it is best to give preference to wood. It is best suited for the construction of a classic bathhouse. However, you definitely need to find high-quality options, and also make sure that both timber and boards are carefully processed.
Preparation for construction: project drawings
Creating a drawing requires certain skills. If they are not there, then it is better to entrust this work to a specialist or use a ready-made drawing.
Before drawing up a diagram, it is important to decide on the following points:
Location of the building on the site
It is important to consider sewer and water drainage. Quite often, the main factor when choosing a location is the laying of communications.
Soil at the construction site
If you plan to make a swimming pool in a bathhouse, then groundwater should not be located near the surface of the territory. The type of foundation to be built will also depend on the type of soil. Bathhouse construction plan and number of floors. If you plan to make a two-story building, it is important to take into account the additional load on the frame structure and foundation. At this stage, you should think in advance about the placement of the stove and what material it will be made of. This will allow you to understand where and which chimney to install, as well as the ventilation passages in the room. Laying communications. It is important to take care of ventilation, electrical wiring, vapor barrier and thermal insulation. It is worth considering the features of water drainage. An important element of any building is the roof. The service life of the structure will depend on it. You should take into account the material of manufacture, as well as its shape. This will allow you to calculate the power of the floors.
You need to include all the information received in the drawing, as well as supplement the project with the necessary details. The more detailed the diagram, the easier it is to build a bathhouse.
The more detailed the project, the easier it is to make a frame bathhouse yourself
It is recommended to draw up a separate plan for communications. If you have little experience, you should not create a complex project. You can use a ready-made diagram, slightly supplementing it based on your own needs.
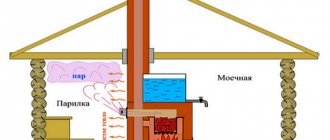
A standard bath includes a corridor, a dressing room, a washing room and a steam room.
A standard frame bath consists of a dressing room, steam room, shower and rest room
Quite often a separate room for recreation is provided. It is recommended to mark the installation location of the stove on the diagram. If this is a steam room, then it is best to place the stove in the corner closest to the door. The stove can be stone or brick.
It is recommended to determine in advance the dimensions of each room and indicate them in the drawing. The standard dimensions of the steam room are 200x240 cm. The optimal ceiling height is 220 cm. This design can accommodate 2-3 people at the same time.
In the drawing you can see a bathhouse for a suburban area with a balcony measuring 1.5x4 m. The overall dimensions of the building are 4x6 m. The project is suitable for organizing gatherings in an open area in the summer.
A frame bath can be equipped with a terrace for gatherings in the warm season
This bathhouse consists of 3 rooms:
- steam room;
- washing and shower;
- rest room.
The corridor is shown separately in the diagram. There is no room for a locker room. There is a small changing area in the washing room. The terrace connects to the living room.
The optimal wall thickness of a frame structure is 100 mm or more. The wood that is used in the process of making a bath must be treated with an antiseptic. It is recommended to use dried, calibrated lumber.
It is mandatory to perform a vapor barrier of the insulating material on the internal base. In the steam room you need to use foil vapor barrier. The reflective layer can increase the temperature inside the steam room.
Supply and exhaust ventilation is required in all rooms. Floors in the sink should be made with a slight slope or along a screed. The top and bottom floors need to be insulated in the same way as the walls.
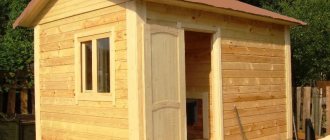
The minimum size of a frame bath is 3x4 m.
The minimum size of a bathhouse for a comfortable stay of several people is 3x4 m
The budget version of the frame is made in this way: the racks are sheathed on the inside and outside with boards up to 25 mm, basalt insulation or ecowool is laid inside the frame structure.
If you plan to use ecowool inside the walls, it should be carefully compacted and horizontal platforms for unloading should be installed. The frame must be sheathed inside and outside. To do this you will need to make a sheathing. On the outside, the insulation material is covered with a membrane to protect it from the wind. In the horizontal plane, the use of ecowool is a more economical option compared to basalt insulation.
The outside of the frame structure can be covered with any facing material. The inside of the building is covered with clapboard, plasterboard sheets with tiles or imitation timber.
Which base is best?
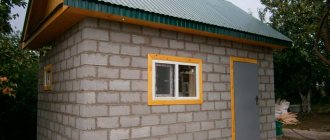
A sauna measuring 4 x 6 meters in plan is one of the most popular home sauna projects. A compact budget building will fit on the smallest plot of land.
The choice of foundation type depends on factors such as the characteristics of the soil foundation, the complexity of the work and the cost of constructing the supporting structure.
On solid soils, a strip foundation would be the best option.- If the task is how to make a foundation at a lower cost, then install columnar supports.
- In order not to risk the first two options, piles are driven on loamy soils, which, after passing through weakly bearing soil layers, reach a solid soil base.
- In the case of building a bathhouse on a peat bog or swampy soil, a monolithic slab is erected, which, holding the entire structure on itself, will “float” on the surface of the earth.
In the process of designing, calculating and comparing various foundation options, the developer can make the optimal choice in favor of a certain type of basic support for the structure.
Advantages and disadvantages of frame baths
Frame construction technology has the following advantages:
- ease of construction. Building a frame bathhouse with your own hands is simple; you don’t need complex tools. You can even build the structure alone;
- efficiency. The construction of a frame bath will cost much less than construction from other materials;
- the ability to limit oneself to a lightweight foundation. The weight of the structure is light, so there is no need to make a strong and expensive foundation;
- no shrinkage. You can carry out interior finishing work and put the bathhouse into operation immediately after its construction;
- high thermal insulation, thanks to which the steam room warms up quickly.
But a frame bath also has disadvantages. The most important of them is low fire safety. According to this indicator, any wooden bathhouse is inferior to a brick and aerated concrete bathhouse. To protect against fire, materials are coated with special agents that reduce their flammability.
Another drawback is low moisture resistance. A frame bath needs high-quality vapor barrier of the walls, otherwise it will quickly deform.
Where does construction begin?
Modern technologies for constructing a frame bathhouse imply the preliminary creation of a project. You can choose one of the most popular options:
- Classic building;
- Assembly of a bathhouse with an open terrace for relaxation;
- A compact option for those who want to save space.
The presented buildings are ideal for a family. If you plan to meet large companies, it is worth expanding the footage, you can add a swimming pool and a relaxation area.
How to build a bathhouse from boards with your own hands?
To build a bathhouse using frame-panel technology, you can use boards, slabs, plywood and OSB.
A slab is a board cut from a rough log that has undergone additional processing (cleaning of bark, leveling the cut surface, coating with antiseptics).
A slab bath has the following advantages:
- light weight;
- the original appearance that the bark gives;
- efficiency. It will cost much less than a bathhouse made of boards.
But croaker also has its drawbacks. The main one is that parasites often live under the bark, so the material must be disinfested. Another disadvantage is that, if necessary, you will have to remove the bark yourself, which will take extra time.
A plank sauna is a more popular and widespread option. The boards are great for constructing a summer bath; building with them is easy and quick.
Before you begin assembling the log house, you need to prepare the foundation. As already mentioned, one of the main advantages of a frame bath is its light weight, so there is no need to spend money on an expensive foundation; you can get by with a budget columnar foundation.
The bathhouse begins to be built from 50x150 boards on edge; the boards need to be laid in 2-3 rows - this will be the base frame of the bathhouse. It is first necessary to treat the material with an antiseptic.
After assembling the harness, it must be placed on a foundation covered with roofing felt.
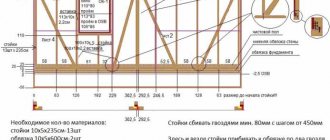
The next step is to place the frame posts. For them, you can use boards with a section of 10x10 cm. The racks must be installed in increments of 60 cm, i.e. the width of the insulation boards. At the same stage, it is necessary to decide on the location of doors and windows and prepare framing posts for them.
The free ends of the racks must be connected with a top frame made of a 50 mm thick board.
The frame does not have to be assembled on the foundation; this can also be done on the ground. This option is more convenient because in this case it is easier to build a bathhouse, in addition, it is possible to speed up construction: build the foundation and walls at the same time.
The next stage is covering the frame with boards. To make the structure reliable and rigid, it is better to place the boards in a horizontal direction.
It is necessary to place insulation between the racks, and on top of it a vapor barrier layer of film.
Next you need to make a roof for the bathhouse. For floor beams and rafters, it is better to use boards with a section of 15x5 cm. For sheathing, boards 25 cm thick are suitable. Different materials can be used as roofing; soft tiles or metal tiles would be a good option.
It is easier to make a bathhouse from boards with your own hands than from many other materials, so it will be a good option for those who cannot boast of much experience in the field of construction.
Are you on a fairly tight budget? A frame bathhouse would be a good option. You can find the project for free on the Internet; the construction itself is also inexpensive. At the same time, a frame bath is a high-quality construction that will serve you for many years. Do not deny yourself the pleasure of taking a steam bath and relaxing in nature!
What to use for wall decoration besides wood
Many people believe that wall decoration is limited only to wood. In fact, this is far from the case. You can use your own materials in different areas. These are tiles, plastic, cork. The most important thing is that moisture does not destroy the materials or that they are sufficiently well protected, as is the case with a metal frame .
There is no single scheme on how to properly arrange the shade and interior space in a arcade-type . You must rely on your own calculations construction options that can be implemented cheaply and quickly .
Standards for room sizes
The layout of 6x4 m baths can be different. It depends on the owner's preferences. However, there are some standards that should be adhered to:
- Window. A bathhouse with a separate sink and steam room should not be large. This will increase energy intensity. Suitable sizes reach 70*80, 40*60 cm. The window in the washing room should be located higher than in other rooms.
- Doors. It is better to make the dimensions of the entrance door smaller than in other buildings. This will reduce heat loss. Inside the room, the doors should not be located on the same straight line, as this will create drafts.
- Ceiling height. This figure can vary between 2.1-2.4 m.
A 6x4 m bath plan can contain a steam room, a relaxation room, a shower room, and a terrace. In addition, during construction it is possible to build an attic instead of an attic. In this case, the usable area will increase.
Rest room or dressing room
The task of the dressing room is to prevent cold air from entering the steam room. In addition, you can leave your things here and relax after water treatments. The area of this room is chosen based on the calculation that 1 person needs about 1.3 square meters. m. To the resulting area add some space for storing bath accessories and things.
Steam room
A bathhouse with a separate steam room needs to take into account the optimal dimensions of this room during its construction. The number of people who can steam at the same time is taken into account. The seating area is 1 m, the lying area is 2.2 m.
Stage II. Building the foundation
Building the simplest frame bathhouse with your own hands usually does not require preliminary preparation of the foundation due to its lightness. But, if you don’t want the walls to become damp, then you still have to make a foundation.
Wooden lumber: for a mini-bath
If your bathhouse is at most 3x4, and the walls and roof are planned to be light, then you can put a simple wooden foundation, securing it with stakes on the sides:
This foundation is especially good for capricious clay soils that do not suffer from excess moisture, but are seasonally mobile.
Columnar: for high groundwater
But for construction on uneven and heterogeneous soil, where groundwater is located quite close, a columnar foundation is more suitable:
To build such a foundation, you will not need either equipment or an additional construction team. It is enough to arm yourself with a drill, asbestos or plastic pipes, and know how to mix cement. Then we move on to the following steps:
- Step 1. Level the area.
- Step 2. Mark the location of future pillars.
- Step 3. We drill holes and make waterproofing at the bottom of each of them.
- Step 4. Gradually pour concrete and carefully lift the pipe.
- Step 5. At the 20-30 cm mark, we fix the pipe, waiting for the concrete to harden, and reinforce it.
- Step 6. As soon as the base hardens, fill the pipe with concrete to the end.
- Step 7. We form a grillage - using a regular strong beam.
Economical and simple, which is what you need for a frame bath. And here’s what further construction looks like on such a foundation:
Block foundation: for a light bath
For a bathhouse of medium architecture, where there will be a heavy stove and more than one person walking, a strong foundation made of blocks is well suited:
But building such a foundation is allowed only on soil where the freezing depth does not exceed one meter.
Pile-screw: for difficult soils
You cannot do without this type of foundation if you are building a solid frame bathhouse (or even a bathhouse-house), and the freezing depth of the soil is low. Then you will have to get to a more solid base using modern piles. This is a fairly simple technology, and usually you can get by with a workforce of four people:
- Step 1. Mark the locations of future piles.
- Step 2. We drill holes of the required length, which we calculate based on the data obtained about the soil.
- Step 3. Place the piles and gradually screw them into the ground.
- Step 4. Assemble and secure the harness.
Belt: for reliable soils
If the soil on the site is heaving, then it is better to opt for a simple strip base. In order to build such a foundation, you need to do the following:
- Step 1. A leveling is carried out at the selected location, and a trench is dug along it - about 40 cm wide and 50 cm deep.
- Step 2. The trench must be filled with sand to ground level and compacted layer by layer, constantly watering it with water for better shrinkage.
- Step 3. Place the formwork – 50 cm high and 30 cm wide.
- Step 4. The base of the formwork must be reinforced with metal pipes and rods for strength.
- Step 5. Now you can pour concrete - either in one go, or in layers, but without allowing the previous layer to dry.
- Step 6. You need to put roofing felt on top of everything - to waterproof the frame walls.
Look at the photo of how this is done:
And here’s what the construction of a small frame bathhouse on such a foundation looks like:
You will have to think about a prefabricated strip foundation if you are planning to build a large enough frame bathhouse:
The essence of such a foundation is to create the most reliable support on any type of soil, except for floating ones.