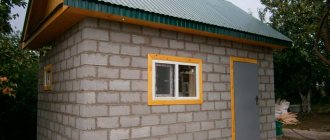
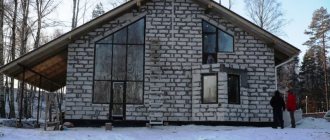
The construction of bathhouses from logs is an ancient tradition of our country, which has not lost its relevance in our time. Moreover, with the development of woodworking technologies, building a wooden bathhouse has become easier and faster, and the possibilities for realizing various architectural fantasies have seriously increased.
The group offers bathhouses made of rounded logs - modern lumber, which gives the structure a neat, beautiful appearance, improves the performance properties and service life of the bathhouse. Affordable prices, high quality materials from our own production and professional construction teams are what sets us apart from our competitors.
Log house in a bowl
One of the common ways to make a log house with your own hands from a log is the method of assembling it into a bowl.
It is most often used in the construction of a bathhouse, since due to its design features it retains heat well. In this assembly method, special semicircular recesses are made along the edges of the log, into which the upper elements of the structure are laid. There is a 25-30 cm protrusion outside the corner, and the cutout is made to fit the size of the log that will be placed in it. This is necessary to increase the density of the connection, which will prevent the building from falling apart, and will also reduce the likelihood of heat loss due to drafts in the cracks. Thermal insulating material is placed between the parts.
Log house in winterSource skstroylider.ru
Log processing method
So, if you want to build a sauna with your own hands from a log and prepare the material yourself, you will need a list of tools, as well as woodworking skills.
Required tools:
- saw;
- scraper for cleaning wood from bark;
- axes: the first - weighing 1.4 kg with a handle of 60 cm and sharpening at 25⁰, and the second - weighing 0.9 kg with a handle of 50 cm and sharpening at 20⁰;
- plane;
- an ax with a round blade for grooves;
- clamps for logs - these can be either metal brackets or two boards with grooves made in them;
- coated thread;
- trait.
All logs must be subjected to further processing no later than two weeks after harvesting and drying (more details: “How and with what to treat a log bathhouse - rules and methods of processing”). Otherwise, working with them will be much more difficult.
Here are detailed instructions on how to assemble a log sauna with your own hands.
At the first stage, you should adjust all the logs to the required dimensions, after placing them on the clamps. The “bowl” connection assumes the presence of an additional 30-60 cm of length in each element. But when fixing “in the paw”, the logs are cut exactly according to the design dimensions. If the thickness of the logs on different sides differs by more than 3 cm, then the size must be set aside from the center, adjusting the diameter from each edge separately.
The next step is to remove knots and bark. First, the work is done with an ax, and finishing is completed with a scraper, stripping the wood to a yellow color. The remaining loose top layer is trimmed off with a plane. Since after this procedure the tree is deprived of its natural protection, it must be treated with an antiseptic.
After this, you can begin processing the rim logs. These will be the thickest structural elements. The log is laid so that the winter side, that is, the area with the densest concentration of annual rings, faces outward. Next, a diameter line is drawn at the end, and markings are made parallel to it for cutting. Similar manipulations are performed on both sides of the log.
Now you can make small notches and, placing coated thread in them, draw a cut-off line along the entire length of the beam. After this, every 30 cm, notches are cut out with an ax, leaving about 1 cm to the desired depth, and then a layer of wood is gradually removed with a smaller hatchet, moving from one notch to another. Final cleaning is done with a plane.
Next, you need to make a dressing mechanism, as well as a longitudinal groove in the shape of a crescent. It is advisable that the moon groove be located at the bottom of the log, then water will not accumulate in the recess.
So, after trying on the log, you should calculate the width of the future groove, which is 2/3 of the average diameter of the adjacent elements. For example, the diameter of the ends is 250 and 235 mm, then the average value will be (250+235)÷2 = 242.5 mm. In this case, the width of the groove will be 242.5 × 2/3 = 162 mm. The depth of the channel will be equal to half the average radius. Of course, the obtained values can be slightly rounded.
In this case, the dimensions are taken from the lower beam, and marks are applied to what is laid on top. For ease of use, you can use a dash. Please note that for areas with different climatic conditions there are standards for the width of the lunar groove. So, for the lower value of -40 ⁰С – it is at least 16 cm, for -30 ⁰С – at least 12 cm, and for -20 ⁰С – no more than 10 cm.
Markings for removing wood along the entire length are made in the same way as with the frame crown. It will be more convenient if you cut a furrow in the center and then remove the wood using an ax or saw. You can use an adze. The surface is adjusted using a plane.
To understand how well the logs fit, any dye or coal chips are applied to the surface and tried on. By assessing the intensity of coloring, you can draw conclusions about the quality of processing and correct flaws.
Now you need to do the corner connection. To lay “in a bowl,” markings for the bowl are applied using a line extended by ½ of the average diameter of the log being placed in the recess. Having cut several vertical notches, the work is completed to perfection with an axe, plane or chainsaw. The result will be a semicircular gutter.
In the absence of a line, you can use two pieces of wire 6-8 mm thick, attached to the handle of a hammer.
But when building a bathhouse from a log with your own hands using the “paw-on” fastening technique, you will have to work hard. The first to be harvested are logs, that is, logs with grooves. In this case, the logs are always placed in the same plane, that is, on both sides of the same log.
To determine the width of the logs, take the thinnest log and calculate the value of 2/3 or 3/4 of its diameter. The depth of the logs will be equal to the average diameter of the thickest log. Moreover, these values will be unchanged for the entire material. You need to set the width of the blockheads starting from the center line.
Then you can start cutting out the paw. To do this, two log frames are made in the upper and lower parts of the block, the depth of which is equal to the width of the groove. After this, the joints are made, dividing it into 8 equal parts. To ensure that all elements are the same, you can use a trait or a pattern.
However, if the process of processing compounds is too complicated for you, you can purchase the material with ready-made compounds.
Note that when processing wood, it is better to use an ax, which clogs the fibers in the working areas, and the tree is less susceptible to fungus and parasites.
Stage 3. Construction of the foundation
Let us immediately make a reservation that massive monolithic foundations can be abandoned due to the insignificant weight of the future structure. In order to save money, you can resort to one of two possible lightweight designs, namely:
- strip foundation;
- columnar.
Let's consider each of the options.
Strip foundation
Belt-type foundationMarkingMarkingDigging a trenchFormwork and reinforcementFillingReady foundation for a bathhouse
To build such a foundation around the entire perimeter, as well as under future walls, dig a trench 40 cm wide and 50 cm deep, lay a “cushion” of sand and gravel at the bottom. Next, lay the reinforcement, build formwork 50 cm high and pour concrete mortar. As a result, the height of the foundation will be approximately 1 m.
Video - Pouring the foundation
Place strips of sand and crushed stone inside the perimeter. In the future, the strips can be filled with concrete or a wooden floor can be built on them. The choice of one option or another depends on personal preferences and financial capabilities.
Columnar foundation
Drilling Fittings and pipe for the foundation Pipe and fittings installed in the hole Concrete poured into the pipe Anchor for attaching the lower trim
In the case of a columnar base, supports will need to be erected. There are two possible options:
- brick;
- from asbestos pipes.
Place supports at the corners of the perimeter, as well as under all walls in 1.5 m increments. Pre-lay a concrete “cushion” under each support. Fix several reinforcement rods in each support so that the latter protrude above the surface by at least 30 cm.
Build formwork 40 cm high, lay reinforcement in it and tie it to rods protruding from the supports. Fill with concrete mortar. After four to five weeks, when the concrete is completely dry, you can begin further work.
Foundation for a bathhouseBrick columnar foundation
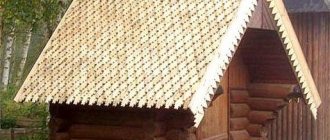
How to properly make a roof on a log bathhouse
The roof of the bathhouse can be of two types:
- A pitched roof is easy to erect and does not require large material costs. The disadvantages of the design include a small attic space.
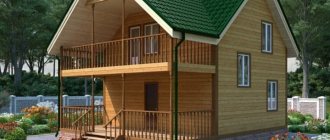
- Gable roofing allows you to equip an attic space for utility or other needs.
Having chosen the type of roof, they begin to build the rafter system, which is attached to the mauerlat.
Bathhouse with a gable roof
Let's consider a simple version of a pitched roof. When choosing a pitched roof, a height difference between two supports is usually provided, which is about 20 degrees. This is achieved in two ways:
- walls are built at different heights;
- a special support unit is installed on one side of the bathhouse box.
Important! The angle of inclination of the rafters should be 35 degrees, in snowy areas - at least 45.
Rafters can be installed without struts for a span length of up to 4.5 meters with a rafter pitch of 60 cm. If the span height is over 4.5 meters, the installation of struts is necessary. Installation of rafter legs must be carried out using metal fasteners, this will avoid deformation of the roof during shrinkage of the building. The roof covering is made of roofing materials at the choice of the bathhouse owner.
Useful tips
In order for the bathhouse to be in working order for a long time, you need to know the subtleties when building a structure:
- Logs for the log house are harvested in winter. This is necessary because during winter harvesting the log undergoes less rotting and is resistant to various precipitation. To check whether the logs were harvested in winter, iodine is dripped onto them. A bluish spot should form.
- To ensure that the building lasts as long as possible, all wooden structural elements are treated with an antiseptic.
- To increase the thermal capacity of the structure and give it a beautiful appearance, it is necessary to fill all joints and gaps with tow. It should not protrude further than the logs, otherwise it will get wet and rot.
- If you choose the “foot-to-foot” method of fastening logs, it is necessary to protect the corner joints. To do this, they are sheathed with boards.
- It should be remembered that during shrinkage, the height of the building will decrease by 5 or 10 percent.
- Cutting the material to the center will help prevent cracks from appearing in the log.
- Caulk work is carried out in dry weather.
- They increase the stability of the structure and prevent the displacement of logs by securing them with dowels, installed in holes in the center of the logs.
Thus, making a log house with your own hands, although a complex process, is doable. In the video presented for this article you can find complete information on this topic.
Types of Corner Joints
There are two types of corner joints - with and without remainder.
The first method is simpler and is called “in the bowl”; there are, in turn, three types:
- a simple half-wood bowl;
- oval comb;
- "in the fat tail."
The first option is more common and is used more often; these are the grooves that are made in standard logs.
Types of log connections
Corner joints are performed using the “claw” method without any residue. It requires a lot of skill and is not easy to do with your own hands. Such a connection requires additional insulation. Therefore, the baths are sheathed on the outside with finishing material.
Corner wall connection
Note! A bathhouse built with ends protruding at the corners is less ventilated. And with even corners, construction will be more economical, because then the logs are needed 50 cm shorter.
The finished log house must be caulked; this is done starting from the bottom crown in a circle. The roof of the bathhouse is usually gable, with a small attic or attic.
Rafter system
The roof consists of the following elements:
- Rafters, consisting of a rafter leg, a tie, a mauerlat, a stand, a purlin and a lining;
- Lathing - from edged and unedged boards;
- Roofing material.
In this form, the log house should be left until the next season for shrinkage and drying.
Material calculation
How to make a log house and calculate the amount of money spent, if the dimensions of the proposed structure are known - this is an important point in the manufacture or ordering of a finished building. For example, for a bathhouse with dimensions of 3x4 m and a height of 2.4 m with a frame in a bowl.
Due to the fact that the corners of such a structure will protrude 25 cm on each side, when calculating the length and width of the building, 50 cm is added.
If the diameter of the log is known (for example, 24 cm), then the volume of wood can be calculated using the formula 3.5 x 4.5 x 2.4 x 0.24 = 9.072 m³. During assembly, a groove is made in each log, which differs in width from 0.5D to 0.67D. This reduces the final volume of wood, so this formula requires further refinement.
Wide logs for a log house Source promdrevo.ru
| Characteristics of rounded logs | Width of crown groove B=0.5*D (1/2D) | Width of crown groove B=0.6*D (3/5D) | Width of crown groove B=0.67*D (2/3D) | ||||||
| D | B | L | V | B | L | V | B | L | V |
| mm | mm | linear meters | cubic meters | mm | linear meters | cubic meters | mm | linear meters | cubic meters |
| 200 | 100 | 5,75 | 0,180 | 120 | 6,25 | 0,196 | 133 | 6,67 | 0,209 |
| 220 | 110 | 5,22 | 0,199 | 132 | 5,68 | 0,216 | 147 | 6,06 | 0,230 |
| 240 | 120 | 4,79 | 0,217 | 144 | 5,21 | 0,236 | 160 | 5,56 | 0,251 |
| 260 | 130 | 4,42 | 0,235 | 156 | 4,81 | 0,255 | 170 | 5,13 | 0,272 |
| 280 | 140 | 4,11 | 0,253 | 168 | 4,46 | 0,275 | 187 | 4,76 | 0,293 |
| 300 | 150 | 3,83 | 0,271 | 180 | 4,17 | 0,294 | 200 | 4,44 | 0,314 |
| 320 | 160 | 3,59 | 0,289 | 192 | 3,91 | 0,314 | 213 | 4,17 | 0,335 |
| 340 | 170 | 3,38 | 0,307 | 204 | 3,68 | 0,304 | 227 | 3,92 | 0,356 |
| 360 | 180 | 3,19 | 0,325 | 216 | 3,47 | 0,353 | 240 | 3,70 | 0,377 |
| L – the number of linear meters of profiled logs that are necessary for the construction of 1 m² of log wall. | |||||||||
| V – volume of log (cubic capacity of profiled log), which is required for the construction of 1 m² of log house wall. |
Based on the table, the total volume of required materials will be 7.2912 m³, which is already 1.7808 m³ less than the previous calculation. Such calculations will help save money due to the fact that excess wood will not be used.
From this video you will learn how much a log house costs:
Types of log bathhouses
There are two main types of log house: “in the oblo” and “in the paw”. The first option is easier to implement and the most popular. However, more material consumption is required here due to the fact that the logs on each side protrude 25 cm beyond the corner. But thanks to this technology, it is possible to create a warmer room and reliably protect its corners from the wind.
Each log is adjusted before being placed in the clapboard, or bowl. Here a rounded groove is cut out, no less than a third of the thickness of the trunk. The lower the temperature in the region, the deeper the excavation should be. Each subsequent log is placed in a previously prepared thicket.
There are several other varieties of this technology. In a log house, the logs are turned over with the notch down, focusing on the product laid below. This allows precipitation to flow freely from the logs without getting into their thickness. The result is a more reliable and durable structure.
The type of log house “in the oblo” is easier to implement and the most popular
With Canadian felling, a trapezoidal notch with a tenon is created in each log from below, and a groove for the tenon is made on top. This technology allows you to create the maximum effect of jamming connections.
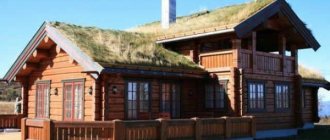
Norwegian log house is made from products with hexagonal processing or oval section. The technology is completely identical to the Canadian log house.
The appearance of the ends of the Swedish log house differs significantly from other technologies. This is a very painstaking and time-consuming process. The protruding ends of the log and the recess are trimmed to a hexagon shape. As a result, it is possible to obtain a unique, aesthetically striking structure.
The most economical is the “paw” method. However, this requires great skill of the performer. The corners in such a log house turn out to be cold, which requires the creation of additional thermal insulation, and, consequently, further cladding with facing material. After reviewing the photos of log bathhouses, you can choose the most suitable option for construction.
The option of a log house “in the paw” is more economical but requires work experience
Marking and cutting logs
To know how to cut down a log house, you need to understand the method of marking logs. To do this, they need to be laid perpendicular to the lower crowns. It is recommended to use staples to secure the structure. This will prevent the log from turning around its axis. Next, using a line, you need to draw the contours of the bowl and longitudinal grooves using several rules:
- One leg of the feature should rest on only 1 log.
- The distance between its points should be half the diameter of the log, depending on the log house used: “to the edge” - the upper one, and “to the edge” - the lower one.
- It is recommended to start drawing with a bowl and end with a longitudinal groove.
- The prepared logs are placed in bowls, and after that it is necessary to process the joint: if there is a large gap, insert wedges, if it is small, remove the excess layer.
It is recommended to mark the log using a line or a chemical pencil. A carpenter's ax must be carefully sharpened before starting a log house. This will make cutting out the bowl easier and will also help avoid unnecessary stress and injury. The bottom of the recess is made smooth so that the gap during installation is minimal.
Log marking Source drevo78.ru
Log bathhouse or turnkey bathhouse
We work according to any convenient scenario. We cut the frame at the construction site and install it on a pre-prepared foundation on the client’s site. If necessary and with prior approval, we carry out excavation work, lay communications and pour the foundation for the log house.
A turnkey bathhouse is the delivery of a facility from A to Z. We start with design work and end with the implementation of an interior design project. For each stage of work, we sign a contract and agree on an estimate.
Assembling a log house
Before assembling the log house, it is necessary to make a strip-type foundation, since the wooden structure has a large mass, and put waterproofing on its upper part.
Next, it is recommended to lay 2-3 larch crowns and level the horizontal surface of the log house using a level. During assembly, insulation is placed in the longitudinal groove, and to compact the log, the log is tapped with a wooden mallet or log. Also, after laying each crown, it is necessary to check the horizontal and vertical position of the structure.
After assembly is completed, all cracks and joints are caulked, and excess insulation is removed. After six months, it is recommended to repeat this operation, since the insulation can become saturated with moisture from the drying logs. All wooden structural elements must be treated with an antiseptic 2 times.
Log houseSource metasold.com
How to assemble a log house is shown in this video:
Walling
All logs for the walls will be placed on the framed crown. However, before laying the crown, it is necessary to ensure waterproofing. It can be two layers of roofing material coated with bitumen mastic. If the insulation consists of several pieces, they are laid with an overlap of 20 cm, sealing the joints. On top of the roofing felt, for additional protection of the lower crown, it is advisable to lay a board 1.5 cm thick, placing it with gaps of 2-3 cm. These indentations can later be foamed.
After this, the material prepared in advance with the selected connecting mechanisms must be laid on the frame. Laying is carried out according to the “butt to top” principle, that is, alternating the arrangement of the ends of logs with larger and smaller diameters from the lower element to the upper one. This is necessary in order to maintain the same height of the walls on different sides.
However, only connecting at the side joints is not enough. The entire structure must be fastened vertically using spikes. In diameter, they are made at the rate of 1/10 of the trunk width plus 2 mm. The depth of the tenon holes is equal to the thickness of two logs. The tenons are mounted 10-20 cm from each edge, and along the wall the distance between them is 80-100 cm. This fastening strengthens the structure of the log house so that window and door openings can be installed without complications. In addition, the spikes prevent the logs from mixing in the horizontal plane during the shrinkage of the log house.
You need to place insulation in the longitudinal grooves - batting, tow, moss or any other. It is desirable that the outside appearance of the walls be neat, and the excess can be removed from the inside.
The position of the logs must be strictly vertical. You can monitor this using a plumb line or level. In this case, the winter side should always be placed outward.
Note that during the shrinkage process, the height of the log house may change, so during the construction process it is made 15 cm higher than the planned value.
Briefly about the main thing
The log house is most often made from pine or other coniferous wood.
The main advantage of a wooden log house is thermal insulation and environmental friendliness.
When choosing a log manufacturing technology, it is recommended to take into account the level of knowledge and skill. If it is not high enough, then it is better to contact specialists.
It is necessary to use high-quality thermal insulation and means to combat fungus and insects. This will extend the life of the building.
All logs for a log house must be treated with a fire retardant to avoid fire in the structure.
Qualitative features of a log bathhouse
The external simplicity and simplicity of a wooden frame implies reliability and thoughtfulness of the design. Only wood can create unique microclimatic conditions in a building. The main features of a log bathhouse:
- excellent ventilation. Wood easily allows air vapor to pass through without creating a stagnant, humid atmosphere;
- low thermal conductivity. Log walls warm up quickly and retain heat for a long time;
- useful qualities of building material. The content of natural resins in wood creates a tonic and healing effect for the human body.
Modern technologies make it possible to satisfy any requirements for bath construction
The main advantages of chopped baths
Today, the construction of log baths is a priority for those owners who want to have at their disposal a building with the following advantages:
- the wood used for laying is “breathable”, and therefore there is practically no need to create ventilation;
- the heat capacity of wood is optimal, and therefore the level of heat transfer is sufficient to ensure the most comfortable conditions in all rooms of the log house;
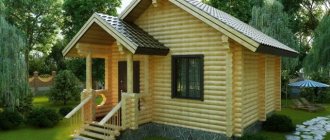
- there is practically no need for thermal insulation, since the wood itself protects the bathhouse very well from heat loss;
- the wood gives the bathhouse the style of an old Russian building, which looks very impressive in the photo and upon visual inspection;
- The wood itself creates a very pleasant aroma and creates a pleasant atmosphere in the room.
Bath sewage system
To drain wastewater from a bathhouse you will need: a pit with a water seal, a well for wastewater and pipes that drain dirty water into the pit and then into the wastewater well.
The pit is torn off from the outside of the bathhouse foundation, and gravity pipes made of plastic, cast iron or ceramics are inserted into it from the steam room and washing room (metal pipes will quickly rust).
The pit should be 500 mm from the foundation, its depth should be 700 mm, and its cross-section should be 500x500 mm. The walls of the pit are covered with a 100 mm layer of concrete, and a 110 mm drain pipe(s) from the bathhouse is inserted into it under the foundation. The main well for drainage, holding at least 2 m3, must be dug at a distance of at least 2.5 m from the pit - the further the better. A pipe is supplied to it from the pit, laid at a slope at a depth of 1.5 m (below the freezing depth), its outlet from the pit must be located 100 mm from its bottom. After inserting the drain pipe, the main drainage well is filled with gravel or sand 1 m from the bottom, and soil is poured on top - in a layer of at least 500 mm. When laying, carefully compact each layer.
Before leading the drain pipe into the pit, a galvanized water seal is installed, located at an obtuse angle to the drain pipe from the bathhouse. Its edges and upper side are hermetically attached to the walls of the pit; the distance from its lower edge to the bottom should be no more than 50 mm - thanks to this design, unpleasant odors and cold air will not penetrate into the steam room (washing room) through the drainage hole.
To prevent freezing in winter, the pit must be covered with two covers of the appropriate size (wooden or metal), felt should be placed between them, and the top cover should be covered with expanded clay, slag or sawdust.
Stage 1. Preparation of round timber
Preparing round timberPreparing logs
Round timber must be harvested at sub-zero temperatures, that is, in winter. It is at this time that the amount of moisture in the wood is minimized, therefore, during drying the material will deform and crack less.
In order to ensure the durability of the log house, certain sections of logs (the so-called butt logs) are used during construction. These sections start from the rhizome and end at the crown. Such butt logs are denser (which compares favorably with the tops) and there are practically no knots in them. Selection criteria also include the round shape and degree of curvature of the trunk. In both cases, a defect is an error exceeding 1 cm per linear meter.
Preparation of logs for a log houseButt logs
The same applies to diameter. For example, the diameter of the base of the log is 35 cm, while the top is 25 cm or less. Such round timber is categorically not recommended for use in construction.
Logs for a log house
Finally, pay attention to the type of wood. Ideally, coniferous trees (spruce, larch, etc.) should be used for the bath.
Larch is characterized by resistance to moisture, although in extreme cases you can resort to the “pine-spruce” combination, in which the first few crowns are erected from pine. And if only spruce is used in construction, then the material must be treated several times with an antiseptic.
Perform further actions in accordance with the previously drawn up project. You can create such a project yourself, find it on the Internet, or order it from specialists. It is with the help of this document that you can calculate the required amount of consumables, determine the area and shape of the base.
Which is better
I would still like to start by looking at wood. And not immediately by species, but for now only from the popular opinion that the best wood will be that which was harvested in winter.
It is expected that such wood will be drier than wood harvested at other times of the year. But we did a little investigation. In fact, according to wood harvesting reference books, the same conifers contain more moisture in winter than in summer. And it seems to us that the source of this myth was... the birch tree.
All sorts of light walkers and survivalists highly recommend birch as a tree for a winter fire. Because it is much drier than other breeds at this time. And by the way, they really don’t recommend conifers . Their experience also says that this wood is too wet, which means it will burn extremely poorly.
Log houses are also made of birch, of course, but only as part of a bathhouse (steam room). But for the rest, they still prefer spruce and pine (and other conifers) - and not only because they are the most abundant in Russian forests. Therefore, we advise you to be more critical of the myth of “wood harvested in winter.” You should be more interested in humidity and drying conditions .
But it’s better to install a log house in winter . And the reason for this is a fungal disease called “blue” or “blue”. Certain types of fungi change the color of the sapwood to bluish. But the matter is not limited to color - some characteristics of the tree also change, it begins to absorb more moisture, for example. However, strength does not suffer .
So, in winter, mushrooms are much less active , and if they are not encouraged, they will not grow. A log house installed in winter will avoid this disease.
Of course, treatment with an antiseptic and bleach will cause the blue discoloration to disappear. But we are talking about a bath, and the antiseptic is poisonous, so you should not use it in the steam room. Bleach... often it’s just bleach, and it erodes, so you can bleach wood in a steam room, but use it only after the smell disappears (more about bleaching here).
IMPORTANT! Antiseptics must be distinguished for internal and external work, and not be confused with each other. It is worth treating the log after laying it, and with the part that will be inaccessible in the future, do the following - they impregnate not the wood with an antiseptic, but a jute lining (for example).
What species are suitable for logs?
As already mentioned, for the most part these will be coniferous species.
These are the ones you most often find on the market and in the offers of construction companies. Of course, there is a lot of taiga in Russia, but the main reason will still be strength and resistance to rotting thanks to resins . And, of course, the straightness of the trunks is higher for conifers than for deciduous ones. All this applies not only to the cheap pine and spruce mentioned above, but also to more expensive species - larch and cedar. They may also offer you fir.
Among the deciduous trees we would name oak, birch, aspen, alder and linden. But only oak has sufficient strength and resistance to external influences. And it's very expensive.
Since we are talking about a bathhouse, where high temperature softens the coniferous resin and causes it to flow to the surface, there are two options: either partially use hardwood to build a steam room, or line the steam room made of coniferous wood with hardwood paneling .
Spruce has less resin and is lighter in color than pine. Larch and cedar are noble species. Larch is not afraid of water, it only makes it stronger.
BY THE WAY! You shouldn’t delude yourself about cedar - this is not at all the tree from which King Solomon built. Here you will find not Lebanese cedar, but Russian... cedar pine. This is what we call “cedar”.
Whom to choose? Focus on your budget. If it allows, take larch; if not, then pine will do. Although... I would like to advise you not to trust myths too much - under unfavorable conditions, larch may well rot, and under favorable conditions, linden can stand for decades.
And it is worth warning that the rounded log into which cone-shaped trunks turn can, over time, present many unpleasant surprises. Especially from the same larch. If you take an atmospheric drying log, then it often begins to wear out over time. It can curl, bend, or simply go into deep cracks.
This can only be avoided if you take trunks that have been subjected to heat treatment. It comes in two types - regular and chamber. In the first case, uniform shrinkage is achieved, but with preservation of the resin.
The second lasts much longer, and the output is wood with evaporated resin, which does not cause shrinkage, torsional deformation, bending, or cracking . All this is extremely valuable, but the price of such wood is high.
Dimensions, diameter
Before we name the dimensions of a log for a bathhouse, let's briefly go over what we know about trunks. Firstly, they tend to get thinner closer to the crown.
Consequently, the upper diameter will be less than the lower diameter of the cut. And for even laying , a cylindrical rather than a cone-shaped shape is preferable. Therefore, of the three types of processing of trunks - rounding, planing and scraping, we get the maximum level only in the first case, the minimum - in the third, and the second - something in between.
At the same time, rounding is the cheapest , since it is done on machines, while the rest involves manual labor. Manual labor costs more than machine labor. But is a rounded log ideal for use?
There is nothing wrong with the operation itself, and it produces a form that is ideal for construction.
IMPORTANT that the wood itself has no defects and is properly dried. In this case everything will be fine.
The planed version has one caveat: after all, when laying logs in a wall, you should adhere to the GOST rule, according to which 1 cm of camber is allowed for each linear meter. (Let us explain: camber is the change in diameter.)
With the scraped version there is no need to expect compliance with GOST standards for consistency. And all the flaws remain there - changes in thickness are possible in places where branches grow, and the curvature of the trunk is not eliminated.
It is clear that the first and second options are preferable, but not the third.
Now about the uniformity of the logs. There is also a rule about it:
ATTENTION! The permissible difference in the diameters of the crowns used in construction should not exceed 30 mm.
That is, it doesn’t matter whether your diameters are large or small, the main thing is that they are not very different from each other.
Otherwise, the strength of the structure will be in question.
As for the dimensions, the linear dimensions depend on the project and on the climatic conditions of the area where the bathhouse will be located. You should also take into account the seasonality of its use - thinner logs are suitable for a summer bathhouse than for an all-season one.
If the task is to make a very light summer building , you need to take material with a diameter of up to 18 cm . And it is also useful in all-season baths for creating partitions.
A more substantial summer(!) sauna can be made from logs with a diameter of 18-22 cm .
For all-season baths, diameters from 22 to 28 cm . Large numbers are applicable where we are talking about large-area objects or climatic zones with very low temperatures, where logs can be up to 36 cm in diameter (at -45 degrees that’s the best).
How many pieces do you need
There is nothing difficult in the task of calculating how many logs are needed for a bathhouse. Let's describe the solution step by step:
- We look at the plan (about layouts here, if anything) and write down the lengths of all the walls. If you use a smaller diameter for the partition, then count the partitions separately.
- Add up the lengths of the walls. The resulting figure is the total length of one conventional crown.
- Decide what diameter the logs will be.
- The height of the bathhouse is included in the project. Divide the height by the diameter of one crown. The resulting figure is the number of crowns.
- We multiply the length of the conventional crown by the number of crowns. We get the total length of all logs.
- The length of one standard rounded log is 6 meters. We divide the resulting length of all logs by the length of one log. The final figure is the amount of material to be purchased.
- Pediments are considered in a similar way.
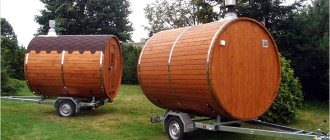
Bathhouse made of large and huge logs
We would classify bathhouses made from large and huge logs as design projects. Because there is clearly not so much a construction need as an aesthetic preference . The owner of such a bathhouse clearly likes fabulous, epic times when heroes walked the earth