One row of logs is called a crown The lower crown is the frame , it becomes the basis of the entire house. For the frame crown, durable hardwood (larch or oak) is selected. All other logs fall on it. Unfortunately, rotting of the lower crown is not uncommon. This is the most problematic part of the design.
To extend the service life of the flashing and the building as a whole, you should not skimp on roof overhangs and wood processing compounds.
Of the coniferous species, preference should be given to pine, which is more durable than spruce and contains less resin. It is highly advisable to use logs harvested in winter for construction. “Frosty” wood is dry, easy to process, and much less susceptible to warping, shrinkage, and rotting processes.
Rules for laying out logs in a log house
- The layout of the log in the crown should be carried out in such a way that the thinner and denser annual rings of the tree look outward, and the wider side from the core faces inside the structure. The dense side of the log is less susceptible to shrinkage cracks, and the wide part of the sapwood creates some thermal insulation effect and is warmer.
log cut
The northern part of the log should be laid outwards. On the server side, the core of the tree trunk has denser annual rings. Due to the difference in the density of the rings, the southern side of the log retains heat better and should be facing inside the house, while the northern side is more resistant to environmental changes and is located outward. Of course, it is rare that a mass log house developer will pay attention to such a feature; this recommendation can be useful to owners who are meticulous and serious about the construction of their log house.
- A curved log with its convex side is laid either up or down. The bulge should not point inward or outward. After the final assembly of the frame, the curvature will not be noticeable.
- Between the logs, to prevent blowing and heat loss, a layer of sealant made of flax (tow), natural moss, jute and other special materials is laid. The thickness of the moss or other sealant between the logs should be approximately 2 cm. The sealant should be laid out in an even layer, extending 10 cm from the longitudinal groove and 5 cm from the bowl of the log.
You should not allow the frame to be assembled without a sealant for subsequent caulking. This way, you won’t fill up all the voids between the logs, which will be blown out and in which fungus will form and insects can infest.
- Laying the top crown
Logs with varying diameters from butt to top can be laid out in two ways:
The first method is when the butt of one log intersects with the top of a perpendicular log in the corner of the crown.
Komel - peak
The second method is when two tops and two butts of a log intersect in two opposite corners. At the same time, in each subsequent crown the intersections of the peaks and butt alternate. That is, if two vertices intersected in the corner of the lower crown, then two butt parts should intersect in the same corner of the upper crown.
The listed methods are suitable for any method of cutting the bowl.
It will be more convenient and practical for two people to lay the top log, so as not to move the unfolded compactor. It is also possible, but more difficult, to place the log in the bowl while maintaining the seal on the log. After laying, to make the log more dense, its surface is tapped with a wooden sledgehammer, popularly called a “baba”.
Technology for laying a log frame: step-by-step instructions from start to finish
Operations for laying timber and logs on the foundation
Having a certain skill in working with wood, many home craftsmen are thinking about assembling their own log house. They can be understood - buildings made of wood are gaining popularity due to their environmental friendliness and beauty. In addition, such houses win the love of buyers because they resemble a construction set with assembly diagrams.
According to this, housing can be built quickly, since the material is numbered from the first to the last crown. So, when the log house has already been ordered and delivered, you should carefully consider the stages of construction that will ensure the structure is reliable and durable.
Assembly operations from start to finish
The logs of the log house are laid as follows:
- Installation of the trim crown.
- General construction.
- Rafter system.
That's it in a nutshell. Now in more detail:
Cover crown:
- Before placing the first crown on the foundation, it should be carefully insulated to prevent interaction with moisture. Concrete is a cold base that can accumulate condensation due to temperature changes from outside and inside.
If you do not pay due attention to protecting the wood from it, the structure will quickly rot. The surface of the concrete foundation should be tarred and covered with two layers of roofing material, then the chances of durability increase.
- Next, a larch beam should be laid on an isolated surface - it will become a special protection for the timber of the log house as a whole, since this type of wood does not interact with moisture at all. An example of this is the wood piles near Venice. They are made, by the way, from Russian larch and have been standing for many centuries.
Work should be carried out exclusively according to the level, thus maintaining the balance of the entire house. Such timber does not need to be tarred or covered - the bottom of the decorative structure will remain beautiful.
- You can lay the first, trim crown. A pair of logs are laid parallel to each other, and another in the corresponding grooves. It is important to know that to start laying, choose the widest logs; they will be a stable foundation for the entire structure.
The methods for laying timber in a log house, as well as logs, are numerous and different, usually they depend on cutting the corners. The most common were “in the bowl” and “in the paw”, that is, with and without remainder. Canadian bowls are considered the best in terms of insulation; they reliably cover all elements of the frame, thereby not giving gaps the slightest chance.
- You only need to select such a bowl manually, that is, a custom-made log house should already contain the appropriate grooves and fat tail tenons. If a home hewer does not have enough qualifications, then a simple bowl would be a good option.
True, it will have to be caulked more than the Canadian one. And factory cuttings, in general, make it possible to ensure that laying a log frame on the foundation will take the shortest time.
After the frame crown takes its place, you can move on.
General log house
- To achieve the desired height from the rows, you need to layer each circle with the selected inter-crown insulation. To do this, it is pre-soaked in machine oil and squeezed out.
- As for the strapping, our ancestors previously made huts without a single nail. This is still practiced today. For fastening, wooden dowels are used - rectangular sticks for round holes - incompatibility of shapes will help to firmly hold the crowns of the log house. How it's done:
- On the frame crown, holes are drilled in increments of 1.5 m in such a way that their depth is equal to the diameter of the log. The dowel itself must be at least 1.5 times the diameter, that is, its ends will necessarily hold adjacent logs or beams.
- in order to accurately calculate the marks for the holes of the next row, you need to hammer the dowels into the frame, lift the log, and holding it in this state, mark their location on the next element with blows from the butt of the ax. It is clear that you will not have to work alone.
- after this, holes are drilled in the next element. In this way, circle after circle is built up.
- The last two rows of the building are left unsecured. This is so that they can be easily removed to install the rafter system.
Thus, the timber frame is laid to the desired height.
Rafter system
The most important element of a house structure, directly involved in the stability of the structure. It ties the crowns like a dome, and therefore even the slightest connivance cannot be allowed in terms of attaching it to them. It is necessary to erect the rafter system only after the final shrinkage of the log house, that is, at least a year must pass.
- First of all, the material for the supporting structures is selected. The thicker the logs or timber, the more reliable the frame should be. As a rule, wood with a cross section of 150*200 mm is suitable for pitched roofs. The sheathing may be a little thinner.
- Secondly, the type of rafters is selected - hanging, layered.
- Next, the Mauerlat is installed - the main load-bearing beam of the roof, side and ridge girders. They are secured using steel wire ties or staples. You cannot use any nails or screws - the roof endures enormous loads, and the fasteners will simply fly out of the places intended for them. It is better to spend time on the correct cuts at an angle and binding.
- It is also worth knowing that the additional equipment of the roof depends on the size of the building - trusses, diagonal braces and eaves overhang. Detailed information about the correct construction of the rafter system can be found from competent sources, which are grandfathers and fathers, God bless them.
- When the roof is settled, the installation of the timber frame is considered complete.
The above contains valuable information for home craftsmen.
But it is worth mentioning that they will not be of any use to people who do not know the purpose of carpentry items. In this case, it is advisable to order a turnkey log house or house kit. It will also have to be assembled by hand, but the technological techniques performed - holes for dowels, cutting out grooves and corners will make the work easier than completely assembling the house from scratch.
As a rule, the technology for laying a log house is the same. The only difference is that the corners are cut out in a special way, and various insulation materials are used, the types of which are widely available in the industry. Good luck!
You need to enable JavaScript or update your player!
https://1drevo.ru
legkoe-delo.ru
Fastening log logs with dowels
Every two or three crowns are fastened together with wooden dowels.
The dowel is a flat, cylindrical wooden stick, approximately 40-43 cm long, with a diameter of 2-2.5 cm. A quadrangular block with a suitable diagonal can also be used as a dowel. Any dry type of wood can be used for the dowel.
Such unification is necessary in order to:
- maintain the rigidity and strength of the log wall
- to minimize the possible formation of gaps between the crowns during shrinkage and shrinkage of the log house.
- restrain and keep logs in one plane during shrinkage
dowels for factory-produced log houses
Holes for bonding with dowels are drilled every 3 logs in height, using a drill with a diameter of 20 mm and a length of 45 mm. The distances between holes on the surface of one log should be from 1 to 1.5 meters and 20 cm from the bowl, window or doorway. Using a construction pencil or marker, mark the location of the dowel on the log. To ensure that the holes do not coincide with those below.
approximate arrangement of dowels in the crowns
If jute or tow was used as a sealant, they must be removed from the drilling areas and returned to their place after drilling. This precaution is necessary to ensure that the drill does not jam in the log due to the sealant wound around it.
If the drill jams, then when working at height, this can be traumatic and create great difficulties in removing it from the log. When using moss as a sealant, such problems do not arise.
The diameter of the dowel should be such that when driven into a log, it will hardly fit into the hole. The length of the dowel should be 5 cm less than the length of the hole itself. After driving in, the dowel should be slightly deeper into the log.
A big mistake and a complete violation of technology is the use of metal products (rebar, rods, etc.) as dowels.
In the cold season, when the dew point is inside the log and on the metal, moisture will concentrate, which will inevitably lead to wood rotting processes. In addition, when a log house shrinks, the rigidity of the metal does not allow the logs to shrink evenly in their plane, which leads to the formation of large gaps between the crowns.
The durability of a log house with metal dowels is several times less than that of a log house fastened with wooden dowels, in compliance with the technology.
Basic methods of dressing corners
Corner dressings are divided into two types:
- With the remainder (the logs protrude beyond the formed corner).
- Without a trace.
The functional difference is minimal and the decision is made based on aesthetic considerations .
The first method is also called “ in oblo ”. It is presented more clearly in the picture:
The second type of dressing is called “ in the paw ”:
When to cut out log windows and doors
Openings in a log house can be constructed at three stages of work:
I cut out the openings in the solid frame after shrinkage.
With this option, the most even shrinkage geometry is maintained and it becomes possible to precisely cut an opening to the dimensions of a specific door or window.
However, cutting openings in a blind log house is accompanied by a large consumption of building material. During shrinkage inside the well of a log house, due to poor ventilation, there is a risk of mold and mildew formation, and the shrinkage period of the structure also increases. Therefore, it is additionally necessary to arrange ventilation. Artificial ventilation is created either by partially cutting out small openings in the places where doors and windows are supposed to be, or the log house should stand on a ventilated base, for example, on stilts without flooring and with the roof sheathing open for ventilation.
blind log house
stuck the door in a blind log house
Arrangement of openings during the assembly of the log house
This method saves building material and money, since there is no need to pay for cubes of wood that will be cut in the openings. The ventilation of such a log house is better and shrinkage occurs faster. A temporary casing is installed in the openings for the period of shrinkage, which is a guide bar spliced with the casing board. The casing structure is inserted with a block into the groove cut out at the ends of the openings and secured. This ensures that the geometry of the openings is maintained during drying. At the same time, there is no obstacle to vertical shrinkage (up and down) and practically reduces the movement of logs in the horizon to zero.
If doors and windows are installed in the openings immediately after assembling the frame, before it shrinks, then they will definitely be damaged during shrinkage, and you will additionally have to bear the cost of new materials.
Pouring a new base
In order for the installation of the new foundation to proceed faster - after all, the log house remains raised, and, therefore, experiences a colossal load - it is necessary to prepare the necessary tools and materials even before lifting, namely:
- Crushed stone.
- Sand.
- Fittings.
- Concrete pouring. She must arrive on time or there must be a construction mixer on site for timely mixing of the solution.
- Construction items - shovels, trowels, etc.
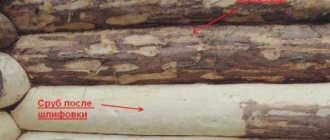
Trimming the ends of the log house
After assembling the log house, the ends of the logs facing outwards are usually cut with a saw to give an aesthetic appearance. It should be taken into account that the protrusion of the log must remain at least 20 cm from the corner. Using a plumb line, mark a straight vertical line along all the protrusions of the logs and cut them to size. Immediately after trimming, the ends of the logs must be soaked and coated with acrylic paint and PVA-based compounds or pure PVA glue. This measure is necessary so that the ends of the logs dry evenly with the entire body of the log and crack less.
Log caulking
Caulking a log house is the process of filling the inter-crown openings with a sealant on which the logs were laid during felling. It is a long and labor-intensive process, which is mandatory, since its heat capacity and draftability depend on the quality of the caulking of a log house. Caulking of a log house is carried out in two stages: immediately after installing the log well and after its shrinkage. During further operation, non-through cracks may also arise which are recommended to be caulked.
For caulking, a metal caulk is used, a tool similar to a chisel, but with a longer pointed part. It is recommended to have several caulks in stock at once. The caulk is tapped with a wooden mallet; using a hammer for this purpose can be dangerous for the brushes and will be a more labor-intensive process. For caulking, dried and then moistened moss is used.
log caulk
Caulking of one crown is carried out from two sides at once: from the outside and from the inside. You cannot move from one crown to another without caulking it completely, as this can lead to distortions in the horizon of the crowns. Caulking begins by spreading dry caulk along the selected area between the logs. Next, the seal is tapped with caulking to secure it, folded in from below and tapped inward again. It is recommended to slightly moisten the last fibers of the sealant by spraying to give strength to the moss or tow. When you begin to feel that the seal is springing, this is a sign that the gap is completely clogged and there is no need to work harder.
The second caulking after planting is performed in the same way, but this process takes less time and takes place with less effort.
Lifting a log using an ochapa
Ochap has the shape of a well crane, which was used in ancient times. It is installed next to the house being built, and it works like a crane - simply and easily:
- Hook the log on a rope attached to the ochapa.
- Raise it to the required height using the effort of your hands, body and counterweight on the ochap.
- Fix the second end of the rope below, under the counterweight on a specially equipped support.
- Having swung the suspended log, determine its place on the log house and lower it there. At the same time, the second worker must release the end of the rope on the counterweight.