After the frame has settled, it is time to polish it. The purpose of this operation is to remove the layer of wood that has darkened during drying and achieve a uniform color. On logs “from under the plane”, unevenness is also removed by sanding. The operation is not the most difficult, but it requires attention and takes a lot of time.
Since a large amount of dust flies during work, it is necessary to have personal protective equipment. You will need anti-dust, anti-fog glasses and a respirator. Headphones and anti-vibration gloves will not hurt: they will make you more comfortable. And it is imperative to protect your eyes and breathing area.
How to sand logs
To grind logs and beams, you can use two types of tools: eccentric sanders or grinders with appropriate attachments.
To give the building an aesthetic appearance, the log house is sanded
Sanding planed logs from the outside
It has long been known: how many people, so many opinions. And choosing a tool for grinding a log frame is no exception. Some people work exclusively with grinders, and others only with grinders. For some it is more convenient and faster to work with petal discs, while others do not accept them at all and work with wire nozzles. The choice is yours. We only tell you how to do it.
Choosing an angle grinder
To polish a frame made of planed logs (from under a plane), angle grinders are used, which are usually called grinders. Choose not the most expensive, but not the cheapest models. Cheap ones usually break down very quickly: they belong to the household class and have a short working life. Sanding of a log house is necessary both inside and outside; the area is considerable, so the resource of household tools is barely enough for one or two walls. Therefore, when choosing, it is advisable for you to find either an inexpensive professional or semi-professional model. They are usually in the mid-price range.
When sanding a log frame, most people use grinders with different attachments.
The power of the grinder is approximately 700-1000 W. If you wish, you can take a more powerful one, but for woodworking this is more than enough. More powerful ones are harder to work with: they themselves weigh a lot, and it will be more difficult to control them. And every awkward movement is a hole in the log, which will then have to be leveled.
125 mm discs are the most convenient to use, so choose a model for them. But these are only recommendations. You can work both larger and smaller. Who's used to it?
Idle speed - 10,000-12,000 rpm. Moreover, it is very desirable that the tool has speed control, and preferably a smooth one.
What to look for when choosing an angle grinder
Pay attention to where the air intake comes from. In order for the grinder to clog less during operation and work longer, the fence should be at the back (not on the sides). It is also important that the handles are comfortable and that the machine itself is not heavy. So try each one on and hold it in your hands. Pay attention to the length of the cord - the longer, the more freedom of action it gives.
For ease of work, it is better to have two machines. The fact is that the processing is carried out at least twice: first, the layer is removed with a coarse-grained abrasive, then sanded with a fine one. In order not to constantly change attachments and not overheat the tool, it is more convenient to have two machines. One will still not be enough for the entire volume. And so the work goes faster, and the tool works in normal mode - it does not overheat.
It is better to use plastic, rather than rubber, attachments for an angle grinder.
There is one more subtlety: for work it is better to use a plastic attachment (on which the abrasive is attached) rather than a rubber one. Plastic, although thinner, lasts longer. If you accidentally touch the surface of the wood with the rubber tip, it will leave a black mark on the wood. This won't happen with plastic.
Sanding discs
For initial rough grinding, use flap discs with a grain size of 40-60. You can simply use an abrasive with the same grain. It's convenient for anyone. The disc consumption is high: one per 3-5 meters of log. It may be more or less: it depends on what layer you need to remove and how smooth the log was before processing. If it was rounded, the consumption was less, if it came from under a plane, it was more. But it’s better not to skimp on these discs; as soon as they get dirty, change them: the work will go faster, and the grinder will work with less load.
Sanding discs come in different grains
The consumption of fine grinding discs depends on how thoroughly you treated the surface the first time. It is better to take this fine abrasive with Velcro - it changes faster. Here the grain size is 100-120.
In addition to the discs, you will need to buy cushions for the attachments. On one side they are covered with a sticky compound, to which abrasive discs are then attached. These pillows wear off on the sides, and the adhesive side also stops working. So this consumable will also come in handy.
Sanding rounded logs
Since the surface in such a log house is already flat, using a grinder with a lack of experience will only lead to the appearance of furrows and holes - traces of too much pressure. Then they will have to be compared for a long time with smaller grains. Therefore, eccentric sanders are often used to process rounded logs. They are less productive, but if the pressure is too strong, the sanding disc is blocked. This allows you to make the surface even and smooth even without experience.
Grinding machines are used for grinding rounded logs.
The power of these machines is more modest - 200-300 W, the speed is approximately the same 10,000 - 12,000 rpm. Many models have a dust collector. This is a big plus when working indoors, but this plus is also reflected in the price. The selection principle is the same: good quality, semi-professional or professional model that fits comfortably in the hand. To sand a log frame, it is also advisable to have two machines: on one, put discs with a grain of 30-60 to remove the darkened layer, on the second, set a fine grain of 100-120 to smooth the surface and remove raised wood fluff.
Is it necessary to process the log house?
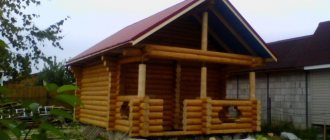
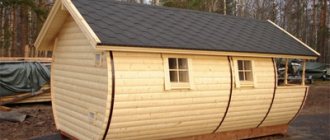
Almost a year has already passed since the construction of the new bathhouse. Walls made of solid logs delight with their unique beauty, give warmth and exude the fresh aroma of wood. All that remains is to enjoy the procedures with a broom, but that was not the case. Various deficiencies haunt us, but still I want to finally put an end to the protracted construction.
Should I sand it or will it do?
The main finishing work related to the shrinkage of the log house, exterior finishing and arrangement of the interior of the bathhouse was completed before the start of winter. Now all that remains is to carry out the work of grinding and impregnating the logs from the outside. Generally speaking, in our villages it is still not customary to make log houses beautiful. So in the previous old bathhouse, the wood did not know planing, sanding and painting. But sometimes you have to do everything for the first time. And this was prompted by one common and terrible misfortune - wood-boring beetles. They quickly rendered the previous, still quite young, building unusable, deciding that there was nothing tastier in the area than it.
Therefore, it was decided to process the new one according to all the rules. In addition to the obvious factor of restraining the colonization of wood by insect pests, finishing of logs also has an aesthetic function, but first things first.
1
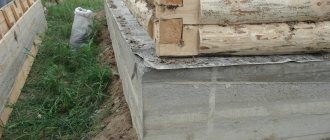
Before cutting a log house, the bark must be removed from the logs, but no matter how diligently this work is carried out, some of it still remains. Especially a lot of it remains if the forest preparation deadlines are not followed - the bark is difficult to remove from wood that has dried under the sun.
After some time, it dries and becomes one with the log, standing out only in dark color. As long as the log house is fresh, all this does not look bad - light areas without bark alternate with dark brown ones. But after a year, part of the bark begins to peel off from the tree, first a little, then more and more. Years later, untreated walls are already a sad sight.
2
True, for many, neat, even, clean and light logs, as in advertising brochures, are not needed at all, as long as the bathhouse is warm and cozy inside.
And everything would be fine, but besides the unsightly appearance, the remaining bark is a source of infection and damage to the logs. Initially, if the forest was infected, a typograph beetle may remain underneath it. And in the future, more dangerous pests will appear.
3
Tools and protective equipment
To remove the bark, we will need the following tool: - an angle grinder (grinder), - several petal circles (KLT), - glasses (to protect the eyes), - a mask (against dust).
It is better to use a small grinder with a wheel of 115 mm or 125 mm, it is more convenient to work with.
The grain size of the wheel is selected based on the task at hand. If you intend to completely lighten the logs and remove wood defects, we select two types of grain - initially we go through P40 (H40), then we use a smaller one - P60 (H25).
In our case, it was decided to only remove the areas where the bark remained, so we make do with the average 25th grain.
Glasses paired with a mask have a bad tendency to fog up, so it is advisable that they have a special coating.
You shouldn’t skimp on a mask; those sold in packs of 5-10 pieces do not protect against dust, these are so-called technical ones. You need to take it with a valve, especially since they are quite affordable, Russian U2k 30-35 rubles, imported 50-70 rubles.
4
Work order
When sanding, remember that the new wheel removes the bark very quickly at first, so be careful to avoid unsightly holes. You should also be careful when processing the edges of logs near the crown joint - sandpaper cuts off the moss (so that you don’t have to caulk it later).
The first two crowns have been processed.
5
We replace the used circle with a new one. Many will probably be interested in how many laps will be needed in total? It all depends on the size of the grain (large ones take longer to clog), on the size of the CLT (115 or 125 mm), the area of the surface being processed, the degree (depth) of cleaning and, of course, on the worker performing all this.
Approximate figures can be stated as follows: for partial removal, each wall of a 4x4 bath took 1 circle with H25 grain and a diameter of 125 mm.
6
After the sanding work is completed, we begin painting the frame. We use tinted (Kaluzhnitsa color) impregnation as an antiseptic.
What is the best way to process it? You can find out the answer to this question in this article.
7
The work is in full swing. For information - if the bathhouse is located separately from a residential building, then the smell from the protective agent quickly evaporates without having time to penetrate into the intervenous groove; if one or two sides are closed (yard, dressing room), then it penetrates inside the bathhouse.
In any case, the impregnation must be applied after a bath day, in dry weather. For better weathering, if there is no ventilation, open windows, doors and chimneys.
8
One wall is completely ready, all that remains is to renew the ends of the logs with white paint.
A completely sanded tree would have looked better, of course, but initially there was no such task, the main thing was to protect the walls of the bathhouse as soon as possible, before the arrival of real heat (the bugs fly out at the end of May - beginning of June).
9
If desired, large cracks can be sealed with something, for example, garden pitch, to protect them from precipitation and pests.
Sanding the log in grooves and corners
Regardless of what kind of log the frame is made of, the grooves are polished with grinders. Moreover, the nozzle is taken smaller than the disk used (for example, for a nozzle diameter of 115 mm, the abrasive is set to 125). If the disk and the attachment are the same size, the tool may jam in the groove during operation. In this case, the grinder will be torn out of your hands, which can lead to injury.
You have to use chisels to finish the logs in the corners
If the disk is larger in size, then you can work calmly. Although it wears out quickly at the edges, you can work like this without fear of injury.
The corners of the log frame remain the most problematic for processing. The only reliable method for processing them is with chisels. Using this tool, the top thin layer of wood is removed. This can be done before or after stripping the entire log. Not so important.
Log end processing
The ends of the logs are sanded with a grinder with a 40-grain abrasive wheel. By adjusting the speed, you select the speed at which the tool is easy to control. Achieving perfect smoothness here is unrealistic, and it is not necessary, so sanding with fine grain is not done. When further processing with primers, varnishes or other compounds, increased attention is paid to the ends - they absorb better, so you have to lubricate more generously.
What mistakes are made when working independently?
- When working with tools, high speeds should not be allowed. This will leave unevenness and grooves on the walls.
- When sanding coniferous timber, you must first remove any remaining resin. If this is not done, sanding will spread the resin over the surface in a thin layer and it will be almost impossible to remove it.
- Defects in the timber that are not coated with adhesive will become disheveled after sanding and will look more unsightly.
- After coating with varnishes or water-based paints, the pile rises. For complete leveling, after the first coating, re-grind with a wheel No. 120. You can use chemical-based compounds; they do not affect the pile.
- Sanding is carried out before the main finishing and installation of windows, doors, and ceilings. This will make it easier to remove wood dust, of which there will be a lot.
The faster sanding is completed, the easier the work will be. Over time, the wood hardens and performance will decline. Try to sand immediately after or during construction.
Processing of logs inside the house
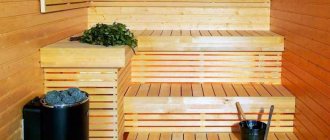
All actions are identical. When sanding a frame made of planed logs, if the wall inside will not be lined with anything, add one more pass for finishing: with an eccentric sander with a 120 abrasive disc. This will allow you to achieve a perfectly smooth surface.
The inside of the log house is polished to furniture smoothness.
Sandblasting cost
Many probably thought that having such undeniable advantages, jet grinding of a log house cannot be cheap.
This is surprising, but the cost of the work is only slightly higher than the cost of traditional sanding. If we take into account the fact that when grinding with a grinder, a huge number of attachments are used, which greatly influence the final cost of the work, and blasting does not involve the use of consumables, in the end it turns out that the price of both works is almost the same. And this is one of the significant advantages of the new technique.
Non-contact grinding is carried out by an autonomous sandblasting machine running on diesel fuel, which eliminates the use of electricity in the customer’s home. At the same time, when grinding with an angle grinder, a lot of electrical energy is consumed. This circumstance also speaks in favor of sandblasting.
It should be noted that sanding small houses with a wall area of less than 200 sq.m. turns out to be less profitable than processing large cottages. The cost of grinding includes transportation costs, which increase the price of the work.
How to sand timber walls
The tools used are the same as for processing logs. A specific choice can only be made by assessing how deeply you need to remove the top layer of wood.
If the bathhouse is made of profiled or laminated timber, most likely you do not need to level anything. Just remove the top darkened layer, if there is one. In this case, if you have a sufficient level of proficiency with an angle grinder, you can work with it. If you don't have enough experience, use an eccentric sander. It will take longer, but the result will be guaranteed to be at least good.
Timber needs to be sanded in different ways. Depending on its geometry
If the walls are made of ordinary timber, then you will have to do a lot of leveling. You can’t do without a grinder here. Moreover, in some places it will be necessary to remove a couple of millimeters of excess - non-ideal geometry and errors in cutting bowls lead to the fact that the difference can be quite significant.
I found a video fragment about a very interesting Pobedit grinding disk, which, it seems, can easily cope with rough grinding and easily remove excess thickness.
Our works
Photos of the work of our craftsmen demonstrate the result of sanding the walls of a house made of timber. Thanks to the service, the tree takes on a completely new look, is healthy and attractive. Any log house, regardless of the size of the log, as well as the type of wood, features of operation, we will help put the surface in order, quickly and efficiently performing all the necessary operations at an affordable price.
Call and order inexpensive scraping right now, or
When is the best time to sand?
There are a lot of possible answers to this question. Traditionally, the frame is sanded after at least the main shrinkage has passed. During this time, the log dries out and it becomes easier to work with. It is extremely difficult to remove even a thin layer from raw wood. If you need to level it, it will take a lot of time, money for disks and effort.
On the other hand, if you have a frame made of dried timber and logs, then you can sand and process it right away. In this case, having placed the frame under the roof, it is sanded, immediately treated with impregnations and left to shrink in this form. This is done infrequently, although no one forbids it. They usually act according to the usual scheme.
The log house is polished after it has settled
Surface degumming
Conifers are known to contain large amounts of natural resins. On the one hand, this circumstance is an advantage, since the resin content protects the tree from rotting and mold formation. But on the other hand, resin prevents good adhesion of paint to wood, and when sanding it spreads over the surface and spoils the appearance of the wood. Therefore, before processing the needles with a grinder, it is necessary to remove excess resin.
How to remove resin from a log before sanding? Suitable solvents for this are: acetone, white spirit, turpentine, purified gasoline. You just need to apply the selected product to the wooden surface, and rinse off the residue with warm water.
Procedure and organization of work
Since a minimum of time should pass between grinding logs or beams and processing, processing must be done along the crown. You can start from the top or the bottom - it makes no difference, but they sand one wall completely, then move on to the other. You can coat with impregnations and primers immediately after completing the treatment of one wall, having first removed the dust.
Questions often arise about what to do if there are blue spots or other dark spots on the wood. These are traces of fungal activity. They do not affect the quality and safety in any way, but they spoil the appearance considerably.
The blueness of the wood spoils the appearance
If you want to use light transparent paints for finishing, you will have to fight with the color. For this purpose, there are special compositions for bleaching wood. In this case, the procedure is as follows:
- bleach wood;
- carry out rough grinding;
- if traces of blackness remain, bleach again;
- final polishing.
Then comes the treatment with fire retardants, primers and finishing compounds.
This video presents the experience of a man who polished a log frame himself. He goes into some interesting detail, so don't waste 20 minutes.
Purpose of grinding
When building wooden houses, many developers want to emphasize the pristine beauty of the wood texture, rejecting this type of finishing such as painting. To do this, the log house is treated with transparent or tinted products, which, along with decorative functions, also protect the wood from rain and snow. Often the substances included in the coating form a kind of ultraviolet barrier that protects the tree from exposure to the sun.
The problem with wood processing is that the log house cannot be immediately coated with protective agents. Any house cut from a log or timber of natural moisture must first shrink. In this case, the wood will dry out and the humidity will be no more than 20%. Only in this case is it possible to apply various protective coatings. However, under natural conditions, wood drying takes months and even years. During this time, the log house will definitely darken and become gray. In this case, grinding will help, which will precede treatment with protective compounds.