The foundation is the basis of any building. It’s not at all difficult to pour the foundation for a bathhouse with your own hands; the main thing is to follow all the recommendations and rules for construction. For a room such as a bathhouse, with high humidity and special drainage features, it is very important to make a high-quality foundation. We recommend that you familiarize yourself with the process of constructing a strip foundation, as the most popular basis for a bathhouse, so that the structure can serve for as long as possible and please its owners.
DIY foundation for a bathhouse
If the bathhouse is built from blocks or bricks, it is advisable to pour a strong monolithic, strip or strip-column reinforced foundation. For lighter structures made of timber, logs or frame baths, columnar, pile, or shallow strip foundations are applicable. To choose the optimal foundation for a future bathhouse, it is recommended to draw up projects and make calculations of the amount of materials, structural strength, thermal engineering, etc.
Do-it-yourself strip foundation for a bathhouse
Foundation diagram for a bathhouse
This type of foundation is the most popular. You can fill it with your own hands, while at the same time taking care of laying communications. To work you will need:
- tools for earthworks;
- stakes, cord and measuring instruments;
- formwork panels;
- metal fittings and binding wire;
- ready-made concrete, or a concrete mixer, tools, containers and mixture for preparing the solution;
- pipes for laying sewerage;
- screws and a screwdriver or a construction stapler;
- waterproofing - mastic and roofing felt.
Preparatory stage
First, let's figure out what you need to consider before choosing the type of foundation and how to prepare the site.
The method of laying the foundation under the building depends on the following indicators:
- soil type and moisture content;
- soil freezing level;
- bath sizes.
Let's start by determining the type of soil. To do this, you need to dig a hole and study the soil.
- Try to make a ring from soil moistened with plenty of water. It can only be made from clay. It is generally impossible to make a ring out of sand. From sandy loam, your creation will quickly collapse into small pieces, and from loam - into 3 fragments.
- If the size of the soil particles reaches one and a half millimeters, then the soil is sandy.
- Place some soil in a glass of water and stir. Severe cloudiness indicates that you are dealing with soil that has a high clay content.
Place some soil in a glass of water and stir
To find out about the UGV, you can talk to your neighbors. Besides, if you've built a house, you've already encountered this. The most accurate way to find out how deep water runs is to drill into the ground with a garden auger. Such a well should be deep enough, at least 2-2.5 m. It will be easiest to build a foundation where the groundwater level is one and a half meters deeper than the point of zero soil temperatures.
Determining soil type
Knowing the type and characteristics of the soil, it is easier to choose a foundation option.
- For arranging a small bathhouse on clay and loamy soils with deep groundwater, a columnar foundation is suitable.
- A universal option for small buildings is considered to be a strip foundation, a special case of which for moist soils is a monolithic foundation.
There are other types of foundations, but the most popular and often built with your own hands are strip and columnar.
When constructing any foundation, at the preliminary stage you need to mark out the area for building a bathhouse.
Preparation
Where to build a bathhouse
Expert opinion: Masalsky A.V.
Editor of the “construction” category on the Stroyday.ru portal. Specialist in engineering systems and drainage.
Where to build a bathhouse? First of all, pay attention to the landscape of your site and the type of sewage system that will be equipped. For example, a cesspool and a septic tank should be located away from water intake points, reservoirs, and neighboring areas. If the bathhouse drain is connected to the central sewerage system, then the structure can be erected in any convenient location on the site, for example, at a short distance (from 30 meters) from a river, pond, or swimming pool.
Bathhouse project
Advice! Even at the preparation stage, think about hiding the area in front of the bathhouse from the eyes of strangers. Make markings for the fence or determine places for planting trees and shrubs.
Also, preparation comes down to removing the top layer of soil and leveling the area. To do this, you should use the services of special equipment.
Site preparation
Meters, per ton of reinforcement
- 8
- 10
- 12
- 14
- 16
- 18
- 20
After you calculate the number of tons you need and decide on the type of material, you can go shopping. When purchasing parts for foundation work, do not forget about the strapping; it can be metal or plastic, depending on your choice. You will need a lot of strapping; you must buy it with a reserve, as it can deteriorate and become unusable during operation. It is quite cheap, so it is not practical to carry out calculations separately; it is enough to simply buy it in large quantities.
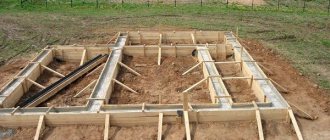
Marking
Marking scheme for a strip foundation
We will make markings based on the large-scale project of the future bathhouse. It will be necessary to mark the outer and inner lines of the walls.
To mark the outer perimeter, you need to take a construction angle, a cord, a tape measure, pegs and a plumb line. Checking the verticality with a plumb line, we drive in the first peg in the place where one of the corners of the building will be located.
Foundation markings: corners and diagonals
Next, we install 4 more pegs in the same way, checking the angles for accuracy. We carry out control measurements of the diagonals of the bathhouse perimeter. If they are equal, then you can start marking the internal perimeter; if not, then we correct the position of the stakes, repeatedly checking the lengths of the sides, the accuracy of the angles and diagonals. We stretch the cord between the stakes. The horizontal position of the cord will mark the height of the foundation. We check the tensioned cord with a level and begin marking the internal partitions and perimeter.
Foundation marking
We retreat from the outer perimeter to a distance equal to the thickness of the strip base. We drive in the stakes and tighten the cord using a plumb line, a square and a tape measure. We mark the location of future partitions with a cord.
Dependence on building materials
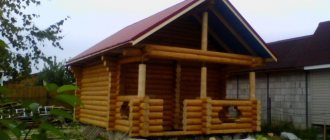
Wall enclosures for baths are built from various materials, such as brick or cinder block. But in most cases, developers choose wood. The tree can withstand high levels of humidity and sudden temperature changes and has high thermal insulation qualities.
Depending on the material from which the walls of the bathhouse will be built, the type of foundation structures is chosen:
For example, for structures made of brick, expanded clay concrete, and concrete blocks, it is preferable to install a shallow strip foundation.- For saunas made of aerated concrete, foam concrete blocks and cinder blocks, a columnar foundation is most suitable.
- For household washing facilities made of logs in the form of a log frame or from profiled timber, the foundation is erected from logs laid horizontally along the perimeter of the walls, or supported on pillars made of wooden logs. Also, wooden baths are built on screw piles.
Excavation
Diagram of how a trencher works when digging trenches for a strip foundation.
Carefully, so as not to disturb the markings, it is necessary to dig ditches for pouring the foundation. The depth of the foundation can be determined by checking the type of soil and checking the table below.
| Types of soils | Foundation soils within the calculated freezing depth | Distance from the planning mark to the groundwater level during the period of soil freezing | Foundation depth |
| Non-heaving | Coarse, gravelly sands, large and medium-sized | Not standardized | Any, regardless of freezing depth, but not less than 50 cm |
| Heaving | The sand is fine and dusty | Exceeds the calculated freezing depth by more than 2 meters | Any, regardless of freezing depth, but not less than 50 cm |
| Heaving | Suspended | The same, at least 2 meters | Not less than 3/4 of the calculated freezing depth, but not less than 0.7 meters |
| Heaving | Loam and clay | Less than the calculated freezing depth | Not less than the calculated freezing depth |
The bottom of the trenches must be compacted with a vibrating plate or manual tamper and leveled by checking with a hydraulic level.
Immediately after compaction, fill the trenches with sand. The thickness of the pillow can be as follows:
- shallow foundation - up to 7 cm;
- deep foundation – up to 15 cm;
- “floating” type foundation – up to 40 cm.
Backfilling with sand
It is also important to level the sand horizontally and compact it, soaking it abundantly with water. If the thickness of the sand layer is large, then backfilling, compaction and pouring with water are carried out in layers (5-7 cm). Further work can be done after 2-3 days, when the pillow has dried.
Sand compaction
Prices for vibratory rammers
Vibratory rammer
Considering the size of the building
It is not at all necessary to create an individual bathhouse project. There is a large amount of ready-made design documentation for almost all baths that are optimal in size. All that remains is to select the type of foundation and tie it to the local soil conditions. The results of numerous analyzes of the dependence of the choice of foundation on the size of the bathhouse can be reflected in the following table.
Table of the dependence of the choice of foundation on the size of the bathhouse.
| Bathhouse size in plan, m | Foundation type | Recommendations | |
| With your own hands | Full construction | ||
| 2 x 2, 3 x 3, 3 x 4 | Tape, columnar | Tape | Shallow |
| 4 x 4, 3 x 5, 3 x 6 | Tape, columnar | Tape | — « — |
| 5 x 5, 6 x 6 | Pile-screw | Belt, pile-screw | It will be more economical to use screw piles |
Formwork
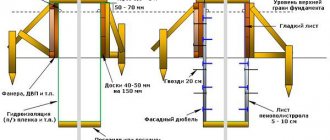
Formwork diagram
Formwork for a strip foundation can be assembled from panels, slate, fiberboard and other similar materials. By the way, shields made of plastic or metal can be rented, which will significantly simplify the construction process. It is advisable to wrap the formwork materials with film, then they can be reused in the construction of other objects.
Board formwork
The formwork is installed in trenches, supported from the outside with lumber and stakes. Between the walls of the formwork, wooden transverse struts and metal pins with a pitch of 50 cm are installed so that the panels do not move apart under the mass of poured concrete. The panels are fastened to the ground with long nails (20 cm), and to each other with self-tapping screws or a stapler.
Formwork, diagram
The panels must immediately have openings for the outlet of sewer pipes and other communications. Otherwise, after pouring you will have to drill through the concrete, which will negatively affect the strength of the foundation.
Formwork
Advice! If you do not use film to protect wooden formwork, then staple glassine. It will prevent the tree from quickly absorbing moisture from the concrete solution and, as a result, cracking the foundation.
Video - Do-it-yourself wood formwork
Prices for various types of construction boards
Construction boards
Video - Non-removable formwork for strip foundations made of EPS
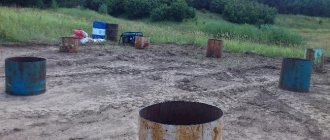
What materials are used?
Inexpensive types of bases are mainly used for steam rooms. It can be:
- columnar supports made of brick or stone;
- wooden piles treated with impregnations - wooden sleepers are often used;
- reinforced concrete elements in the form of FBS blocks, curbs and other suitable concrete building elements;
- plastic, metal and asbestos-cement pipes for pile foundations.
Reference. Classic material options are reinforced concrete (for monolithic and prefabricated foundations) and metal for pile supports.
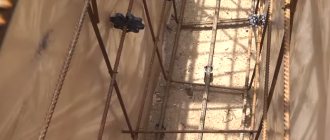
Reinforcement
The armored belt is made of thick reinforcement (>12 mm longitudinal and 6-8 mm transverse, vertical reinforcement). To work, you will need a grinder, wire for tying the armored belt, a welding machine, and a tape measure.
Reinforcement
The belt consists of longitudinal (four or more), transverse and vertical reinforcements. In this case, the entire structure must be 5 cm away from the formwork, soil and the top point of the foundation, and be reinforced in the corners of the building. The cross section of the armored belt is a rectangle or square.
The reinforcement is cut to the required length. Longitudinal and transverse rods are laid out on the ground and tied with wire at the points of contact. Welding the frame is not recommended, since the welded frame may lose its integrity when compacting the poured concrete or operating the constructed bathhouse.
The longitudinal rods are laid out and tied to each other with an overlap of about 30 cm.
Knitting longitudinal rods
The distance between the transverse and vertical rods should not exceed 50 cm. If the strip foundation is up to 120 cm wide, then it makes sense to make the frame not from two, but from three longitudinal reinforcement bars. If the foundation height is high, it is also worth increasing the number of longitudinal rods. The frame is also reinforced on top with U-shaped clamps, designed to increase the strength of the structure and reduce the risk of cracking of the strip base.
Clamps
At the corners of the bathhouse, the frame is additionally strengthened with reinforcement located at an angle of 45 degrees relative to the horizontal rods.
Corner reinforcement
Corner reinforcement
The finished connected frame is installed on plastic supports. To prevent movement during the pouring of concrete, plastic fasteners are inserted between the formwork and the reinforcement.
Strip foundation reinforcement
Reinforcement and laying of communications
Video - Knitting reinforcement with a hook
Monolithic base.
This is a floating base, poured with concrete over the entire area of the building, a good option for rectangular structures on heavy soils of heaving, weak-bearing or bulk nature. This is a reliable and durable foundation, the thickness of which should be from 30 cm.
A trench 60 cm deep is dug for it and filled with crushed stone and sand, which are repeatedly watered with plenty of water to allow them to shrink. After installing the waterproofing, reinforcement and formwork are done to strengthen the base.
What is the best foundation for a bathhouse?
After pouring concrete, the monolithic foundation is held under wet sawdust or burlap.
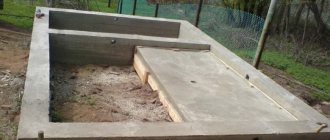
Pouring a strip foundation for a bathhouse
The main rule is monolithicity, that is, the entire mass of concrete must be poured into the formwork in one day. Therefore, if you do not have a concrete mixer, it is worth ordering ready-made concrete M200 or M400 at the factory. Be sure to make sure that the concrete mixer can reach either side of your bathhouse foundation.
Pouring concrete
You can prepare concrete yourself by mixing dry bulk materials in the following proportions:
- cement M400 or M500 – 1 part;
- sifted sand - 3 parts;
- clean crushed stone without foreign inclusions - 4 or 5 parts.
Water is added to the dry mixture in such an amount that the finished concrete is not too thick and does not spread.
Concrete is laid out in the formwork in layers of 20 cm, leveled with shovels, a trowel and at the same time either pierced with a reinforcement bar or compacted with a vibrating drill. This is necessary to remove existing voids (air bubbles). For the same purpose, it is important to tap the formwork walls.
Pouring the foundation
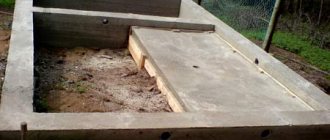
The poured foundation should be covered with film at night and in the rain, and spilled with water during the day. When the concrete has hardened (after 14 days), you can remove the formwork and grind the surface of the foundation, but it is not recommended to begin further construction earlier than a month after pouring.
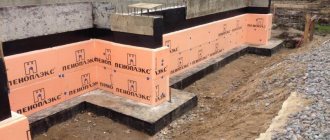
Foundation with waterproofing
Types and characteristics of foundation bitumen mastics
The finished foundation for a bathhouse must be waterproofed by gluing two layers of roofing material onto bitumen mastic.
Waterproofing scheme
Prices for cement and basic mixtures
Cement and base mixtures
Features of the steam room and base operation
A home bathhouse is a special type of structure, the operation of which involves the consumption of large amounts of water. This mainly concerns the steam and washing departments. The bathhouse also experiences sudden changes in temperature conditions. All this affects the special requirements for the supporting base of a home sauna.
Intermittent heating
The source of heat in modern baths are boilers, which can be electric, running on solid or liquid fuel.
The soap compartment and steam room are heated for the duration of people's visits. The rest of the time the structure remains cold.
That is, periodically the temperature inside the sauna makes significant fluctuations.
Attention. Sudden changes in temperature, as well as increased levels of humidity inside the bathhouse, can adversely affect the condition of the foundation. Therefore, it is important to carry out hydro- and thermal insulation of the base floor of the building.
Availability of a washing station
A bathing session involves copious amounts of water in the washing area. Waste water in the form of wastewater is removed through a special drainage system, for which a drain is installed in the foundation. If drainage is not done, then moisture over time can destroy not only the structure, but also the foundation itself.