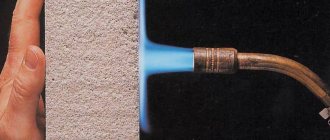
One of the most vital requirements for a roof at all times is fire safety. Of course, straw hats and wooden shingles are long gone, but not all modern roofing materials can boast of good resistance to open flames. Moreover, some of them just need to be heated well so that the wooden sheathing and roofing begin to smolder.
It is precisely for this purpose that a reliable connection of the roof to the chimney pipe of the house is installed - to create the most reliable barrier between the steel that heats up on the coldest winter days and the poorly protected roof. We will show you in detail what this design looks like for different types of coatings.
What is the difficulty of arranging the junction?
Experienced roofers know well that one of the most difficult and critical stages is the connection of the pipe to the roof and its installation.
After all, several risk factors are at work here:
- high temperature of the pipe, which can heat almost any roofing material, especially wooden sheathing, to a critical temperature;
- technological gap between the pipe and the roofing, which must be completely sealed;
- a cap of snow that always accumulates on any obstacle it encounters on its way down.
Therefore, the main requirement for a chimney bypass is to be fireproof, durable and 100% airtight.
The chimney protective apron itself is made in two ways: from lead or aluminum flexible tape or steel sheet with a special coating.
The main thing is to do everything right:
The issue of the tightness of the junction of the roof to the chimney is usually solved with the help of an internal apron made of junction strips, and we will try to analyze this issue in detail with you.
Features of arranging the passage of a chimney through the roof
A high-quality connection of the roofing material to the pipe can be made only if the roof has a reliable rigid sheathing that matches the type of roof and the steepness of the slopes, on which the load will be evenly distributed both from the mass of the roof system itself and from external influences.
- The best option is when the chimney pipe is installed before the sheathing is installed. That is, in the design of the rafter system itself, a passage is provided for it, reinforced with additional parts. In such cases, joining sheet or piece roofing material to the pipe will be much easier than in those cases when it is necessary to organize a passage for the newly erected pipe in the finished sheathing.
- If the pipe is installed later, in order to make room for the passage of the chimney, it will be necessary to dismantle some elements of the sheathing, which may well weaken the overall structure.
- It is also necessary to ensure in advance that the pipe does not rest on the rafter leg, since its partial or complete dismantling is an extremely undesirable operation. If the pipe does end up on one of the rafters, and part of it has to be removed, then before carrying out this process, it is necessary to immediately install supporting posts under the remaining parts, which are fixed to the floor beams. In addition, most often it is also necessary to connect parts of this leg with entire rafters and horizontal jumpers.
- Whatever option is considered, it is imperative to equip an additional reliable frame around the chimney, which must be firmly connected to other elements of the rafter system and roof sheathing.
Prices for chimney pipes
chimney pipe
The gap between the pipe and the wooden parts of the rafter system and sheathing is often filled with non-flammable thermal insulation materials. It is good to use basalt mineral wool for this purpose.
- The clearance between the chimney and the elements of the rafter system is regulated by the rules of SNiP 41-01-2003, paragraph 6.6.22. It states that the distance from the surfaces of concrete and brick chimney pipes to any parts of the rafter system and roofing “pie” made of flammable material should be no less than 130 mm. For ceramic pipes that do not have insulation, this clearance should be at least 250 mm, and if there is thermal insulation, also at least 130 mm.
The remaining uncovered space between the pipe and flammable or even low-flammable roofing coverings should be covered only with completely non-combustible materials (usually sheet metal is used for these purposes).
Traditional galvanized steel: durable "tie"
To ensure a tight connection of the roof to the chimneys, make an internal apron from the strips:
- Step 1. Place the bar itself against the walls of the pipe and mark the level of the top edge on the wall.
- Step 2. Then carefully remove the dust after the groove and rinse the groove with water.
- Step 3: To install the inner flashing, start at the bottom of the pipe. Here the abutment strip needs to be trimmed.
- Step 4. Install the apron in other places in exactly the same way and do not forget about the 150 mm overlap to protect against leaks.
- Step 5. Next, the edge of the strip, which is inserted into the groove, needs to be sealed using a special roofing tape.
- Step 6. Now place a tie (a flat sheet with flanges) under the bottom element of the inner apron.
- Step 7. Point the tie into the valley or down, right up to the cornice.
- Step 8. Now you can proceed to the installation of the roofing.
The main requirement here is to maintain sufficient distance for ventilation of the space under the roof. At the same time, so that during rain the wet brick does not crack due to overheating, it is wrapped in a steel sheet with a polymer coating. The gap for ventilation is left 20 mm.
Here is the most popular option for bypassing the pipe:
- Step 1. We extend the waterproofing 50 mm directly onto the pipe, if the membrane or film itself is heat-resistant. Glue the cut of waterproofing to the pipe with adhesive tape.
- Step 2. Create a protective line around the pipe using protective strips.
- Step 3. Make a groove in the pipe itself (but under no circumstances into the masonry seams). The depth of the groove should have a slight slope and be at least 15 mm.
- Step 4. If there is a valley on the roof, it is better to divert the water there using a “tie”; if not, then to the eaves.
Bypassing the chimney on a metal tile roof should only begin after laying the metal tiles.
To do this, external junction strips are placed on the pipe, part of which goes into the groove and is sealed with a special heat-resistant roofing sealant. And the lower part of the strip must be secured with roofing screws directly to the sheathing.
If we are talking about a roof with composite tiles, the technology for it is slightly different:
- Step 1. We will need a flat sheet of sprinkles, which will consist of 4 parts: front, back and two sides. Such a sheet is always made individually, according to the dimensions of the chimney.
- Step 2. The sheet needs to be folded upward by 5 cm.
- Step 3. Now take a block 5 cm high to support the back and front of the sheet in front of the chimney.
- Step 4: Install the front flashing piece to the closest row of shingles ahead of the chimney.
- Step 5. Attach the side abutments to the front and back single pieces and secure them into the metal lock by folding them.
How to seal a chimney on a roof
Combustion products are removed through the pipe. Their temperature can reach 200 degrees. Sealing is designed to achieve the following purposes:
- Smoke must not be allowed to enter the room.
- The fire hazard of using the pipe must be ensured.
- Sealing must be done aesthetically.
This stage of work is carried out after the pipe and box have been installed.
Waterproofing self-adhesive tapes: a flexible approach
One of the most popular and proven methods for arranging the connection between the roof and the chimney pipe is the use of special waterproofing tape.
For example, it is difficult to come up with something better for a roof made of piece materials, for which a galvanized steel apron is not suitable. It is easy to work with such tapes, the main thing is to adhere to the temperature regime – from +5 to +40°C.
In this article we will look at the highest quality and most popular tapes. In general, there are many options, because each manufacturer of roofing material tries to produce its own roofing element, which will be most suitable for a specific brand.
For example, if you need to go around a round chimney, an Ecobit type tape will help you. It is good because it has a self-expanding base and can be sealed without problems.
Its lower part must be placed under the tiles, and the upper part must be placed on the roofing. Next, press both layers and glue them to the walls of the chimney and to the tiles. Next, cover the edges of the top tape with metal profiles.
This is what these waterproofing tapes look like:
In total, today tapes are produced on two bases. Thus, butyl rubber has the highest waterproofing qualities, and aluminum allows you to hermetically fit even the most complex shapes.
Easy-Form: the strength of aluminum
Easy-Form is an aluminum tape with a butyl layer on the surface. The elongation of such a tape is 70%, and at the same time there is a rigid lining made of polyester material.
It is self-adhesive and is great for waterproofing a chimney. Does not rot, is resistant to frost and temperature changes, does not lose its properties within the temperature range from -20° to +80°C.
This tape completely replaces the use of lead sheets, and is cheaper and much easier to install. It comes with a 10-year warranty. And the work is quite simple, although the instructions look voluminous:
- Step 1. Even at the stage of construction of the sheathing, include additional elements made of timber with a section of 40x40 or 50x30 mm. Secure them along the chimney walls.
- Step 2. Cover the front of the pipe with a covering apron. Usually this is recommended by the manufacturer himself, from a specific material for each type of roof.
- Step 3. Install the apron in its place - along the lower edge of the pipe.
- Step 4. Make markings on the apron and make cuts along it. Make sure that the top of the apron is exactly the width of the pipe, and that the wavy part has one wave on each side.
- Step 5. Make markings with a pencil and cut off excess material along the lower crest of the wave with a sharp knife.
- Step 6. Press the finished apron onto the pipe and fix it to the surface with proprietary roofing nails, directly into the sheathing beam. Drive nails into the top of each wave, strictly vertically, except for the waves that extend on the sides beyond the dimensions of the pipe.
- Step 7. Now attach the cut piece to the installation site and give it the shape of a corner relief.
- Step 8. From the back of the tape, remove the protective film that covers the adhesive layer. Apply the tape to the pipe so that it covers the top and bottom of the apron by 70-80 mm. To ensure that the tape fits tightly to the roof, trim its corner.
- Step 9. Press the tape onto the entire surface with a little force. Do this on one bottom corner of the pipe, and then on the second.
- Step 10. Attach the side apron to the pipe, press it and mark the cut line. You will need to cut along the vertical boundaries of the pipe with a sharp knife. Do not press the knife itself too hard, so that it enters the apron only 2/3 of the thickness of the material. Then bend it and carefully break it off.
- Step 11. Nail the prepared side parts of the apron to the roof, three nails in each part: one in the center and one more at the bottom and top.
- Step 12. Cut a piece from the self-adhesive tape that will be 200 mm longer than the width of the pipe. This length is suitable for sealing the back of the chimney pipe.
- Step 13. Now glue the tape to the front side of the pipe. Now the length of the tape should exceed the width of the pipe by 200-300 mm. The tape itself will bend over the sides of the pipe and go under the side parts of the apron.
- Step 14. Press the top edge of the tape with the metal fixing bar and secure it to the dowels. Bend the edges of the apron away from the surface of the pipe.
- Step 15: Seal the corner between the pipe wall and the folded edge with a layer of polyurethane sealant.
- Step 16. Lay an additional piece of ondulin on the back side, from the ridge to the pipe.
Here's what it all looks like in practice. Part 1:
Part 2:
In the case of a metal roof, the whole process is as follows:
Wakaflex and Grind Line: modern waterproofing
Vakaflex is a reinforced polyisobutylene mastic, which is supplied in the form of a roll 5 meters long and 28 cm wide. On its reverse side there are strips of synthetic rubber, which are glued to the base using a stitching roller.
Let's look at the Wakaflex tape installation technology step by step:
- Step 1. Trim the waterproofing film so that there is an overlap of at least 10 cm on the pipe.
- Step 2: Make a drainage groove using waterproofing material directly above the pipe opening.
- Step 3. Trim the tiles around the pipe and lay them with a gap of 2-3 cm.
- Step 4. Now cut the Wakaflex to a length that is equal to the width of the pipe + 5 cm for each side of the pipe.
- Step 5. Bend the strip using a corner so that the resulting corner width is 15-16 cm.
- Step 6. Next, apply the wide part of the strip to the pipe, remove the protective film and press the Wakaflex to the base.
- Step 7. Stretch the tape over the surface with your hands and roll it using a roller.
- Step 8. Cut the upper part of the Wakaflex at an angle of 45°, but do not cut 1 cm to the line of the pipe and the slope. Glue with a roller.
If you did everything correctly, the side roll should start from the bottom of the glued strip and end 15 cm above the top of the pipe.
The following instructions are:
- Step 1. Remove the protective film and glue the top of the Wakaflex onto the pipe.
- Step 2. Step back 2-3 cm from the level of the pipe and cut the tape parallel to the pipe, but do not bring the cutting line to this same 2 cm point.
- Step 3: Now cut the side of the tape so that it is parallel to the water drain from the roof.
- Step 4. Using scissors, round the corners of the Wakaflex strips so that the junction has a beautiful appearance and is not torn off by the wind.
- Step 5. Next, glue the lower part of the roll to the tile and roll it with a roller.
- Step 6. Cut the top part of the roll and do not bring the cutting line to 1 cm. Glue the cut parts onto the pipe and tiles, then roll them.
- Step 7. Glue the left and right corners of the pipe with the remnants of the strip. This will protect them from sliding ice and snow. As a result, the overlap on the side of the chimney pipe should be about 2 cm.
The tape should be placed under the shingles above the row of shingles. At the same time, to protect the roof from melt water, make the top roll of tape double. To do this, cut two strips, remove the protective film and stick to the bottom strip with a 5 cm overlap and roll with a roller.
But it also happens that the tiles are not located in the best way, and the width of the double strip will not be enough. In this case, it will not be possible to install the upper waterproofing of the pipe under the roof. Then a flooring of boards is installed behind the pipe. By the way, a good alternative to Wakaflex is the tape from Grind Line:
Here's how to work with it:
- Step 1. Place the double roll with a slight slope into the groove and glue the tape to the pipe.
- Step 2: Remove the protective film and press the wood decking tape against the waves of the shingles.
- Step 3. Roll with a roller all places except the lower section - the one that is adjacent to the pipe and is not yet covered with tiles.
- Step 4. Now make a cut parallel to the pipe line to the bottom, and retreat 2-3 cm. Do not bring the cutting line to the slope line of 1 cm.
- Step 5. Cut off the excess part of the roll with scissors, round the corners.
- Step 6. To avoid leaks due to a large snow bag above the pipe, bend the top edge of the Wakaflex to a width of 2-3 cm.
- Step 7. Now lay the shingles so that they partially cover the tape above the pipe.
As soon as the junction assembly is ready, you can proceed to the installation of the ridge elements.
Sealing of passages of round pipes
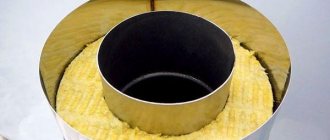
As you know, stoves and fireplaces in recent years are increasingly equipped with round chimney pipes of different diameters. Modern metal chimney pipes most often represent a “sandwich structure”, that is, they consist of three layers - two metal cylinders, outer and inner, and a layer of thermal insulation between them. Basalt-based mineral wool is usually used as thermal insulation.
Prices for metal tiles
metal tiles
To seal the joints between the roof and round pipes, special rigid or elastic penetrations are produced
Manufacturers have provided special elements - penetrations - to seal the junction of such round pipes to the roofing. These parts can be made of metal or of an elastic, heat-resistant composite material, which is mounted in conjunction with metal elements.
In principle, the same principle is used to construct a hermetically sealed roof connection for ventilation pipes.
Metal penetration for round pipes
Options for finished metal products for arranging the junction of the roof with round pipes usually consist of two parts. This is a cap-apron and the so-called “sole”, which is a rigid base and made of a steel sheet on which the cap is attached by the manufacturer. Metal penetrations differ from each other in the angle of slope of the bottom plate of the structure in relation to the cap, therefore, they are selected depending on the slope of the roof. As a rule, in specialized stores you can always find the desired version of the products, since they are produced for roof slopes of various slopes.
Before installing the structure on the roof, the upper part of the hood is cut to the diameter of the chimney pipe, since it must pass freely through the hole in the hood. Then, the “sole” is rigidly fixed to the roof surface using roofing screws, onto which sealing elastic gaskets made of rubber or neoprene are put on.
Very often, when installing a metal penetration on a relief roof covering, to enhance the sealing of the junction, a metal sheet is fixed above the pipe, which is brought under the ridge element and fixed with an overlay on the upper side of the “bottom” of the penetration.
Rigid metal penetration for round pipe. The sheet located above it and placed under the ridge element reliably protects the penetration unit from above - a particularly relevant measure for piece roofs with a pronounced relief
After the sole is fixed to the roof surface and the pipe is passed through the penetration, the upper edge of the cap is pressed against the chimney using a special clamp in which a heat-resistant elastic gasket is installed. This element will protect the junction of two elements from moisture entering it.
Ready-made elastic penetrations
As mentioned above, in addition to metal penetrations, you can also find elastic ones on sale, equipped at the bottom with a sole made of soft flexible metal, such as lead or aluminum. Through this plastic, but preserving the shape given to it, spacer, framing the “bottom” of the penetration, it is fixed to the sheathing, through the surface of the roofing material. The cap itself is made of weather-resistant elastic rubber, and tightly covers the pipe around the circumference, especially since it is usually also “grabbed” with a metal clamp.
Slate prices
slate
Elastic penetrations for round pipes – “master flash” – have become very popular.
The advantage of elastic penetrations is their versatility, since they can be installed on slopes that are built at any slope. Thanks to the flexibility of the combined penetration base, it is easy to shape the base of the roofing material.
Such flexible penetrations for round pipes are often called “master flash”. There is no shortage of such products in our time. And installation is very simple and accessible to any home owner.
Installation of a master-flash penetration is simple and intuitive. A feasible task even for a home owner who is inexperienced in such work
Video: installation of an elastic penetration for a “master-flash” chimney
Sealing the junction of the roof to a round pipe using aluminum or lead tape
In cases where for some reason it is not possible to use ready-made penetrations to seal pipe passages, then special self-adhesive aluminum or lead tape can be used to perform this work. Due to the flexibility, heat resistance and versatility of this material, you can use it to form a penetration yourself.
Self-adhesive sealing tape on an aluminum or lead base allows you to seal the joints between the pipe and the roofing, if the use of a finished penetration seems impossible
The vertical part of the pipe with the transition to the roofing is covered with pieces of tape. And then the tape is secured around the chimney - thus sealing the joint.
This material is highly resistant to various external negative influences: high and low temperatures and their sudden changes, moisture, ultraviolet radiation,
In order for the tape to provide high-quality waterproofing of the junction, and the sealing to last as long as possible, the tape must be applied to a clean, degreased and dried surface of both pipes and roofs.
Vaka strips: reliable connection
So, to protect the abutment seams:
- Step 1. Install the strips and fill the top flange with sealant. In traditional units, a brick overlap is usually used, but here the plank performs exactly this function.
- Step 2. Cut the bottom strip to the required length - so that the length of the strip is the width of the pipe and 5 cm on the sides.
- Step 3. Cut the top of the strip and bend it along the line of the pipe itself.
- Step 4. Now cut the bottom part of the pipe and bend it along the line that will be 1 cm further from the corner of the pipe.
- Step 5. Cut the strips to 1 cm and bend the top flange with a hammer to the pipe.
- Step 6. On the bottom, cut a corner parallel to the slope line.
- Step 7. On the top part, drill holes in increments of up to 20 cm, for dowels 6 mm. The holes for them need to be drilled 6x40 mm.
- Step 8. Attach the strip directly to the chimney with heat-resistant dowels.
The finished chimney bypass should look like this from all sides:
Next, attach the side bar so that it is parallel to the line of the slope, and follow these instructions:
- Step 1. Mark the outline of the bottom strip on the inside surface of the plank.
- Step 2. Cut the top of the strip along the line of the pipe, and the bottom of the strip along a line that is 1 cm away from the corner of the chimney.
- Step 3. Cut the side strip along the contour of the bottom strip that is already attached.
- Step 4. Secure the plank with screws in increments of up to 20 cm, and do the same with the second plank.
- Step 5. Now cut the top strip to the width of the pipe with a 2cm overhang on both sides.
- Step 6. On the inside of the top plank, mark the contours of the already installed side strips.
- Step 7. Cut the top strip and bend it along the line of the pipe. Make the necessary cuts, drill holes in the pipe for dowels, 6x40 mm. Secure the bar.
Finally, apply sealant to the flange around the entire pipe. For convenience, take a construction syringe, and to make the seam neat, stretch it with cardboard.
Joint of pipe and corrugated sheet on the slope
Not in all cases, the layout of the building allows the chimney to be brought out through the roof ridge. Therefore, another path is chosen - to make a hole on the slope. In this case, the work on sealing the junction becomes significantly more complicated.
The main goal is to correctly install the top element of the apron. Therefore, the main rule is to install this element under corrugated sheeting.
Attention! If the upper side of the chimney structure is more than 80 cm wide, a shaped apron with a slope is installed on it. This design resembles a breakwater that diverts water in different directions from the chimney.
Installation of such an apron is associated with certain difficulties. In addition, at the junction of its elements and corrugated sheeting, two valleys are obtained. They need to be sealed in the same way as valley roofs. This requires the installation of additional strips and increased waterproofing.
Fastenings
When choosing a sandwich chimney, there is a simple rule that solves a lot of problems. It says: compare the entire chimney system, not its individual elements. Guided by this rule already at the stage of choosing a product, you can significantly simplify your installation.
our life is like a daisy in a field
For high-quality DS, a smaller amount of fasteners is used - clamps and consoles. It comes down to the quality of steel, thermal insulation and design of the elements. A conscientious manufacturer invests in these components. The result of quality is a reliable, safe and durable chimney system.
In a high-quality chimney, the step between the clamps is 3-4 meters and 1.5-3 in the free-standing section (the distance between the outer clamp and the top of the chimney mouth). And just one supporting element can support 10–15 meters of pipe (see Figure 8). A smaller number of fasteners used speeds up installation, reduces its cost, and also does not spoil the interior of the room or the facade of the building.
Spacing of wall clamps and support consoles
It is important to know! The straight pipe elements of some chimney system manufacturers can be shortened. This function greatly simplifies the installation of the chimney and reduces installation time. When purchasing a DS, ask if this operation is possible.
Steel chimney systems are quickly assembled, are light in weight and do not require serious skills for their assembly. But at the same time, there are important nuances (passage of floors and roofs, connection to a heating device, fastening to the facade, etc.) that directly affect the safety of residents. So it is better to entrust the installation and connection of the chimney to qualified specialists.
Source
Video description
Watch the video on how to line a pipe:
Corrugated sheeting is considered one of the best. Due to its positive qualities, low price and the ability to accept any color from a range of options, it is extremely common. But this material also has a negative side, like any other metal - low sound insulation.
Metal tiles have the same disadvantage. In all other parameters, this material is in no way inferior to corrugated sheeting.
Ceramic tiles are only suitable for cladding inside a building. For this material it is necessary to carry out high-quality preparatory work. Installation must be carried out on a flat surface. But the tiles look great.
Clinker brick is suitable for those who value durability and strength. But not everyone will like its appearance. The main disadvantage is the high cost and weight. Due to the last drawback, reinforcement structures are installed during construction.
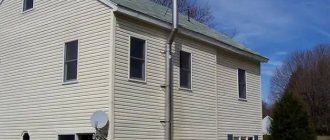
Advantages and disadvantages of installing a steel chimney along the facade and indoors
The answer to the question why most people choose a steel chimney is simple:
Let's move on to the pros and cons of installing a chimney system outside and inside the building.
Helpful information! Steel chimney systems are assembled without the use of sealants. All elements have socket connections. The DS parts are inserted into one another and crimped with a clamp. This guarantees tightness and high reliability of the system. Sealing compounds can only be used to connect the chimney and the heating device.
Advantages of installing a chimney on the facade:
Disadvantages of a chimney on the facade:
Advantages of installing a chimney inside a building:
Disadvantages of a chimney indoors:
Attachment option
This type of connection of the chimney to the OP is conventionally called an economical option, since the installation of the entire system requires less fasteners when compared with other types of connections. Here the pipe stands and rests directly on the heating device. The connection is simple, but has serious drawbacks. In the mounted version, flue gases are removed by direct flow from the furnace. Because of this, excessive draft is created, which makes the fuel combustion process uneven and also increases its consumption.
Mounted chimney connection option
The next problem with a push-on connection is condensate drainage. During the operation of heating devices, condensate forms, which must be removed from the firebox. Otherwise, condensation or moisture from atmospheric precipitation will fall directly into the firebox, which will lead to a reduction in its service life or destruction. And while a windproof umbrella will protect you from precipitation, there is practically no protection from moisture condensing in the channel.
Another disadvantage of a push-on connection is that it makes cleaning the chimney system more difficult. In this case, to clean the chimney, you need to dismantle the lower elements and securely fasten the upper part of the pipe. Another option is to remove soot from the firebox, if, of course, such a function is provided in the heating device. All this leads to an increase in the cost of cleaning and maintaining the diesel engine.
Conclusion
The installation of a pipe outlet through the roof should be approached with the utmost responsibility. If the work is done poorly, moisture will regularly enter the attic. This will entail dampening of the rafter system and insulation.
High humidity has a negative effect on the condition of wood. As a result, many load-bearing elements of the attic are deformed. This can lead to sagging of the roof and the appearance of cracks in it. High humidity in the attic has a destructive effect on the internal cladding material. The durability of the roof depends on the correct selection and installation of sealant.
What types of sealants are best to use for chimney pipes? characteristics
The chimney is one of the most important communications in residential buildings, the efficiency of which largely determines the ability to live in the house. However, in order for the functioning of smoke structures to be effective and safe, simply installing them is not enough - it is also necessary to ensure the tightness of the structure.
During the operation of the chimney, the very high temperature that occurs inside it (1300 °C) contributes to the formation of various cracks and fistulas in the structure. This significantly reduces draft and allows toxic combustion products to penetrate into the room. Therefore, the need to ensure the tightness of chimneys becomes vital.
The need for repair and sealing sooner or later arises even for expensive and high-quality pipe products, for example, galvanized or made of stainless steel. In order for sealing to be effective and long-term, you should use high-quality and reliable sealant for chimney pipes for this purpose.
What to look for when installing steel chimney systems
Holes in ceilings, walls and roofs
When the installation parameters of the DS are determined (height, location, type of connection), you need to make holes in the ceiling, wall and roof. When making holes, it is necessary to take into account that the chimney will heat up during operation and this can lead to burns or fire. In this regard, it is necessary to strictly observe the clearances from combustible structures.
It is important to know! Even if the chimney pipe passes through non-combustible structures, small gaps must be left, since the chimney system is a self-supporting independent structure. Its rigid fastening (clamping) to building structures is strictly prohibited!
Before installing the DS and making holes in the building structure, check the fire safety distances specified in the manufacturer's instructions. Russian standards state that the manufacturer of chimney systems must indicate safe distances to combustible structures.
But today, not every manufacturer can provide such information, and there are even fewer who can confirm it with certificates and test reports. By the presence of these documents, you can distinguish a bona fide chimney manufacturer from those who produce low-quality products.
Fireproof indentations
Stitching
Additional stitching is not needed in every case; it is a necessity if:
- standard brick was used for masonry;
- the pipe rises above the roof by more than two meters (this height negatively affects traction, and lining will restore its strength).
Lining the pipe Source amazonaws.com
Due to the availability of modern mixtures that make it possible to give the material increased resistance to high temperatures, fire and parasites, wood began to be used as a frame in the construction of the chimney. But not all experts agree with this decision, since extreme temperature changes can still harm the wood due to the formation of condensation that is absorbed by the material.
It is ideal to use metal when finishing a chimney on the roof. It is easy to install, low price and lightweight. You just need to pay close attention to the thermal insulation process. Then heating of the skin will be eliminated. This adds aesthetics and the ability to use any material for decoration. Decorative stone is also a good option; both natural and artificial are suitable.
Making the sheathing
lathing for metal tiles
Sheets of metal tiles are mounted on a lathing, which is assembled from boards with a cross-section of 30x50 millimeters. The initial lathing, located at the very bottom, is made a little thicker - 15 -20 millimeters, since it is used to support overhangs. The first of the battens is aligned with the cornice. The distance between the first sheathing board and the second should be 280 millimeters, and subsequent ones are fastened at intervals of 350 millimeters. Thus, it is necessary that the pitch of the metal tile matches the pitch of the sheathing. When the sheathing is created at the location of the valleys, the location of the chimneys and other elements, additional (reinforcing) strips are installed.
Important points
The waterproofing of chimneys, if it is damaged, can be restored in several ways: the choice of the most suitable one depends on several factors:
- A pipe installed on a slate roof must be freed from the cement apron, and then the slate sheets adjacent to the pipe must be removed. After checking the condition of the pipe for mechanical damage, an apron should be made from sheet metal. The joints are treated with oven clay with the addition of Portland cement or fire-resistant mastic. Now you can lay slate sheets on the apron, and then coat them with cement mortar.
- Fused insulation can be used to insulate leaky areas, but damaged slate sheets should also be replaced.
- If the pipe is made of brick and the first two above points are completed, it is enough to coat it with clay-cement mortar.
- For a metal roof, you need an apron made of the same material: it can be made using special scissors. The outlets of round pipes can be sealed using special corrugated rubber elements.
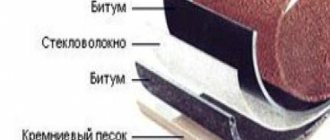
- If the distance between the pipe and the ridge is large, special bitumen tapes with metal inserts are used.
The exit points of round pipes are sealed using rubber corrugated inserts