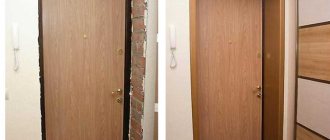
If you've ever looked at a good-quality clay tile roof, you've probably wondered: what holds all the shards together? Don't they fly off for an hour? How many people do you need to install natural tiles at such a height, and is it really possible for just one or two people to do it? And do skill and experience play a big role in such a process?
Such questions always arise for those who decide on this beautiful and centuries-old roofing covering. After all, with fragile modern analogues everything is more or less clear: cut, stick, secure with a self-tapping screw - and everything is ready. What to do with such heavy weight elements as ceramic tiles, what to fasten them with and how to ensure the safety of people below?
Yes, of course, from century to century roofing masters passed on and improved their experience, but they also baked shards individually and by hand. And modern manufacturers have not only established large-scale production, but also completely changed the approach to installing tiles, for which they have shown ingenuity and added special accessories.
Where to start then? We will now try to illustrate the entire process in as much detail as possible.
Stage I. Calculation and design of a tiled roof
Let's start with the most important thing - design. In addition to the shingles themselves, you will need waterproofing substrates, an eaves overhang and a ridge with a valley:
Think in advance which of these elements you will need, how many tiles will be used for the slopes (calculate by area, and for 1 square meter the consumption is usually 9-15 shards).
And also decide right at this stage whether you will use the attic space as a living space in the future, because the structure of the roofing pie itself depends on this:
Price
The total cost of a roof consists of the price of the roofing covering, substructure and other elements of the “roofing pie”, installation and maintenance costs.
Metal tiles have an affordable price. The material is mounted on a step lathing; laying a solid base and underlayment is not required, as is the case with flexible tiles. Therefore, there is no need to spend money on additional materials. You can install steel shingles yourself without having to contact professional installers. Metal roofing is easy to care for - just periodically clean it from dirt with water from a hose. It's also easy to do yourself.
Soft tiles can be inexpensive. But its installation is usually more expensive. The material is laid on a solid base and a lining carpet - and this will entail additional costs for materials and installation. As a result, the weight of the roof increases. Often it is necessary to strengthen the load-bearing structures and foundation - this also requires costs for materials and labor. Maintenance of flexible tiles can become a separate expense item. The roof must be treated with protective compounds to prevent mold or moss from appearing on it. It also needs to be cleaned regularly. It is not always possible to do this yourself, because special equipment is required. You may have to contact specialists. Having your roof professionally cleaned can be an expensive undertaking.
Conclusion: metal roofing is an economical and practical solution. Available roofing material requires almost no installation costs. There is no need to strengthen the foundation and supporting structures. There are virtually no operating costs. The cost of a roof made of flexible tiles will probably be higher, since installing a “roofing cake”, strengthening load-bearing structures and foundations, and regular professional roof maintenance is not a cheap pleasure.
Stage II. Assembling the rafter system
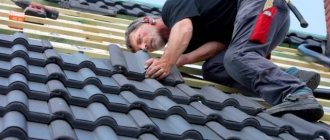
Proper and high-quality installation is one of the most important conditions for the durability of a tiled roof. Let's look at its main stages. Let's start with the preparatory work.
Before laying the tiles, be sure to check the geometry of the rafter structure, measure the diagonals and compare their lengths. Any unevenness must be leveled out because tile locks have an extremely small range of motion.
Those. You will not be able to correct defects using the roofing itself, unlike a soft roof, which can go around any radius.
Therefore, arm yourself with a two-meter strip or cord and check all planes. The deviation should not be more than 5 mm along a length of 2 m. Now, for convenience, arrange the tiles in stacks of five or six pieces on opposite slopes to create an even load on the rafters.
If you have decided on the roofing pie, proceed to installing the rafter system. The optimal rafter pitch is up to 75 cm, because natural tiles have quite a significant weight.
The sheathing is the base on which the tiles rest, so it is important to correctly calculate the sheathing pitch so that you get a whole number of tiles on the roof. Therefore, using a level, make sure that the beam is located strictly on a horizontal surface. Use softwood beams, without passing knots and wane. For rafters that are installed in increments:
- no more than 75 cm, take bars with a section of 30 by 50 mm;
- exceed 90 cm, bars 40 by 50 mm are needed;
- if the rafter pitch reaches 110 cm, then the bars should measure 40 by 60 mm or 50 by 50.
To make the correct marking of the rows, a marking cord is used. It is pulled according to the marks made.
Consider especially carefully the location of the counter-lattice where the attic window will be located:
Now proceed to installing the eaves strip or drip line, the task of which is to remove condensation and prevent the wooden structures from getting wet.
Installing drip pipes is generally the simplest of all installations:
Color fastness
The polymer coating of metal tiles is resistant to fading. It practically does not change shade when exposed to sunlight. Polyurethane-based coatings have the highest color fastness. You can safely choose a rich or bright color - and the appearance of the roof will delight you for a long time.
Flexible tiles are also often resistant to fading. The color fastness of the material largely depends on the quality of the granulate. Decorative and protective coating can be made of anthracite, slate, basalt. It is believed that basalt chips are less susceptible to fading.
But granulate has a peculiarity: over time it can crumble (especially under the influence of snow, rain, wind). Because of this, the tiles will lose color, since only the mineral coating gives it a tint. This can also negatively affect the performance of the material - the roof will become more susceptible to external influences.
Conclusion: both materials are colorfast. But flexible tiles may crumble granules - and then their aesthetic and performance qualities will decrease.
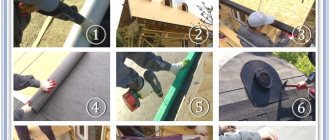
Stage III. Installation of waterproofing and sheathing
Once the base is ready, proceed to the waterproofing device:
- Step 1. Nail the bars on both sides of the valley to the rafter legs.
- Step 2. Place the waterproofing membrane on top of the counter-lattice, always with the inscription and the front surface facing up.
- Step 3. Trim it along the edge of the eaves overhang with a margin of at least 15 cm. Lay it starting from the lower right corner and fix it with a stapler, aligning it with the drip line. Double-sided tape will help you with this.
Here's what it looks like in practice:
Now nail the counter-lattice directly to the rafters, on top of the membrane, at intervals of approximately 30 cm. Cover the ventilation gap under the eaves with perforated ventilation tape.
To find out the optimal position of the bottom support sheathing, you need to try on the shingles from the bottom row and the gutter bracket. The support sheathing beam should be fixed at a distance of 32 to 39 cm from the bottom edge:
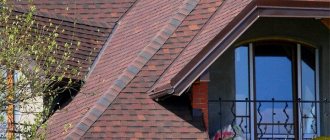
At this stage, it is very important to properly waterproof the gable overhangs:
By the way, to make the gable overhangs look beautiful, special side tiles are attached to them.
You can also resort to the traditional method by arranging the pediment with carved boards, which are also called piers. They just need to be treated with an antiseptic and protected with a metal apron.
Stage IV. Gutter installation
Now install the gutter on the pre-mounted mount. Attach the drainpipe clamp to the wall of the building and assemble the elbows with connecting elements.
Cover the ends of the gutter on the gables with a universal cap so that the gutter does not interfere with the installation of the lower gable tiles.
And connect the straight elements of the gutter with a joining element and close it from the inside using clamps that are attached to the additional sheathing:
Stage V. Working with the valley
Lay the valleys starting from the eaves overhang, from bottom to top. After laying, it can be trimmed by 3-4 cm to prevent the groove at the top from slipping.
If you need to choose the exact size of the valley, then follow this simple principle:
- if the length of the valley is no more than 4 meters, the width of each half should be 20 cm, and when unfolded, about 55 cm.
- if the valley is long enough, more than 4 meters, then in the unfolded state the steel sheet should be at least 66 cm wide.
Secure the valley to the sheathing with two screws. Trim the tabs on both sides for a tight fit, secure with self-tapping screws, and seal their joint with sealing tape.
Next, roll the edges with a roller to protect against dust and debris getting into the under-roof space:
At each edge of the valley groove, install a self-adhesive foam rubber strip with water-repellent impregnation.
On both sides of the valley, along the entire eaves overhang, an overhang aero-element is attached, which should not extend into the valley further than 10 cm from the edge of the groove, otherwise it will trap debris, fallen leaves and snow melting there.
Make sure that the visible part of the valley is at least 13 and 15 cm. The fact is that if the groove is completely covered with tiles, then rainwater will accumulate in it.
Stage VI. Laying tiles on slopes
So, now that everything is ready, try on the gable tiles on the gable overhang, which should lie with a gap of 1 cm from the front board.
On the sheathing, mark the left edge of the pediment tiles, and to the left of it, mark the position of future columns after 90 cm, at the rate of 30 cm per column.
Using string, apply these markings to the sheathing. Now lay out the lower first row of tiles freely, while carefully checking the position of every third tile using the previously made marks.
The support spike, which will rest on the front board, needs to be knocked down with a hammer, as in this photo master class:
Now fasten each tile of the bottom row with a self-tapping screw through the holes drilled in the ridge, and lay out the first column of gable tiles along the previously marked vertical line. At the same time, fasten each tile at the top with two screws.
After this, lay the tiles on the slope, from bottom to top, along the vertical markings applied to the sheathing:
To walk on a tile roof, all you need is a harness—you can step on it anywhere. Start laying and marking tiles on hip and hip roofs from the middle of the slope. To do this, you will need to find the middle of the triangle: simply lay out a vertical row of tiles from the very top, right in the center, and now lay the bottom row.
After this, mark the vertical rows where you can, and lay the tiles from bottom to top, in rows, starting from the middle of the slope towards the ridges.
Stage VII. Fixing tiles using different methods
Now let's talk about fastening the tiles. Up to 60 degrees, most of the tiles do not need to be fastened at all; only the bottom row on the overhang, the top ridge rows and the side gable rows must be fixed.
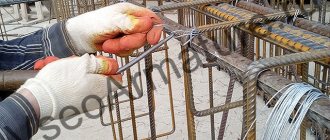
They also fasten all the trimmed tiles, which are usually located on the valley, ridges and adjacent to the walls, roof windows and hatches. In regions with strong winds, shards are additionally secured with wire.
But groove tiles, which are also called castle tiles, are produced separately. It has the largest area and profiled shape, and this tile differs from others in the presence of locks.
The locks consist of two edges, top and side, which overlap the adjacent ones, snap into place and ensure reliable tightness of the coating. In addition, at the bottom, such tiles have protrusions that, during installation, cling to the sheathing bars.
The most popular models of such tiles are double S-shaped, Dutch and S-shaped Marseilles. Most of them have sliding locks, so the shingle periods can be made as wide or as narrow as possible. Thanks to the presence of such sliding locks, the tiles fit perfectly into the existing spacing of the bars, and there is no need to trim them:
In addition, basically all tiles today are produced with two manufactured holes for screws. They are not end-to-end, it is worth noting.
Therefore, if you decide to fasten the tiles, then these holes need to be drilled with a 6 mm drill and fixed at the top to the sheathing using two anti-corrosion screws 4.5 by 50 mm, and at the bottom with anti-wind clamps.
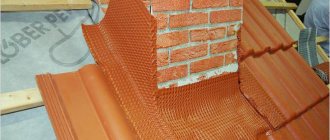
Also, if the slope has a length of more than 4.5 m, additional ventilation tiles must be installed on it. This is placed in the third row, in increments of 1 meter. If the slope is more than 7 m, then the ventilation tiles are laid in two rows:
Ventilation tiles are also needed where chimneys or roof windows are located, because these create obstacles to the air circulation under cover.
Fire resistance
Metal tiles "Metal Profile" are made from galvanized steel with a decorative and protective polymer coating. This roofing material belongs to the flammability class NG - neither the steel nor the coating burns. Metal tiles are fire-resistant; in the event of a fire, they will prevent the spread of fire. Thanks to this property, it is used at any facilities, including those with high fire safety requirements.
Soft tiles are a “pie” made of fiberglass, a bitumen layer, decorative and protective mineral coating (granulate) on the outside and an adhesive layer on the inside. Bitumen is a derivative of oil and can burn or melt. Therefore, flexible tiles, as a rule, belong to the flammability class G3 or G4 - normally or highly combustible materials. This limits the scope of its application.
Conclusion: metal tiles are a fire-resistant material with a flammability class of NG. Soft tiles are usually classified as normally or highly flammable materials (due to the bitumen binder in the composition).
Stage VIII. Window bypass and waterproofing of junctions
Where natural shingles go around the skylights, you will most likely need half shingles (unless you timed everything perfectly). Place it next to the others and try to close the joints as much as possible.
We have prepared for you a detailed master class on waterproofing the junctions of natural tiles with windows and chimney pipes, so that you can understand all the intricacies of such work:
Here is another example of how to “fit” a window into a tiled roof:
Bottom line
Flexible tiles are aesthetic and plastic; this material is often used for cladding roofs of complex shapes. But it may have disadvantages:
- complex, time-consuming and often expensive installation;
- possible shedding of granulate, resulting in loss of color, appearance of “bald spots” on the tiles;
- quite labor-intensive operation. The roof will have to be regularly cleaned from dirt and dust, and in advanced cases - from moss, mold and lichens;
- high weight of roofing material and continuous sheathing. This will require additional costs to strengthen the substructure and foundation;
- flammability class - G3, G4. This limits the scope of application of the material.
Metal tiles are classified as non-combustible materials (NG), therefore they can be used on any objects. It has an affordable price. Easy to install - you do not have to strengthen the substructure and foundation. It requires virtually no maintenance, and additional costs during operation are excluded. A rich range of colors and a wide range of profiles allow you to find a solution for any project. A manufacturer's warranty of up to 40 years* confirms the high quality of Metal Profile steel tiles.
It is no coincidence that metal tiles have been in demand for many years: it is an inexpensive, and most importantly, unpretentious, aesthetic and durable roofing material.
* Detailed information about warranty periods for products can be obtained on the website metallprofil.ru in the “Documents” section.
Stage IX. Trimming tiles for valley joints
To correctly lay the tiles in the valley, use a string on the groove to mark the hanging line so that the overlap of the tiles on the groove is 8-10 cm. After this, cut the tiles at an angle along the marked line. Just don't use small, triangular pieces of shingles that are difficult to secure.
To move the column and ensure quality fastening, you will need half shingles. Approximate consumption – 1 piece for 2 rows:
For convenience, first number the cut tiles and remove them from the sheathing. To cut tiles, we advise you to take a miter saw with a power of 2 kW and a diamond blade with a diameter of 22.23 cm, which is specially designed for dry cutting of heavy concrete. Protect your eyes with goggles or your face with a respirator.
By the way, accuracy will be achieved on a water-cooled machine. Wash the cut tiles with water to remove dust and let them dry. Since you will not cover the cut edges with anything, cover them with cold engobe to match the color of the roof - this is sold immediately with the tiles.
To properly secure the cut tiles to the ridges, use special stainless steel clamps. These clamps come in two types:
- anti-wind, which attract the tiles to the sheathing;
- universal, which support the tiles in weight.
The wire fastener is screwed to a nail, which is driven into the nearest lath. And sometimes the wire is used so thick that it itself is driven directly into the sheathing instead of a nail.
Stage X. Installation of ridge tiles
To install a natural tile roof ridge, follow our detailed tutorials. Here's how to install a ridge on a ceramic tile roof:
If you have a residential attic under such a roof, then use an aero element that has the largest cross-section for ventilation - this is “Figarol”. If there is only a cold attic in the under-roof space, then any other aero element will provide ventilation.
To install ridge shingles, bend the beam holders so that when installing the beam, the distance from the top edge of the beam to the top edge of the rafter matches what you previously measured.
Trim the tiles so that the gap remains 2-3 cm. Fasten the trimmed tiles to the sheathing with corrosion-resistant 4.5 and 50 mm screws, or directly to the ridge using copper wire. Special stainless steel clamps are also suitable.
You will need to place one holder at the end and the beginning. After this, tighten the lace and install the intermediate fastener directly along it.
Aesthetics
Metal tiles are available in different coatings - glossy and matte, smooth and textured. It can imitate different materials - copper (Agneta®), ceramic tiles (Cloudy®). You can choose a standard color from the RAL or RR palette, or you can choose original branded metallics (Purman®). You can easily select a roofing material that matches the facade of any color.
You can also choose different shapes, widths and wave heights - depending on the shape and size of the roof. For example, for small slopes we recommend metal tiles with low and medium waves. For large roofs, you can choose metal tiles with an expressive relief; it will look more attractive.
Flexible tiles also come in a variety of colors. It is often presented in muted colors; material in bright colors is rarely found. Usually the color is uneven, with dark and light tones.
The edges of soft tiles can be semicircular, square, in the shape of polygons, etc. They can imitate various roofing materials - slate, shingles, shingles.
Flexible flat tiles. You can choose the color and pattern, but you cannot change the relief of the material. Flat slopes with a soft roof rarely look voluminous. But it looks impressive on semicircular and curved roofs - thanks to its plasticity, the material adapts to almost any terrain.
Conclusion: both options are aesthetically pleasing in their own way. Metal tiles add visual volume to slopes; they are distinguished by a wide range of shapes, textures, colors and coatings. It can be glossy or matte. Available in many shades of the RAL or RR , in branded “metallics”, it can imitate copper or ceramics. Flexible tiles are usually presented in muted shades with a matte texture. It is plastic, often used for facing slopes of complex shapes.
Stage XI. Fixing the spine tiles
Aren't you tired? Go ahead! If you have a gable roof, you can skip this step. If it is hipped, study:
The installation of hip roof ridges begins with the installation of spine bars. To calculate their height, you need to lay two ridge tiles on top of the rows. Start measuring from the narrow end. The spine block should be lower than the ridge tile so that it rests on the waves nearby. Leave at least 1 cm between the spine bar and the inner surface of the ridge tiles.
Now be careful! The metal fastenings of the spine beam must be bent and installed at the beginning and end of the spine. Mark the intermediate brackets along the lace in increments of no more than 60 cm.
Install the backbone beam directly into the mount and secure with nails or self-tapping screws. To ensure ventilation of the roof, cut the tiles on the ridges diagonally with a gap of 1-3 cm from the ridge beam and secure them with clamps, which are secured with screws on the opposite side:
On a triangular slope, mark the middle of the slope on the lowest and highest sheathing, and from this mark, to the right and left towards the ridges, lay out the bottom row. Lay out all the following rows as well, starting from the center.
To ventilate the under-roof space, you can use Figarol roll material. Roll it along the axial tape for the backbone beam and secure it with a regular construction stapler, in increments of 30 cm.
Remove the protective tapes from the rubber strips, press the material on the sides with a roller (just do not press the central part). At the top of the hip, “Figarol” is laid with an overlap on another slope.
Additionally, for waterproofing, you can use Wakaflex waterproofing tape:
Begin installing the initial spine shingles with a slight overhang, and secure with two screws and plastic washers through the drilled holes in the top and middle of the shingles.
Next, install a ridge clamp in which to secure the next spine tile. Place all ridge clips exactly along the center line, with a gap of 5 mm between the clip and the ridge tile:
All upper spine tiles must be trimmed at the top of the hip along the joint line. Simply lay the hip tiles on top and mark their outline on the ridge tiles so they can be cut 6cm above this line.
Install such tiles in a clamp on the ridge tiles and secure them with a screw on top of the adjacent ridge tiles:
And finally, the final work. Lay out the ridge tiles on the ridge in the same pattern as on the hip, the only thing is that the tiles that go to the valley need to be trimmed on both sides.
To create a beautiful roof spine, use starter spine shingles. It should be installed with a small allowance and secured with galvanized screws 5x70 or 5x100 mm.
Stage XI. Additional roofing elements
Pay attention to the correct organization of the eaves overhang, which must meet all technical requirements: collect water and provide air access to the under-roof space for high-quality roof ventilation. And also not to be devoid of aesthetic appeal.
Additionally, a ventilation tape and a cornice aero element are installed here:
At the finishing stage, the ends of the slopes are covered with a protective strip made of steel sheet. Further along the length of the rafters, at the edge of the eaves overhang, an aero-element against birds is fixed, if the rafters are less than 8 meters, and a rigid profile with perforation, if the rafters are longer than 8 meters. At the same time, it supports the bottom row of tiles.
As you have already seen, old and modern technologies combine perfectly with each other, and allow you to build houses without losing the spirit of their history, while taking only the best from centuries of experience.
Metal tiles
Metal tiles (photo No. 2)
How it is made
Metal tiles are profiled sheets of thin sheet metal. They can be steel, copper or aluminum.
The sheet is covered with a protective coating, most often zinc or aluminum-zinc, but other types of coatings can also be used. This layer protects against corrosion, increases the strength and service life of the material.
The metal tiles are also covered with a protective and decorative polymer coating:
- Polyester
- Acrylate
- Polyurethane
This coating gives the material color and texture, and also protects against external influences: ultraviolet rays and corrosion.
Structure of metal tiles (photo No. 3)
The weight of metal tiles is 4–7 kg/m2.
Advantages of metal tiles
- Large selection of texture, color and profile options
- A light weight. Simplifies the installation of metal tiles; there is no need to strengthen the rafter system
- Reliable corrosion protection. A protective coating made of zinc and aluminum alloys copes well with this task
- Long service life - up to 50 years or more
- Simple installation technology: you can do all the work yourself. A metal roof is also easy to repair.
- You can lay metal tiles even in winter (at sub-zero temperatures)
Disadvantages of metal tiles
- Poor sound insulation. During strong winds, rain or hail, the attic will be noisy
- On complex roofs there may be increased material consumption
- If the protective coating is damaged or insufficiently thick, there is a risk of corrosion.
- High thermal conductivity
!
Note!
When installing metal tiles, it is important to use high-quality seals for self-tapping screws. Poor quality seals deform over time and the roof begins to leak.