When old buildings are dismantled, secondary construction materials are formed, which can be successfully used for the construction of utility rooms or for landscaping a suburban area. When carefully dismantling the brickwork, the structure of the material is preserved. And when you break the walls, you get broken bricks and fragments of different fractions. Regardless of size, all these fragments can be used to improve a garden or summer cottage: filling holes, creating flower beds, making paths.
Advantages, disadvantages and types used
The following speaks in favor of building a walkway from used bricks:
- the opportunity to free the territory from the remains of construction;
- cheapness;
- ease of installation, allowing you to perform the necessary work without the involvement of professionals;
- environmental friendliness;
- good drainage properties;
- ease of dismantling if necessary and quick restoration of the surface of the area.
However, with all this, brick is mostly a wall material, which means that in the open air it will collapse, exposed to moisture and frost. To extend the life of a broken brick walkway, it is recommended:
- if possible, use sand-lime brick;
- treat the stones with a hydrophobic solution or waterproof varnish;
- if clay bricks are used, then before laying the bricks should be treated with a hydrophobic solution twice, immersing each fragment in the solution.
The purpose of this treatment is to give the stone frost resistance and moisture resistance.
The validity period of the water repellent is 5 years, at the end of this period the treatment must be renewed. When paving a garden path with your own hands, simple installation methods are recommended:
- longitudinal layout;
- transverse layout with seams located perpendicular to the direction of the track;
- chaotic layout (in the presence of multi-colored elements) with any method of laying relative to the direction;
- herringbone laying, when the paving elements are located at right angles to each other, with the pattern often oriented along the direction of movement;
- braiding (a pattern imitating weaving is formed by alternating longitudinal and transverse elements);
- alternating horizontal and vertical lines.
It is easiest to lay rectangular stones in straight areas and along the curb. In curved areas, laying is done using wedge-shaped seams. If desired, you can create a spectacular pattern from small fragments and whole bricks. If the old bricks used are of different shades, this will also help create an interesting compositional solution for the path.
What can you make from broken bricks at your dacha with your own hands?
Those designs that we will discuss below can, of course, be made from whole material. But it also happens that after construction there are broken bricks that also need to be used. Here are some good ideas for using it.
Broken brick facing material
Broken and whole bricks will be used in the construction and lining of both above-ground and underground cellars. You can also pave a cesspool with broken bricks: this will allow the water to sink into the ground faster.
If there are deep holes in your summer cottage or somewhere near it, then they can be filled with fragments of broken bricks, but they must be well compacted into the ground.
Brick path
Red or yellow bricks, either broken or whole, are suitable for the path. It is simply laid on top of the sand. The advantage of such material is its availability, low cost and ease of processing. If desired, you can diversify this garden path with gravel or pebbles.
Brick can also be used as paving slabs, paving the courtyard area with it.
Brick border
Our list of successful embodiments of old brick in a different capacity continues with a border. It can also be laid out from either whole or broken bricks, or you can combine both types and different colors of this building material. Brick will look good as a frame for a path and as a fence for a flower bed.
We plan the location of the path and the work plan
A garden path made of old brick will last a long time if you take into account important points when planning its location:
- Do not place it in the watering area.
- Consider the location of the water supply and electrical cable.
- Take into account the degree of flooding of the area with rain or melt water (when laying a path, it is advisable to choose the driest and highest places).
- Do not lay the path in places where tree roots may eventually destroy it as they grow. Branches should also not interfere with walking along the path.
- Make it wide enough for a garden wheelbarrow to pass.
Construction rules
The supports should be placed no further from one another than 1.5–2 m along the contour of the building, certainly at the intersection of the walls. They are also needed under piers and purlins, and at other points subject to heavy loads.
To ensure that the load is evenly distributed, a beam bandage is mounted on top of the columns, taking into account the distance between the supports when calculating the power of the beams.
According to the depth of placement of the base of the columns, two options for brick structures are classified:
- shallow support;
- buried structure.
Recessed types of foundation are recommended in areas where groundwater is located close to the surface. Then the base of the base is placed under the soil freezing line.
A shallow brick column is embedded in the ground no deeper than 0.4 * 0.7 m.
Required materials and tools
To build a brick path, you will additionally need the following materials: boards, sand, crushed stone, cement, brick for edging, geotextiles. A set of tools that will help you make a path: a cord and pegs for marking, a tape measure, a bucket, a shovel, a tamper, a rubber or rubberized hammer. The tamper can be either manual or electric (gasoline). You may need a grinder to trim sharp edges on bricks or to trim them to the desired size.
Marking
Marking and excavation of soil.
To mark future paths and areas, use pegs, cord and tape measure. They should be kept at least two meters away from trees, as growing roots can cause the foundation to collapse. The garden path should be so wide that two people can pass on it without leaving the surface.
The cord on the pegs should not sag much. To do this, keep the distance between them no more than 5 meters. It is recommended to make turns smooth so that a wheelbarrow or cart can turn on them. In places of turns, increase the number of pegs.
Preparing the base and installing the border
excavation
excavating soil for a brick garden path, leveling the layer of sand.
The next stage after marking is done is preparing the base on which the brick mass will be laid. Preparation is carried out according to the following scheme:
- A trench is dug 20-25 cm deep, after which its bottom is leveled and compacted so that there are no holes or bulges.
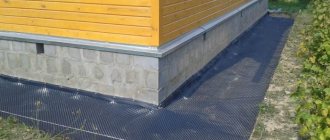
- Sprinkle with a layer of sand 2-3 cm thick for leveling and cover with geotextile. It will divert water from above into the deeper layers of the base and prevent weeds from germinating. The layer of geotextile is positioned so that it also covers the walls of the groove. Geotextiles serve to increase the strength of the path, providing additional protection against deformation. The cost of this material is low, and its use will not cause a significant increase in costs.
- After this, a temporary edge made of boards is installed. If the path will lie at the same level with the soil, then the upper end of the board should coincide with this level. To drain water from the surface, it is recommended to make a slope; in this case, the sides on opposite sides of the path are made with a difference in height of 10-15 mm.
- A layer of sand 2-3 cm thick is again poured on top of the geotextile, and a ten-centimeter cushion of crushed stone or gravel is placed on top of it. This layer will act as drainage for incoming moisture and will prevent erosion of the base of the path. Sand is necessary to prevent the integrity of the geofabric from being damaged due to the sharp edges of the crushed stone.
- The drainage layer is once again sprinkled with sand and covered with geotextile.
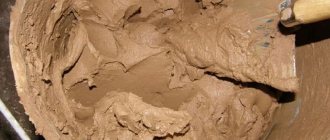
- A mixture of sand and cement in a ratio of 1:5, approximately 50 mm thick, is poured on top, leveled and compacted. The base for laying the brick is ready.
- The perimeter of the trench is decorated with a border. Its presence gives the path a complete look. You can install ready-made border elements or pour the concrete border into the formwork yourself. If you choose a curb made of ready-made concrete or metal elements, then you need to think in advance and deepen the fasteners under the sidewalk. A plastic border does not require foundation preparation or special fasteners.
How to make garden paths with your own hands
It’s not enough to know what you can make garden paths from with your own hands. You also need to know how to make them correctly so that it lasts for more than one season or two. Laying different materials may differ slightly, but there are several rules and actions that are repeated in any technology.
First rule : when laying or forming a path covering, it is made with a slight slope. If the material allows, a slope of several centimeters is made on both sides of the center. If, for example, a concrete path is poured, then the slope is formed in one direction - away from the house, if it is nearby. The slope is made towards the lower part of the site if the path is located on a slope.
Section of a garden or country path
Second rule : any coating requires preparation of the base. If you place stones (for example) directly in clay or loam, there will, of course, be benefits - it will definitely be more convenient to walk, but the stones will “silt up” after some time. They will simply trample into clay. When installing a bedding, this will take much more time. And if you add a drainage cushion and a side, water drainage will be even more effective, and everything will look even more beautiful.
A prepared base is required for the coating
Third rule : the level of the path should be a couple of centimeters higher than the adjacent area. Then the water will drain quickly, cleaning will be more convenient, and cleaning will be required less often: the eroded soil will not flow either during rains or during watering of flower beds, which are often done along paths.
Step-by-step instruction
When making garden paths with your own hands, start with markings. In theory, the dimensions and shape should be marked on your site plan, and the markings should be carried out according to the project. But most often everything is done locally. To make the future path more visible, its contours can first be covered with white sand or something similar. If the shape suits you, you can drive in pegs and stretch twine between them, but you can also work on the backfill.
Next, to make a path from stone, flagstone, brick, paving stones, pebbles and other similar materials, the steps are as follows:
- The turf is removed between the two marks. The depth of the ditch should be about 15-25 cm.
- A curb is dug along the edge, if provided.
- The bottom of the ditch is leveled by removing roots, stones, and eliminating significant holes or mounds. The bottom is compacted (tamping in the photo below).
- Pour a layer of crushed stone of large or medium fraction. To save money, you can fill in broken bricks and other large construction waste. If you have a vibrating plate, great, if not, take something similar to the tool in the photo (you can make it from a large log, to which you nail a handle across the cut). Use this tool to level the bottom. If you have filled up with garbage, you need to sprinkle a little crushed stone on top and compact it again.
One way to level the sand under the path. But you need to dig in the boards first and level them. Then they make such a blank and level the sand, pulling it along the guides
You can place a flower garden or flower bed along a beautiful path. Read how to make them here.
Beautiful DIY pebble path
If with flagstone, paving stones, brick, everything is more or less clear - everyone has already seen more than once how this is done, then how to lay pebbles in patterns is not clear.
Photo instructions for making flagstone paths
Below is a photo report on the process of making a pebble path. It shows the basic techniques: lines are drawn onto leveled sand along which pebbles will be laid out. If these are arcs, they are made using thread and two sticks/nails.
Draw a picture on the sand
When selecting stones, they are laid out on edge close to each other, slightly buried in the sand.
Place the stones close to each other
Place a board on the folded pattern, take a rubber mallet and knock on the board, hammering the pebbles into the sand. This is how they deepen the entire pattern, making sure that the edges of the pebbles are at the same height.
Stones are sunk into the sand
Take a mixture of sand and cement (2 parts sand, 1 part cement) and fill the gaps, leveling the layer with a brush.
Cover the finished pattern with a mixture of sand and cement
A fragment of a pebble path is carefully watered with water so that the backfill does not wash away. Wait several hours for the cement to set a little, then remove the excess with a soft brush.
Excess concrete mortar is removed with a brush
It is important not to miss the moment: the solution should not get dirty, but also become a stone. If you pick at it with your finger, it should crumble. It's time to clean off the excess.
Read about how to grow a green hedge in the article “A hedge fence: how to grow and shape”
Path made of wooden stumps and crushed stone: video
Old logs or trees can be turned into a beautiful path. The wood is cut into logs of the required length, the face cut is sanded, and all the wood is first treated with a bioprotection compound (you can soak it in waste oil). After drying, dip into Kuzbass varnish and dry again. Then paint the desired color on the front parts of the stumps - which will protrude outward. They dry it again and only then put it in the sand.
The process is described in detail in the video. Here we explain step by step how to make garden paths from stumps or logs with your own hands.
Making a concrete path yourself
The process is generally similar to that described at the beginning. There are some differences that we'll talk about.
After the trench is dug and the bottom is leveled, formwork is installed along it on both sides. These are boards with a thickness of 25 mm (thicker is possible, thinner is not advisable, you can use plywood 16-18 mm thick, chipboard). Their height is the height of the track. If you are shaping the slope, the boards should be aligned taking it into account - one side is slightly higher, the other is slightly lower.
The formwork is leveled - the concrete will be leveled against it
To make formwork, pegs are driven into the ground at intervals of no more than 60 cm. Boards are nailed to them. It is better to smear the inner surface of the formwork with mining or other oil: so that it can be removed easily. Next, crushed stone is poured onto the bottom and compacted. But compaction must be done carefully: if you walk along the bottom, no traces should be visible.
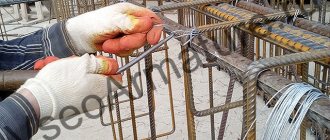
Next, to prevent the path from cracking, a metal reinforcing mesh is laid on the crushed stone. The thickness of the rod is 4-6 mm, pitch is 5-10 cm. It is sold in pieces, they need to be tied together with steel wire.
Reinforcing mesh (note that the formwork is made of slate, it will not be removed)
Then, to compensate for expansion in winter, you need to install wooden planks 1.5-2 cm thick. They are placed across the path, set so that the height of the planks is level with the formwork boards. Compensation strips are installed at least every 2 meters. More often it is possible, less often it is not. Why do it more often? For beauty. Squares look better than long rectangles.
A concrete solution of a grade no lower than M-250 is poured into the finished frame (read about the grades of concrete and its preparation here). For it, take 1 part cement, 3 parts sand, 4 parts crushed stone. Everything is mixed into a solution of medium fluidity (thick sour cream) and poured into the formwork. When pouring, you need to make sure that there are no air bubbles left. To remove them, pierce the solution with a pin, shaking it slightly - bayonet it. It is ideal if you have a surface vibrator for concrete - it quickly compacts the solution, creating a perfectly flat surface. If it is not there, you will have to level it using the rule, using the edges of the formwork as beacons.
Approximate consistency of concrete
A few hours later, after the concrete has set, you can treat the surface. You can leave it as is, you can brush it with a stiff brush, making transverse stripes, and finally, you can lay pebbles, stones, flagstone, etc. into the not completely hardened solution. It's not very economical, but it's reliable. After a couple of days, the formwork can be removed, and you can already walk along the path.
Budget track made from tires
They make a lot of things out of tires: flower beds, swings, ponds and... paths. It's simple: you need to cut off the sidewalls of an old tire, leaving only the tread. How can I cut it? Bulgarian. Someone manages to use a knife, but this is only if the cord is not metal.
Only the protector is left
The projector is cut crosswise to create a track. Then cuts of 15 centimeters are made on the sides - depending on the diameter of the tire. They will give you the opportunity to unroll the tires.
They make cuts on the curved edges - the surface is still nonlinear
In this form it can already be laid on the beds. It will serve for many years. This one is definitely a low cost garden path.
This coating will withstand many years of active use.
As you understand, there are a lot of options on how to make garden paths with your own hands. It is impossible to tell and describe everything, but we are trying...
Brick laying
Stones are laid between the prepared borders on the prepared cushion. They are pressed into the sand in accordance with the selected pattern and hammered in with a mallet, controlling the laying plane. If any element is lower than the others, you need to add a little sand or gravel under it. If it is higher, the layer of sand cushion underneath should be reduced. If the sidewalk is more than a meter wide, laying can be done level. To set the level, you need to pull the cord between the pegs on opposite sides of the track. A small gap is left between adjacent elements. There is no need to fix the brick with masonry mortar. When the masonry is completed, the surface of the path is covered with sand or a mixture of cement and sand. This material is rubbed into the seams with a mop or broom and the path is generously spilled with water. After this, you can repeat filling the joints one or more times, alternating with watering.
After a few days, the guides are removed. The resulting voids can be filled with a cement-sand mixture or backfilled with excavated soil.
Recycled crushed stone
This definition refers to a set of certain used building materials, such as brick chips, broken concrete, crushed stone waste, asphalt. Such a set is often the best option for a temporary road on a small budget.
Places of application
Recycled crushed stone has a number of places where it is successfully used:
- construction of roads with low loads,
- concrete aggregate,
- drainage systems,
- strengthening of mobile soils,
- pouring factory and warehouse floors,
- production of concrete products.
Road made from recycled materials
A temporary road made from cheap recycled crushed stone is made according to the proven scheme:
- remove the top soil,
- fill the lower road surface with large crushed stones,
- compact the laid crushed stone for strength and a smooth road surface,
- lay the fine fraction of secondary crushed stone
- finally compacted and put into operation.
Provided that heavy freight vehicles will not drive on the temporary road surface, the laying procedure can be simplified. Also, such a road does not need to be compacted with a roller; you can drive along it with ordinary dump trucks.
If this is a country road, for cars, you can use medium and fine fractions of recycled crushed stone.
Fence on a flower bed
Making a border for a flower bed couldn't be easier. The work has no mandatory criteria; you just need to present the final result. Height, shape and diameter may vary. It depends on the owner's preferences.
Before reproducing the dream, the desired brick shape is laid out. This is necessary to visualize the future construction. And then they start laying.
Photos of role models
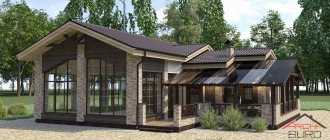
When starting any business, it is always useful to evaluate how others have done it. From the above examples, the logic of combining brick with stone clearly follows. The border carries the greatest load and therefore it is wise to use a more durable natural material for this purpose.
These shots highlight the potential of brick for paving large areas. In this case, various variations in the shape and color of the coating are possible. The main thing is that the chosen solution fits well into the surrounding landscape. In conclusion, we would like to add that no matter what material you work with, diligence and perseverance will bring the required result.
Let everything work out for you, and we offer a short video to help.
What to consider when designing
There are several recommendations that you must consider when planning the entire area and the size of the path:
- Delimit the space in such a way as to provide yourself with easy access to any point of the green zone, but at the same time, the size of the paths and their number should not occupy too large an area, reducing the possibility of decorating it with other landscape forms.
- Try to think through the trajectory of the path in such a way that it is not located near large trees - their roots over time can disrupt the integrity of the brick covering and the evenness of the surface of the pedestrian area.
- Plan the width of the path to be at least 90 cm, so that it is easy to move along it in the future.
- Think in advance about the laying pattern in such a way that it most effectively emphasizes the attractiveness of the entire local area.