The strip foundation has a non-standard geometry: its length is tens of times greater than its depth and width. Due to this design, almost all loads are distributed along the belt. A concrete stone cannot compensate for these loads on its own: its bending strength is not enough. To give a structure increased strength, not just concrete is used, but reinforced concrete - this is a concrete stone with steel elements located inside - steel reinforcement. The process of laying metal is called strip foundation reinforcement. It’s not difficult to do it with your own hands, the calculations are elementary, the diagrams are known.
The quantity, location, diameters and type of reinforcement - all this must be specified in the project. These parameters depend on many factors: both on the geological situation on the site and on the mass of the building being constructed. If you want to have a guaranteed strong foundation, you need a project. On the other hand, if you are building a small building, you can try, based on general recommendations, to do everything yourself, including designing a reinforcement scheme.
To avoid problems
When laying the foundation of a private house, it is difficult to foresee what loads it will be subjected to in the future. Perhaps the owner will need to install a massive lathe or arrange a dance hall in the house, a water supply will break, or a powerful structure will be erected in the neighborhood, causing a rise in groundwater or a new underground flow. The loads will change, the foundation, not designed for dramatic changes in loads, will burst and sag, followed by the collapse of the building.
If the developer considers the installation of a strip foundation to be the most appropriate option, then reinforcement is necessary to guarantee its reliability. And you should know at least approximately how the foundation should be reinforced, the calculation of reinforcement, laying and tying should be done, even if other people will build your house.
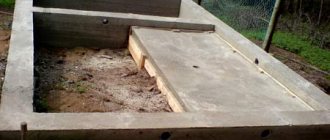
Sectional strip foundation Source ar.aviarydecor.com
About the need for strengthening
To what extent is it necessary to strengthen a concrete mass with steel wire? After all, concrete has fairly high strength characteristics. Indeed, concrete has increased resistance to compressive loads, but requires reinforcement against the destructive effects of tensile forces.
The greatest likelihood of stretching is on the surface of the base, this is where the reinforcement should be placed
This feature of concrete can be compensated for by laying steel rods at two levels of the base. This solution increases the strength characteristics of the array, allowing it to maintain integrity under the influence of bending loads, torques and tensile forces.
The concrete base is additionally reinforced with auxiliary rods located in a vertical plane. Vertical elements provide fixation of the rods of the upper and lower levels of the load-bearing frame.
Calculation with reserve
Foundation reinforcement is the installation of a metal frame in its mass, designed to create a single, indestructible structure from concrete.
Making an accurate engineering calculation of the foundation of a small individual building is difficult and expensive; it requires geological surveys, comparisons with promising development projects for the area as a whole, soil and groundwater characteristics, and solving a long list of issues.
Based on this, private developers are guided by two basic rules for constructing foundations:
- The base of the foundation should lie below the soil freezing depth according to the maximum indicators of the development region.
- Reinforcement of the strip foundation is mandatory and is carried out in accordance with the general recommendations of the standards with a margin of safety.
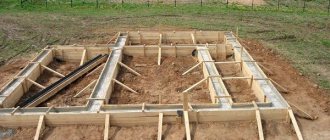
Basic rules for performing reinforcement Source sevparitet.ru
Technologies for assembling reinforcement for strip foundations
Reinforcing the strip foundation with your own hands begins after installing the formwork. There are two options:
- The entire frame is assembled directly in a pit or trench. If the tape is narrow and high, it is inconvenient to work. According to one technology, the reinforcement is knitted directly in the formwork
- Frame sections are prepared close to the pit. They are transferred in parts and installed in their designated place, linking them into a single whole. It’s more convenient to work this way, except that it is very inconvenient and difficult to move connected structures made of reinforcement.
Both options are imperfect and everyone decides how it will be easier for him. When working directly in a trench, you need to know the procedure:
- The longitudinal rods of the lower reinforced belt are laid first. They need to be raised 5 cm from the edge of the concrete. It is better to use special legs for this, but pieces of bricks are popular among developers. The reinforcement is also 5 cm away from the formwork walls.
- Using transverse pieces of structural reinforcement or molded contours, they are fixed at the required distance using tying wire and a hook or a tying gun.
- Then there are two options: If contours formed in the form of rectangles were used, the upper belt is immediately tied to them at the top.
- If during installation you use cut pieces for crossbars and vertical posts, then the next step is tying up the vertical posts. After they are all tied, a second belt of longitudinal reinforcement is tied.
There is another technology for reinforcing strip foundations. The frame turns out to be rigid, but there is a large consumption of rods for the vertical posts: they are driven into the ground.
The second technology for reinforcing a strip foundation is to first drive in vertical posts, tie longitudinal threads to them, and then connect everything with transverse ones
- First, vertical posts are driven in at the corners of the tape and at the junction of horizontal rods. The racks should have a large diameter of 16-20 mm. They are placed at a distance of at least 5 cm from the edge of the formwork, checking horizontal and vertical, and driven into the ground 2 meters.
- Then vertical rods of the calculated diameter are driven in. We determined the installation pitch: 300 mm, in the corners and at the junctions of the walls it is half as much - 150 mm.
- The longitudinal threads of the lower reinforcement belt are tied to the posts.
- At the intersection of the racks and longitudinal reinforcements, horizontal jumpers are tied.
- The upper reinforcement belt is tied, which is located 5-7 cm below the upper surface of the concrete.
- Horizontal jumpers are tied.
It is most convenient and quick to make a reinforcing belt using pre-formed contours. The rod is bent to form a rectangle with the specified parameters. The whole problem is that they need to be made identical, with minimal deviations. And a large number of them are required. But then the work in the trench moves faster.
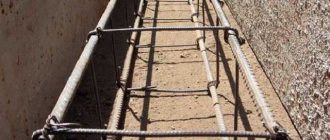
The reinforcing belt can be knitted separately, and then installed in the formwork and tied into a single whole on site
As you can see, reinforcing a strip foundation is a lengthy and not the easiest process. But you can cope even alone, without helpers. It will take a lot of time, though. It’s easier to work with two or three people: both carry the rods and set them out.
Arrangement of the foundation frame
The monolithic foundation is reinforced in the form of a single frame throughout its entire height. The distance between individual reinforcing bars should ensure free passage of the concrete mixture between them. In other words, if crushed stone of fraction 20-40 is used in concrete, then the gap between the frame rods should be at least 4 cm.
The use of rubble stone is much cheaper than conventional concrete mixture, but to create a unified structure, it is necessary to bandage the foundation along the entire perimeter. The reinforcement cage is incompatible with large stones; in such cases, the technological solution is to install reinforced belts at the bottom and top of the foundation.
Even the largest fractions of concrete should pass freely through the frame Source earny.ru
See also: Catalog of companies that specialize in foundation repair and design.
Calculation of size, quantity and diameter of reinforcement
It is important to immediately know how much reinforcement is needed to make the reinforcement cage reliable and durable. Knowing the dimensions of the building, you can carefully calculate everything.
Standard frame configuration for small houses:
- Bottom and top row of belt
- 3-4 rods for each row
- The current distance between the rods is about 10 centimeters. The distance from the rods to the edges of the base should be at least 5 centimeters.
- The belts are connected with clamps or sections of rods in increments of 5-30 centimeters.
So, if you need to build a building with an area of 150 square meters, the perimeter of the external walls is 50 meters. To calculate the amount of reinforcement, you need to take everything into account: 2 belts of a longitudinal row of 3 rods each equals 6 rods, multiplied by 50 meters, that gives 300 meters of main rods. If the lintels are laid in increments of 30 centimeters, the result is 167 pieces per 50 meters. The length of the transverse lintels is 30 centimeters (167x0.3=100.2 meters), vertical - 60 (167x0.6=200.4 meters).
It turns out that to the question of how much reinforcement is needed to strengthen a house with an area of 150 square meters with a wall perimeter of 50 meters, the answer is: 300 meters of thick corrugated rods and 300.6 thinner rods. Plus 10-15% for stock and docking.
Stages of work on arranging a reinforcement frame
The base for the foundation is made of a layer of sand of at least 10 cm, the sand is covered with a layer of crushed stone of fraction 2-5, then the sand-crushed stone base is compacted, and only then should the laying and tying of the reinforcement frame begin.
- Reinforcing rods, cut along the length of the foundation strip on one side, are laid out at a distance of 20-30 cm from each other along the bottom of the foundation. At the corners they are screwed with soft knitting wire to the vertical rods, as well as to each other when overlapping.
- To create the vertical corner supports of the frame, the horizontal bottom rods of the frame are bent at an angle of 90 degrees. Extended by overlapping joints and fastening with wire.
- To facilitate the work on reinforcing the corners of the foundation, the installation of anchors is allowed; the work is similar to the installation of grillages or armored belts. At all corners of the foundation, 4 metal rods are driven into the ground, covered with bitumen resin on the bottom for waterproofing. They act as anchors for fastening the frame. In cross-section, the driven anchor pins should form a square with sides parallel to the foundation strip.
Anchors driven into the ground on which the frame is attached Source sjthemes.com
- Vertical reinforcing rods equal to the height of the foundation are screwed or tacked to the anchors for fixation. All vertical rods are tied or welded together along the perimeter, forming a pillar structure.
- In order to avoid contact between the metal and the sand-crushed stone base, brick halves are placed under it along the entire length of the rod at intervals of 1 m.
- Rods are cut for transverse laying of reinforcement. Their length should be 10 cm less than the width of the monolithic tape, that is, the crossbars should be completely covered with poured concrete with a distance of 5 cm from the outer wall of the foundation.
- The pitch of the foundation reinforcement with transverse rods is 50 cm along the entire length of the longitudinal reinforcement.
- All reinforcement connections are twisted with binding wire.
- Depending on the length of the foundation side, the distance between the vertical rods ranges from 30 to 80 cm.
- Only two longitudinal rows may be enough: top and bottom.
- Each horizontal row is parallel to the bottom one and similar to it.
It is quite possible to assemble the frame close to the foundation, and then simply lower it into a trench or formwork.
The frame does not have to be assembled inside a hole prepared for the foundation - installation can be done outside, and then the entire structure can be lowered down Source newspasky.ru
Of course, this method is only possible if there is a flat area for assembly, otherwise it will be difficult to achieve accurate work.
Excavation and preparatory work
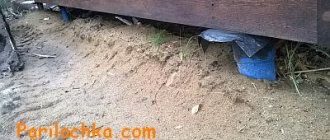
One of the advantages of a strip foundation is the relatively small amount of excavation work. A couple of people, working every day with short breaks, can easily dig a pit of a suitable size on normal soil. When the foundation pit is ready, you can begin to arrange it.
The first step is making the foundation cushion. Thanks to it, the negative impact of groundwater on the foundation is reduced, and the load from the foundation itself and the entire building is distributed as evenly as possible over the ground. Here you can use different materials. Most often sand or crushed stone is used. They do their job well - the main thing is that the thickness of the pillow is at least 15-20 centimeters.
But some experts recommend a concrete pad. Yes, it costs the most. Expensive cement and the need to reinforce the cushion greatly increase the cost and time of construction. But as a result, you get the most reliable foundation for the foundation, guaranteeing that it will last for many years. Therefore, we can say with confidence that this money will not be thrown away.
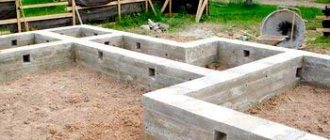
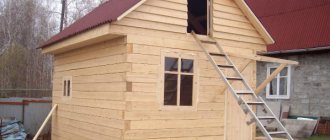
An example of a reinforced strip foundation
If work is carried out on weak, heaving soil, or if you plan to build a heavy brick house, but the use of a monolithic foundation is undesirable for some reason, then you can use a strip foundation with a sole. The widening (glass) can significantly reduce the load on the ground. Of course, do not forget about the reinforcement of the foundation shell - on heaving soils it will regularly withstand significant tensile and bending loads. It is very important to provide it with sufficient strength.
When using a foundation with a sole, the volume of excavation work increases. In addition, you will have to spend additional money on reinforcing the base of the strip foundation - if it fails, this will lead to the rapid destruction of the entire structure.
Formwork is installed on top of the finished cushion. When choosing the width, keep in mind that the finished foundation should be 10-15 centimeters thicker than the external load-bearing walls.
The next step is to install waterproofing. Some builders use roofing felt, but this is a rather expensive material. And the heavy weight makes the installation process difficult. Therefore, it is quite possible to use construction polyethylene. Yes, it is less durable. But it is only needed for a few days - so that the cement laitance does not go into the sand. Therefore, cheap and lightweight polyethylene is quite suitable. It is laid on top of the formwork. At the joints, make a larger overlap - at least 10-15 centimeters - and glue with wide tape.
This concludes the preparatory work. Now we’ll tell you about pouring and reinforcing the foundation with your own hands.
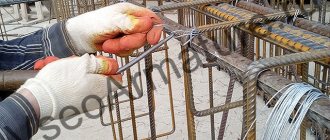
Fastening with binding wire
Two common methods of connecting reinforcement in a frame structure are welding and knitting, and knitting is considered more reliable. When filling a foundation with a concrete mixture, welded joints often cannot withstand the weight of the concrete.
The knitting wire, cut into 40-50 cm lengths, is doubled, inserted from below at the intersection of the rods, and twisted with pliers.
The version with twisting using a hook is simpler and faster: the wire is wound freely with a gap around the junction of the reinforcement, its ends are twisted by hand one or two turns, a hook is inserted into the gap between the reinforcement and the wire, and by turning it the wire is tightened.
Hooks are sold in hardware stores, but bending a cleaned welding electrode is sufficient for this purpose.
For large volumes of fastening reinforcement with wire, there is a special knitting gun. It is very effective in places that are easily accessible, but where access is difficult, and these are usually corner joints, a simple hook is again more useful.
Using a knitting gun significantly speeds up the process of tying reinforcement for the foundation Source dvamolotka.ru
Plastic clamps are often used instead of wire. This significantly speeds up and facilitates the work process, but at low temperatures such fasteners lose their elasticity and strength.
Knitting reinforcement using a special device - a knitting machine
To create this tool, you need to take several boards 20 millimeters thick, cut 4 boards along the length of the reinforcement, connect two at a distance equal to the pitch of the vertical posts, creating 2 identical templates. Next, two vertical supports are made with a height equal to the height of the reinforcement mesh. The supports are constructed with side corner stops; it is better to choose a flat area for work.
The device is used as follows: the legs of the stops are installed on two knocked down boards, the two upper boards are placed on the top shelf of the stops and fixed. That's it, the reinforcement mesh layout is ready, now you can quickly knit it. It is enough to place the vertical reinforcement struts in the marked places, fixing them with nails, install the rods on each steel lintel, doing this on all sides of the frame. Next, take a hook and wire - that’s it, you can knit. Such a device is relevant where it is planned to create many similar mesh sections.
Video on how to knit reinforcement using a device
How fittings work
In construction, reinforcement is usually called rods of various diameters and shapes to counteract compressive and tensile loads, internal and external. The division into types, classes and groups depends on the properties and characteristics specified for the reinforcement.
The division into groups of reinforcement depends on the characteristics:
- material of manufacture;
- profile shape;
- method of use;
- installation technique;
- appointment.
In the construction of foundations, the spatial arrangement of the reinforcement is important. Longitudinally oriented reinforcement elements work to minimize the formation of cracks by redistributing the load on the surface of longitudinally oriented structures.
Transverse reinforcement connects concrete in the compression zone with longitudinal reinforcement, redistributing and reducing loads.
Why do you need reinforcement: just a concrete beam on top, and a reinforced one on the bottom Source rmnt.mirtesen.ru
When studying the markings of reinforcing steel, the designations C and K after the numerical value of the yield strength are of practical importance for a private developer
The C index indicates the possibility of welding the reinforcement; the absence of this index means that welding is undesirable due to the fragility of the joint. The designation K indicates the increased resistance of the reinforcement to corrosion.
How to knit reinforced mesh in a trench
Working in a trench is more difficult, so you need to plan everything ahead of time. Special devices or ordinary stones are placed at the bottom of the trench at a height of at least 5 centimeters in increments of the width of the mesh. The stones are laid out with longitudinal rods, and horizontal struts are tied. Until the rods are in the desired position, a second person holds their ends.
The reinforcement is knitted with a step between spacers of 50 cm wide. We install the pegs and begin to knit the monolithic structure. This is done on all straight sections. Parts of the frame should not touch the formwork; they should be at a distance of several centimeters from the formwork.
Then the corners are knitted using one of several existing methods. It is imperative to maintain the length of the overlaps, with the installation of vertical rods. Rods are often used here with a larger diameter, increasing the strength of the material. Upon completion of the binding, the concrete solution is poured in one go, covered with polyethylene, and during the drying process, it is periodically watered with water by spraying.
Diagram and calculation of metal
The need for metal and estimated costs can be easily calculated if you draw a reinforcement diagram for a strip foundation with all longitudinal, transverse and vertical rods. The reinforcement is sold by weight, so when calculating, you should take into account the diameter of the reinforcement; it is possible to complete the frame with metal of different diameters and types of corrugation.
To reinforce foundations, reinforcement of various brands and diameters is used; the most common are reinforcing bars with a diameter of 10-14 mm, smooth and ribbed. For laying transverse connections, it is permissible to use round smooth reinforcement of a smaller diameter.
The most common types of reinforcement for foundations are made of steel grades M35GS and M25GS, rod lengths up to 12 m, diameter from 10 to 40 mm.
Correct selection of reinforcement cross-section is the key to foundation strength Source armsetka16.ru
Corner reinforcement
In the design of a strip foundation, the weakest point is the corners and the junction of the walls. In these places loads from different walls are combined. In order for them to be successfully redistributed, the reinforcement must be properly tied. Simply connect it incorrectly: this method will not ensure load transfer. As a result, after some time, cracks will appear in the strip foundation.
The correct scheme for reinforcing corners: either bends are used - L-shaped clamps, or longitudinal threads are made 60-70 cm longer and bent around the corner
To avoid this situation, when reinforcing corners, special schemes are used: the rod is bent from one side to the other. This “overlap” should be at least 60-70 cm. If the length of the longitudinal rod is not enough to bend, use L-shaped clamps with sides also at least 60-70 cm. Schemes of their location and fastening of the reinforcement are shown in the photo below.
The abutments of piers are reinforced using the same principle. It is also advisable to take the reinforcement with a reserve and bend it. It is also possible to use L-shaped clamps.
Reinforcement diagram for adjacent walls in a strip foundation (to enlarge the picture, right-click on it)
Please note: in both cases, in the corners, the installation step of the transverse jumpers is reduced by half. In these places they already become workers - they participate in the redistribution of the load.
Alternative fittings
The difficulty of transporting steel reinforcement due to its length and many problems in working with metal forced developers to pay attention to alternative solutions.
One of them could well be fiberglass reinforcement.
It has many advantages, but to appreciate them, it is worth remembering the original purpose of foundation reinforcement. In essence, the reinforcement cage should protect the concrete foundation from stretching. The modulus of elasticity of metal rods is significantly lower than that of similar plastic rods. This means that the low elasticity threshold of plastic rods will lead to deformation, and therefore destruction of the foundation, much faster than a metal one. And the meaning of replacing metal with a plastic composite disappears.
The second very unpleasant drawback concerns specifically individual developers who do not have special conditions for aligning plastic reinforcement rolled into coils.
The disadvantages of modern plastic reinforcement relate only to the undesirability of using it in monolithic strip foundations. There are many areas of application where this type of reinforcement will perform better than steel reinforcement, but not in foundations.
Do-it-yourself formwork installation
A properly made frame for the foundation will not only save a lot of money on the purchase of concrete, but also significantly simplify the reinforcement process. If you already have it, you can skip this stage and go straight to the reinforcement; if you don’t, then consider the step-by-step instructions.
STEP 1: selection of material. With a small foundation height, choosing a material is quite easy: plywood, wood, OSB boards, fiberboard. The main requirement is the strength of the material. For high foundations (from 150 cm) only metal is used, since the pressure of the concrete will be significant and the wood may fail.
STEP 2 : preparing the base. Let's say we have a trench that meets the standards, now we need to compact the base. Pour a 150 mm layer of sand, fill it with water, then 4-5 centimeters of concrete to level the surface. Do not forget about communications, they must be done at the stage of formwork and reinforcement of the foundation of the house; you must not forget about the embedded pipes in the right places, otherwise you will have to work with a hammer for a long time and break the solidity of the foundation.
STEP 3 : having a construction project, we install pegs along the perimeter of the trench exactly to the width of the future foundation, they will hold the bottom of the formwork, we place spacers at least 70% of the height of the structure (the spacer itself is 2 times the height of the foundation). It wouldn’t hurt to make 3-4 control slats for the width of the foundation, which can be used to measure width deviations.
Expert advice: you need to drive the nails from the inside of the formwork into the spacers and pegs, so that later you can remove everything without any problems. Otherwise, you will have to break the wooden beams or saw off the hats, since the protruding nails are concreted. If the foundation is 150 cm or higher, it is recommended to tie the formwork together with wire in a checkerboard pattern every 1 m.
The formwork should be as rigid as possible, the gaps between structural elements no more than 0.3 cm, so that when pouring the foundation, the liquid mixture does not leak out, otherwise the strength of the foundation will decrease in arithmetic progression.
It must withstand heavy loads and retain its shape after pouring cement; this is the only way to make a monolithic foundation for a house that will last for decades.
Important: the inside of the formwork must be lubricated with technical oil or other petroleum products (working off will do) so that it can more easily peel off from the concrete after it has hardened. You can use it many times.
Photos of strip foundation formwork
Formwork with spacers
Wooden formwork
Correct formwork
Panel formwork
Tape: calculation algorithm
This issue is given great importance at FORUMHOUSE.
al185MODERATOR FORUMHOUSE
I beg you not to prescribe a foundation design based on “people’s experience” and the advice of various advisors who “have always built this way.”
A member of our portal with the nickname MaximGvozdev created the LentaOnline v calculator. 1.0, which will help with the construction of this type of foundation. The tool can calculate the resistance of the foundation soil, the width and length of the designed tape, reinforcement and concrete, concrete composition, and the number of concrete batches in a concrete mixer.
For beginners, the FORUMHOUSE moderator with the nickname al185 recommends first deciding on the soil conditions (soil composition, groundwater level, topography) to design a strip foundation and resort to the following methods:
- Ideally, order a project from an adequate designer who can get good recommendations on FORUMHOUSE.
- You can borrow an already calculated analogue foundation design for similar soil conditions and a similar building.
- Master design for amateurs: an algorithm for designing a strip foundation for dummies.
Next, you need to compare the cost of the options received and choose the appropriate one.
What kind of reinforcement is used to knit the frame?
So, moving on to preparing everything necessary for arranging the foundation, it is necessary to obtain information about which reinforcement is best suited for forming the frame of a strip foundation. Nowadays, “classic” steel and composite reinforcement can be found on sale in construction markets. Which one is better for a strip foundation is worth figuring out.
Metal fittings.
Steel reinforcement used to create frames for pouring foundations must comply with the requirements of current GOSTs. In residential construction, material manufactured in accordance with GOST-5781-82 is most often used. This standard regulates the parameters of hot-rolled reinforcement intended for use in conventional and prestressed building structures.
To reinforce foundations, hot-rolled reinforcement is most often used, produced in accordance with GOST-5781-82.
In accordance with the provisions of GOST, this fittings are divided into six classes. If for the first class ordinary low-carbon steel is used, then as the class increases, the content of special and even alloying additives increases, sharply increasing the mechanical strength of the material.
Class I reinforcing bars have a smooth outer surface. All others (with rare exceptions) are given a corrugated shape, the so-called periodic profile of annular, crescent or mixed type. This relief structure of the surface is intended for maximum contact of the reinforcing elements of the structure with the concrete gaining strength.
For the main reinforcement of a strip foundation, the optimal choice, from the standpoint of a sufficient degree of strength and reasonable price, would be class A-III reinforcement, with a diameter of 12 to 18 mm, depending on the features of the structure being created. The indicators of classes from the fourth and above will simply remain unclaimed, but A-II may turn out to be rather weak.
It is worth paying attention to the presence of a letter index.
- So, the letter “C” indicates that this reinforcement can be connected by welding. With all other types, welding work is completely eliminated - the structure of the steel changes during high-temperature heating, and the frame will lose the necessary strength.
- The letter designation “K” is used for products made of steel with increased anti-corrosion properties. They are usually used in the construction of objects that have special requirements, and for a strip foundation for private construction, the purchase of such reinforcement (and it certainly costs much more) does not seem necessary.
Smooth hot-rolled bars of class AI are the best option for the manufacture of clamps that combine the main reinforcement into a single volumetric frame.
But for additional structural elements - lintels, racks, clamps that give the main frame the necessary volume, smooth reinforcing bars of class AI with a diameter of 6 mm (with tape height up to 800 mm) or 8 mm (at a higher height). They are easily bent into the required configuration, and their strength characteristics are quite sufficient for such an application. You can also use corrugated rods of class A-II, but this will be somewhat more expensive.
Prices for fittings
fittings
Fastening of reinforcement is most often done using a special binding wire, which is installed and looped at all intersection points of steel rods. The use of welding is not recommended for several reasons:
- Any weld, even a well-made one, is a place with increased vulnerability to corrosion.
- Lack of penetration at the joint, which may not be noticed when installing the frame, can result in a violation of the integrity of the structure at the stage of pouring heavy concrete mortar.
- Even slight overheating of the rod at the point of its intersection with another structural element reduces the reinforcing qualities inherent in it.
So even if the developer considers himself an experienced welder and has a machine at his disposal, it is still better to refrain from such an operation. By the way, only masters of the highest qualification category are allowed to work on welding reinforcement structures, where it is necessary in industrial construction conditions. And in this case, only fittings marked with the letter “C” should be used.
Composite reinforcement
Composite reinforcement is a relatively new building material. It can be produced on different bases - fiberglass, carbon fiber or basalt plastic.
Fiberglass reinforcement is a material that is gaining popularity, but its application is still not entirely clear.
The most common in this category is fiberglass reinforcement, as it has a more affordable price compared to the other two types, while having high strength qualities.
Composite rods are used to reinforce various types of foundations, including strip foundations. The advantage of this type of reinforcement is its low thermal conductivity compared to metal rods. Therefore, these products are well suited for reinforcing foundations and basement walls that are planned to be insulated, since there will be no unnecessary heat loss due to this material.
Polymer reinforcement is inert to external influences, therefore it is quite durable - it is not afraid of moisture and fairly high temperature changes. If high-quality concrete and fiberglass reinforcement are used when arranging the foundation, the foundation for the house should be strong and durable.
Installation of polymer rods is much simpler than installation and fastening of metal reinforcement, since they are light in weight, easily fastened with clamps or wire and do not leave traces of rust on hands and clothes.
A comparison can be made with steel reinforcement based on basic indicators:
- Tensile strength, with equal diameter, for a steel rod is 390 MPa, for a fiberglass rod - 1000 MPa.
- Fiberglass has a mass 3.5 times less than steel.
- Steel is susceptible to corrosion, polymer is resistant to acidic environments.
- Fiberglass does not conduct electricity, unlike metal.
- Steel has a high thermal conductivity, while polymer practically does not conduct heat.
- Metal is a non-flammable material, while fiberglass is a low-flammable, self-extinguishing material.
- The elasticity of steel is several times higher than that of fiberglass.
- Polymers have great tensile strength, however, when heated to very high temperatures, the plastic binding fiber becomes soft, losing elasticity.
- Composite reinforcement is fastened only with plastic clamps or wire; metal reinforcement can be welded or twisted with wire.
From a comparison of the characteristics of these two materials, the conclusion suggests itself that for heavy buildings it is best to use metal reinforcement, and for light structures a frame for a fiberglass strip foundation is also suitable. However, there are several important nuances to keep in mind.
- To date, clear technological recommendations for the use of composite reinforcement have not yet been developed - all calculations are so far based on the use of steel products. So the owner who decides to use a fiberglass frame takes a certain risk.
- The market is literally flooded with fiberglass reinforcement of very dubious quality. This is not surprising - if the production of rolled steel requires extremely specific production conditions, then lines for the production of composite rods are advertised and sold to everyone who wants to try their hand at this business. Naturally, in this case there is no need to talk about any compliance with GOST - at best, compliance with independently established technical conditions (TS) is declared, in which the criteria for assessing product quality are either deliberately underestimated or unclearly stated. And very often, consignments of goods do not have any accompanying technical documentation at all.
If we dare to use fiberglass reinforcement, then only with quality that complies with GOST.
Alas, the market is literally overflowing with low-grade material. Such rods may have longitudinal or transverse (noticeable on the cut) cracks, delaminations, protruding fibers, knots, resin drips, uneven curling pitch, differences in color, which, in turn, indicates obvious non-compliance temperature-time regime of processing. It is difficult to say how such reinforcement will behave in a loaded state as part of a strip foundation frame, and hoping that it will “carry through” is not the most reasonable solution.
Choice
To choose the right reinforcement, you must first determine which type is suitable for the foundation .
Steel rods can be with a smooth surface (designated as A1) or with a grooved surface (A2, A3, A4, etc.). Reinforcement A1 (mounting) has less adhesion to concrete , so it is used in that part of the base where there will be minor loads.
Working, A3 fittings, has three types of protrusions:
- crescent-shaped , increases the resistance of reinforcement to breaking loads, used for thin walls ;
- ring , usually domestically produced, increases adhesion to concrete , designed for powerful concrete structures;
- mixed , combines the advantages of both types.
The reinforcement can be sold in the form of steel rods, welded mesh, which was produced in production, or in coils .
Before choosing reinforcement, decide on the method of connecting the rods. For welding you need fittings marked “C”.
fiberglass fiber can be found as a reinforcing material . It has many advantages: it weighs much less than steel, is not afraid of corrosion, is resistant to moisture , and does not change size with temperature fluctuations.
But still, metal reinforcement has greater rigidity and is considered the most reliable material for strengthening the foundation.
Pouring concrete onto the frame
We have just figured out how to reinforce the foundation, now we will look at how to pour concrete correctly so as not to damage the integrity and increase the strength of the structure. The first step is to make a good base. To do this, pour 5 centimeters of broken brick or cinder block under the first strapping belt. Next, fill it with liquid solution so that it penetrates well into all the cracks and ensures maximum strength of the sole.
Important: you cannot fill the foundation and plinth in “waves,” especially at the junction of the reinforcement - the crack will go along this line. If you need to perform the operation in 2 times, then it is better to make the “break” in the middle of the foundation. For example, if its height is 150 centimeters, then at the level of 75 cm you can take a break. Next, you need to fill everything with a monolithic layer, and that’s the only way.
The metal is poured at least 8-10 centimeters so that it is not near the edge, otherwise the foundation will fall apart under an average load. This will not affect the overall strength, but the base will lose its appearance - the edges will crumble.
Design Features
A strip foundation is a closed loop of reinforced concrete beams laid around the perimeter of the building and under the load-bearing walls, and transfers the load of the building to the underlying soil. Both light garden houses and frame houses, as well as heavy monolithic “castles” and stone cottages are built on it: the load-bearing capacity depends on the width and height of the tape. Even twelve-story apartment buildings are built on solid soils on strip foundations. Also, this type of foundation is used for houses with basements and basements - the tape is considered as a basement wall.
Almost all types of soil are suitable for such a design, except for unstable peaty soils - therefore, on weak-bearing and waterlogged lands of the Leningrad region, houses are built on complex and expensive foundations, but in Moscow such structures would be a waste of money.
A strip foundation is usually installed on a bed of medium-fraction sand with vibration compaction every 100 mm. The depth of the structure is calculated taking into account the characteristics of the site:
- presence or absence of basements;
- soil depth;
- weight and other characteristics of the building.
al185MODERATOR FORUMHOUSE
The foundation should be built not according to wishes and fanatically beautiful ideas, but according to calculation. The foundation in individual housing construction is calculated based on the design resistance of the base soil and the load of the object, with mandatory consideration of possible unfavorable factors: hydrogeological, frost heaving forces, heterogeneity of the base, subsidence and swelling soils.
All deformed houses with skewed openings are built on an incorrect foundation, calculated and built without taking into account the characteristics of the soil, groundwater level, weight of the house, etc.
Depending on the design features and depth of installation, there are several types of strip foundations.
By design:
| Type | Design Features |
| Monolithic | One-piece reinforced concrete casting with high strength and maximum load-bearing capacity. It is poured in one go. The reinforcement must be of high quality, of appropriate cross-section - this provides resistance to bending loads. |
| Made | Consists of factory foundation blocks (FBS). It is somewhat inferior to monolithic tape in terms of performance properties; it is often used in low-rise construction. To increase the stability and durability of such strip foundations, a sand cushion is made, specialized FL reinforced concrete soles are placed on it, and FBS is placed on top of them on a cement-sand mortar. This structure can be topped off with an armored belt for strength and even distribution of loads. |
By depth
| Type | On what soils is it used? |
| Non-buried | Only on rocks and completely motionless soils, so it is done extremely rarely and not for houses, but for outbuildings. Such a strip foundation is made only monolithic. |
| Shallow | On strong soils that are not susceptible to frost heaving. They are laid to a depth less than the freezing level of the soil. |
| Fully recessed. | Suitable for almost all soils and hydrogeological conditions, deepened below the calculated freezing depth (but not on hard clays and sandy soils with low groundwater level). Performed in trenches and pits with backfill. |
Such a number of varieties of strip foundations, both monolithic and made of blocks, allows you to make the right choice for the conditions of a particular site and get a good result. The strip foundation has one big drawback (not counting the abundance of excavation work and the time it takes for the concrete to mature after pouring) - it can be expensive, so if we are talking about light buildings, it is better not to choose another option. But still, the strip foundation has obvious advantages, these are:
- long service life;
- high load-bearing capacity;
- the loads of the house are evenly distributed on the soil foundation;
- The construction technology is quite simple.
Pouring directly into the ground, or the so-called “Kuban version” of a strip foundation, is a violation of technology; FORUMHOUSE warns against this.
RNikonovForumHouse Member
I consider the construction of a strip foundation with pouring “into the ground” unacceptable. It is almost impossible to make a tape “in the ground” with high quality.
Tools for tying reinforcing bars
It is almost impossible to fasten reinforcement with wire manually, that is, simply with the efforts of your fingers, so special tools, both manual and mechanical, were created to carry out this process. These devices and devices will not only speed up the work, but will also significantly improve the quality of the reinforcement element bundles.
So, knitting rods into a reinforcing structure under the foundation can be done with the following tools:
- handmade crochet hooks, factory-made or homemade;
— inertial crochet hook of semi-automatic action;
- a special knitting gun;
In addition, for the knitting process they learned to use a regular electric drill (which switches to low speed) or a screwdriver with a special homemade hook attachment.
- Knitting gun
The highest quality binding is obtained when using a specialized knitting gun. But this is a fairly expensive tool, and in order to make only one foundation, rarely anyone buys it. Basically, professional builders have it in their set of tools, since, moving from object to object, they cannot waste much time on the already rather lengthy and labor-intensive operation of linking the frame.
Prices for a knitting gun
knitting gun
A convenient and quick way is to use a special knitting gun. Who knows, maybe there is a possibility of renting...
For the pistol, special replacement coils are produced with wire wound on them, with which the device is charged. Many of these tools can be powered by a battery, and since two batteries are usually included with the knitting gun, work can proceed almost uninterruptedly. Another advantage of such a device is that it is not connected by a cable to an outlet, so it can work in autonomous conditions - in the absence of nearby network connection points.
The knitting gun produces connections that are reliable and completely uniform in terms of wire tightening force.
The tying gun grabs the desired area of the metal rods, releases the wire and loops it around them, and then twists the edges of the wire together. The disadvantage, besides the high cost of the device itself, is the inability to work in some hard-to-reach places, where you still have to switch to “manual labor”.
- Crochet hooks
A universal device for tying reinforcement in the foundation frame can be called a crochet hook, since it can be used in the most inaccessible and narrow places. The hooks are small in size, so they are quite convenient for tying rods in a narrow trench under a strip foundation.
A universal tool for tying reinforcement – a hook on the handle
Hooks may vary slightly in appearance and configuration, so when purchasing this tool, you should ask to test it on site. The tool that fits comfortably in the hand, which means it will be more comfortable to work with, is worth choosing for further work. Keep in mind that an uncomfortable hook can quickly cause calluses on your fingers.
You can easily make a convenient hook for yourself
A homemade hook is made like a factory model, repeating its shape. To make it, you can use a sharpened piece of reinforcement, which is bent in a vice and then inserted into the handle. The handle can be made from molten plastic by screwing it onto the fittings, or by placing a thick-walled polymer tube on it, heating it and then cooling it. When cooled, the plastic will press tightly against the fittings, forming a handle convenient for working manipulations.
Another option for a crochet hook, the design of which will significantly speed up the work of installing the frame, is a semi-automatic tool that operates on the inertial principle.
The cost of such a semi-automatic hook is quite affordable, and the work will go much faster and require less effort
The hook itself is located on a kind of leg, which has grooves cut into it like a spiral. There is a return spring mechanism located inside the hook handle.
This tool works as follows: hook loops of wire and pull them up, applying force. At this time, the leg, when leaving the handle, when moving the spiral grooves along the guide protrusions, rotates, making several turns, twisting the two ends of the wire together until the knot stops against the fastened elements of the frame structure. If necessary, the operation is repeated until the required tightening of the unit is achieved. Thus, just one or two forward movements are required to link the point.
A hook made from a steel dowel can be inserted into a screwdriver or drill chuck
A hook attachment installed in a drill or screwdriver will speed up the work with less physical effort. These tools quickly twist the two ends of the wire until they stop, securely fixing the crossed reinforcement together. It is easy to experimentally set the optimal tightening torque on a screwdriver ratchet. It will be more convenient to work with a compact tool, since the trench space for a strip foundation is often very limited. In addition, if you plan to use a conventional electric drill to tie the reinforcement, you will need to stock up on a multi-meter extension cord.
Whatever knitting tool is chosen, the principle of twisting the wire is the same, so its choice depends on the financial capabilities and preferences of the master.
Required materials and tools
Before starting reinforcement and installation of the strip foundation, prepare the necessary materials and tools:
- corrugated reinforcement for longitudinal rods;
- smooth reinforcement for crossbars;
- knitting wire;
- shovel;
- hammer;
- nails;
- screwdriver;
- self-tapping screws;
- roulette;
- level;
- Bulgarian;
- crochet hook or gun;
- device for bending reinforcement;
- formwork material (wood, plywood, etc.);
- sand;
- vibrator for compaction.