Building a good-quality house from timber is a difficult process, in which each operation must be carried out with special care and reason. Much attention should be paid to laying the first crown, because this is what will affect the quality of the entire structure. If you do this step correctly, the walls of the house will stand straight, forming angles of 90 degrees.
The first crown should be laid slowly, in accordance with all requirements and technical standards. In addition, you need to prepare for work no less carefully. Even before you start laying the crown of a house made of timber, you need to take care of waterproofing the foundation.
Laying technology
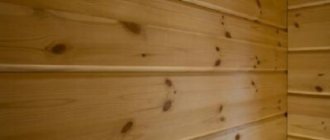
First of all, you need to choose a beam. Everything is simple here. This material should have a minimum number of knots, because it will be subject to heavy loads. And knots are places that do not withstand loads well. Plus, the material should not have a tint of blue.
It is recommended to pay attention to the annual rings of wood. Or rather, the distance between them. The closer the rings are to each other, the stronger the beam.
It is clear that even in one batch of material there are different timber with different degrees of quality. And if you come across elements of lumber with visible defects, do not be upset. The main thing is to place them correctly. So, if there is a visible defect on the beam, then this side should be laid upward. If there are bulges, then this side will be lateral.
Before laying, all lumber must be treated first with an antiseptic and then with a fire retardant. The first will protect the wood from fungi and mold, the second is a protective layer from fire.
Treatment of lumber with antiseptic Source teplicno.ru
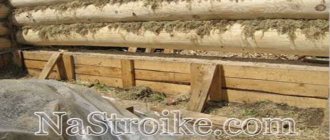
Now a few words about the foundation. A wooden house made of timber requires a structure with the most flat upper plane. Because leveling beams is not easy. But there are options:
- This can be done using a waterproofing layer, which is usually formed from roofing felt and bitumen mastic. The first one is laid in 2-3 layers. On uneven areas, roofing felt can be laid with a large number of layers. Or use a thicker layer of mastic.
- Wooden pads are placed under the timber.
Other options do not apply. Some craftsmen subsequently fill the free spaces between the laid timber and the foundation with polyurethane foam. The option is acceptable, but short-lived. Therefore, advice - before laying the timber on the foundation, decide how to level the latter. It's better not to save money on this. But it is better to do it correctly right away at the stage of forming the foundation structure, taking into account the evenness of all surfaces.
Leaks hidden by bitumen mastic Source https://i.ytimg.com/vi/hr_Y3edfXGM/maxresdefault.jpg
How to attach timber to the foundation
In general, the question of how to properly lay timber mainly concerns the method of attaching it to the foundation structure. There are several options here, which we will now discuss.
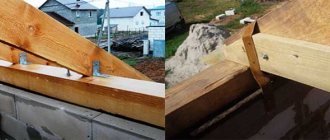
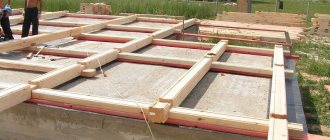
The first of them is fastening with studs. The latter is a steel rod on which threads are cut: on one or both sides. In this case, one-sided studs will be required, the threads of which will be directed upward. This fastening element is installed in the foundation at the stage of installation of the reinforcing frame. It is to this that they are welded by electric welding. Here it is important to accurately set the distance between fasteners.
It turns out that the studs will stick up from the foundation structure. And their protruding size should be 5-10 cm greater than the thickness of the timber.
Beam fastened with metal pins Source tskastra.ru/
See also: Catalog of double timber house projects
So, the foundation is ready, the studs are sticking out, we need to lay the timber. To do this, it is necessary to drill through holes with a diameter slightly larger than the diameter of the installed studs. In this case, the distance between fasteners is strictly maintained. After that, the lumber is simply placed on the protruding pins and tightened on top with a nut, under which a wide washer must be placed. First, a wide groove is made on the upper surface of the beam in the places of through holes for a washer and a nut. It is important here that both elements do not protrude above the plane of the lumber.
Fastening with dowels
The second fastening method is based on the same metal pin, only without a thread. It is also welded to the reinforced frame. But the length of its part protruding from the foundation is equal to half the thickness of the timber being laid. Therefore, in the latter they do not make through holes, but blind ones. And their length should be equal to the length of the protruding part of the dowel.
That is, it turns out that before laying the first row of beams on the foundation, it is necessary to prepare it, and then simply place it on the pins protruding from the foundation structure. In this case, no fastening is performed. The dowels will hold the lumber well, preventing it from moving in the horizontal plane.
Attaching timber to the foundation with dowels Source 1.bp.blogspot.com
Fastening with anchors
Not the best option, but some masters use it. There is no need to install fasteners into the foundation structure. First, through holes are made in the beams, the material is laid on the foundation and marks are made on the concrete plane through the holes.
After that, the timber is removed and holes are made according to the marks. Then the lumber is laid back and a metal dowel is inserted into the foundation through the holes, which is tightened with a nut. Long and difficult.
Fastening timber with anchors Source krysha-expert.ru
Fastening timber to screw piles
If a wooden house is built on screw piles, then the first crown is attached to them with bolts. To do this, through holes are also drilled in the timber, which must exactly coincide with the holes on the piles. It is through them that the bolt is inserted: from bottom to top. And on the upper side it is secured with a nut and washer. Typically, four bolts are installed on each pile.
Some craftsmen use long, thick self-tapping screws as fasteners.
Fastening timber to screw piles Source strhouse.ru
Choosing the material for the first crown
Every builder knows that when building a house you should never skimp on materials.
Therefore, when buying materials for installing the lower trim, give preference to the highest quality, even if they cost twice as much as the rest.
After the selected beams (logs) are delivered to the construction site of the house, they must be prepared for further use.
The entire area of the logs, except for the end part, is treated with a mixture of bitumen mastic and waste motor oils. And the ends are “riveted” by tapping with a wooden hammer.
Once the wood is dry, it is ready for use.
Criteria for quality material for the lower crown:
- The bars must have a perfectly flat surface.
- The wood must have rings (the distance between them should be as minimal as possible).
- There should be no knots on the surface.
- Logs should not have a bluish tint.
- Logs (bars) for the bottom trim are preferable to a large diameter, from 20 cm.
- If possible, choose oak or larch wood for the frame crown.
Attention!
The use of wet timber is unacceptable. Before starting work, wait for the timber to dry.
Connecting beams to each other
So, let’s move on to the topic of how to correctly lay the first crown of timber on the foundation, and move on to a very important position - fastening the elements together. If this concerns the corners of the house, then four options are most often used:
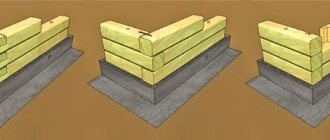
- Half a tree. This is when half the thickness of each element is cut off to a certain length. Two adjacent beams are joined, forming a reliable connection that does not change the cross-section of the joint relative to the body of the material.
- Butt joint is the simplest option. But it is not recommended for use in residential buildings. Because it is the corner that often becomes the place where heat leaks from the house due to the formation of leaks at the joint. Therefore, the corners of buildings are well insulated, but often this does not save.
Root tenon - ideal joint Source remontik.org
- Root thorn , also known as a warm corner. An ideal option for corners both in terms of reliability and thermal insulation qualities. Structurally, it is a tongue-and-groove connection. That is, a groove is made in one element, a tenon is planed in another, which exactly fits the dimensions of the first. When joining, insulation is placed inside, providing high thermal insulation characteristics of the structure.
- Dovetail . The most difficult to manufacture, but the most durable option in terms of fastening. It also falls into the category of tongue-and-groove joints. Only the shape of the cut elements is not rectangular, but trapezoidal. It is this shape that ensures an increase in the contact area of the joint parts.
How to replace a crown at home:
As you probably already understood, crowns are quite strongly influenced by rain, snow and temperature fluctuations. Therefore, after some time, even the highest quality wood begins to deteriorate and rot. In this case, people have no choice but to replace the damaged beams. We will tell you how to do this correctly below.
Ways to replace rotten logs:
Restoration
We carefully cut out the damaged part of the wood, and put an undamaged piece in its place. This manipulation can only be carried out if small areas are damaged.
Complete dismantling of the building
A rather labor-intensive process, as it involves the demolition of a house. The old structure is completely disassembled and then reassembled.
Briefly about the main thing
The timber that will be laid on the foundation must be of high quality - without knots, blue stains, with tightly lying annual rings. Antiseptic treatment is required.
The smoother the foundation on which the timber will be laid, the higher the quality of the work as a whole.
The timber is attached to the foundation with studs, dowels or anchors. The choice of method depends on the skills of the master.
The beams are attached to each other in different ways - depending on whether it is an angle or a longitudinal connection. Popular methods are root tenon, dovetail, bowl, oblique lock and others.
Ratings 0
Work order
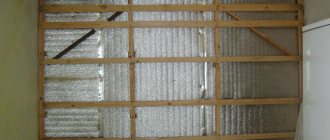
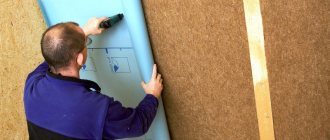
In some cases, in order to protect the first row of wood from the cold concrete of the foundation, you can lay beds (backing slats). Whether to do this or not is a controversial issue and each builder decides it individually. But if it is decided to lay it, then both the logs and the logs must be carefully treated with an antiseptic and protected from moisture penetration.
The next stage is laying the embedded (longitudinal) logs of the first row. To ensure stability, the lower part is cut off. Next, the transverse logs are installed, the markings of which must exactly match the marks on the longitudinal ones. Only if these requirements are met will the log house be smooth. During the installation of the first row, the dimensions of the building perimeter and the correctness of the diagonals are checked.
The next task that definitely needs to be solved is to seal the gap between the foundation and the first row. Craftsmen often use for this purpose small trunks of trees of the same species that were used for the first crown. They are adjusted to the dimensions of the gap and sealed with insulation specially designed for this purpose. Sizing is done by cutting off excess wood from the top and bottom of the log.
We recommend watching a video on how to process log corner notches.
The procedure is very important, since it determines whether the house will be warm and dry or not. Therefore, if during the process of sealing cracks there is no access to all the necessary places, then the transverse logs are dismantled. Eliminate all cracks and gaps between the logs in the longitudinal direction, then return the cross members to their places. In some cases, ordinary cement mortar or polyurethane foam is also used to seal cracks instead of tow or moss.
Timber quality
Lumber for the first crown must be selected taking into account certain requirements. It should not have knots or blue spots, and all four surfaces should be smooth, without nicks, depressions or sharp bends. The timber must be pre-treated with an antiseptic and fire retardant. Even if the seller assures that the material was impregnated under production conditions, he will not be able to provide truthful information about the thoroughness of processing, the circumstances and shelf life of the timber. So it's better to play it safe.
When buying solid wood timber, you need to pay attention to its cross-section. High-quality material has an average core location and annual rings evenly moving away from the center. When drying lumber with a different “pattern”, problems may arise associated with various deformations of the wood - bending, twisting, severe cracking, etc.
You can hear different opinions about applying a film-forming composition to the ends of solid timber. Some opponents argue that cross-sections need to be “sealed” immediately so that moisture does not leave the wood too quickly. Others give arguments about the inadmissibility of such actions, although they agree that the ends need to be covered. For these purposes, they recommend using clay, lime or water-based emulsion. The film prevents moisture from escaping naturally, resulting in the formation of pockets of rotting inside the trunk. In fact, both sides are right to some extent.
Checking the foundation horizon
Even before laying the first crown, we lay two layers of waterproofing, a backing board, and then an additional layer of waterproofing. But before you begin installing waterproofing on the foundation, you need to check that it is horizontal. A simple level can give a large error and for this it is better to use its hydraulic version, which you can buy or use a transparent hose for this.
The difference in level should not exceed 1 cm throughout the entire foundation. The plane can be leveled with a solution, using a backing board of different thicknesses or a different number of layers of waterproofing. If the difference in level is significant and there is no time for leveling with a solution, you can use bars of different thicknesses under the backing board or adjust the thickness of the backing board with an electric plane.