Slate is a popular material that is inexpensive, but highly reliable and durable. If you paint it, then in terms of decorativeness it can easily compete with modern roofing materials. Therefore, the scope of application of slate is practically unlimited: asbestos-cement roofs can be found on both modest country houses and luxury cottages.
The spread of the material is also facilitated by the fact that laying slate on a roof is not a difficult job, anyone can do it. But in order for the coating to last, as it should, for at least half a century, you will need to study all the nuances of this simple but important event.
Technical characteristics of slate
Let's start with the fact that 20-25 years ago, companies that produced new roofing materials started an anti-slate campaign. They began to claim that this roofing building material contained asbestos, which causes cancer in people. All this is an outright lie, because the slate uses chrysolite asbestos - safe for humans, and not amphibole asbestos, which is harmful to us.
In addition, the substance itself is in a bound state in the product. So we can talk about its danger only if cutting is done using a grinder. In this process, dust will be released from under the cutting tool. She is harmful.
Types of slate according to technical characteristics Source ms.decorexpro.com
Now about the technical characteristics that the buyer must know about before purchasing it:
- There are 6, 7 or 8 wave slates on the market today.
- Sheet thickness: 5.8; 6.0 and 7.5 mm. Here the connection is direct with the wave height; the larger this size, the thicker the material.
- Depending on the number of waves present, the width of the sheets varies in the range of 98-113 cm.
- The bending strength of the sheet is 16 MPa. This is the lowest rate among modern roofing materials.
- Slate itself is fragile, and it does not withstand shock loads well.
- All manufacturers provide a guarantee of 40 years of operation. Experience has shown that slate roofing covers last much longer.
Seven-wave asbestos slate Source softwaremonster.info
Beginning of work. Tools
First of all, check your tools. To lay slate on the roof you will need a fairly large list of tools, but you can do without some of this list:
- axe;
- hammer;
- nail puller;
- pliers;
- chisel;
- chisel;
- Screwdriver Set;
- mallet;
- metal scissors;
- wood saw;
- hacksaw for metal;
- electric drill;
- drill;
- electric screwdriver;
- hand-held circular saw (grinder)
- stone cutting discs
If something is missing, then the necessary tools must be purchased before starting work. Make sure that the cutting tool is properly sharpened, the hammer and ax are firmly seated on the handle, and the screwdriver battery is fully charged. These simple safety rules will help avoid injuries during work, and in addition, eliminate annoying delays.
Advantages and disadvantages
There is a large amount of information on the Internet regarding the advantages of this roofing material. Experts highlight two main ones: low price and good service life. The last advantage is possible only if the slate laying technology has been 100% maintained.
Now about the shortcomings, of which there were many:
- Many companies producing corrugated slate offer material with quite serious errors in shape and size. Therefore, the process of laying it on the roof becomes a big problem. The sheets must be adjusted to each other, swapped all the time, aligned and precisely joined.
- Heavy weight. Under the slate you will have to build a powerful rafter system, which will negate the savings in purchasing this roofing. Lifting sheets onto the roof is also difficult, and it is inconvenient for roofers to work while lifting them. Especially if one sheet has to be shifted, trimmed or shifted all the time.
- During operation, sheets may break. It’s good if the crack goes along the upper wave. This defect is not critical. But if a fracture occurs along the lower plane, then the sheet will have to be replaced or repaired. Again costs.
- You can lay corrugated sheets and bitumen shingles with your own hands. These are simple processes. But when the question is raised about how to properly cover a roof with slate, you cannot do without an experienced craftsman. You can try on your own, but the quality of the final result is not guaranteed. Moreover, not everyone can hammer a nail correctly so as not to break the sheets.
Powerful rafter structure for slate Source krovlyakryshi.ru
Slate roofing - types of materials and their features
The most common option is corrugated asbestos cement sheets, which cover most houses. Their advantages include: resistance to temperature changes, fire resistance, fairly long life, ease of processing. The disadvantages of such slate are increased fragility, it is very easy to damage even with a slight blow, and large weight, which significantly complicates roofing work. In addition, there is an opinion that the asbestos contained in it is harmful to health, but studies have not confirmed this.
There is also so-called asbestos-free paper slate. It is inferior to its brother in terms of resistance to mechanical loads. However, its durability, moisture resistance, lightness and flexibility make it possible to use it, unlike its asbestos counterpart, even on roofs with a fairly weak frame. For the roofing of industrial premises, it will be important to familiarize yourself with how to cover the roof with slate made of plastic or metal. They are distinguished by good wear resistance, lightness, strength characteristics and environmental safety. In addition, their color range can satisfy the needs of even the most demanding consumers.
Useful tips
Before moving directly to the topic of the article, namely, how to lay slate, I would like to give a few recommendations.
First, you should not paint slate after laying it on the roof. After applying the paint and varnish material, the coating will look good. But after a few days it will become covered with faded spots. It's all about the heterogeneous porosity of the material. In some places it will quickly absorb paint, in others slowly. Therefore, it is recommended to purchase painted slate, which is offered by manufacturers today.
Painting slate is useless Source remontik.org
See also: Catalog of companies that specialize in roofing materials.
There are two painting technologies: pigment is added to the raw material mass, so the color is obtained throughout the entire thickness of the sheets, or the paint is applied to the surface of the finished product. For this purpose, special paints and varnishes are used that are well absorbed and do not fade in the sun. The first option is better, but it is correspondingly more expensive.
The second is installation of the sheathing. The number of sheathing elements depends on the angle of inclination of the roof slopes. But experts adhere to the golden rule - the slate must lie on at least four slats. In addition, the entire roofing system must be stable. Therefore, before putting slate on the roof, it is recommended to walk on it and try to loosen it.
Slate lathing Source www.stroimdom.com.ua
Third, how to fasten the slate and how to do it correctly. There is information on the Internet that it is optimal to fasten with self-tapping screws, for which holes are made in the slate covering using a drill. This information is for those who do not understand anything about roofing. This technology will take a very long time. Plus, there is no guarantee that the sheets will be firmly held by self-tapping screws. In addition, you will have to place either sealing washers under them, or fill the holes with silicone sealant.
Craftsmen use slate nails all the time. This is a guarantee of high quality. Of course, hammering such a nail is not easy, but not for them. You can learn how to use nails quickly, although you will have to ruin more than one sheet. Therefore, my advice is to try it on damaged or used material. Twenty to thirty holes punched and you'll be driving nails in like a real roofer.
Slate steel nails Source hi.decorexpro.com
Fourth - how to properly lay slate on the roof. This refers to the arrangement of the sheets relative to each other. Like all roofing materials, slate is laid overlapping in one wave. To ensure that the joining point does not stand out from the total mass of laid material, manufacturers make the outer wave thinner. The product marking is applied to its upper surface. It is on this plane that the adjacent slate should lie, covering the inscription.
Attention! There is no need to hammer nails into the overlap area. The joint itself is strong.
The marking on the slate is covered with an adjacent sheet Source gid-str.ru
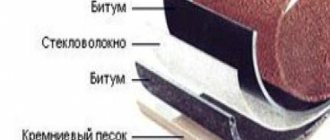
Pie structure
Since slate has a wavy shape, moist air can penetrate into the space between the ridges in the lower parts of the roof (the upper parts are sealed with special metal ridges). To minimize the negative impact of moisture on the wooden elements of the roof frame, it is necessary to use a multi-layer roofing cake.
Its structure consists of several elements , which must be arranged in the specified order (from bottom to top):
- inner lining;
- ventilation gap;
- vapor barrier;
- insulation;
- waterproofing;
- counter-lattice;
- sheathing;
- slate covering.
Inexperienced builders often confuse the location of vapor and waterproofing, mistakenly believing that these materials perform identical functions. This leads to a noticeable reduction in the service life of the roof, since the vapor barrier layer is designed only to retain water vapor, and not rain or melt water in its liquid form.
The insulation, in turn, must be reliably protected from moist air penetrating from the premises of the house, as well as from precipitation, which can penetrate under the slate from the outside if it is accidentally damaged or improperly fastened.
Therefore, the thermal insulation material must be located between the vapor and waterproofing . Otherwise, it will quickly lose its properties.
The sheathing should not be attached close to the waterproofing layer. There should be ventilation gaps below and above it. Otherwise, condensation will accumulate.
Slate installation rules
Let's go further and go directly to the step-by-step instructions - how to properly lay slate on the roof:
- First, the rafter system is checked to ensure its correct assembly. That is, four sheathing slats must be laid under each asbestos sheet.
- A board is nailed to the ends of the rafter legs at the overhang. Some craftsmen use a tensioned thread, but a board is better; in this case, it will additionally work as a stop for heavy sheet material. After completion of the work, the board is dismantled.
- The slate of the first row is laid with emphasis on the hammered board. Make sure that the lower edges of the material fit tightly to the surface of the board.
- Each sheet is nailed. Usually the scheme is as follows - through two waves to the third. Therefore, the consumption of nails is 10 pieces per sheet. We have already discussed how to fasten slate with nails. Let us add that the blow with a hammer should be sharp.
- As for trimming the corners, they should be trimmed at the second and third sheets, while the first and fourth remain intact.
Slate laying scheme Source teplica-exp.ru
Preparing the rafter system for installation
Before you start laying slate, you need to prepare a reliable rafter system.
Since slate is heavier than most modern materials, the rafter system must be very strong and withstand heavy physical loads.
The lathing will serve as a good base for installation.
Before covering the roof with slate with your own hands, pay attention to several important details:
- rafter legs should be made of high-quality, well-dried materials. The minimum section thickness of the board is 60 by 150 mm, the optimal thickness is 100 by 150 mm. Give preference to beams without branches or unedged boards;
- The minimum size of beams for sheathing is 6 cm by 6 cm; it is better to give preference to coniferous species. The flatter the roof you are going to cover with slate yourself, the stronger the sheathing should be;
- the weight of slate is a large load even for a strong sheathing, so it is important to evenly distribute the load. Optimal support for the sheet can be provided by 3-4 bars located no closer than 15-16 cm from the edge of the sheet;
- To provide more reliable support in the sheathing, it is better to use beams of different diameters. In even rows, as a rule, bars of a standard size are installed, and in odd rows - 2-3 mm higher. The bar for the cornice should be another 2-3 mm higher. The easiest way to increase the size of the bars is to increase them using special linings.
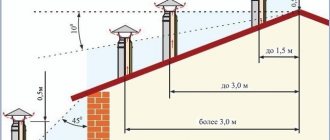
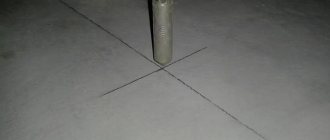
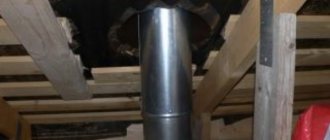
Installing sheathing near a chimney requires compliance with fire safety regulations. The minimum distance from the pipe to the beams is 13 cm.
How to lift slate sheets onto a roof
To do this, you will need two wooden slats with a cross section of 50x50 mm. Their length is selected experimentally, the main thing is that they are positioned freely at an angle of 60-70° and reach the edge of the roof structure.
They are connected to each other by two boards: below and above. The distance between them is selected so that the slate, with its waves, exactly lies on the slats. For ease of lifting, you can make a special device in the form of a poker. The material is the same slats. A rope is tied to the upper end. You can use a hook made of steel wire or reinforcement, to which a rope is also tied.
One worker places the sheet on the made skid from below and attaches the lifting device to it. The second one from the top pulls the sheet towards itself using a rope. The lower one helps him with his hands.
Instructions for laying the material yourself
Laying slate on the roof begins with planning the work
Pay attention to the direction of the wind: start laying the material from the leeward side - this way, even in a strong wind or thunderstorm, the roof will not leak at the joints
To lay the rows evenly, stretch a rope or cord along the cornice.
There are two types of slate roofing: staggered (horizontal rows are slightly offset relative to each other so that the joints do not coincide) or without offset (at the intersection of the seams, the corners of each sheet are slightly trimmed).
Correct installation of slate is the key to the durability and reliability of the roof.
Read the instructions to the end before laying the slate, pay attention to how to nail the slate correctly
Staggered laying
Before covering the roof with slate, cut all the sheets needed for the job. The sheets are laid with a slight overlap to ensure more reliable waterproofing, in horizontal rows.
The main task: to shift each subsequent row relative to the previous one so that the joints do not coincide. This is exactly how to lay slate with your own hands.
The first row can be laid out from solid sheets so that they slightly overlap each other. The horizontal rows should slightly cover each other.
Fastening is carried out using special nails or self-tapping screws, and be sure to place a soft gasket, for example, made of rubber, under the head.
The first sheet of the second horizontal row needs to be cut slightly lengthwise, by one or two waves, so that the joints of the second row are shifted and do not coincide with the joints of the first. Then, starting from the second, you can lay whole sheets.
Just like the sheets themselves, the horizontal rows should overlap each other slightly. With a slope slope of 20 degrees, slate can be laid with an overlap of 14–17 cm; with a gentler slope, it is necessary to increase the overlap to 20–22 cm to ensure reliable waterproofing.
The first sheet of the third row is cut even further to provide further offset relative to the second row, and so on - each laid row should be slightly offset.
So, if you cut the first sheet of the second row into one wave, then in the third row you will have to cut two or three waves, in the fourth - three or four, etc.
Installation of slate should be carried out carefully. Before nailing the slate, make holes of a slightly larger diameter, do not drive the nails in tightly
A small gap will compensate for various climate changes and roof shifts.
When the temperature changes, the volume of the slate changes, so if you hammer the nails in too tightly, the material may crack or split.
DIY installation technology without displacement
To properly lay slate without displacement, you must first prepare the sheets.
With this installation method, a corner is cut off from the sheets, which overlaps with the already laid sheet.
Laying begins from the right or left lower edge of the roof - a solid sheet is laid first.
If you started work on the right side, then you need to cut off the upper right corner of all other sheets of the first row. If you started laying on the left side, then the upper left corner is cut off.
Sheets for the second and all subsequent rows except the last must be prepared in advance by cutting off the corners at all intersection points.
Since the first sheet of each row only touches the other sheets on one edge, you only need to trim the bottom corner, right or left, depending on which side you started working on.
For the last sheet, you only need to cut off the upper corner on the corresponding side.
For the remaining sheets in the row, the upper and lower corners are cut off at the intersections with the adjacent row. Lastly, another solid sheet is laid.
Now you know how to properly cover a roof with slate with your own hands, how to lay it and how to attach slate to the roof.
Do-it-yourself slate roofing is reliable and inexpensive, and it’s always a pleasure to invest your labor in creating warmth and comfort in your home.
How to cut slate correctly
Before grinders appeared, slate was cut in different ways, which were difficult and ineffective. Eg:
- made holes with nails along the cutting line, and then broke along it;
- the same thing was done with a carpenter's hammer, which has a pointed nose, or they used a chisel with a hammer;
- We used a regular saw, which quickly became dull.
Today the problem has been solved; craftsmen began to use a grinder and diamond cutting discs. The process goes quickly, the cut is smooth. The only negative is a lot of dust. Therefore, some tips:
- moisten the cut area with water;
- lay the slate sheet on a flat surface;
- select the diameter of the disk so that it is twice as large as the wave height of the roofing material;
- rotation of the disk is towards itself, it is clear that dust will be thrown towards the worker, but in the process of jamming the tool will be thrown away from the person, safety is more important;
- wear protective equipment: goggles, respirator and gloves.
Stage 2. Calculation of roofing material
Before laying slate, you need to make some calculations. Correctly determining the amount of roofing material will allow you to avoid unnecessary costs associated with the additional purchase of missing sheets and corresponding transportation costs.
When performing calculations, you should remember that not the entire sheet area is useful; some part is lost under the overlap.
To correctly calculate the number of slate sheets, you can use this method:
- First, calculate the number of sheets in a horizontal row using the formula
Г = (Шс+2С)/(Шл-Шп), where
G - number of sheets,
Shs - width of the slope,
Sf is the length of the gable overhang,
Wl - sheet width,
Шп - width of the sheet under the overlap.
The number of sheets of a longitudinal row is determined in this way:
P = (D+Sk)/(Dl-Dn), where
P - number of sheets in vertical rows,
D is the length of the slope,
C is the length of the eaves slope,
L - leaf length,
DN is the length of the vertical overlap.
The resulting values of G and P are rounded to a whole number and multiplied. The result is the number of slate sheets for one roof slope with certain parameters.
Briefly about the main thing
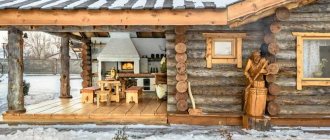
Now you understand how difficult it is to cover a roof with slate. There are many nuances of this construction process; everyone who decides to carry it out independently must know them all. As practice shows, newcomers to this business are dissatisfied with the final result of their actions, so they are recommended to start with small buildings: a bathhouse, a garage, a barn, etc.
| A little more attention! Write in the comments what you think: is it worth using asbestos corrugated slate to cover your own home, or is it already a material of the last century, and for example, metal tiles or corrugated sheets “rule” today? |
Ratings 0
Read later